| Table of Contents | ||||||||||
|---|---|---|---|---|---|---|---|---|---|---|
|
Overview
The following guide reviews how Users can set up their Classic POS system to be able to charge Tickets in Classic POS when the Member has a physical Credit Card present. This guide has been broken down to include instructions for both a Stationary Device and a Roaming Tablet. Use Case(s)
|
Content
|
|---|
Device Activation
Users will need to activate their Physical Credit Card Readers before getting connected to the CE Payments System. CE Payments Card Present transactions currently work with the following devices:
iSMP4
This card reader works over local WiFi.
Users will need to power on and then connect to their WiFi network.
Info Click this link for further assistance with the setup of this device.
iPP320
This card reader works via an Ethernet connection.
Users will need to power on the device and connect to Ethernet.
Info This device is plug and play.
Lane/3000
This card reader works via an Ethernet connection.
Users will need to power on the device and connect to Ethernet.
Info This device is plug and play.
Link/2500
This card reader works over local WiFi.
Users will need to power on and then connect to their WiFi network.
To connect this reader to WiFi:
On the PIN pad, type 2634 and then press the F key.
Click Tetra Admin.
Click 3-Configure Wi-Fi.
Click 2-Scan Networks.
Select the wireless network and enter the password.
Upon confirmation, press the green button on the PIN pad.
Please Note: The WiFi status should now show in green. If the status indicator is white, delete the network connection from 3-My Networks and try again.Click the Red X until returned to the Home Screen.
Manual Entry For All Devices
Navigate to the POS settlement screen and process the sale as normal.
When prompted by the device to insert your card, select F1 on your terminal to Enter Card for manual entry.
Follow the instructions on the terminal. First, enter your customer's credit card number and press the green enter button.
Next, enter the expiry date, and press the green enter button.
When the payment amount appears on the screen: Either
...
select F3 to confirm
...
or F4 to cancel
...
the payment.
Your customer will then have to provide you with the zip code that is associated with the credit card account. Enter this into the terminal and press the green enter button.
The terminal will then return to the idle screen once the payment is successful.
All devices will display an Activation Code (6 or 7 letters and numbers) when setup correctly. After the Activation Code is received, then the configuration can begin for CE Payments with the Clubessential Configuration Team.
Charge Settlement Type
Access System → Charge Settlement Types and then select New. This process is just like creating a Settlement Type for any other processor.
Name the Payment Type, select what Payment it is from the Type dropdown menu (for Card Present Transactions this will be Credit Card or PIN verified Debit Cards), select the corresponding Token that you created previously, and then select which Devices and Areas you wish the Payment Type to show on.
Also, include the display name, and the location. 
...
Setting Up a Card Reader in Classic POS
Stationary Device
After the Credit Card Readers are configured with CE Payments, POS Devices that will work as a Stationary Device and not roam throughout the Club will need to be configured to work with one specific reader (Often the iPP320 Reader).
First, access System Tools. 
...
Next, select the Utilities tab and then the Credit Card submenu. 
...
From here, link the terminal with the corresponding CE Payments device by selecting Lookup. This will populate all activated devices and users can select which device they would like to function as the default for transactions.
Please Note: Users must search for devices through the Lookup button, they cannot type directly into the CE Payments Device box. 
...
Finally, once the device is selected from the Lookup, select Save Configuration. This will save the device into the registry.
Roaming Tablet
For POS Devices that will work as a Roaming Tablet, select select Prompt for CE Payments Device. 
...
Click Click Save Configuration and select Yes to and select Yes to the confirmation prompt.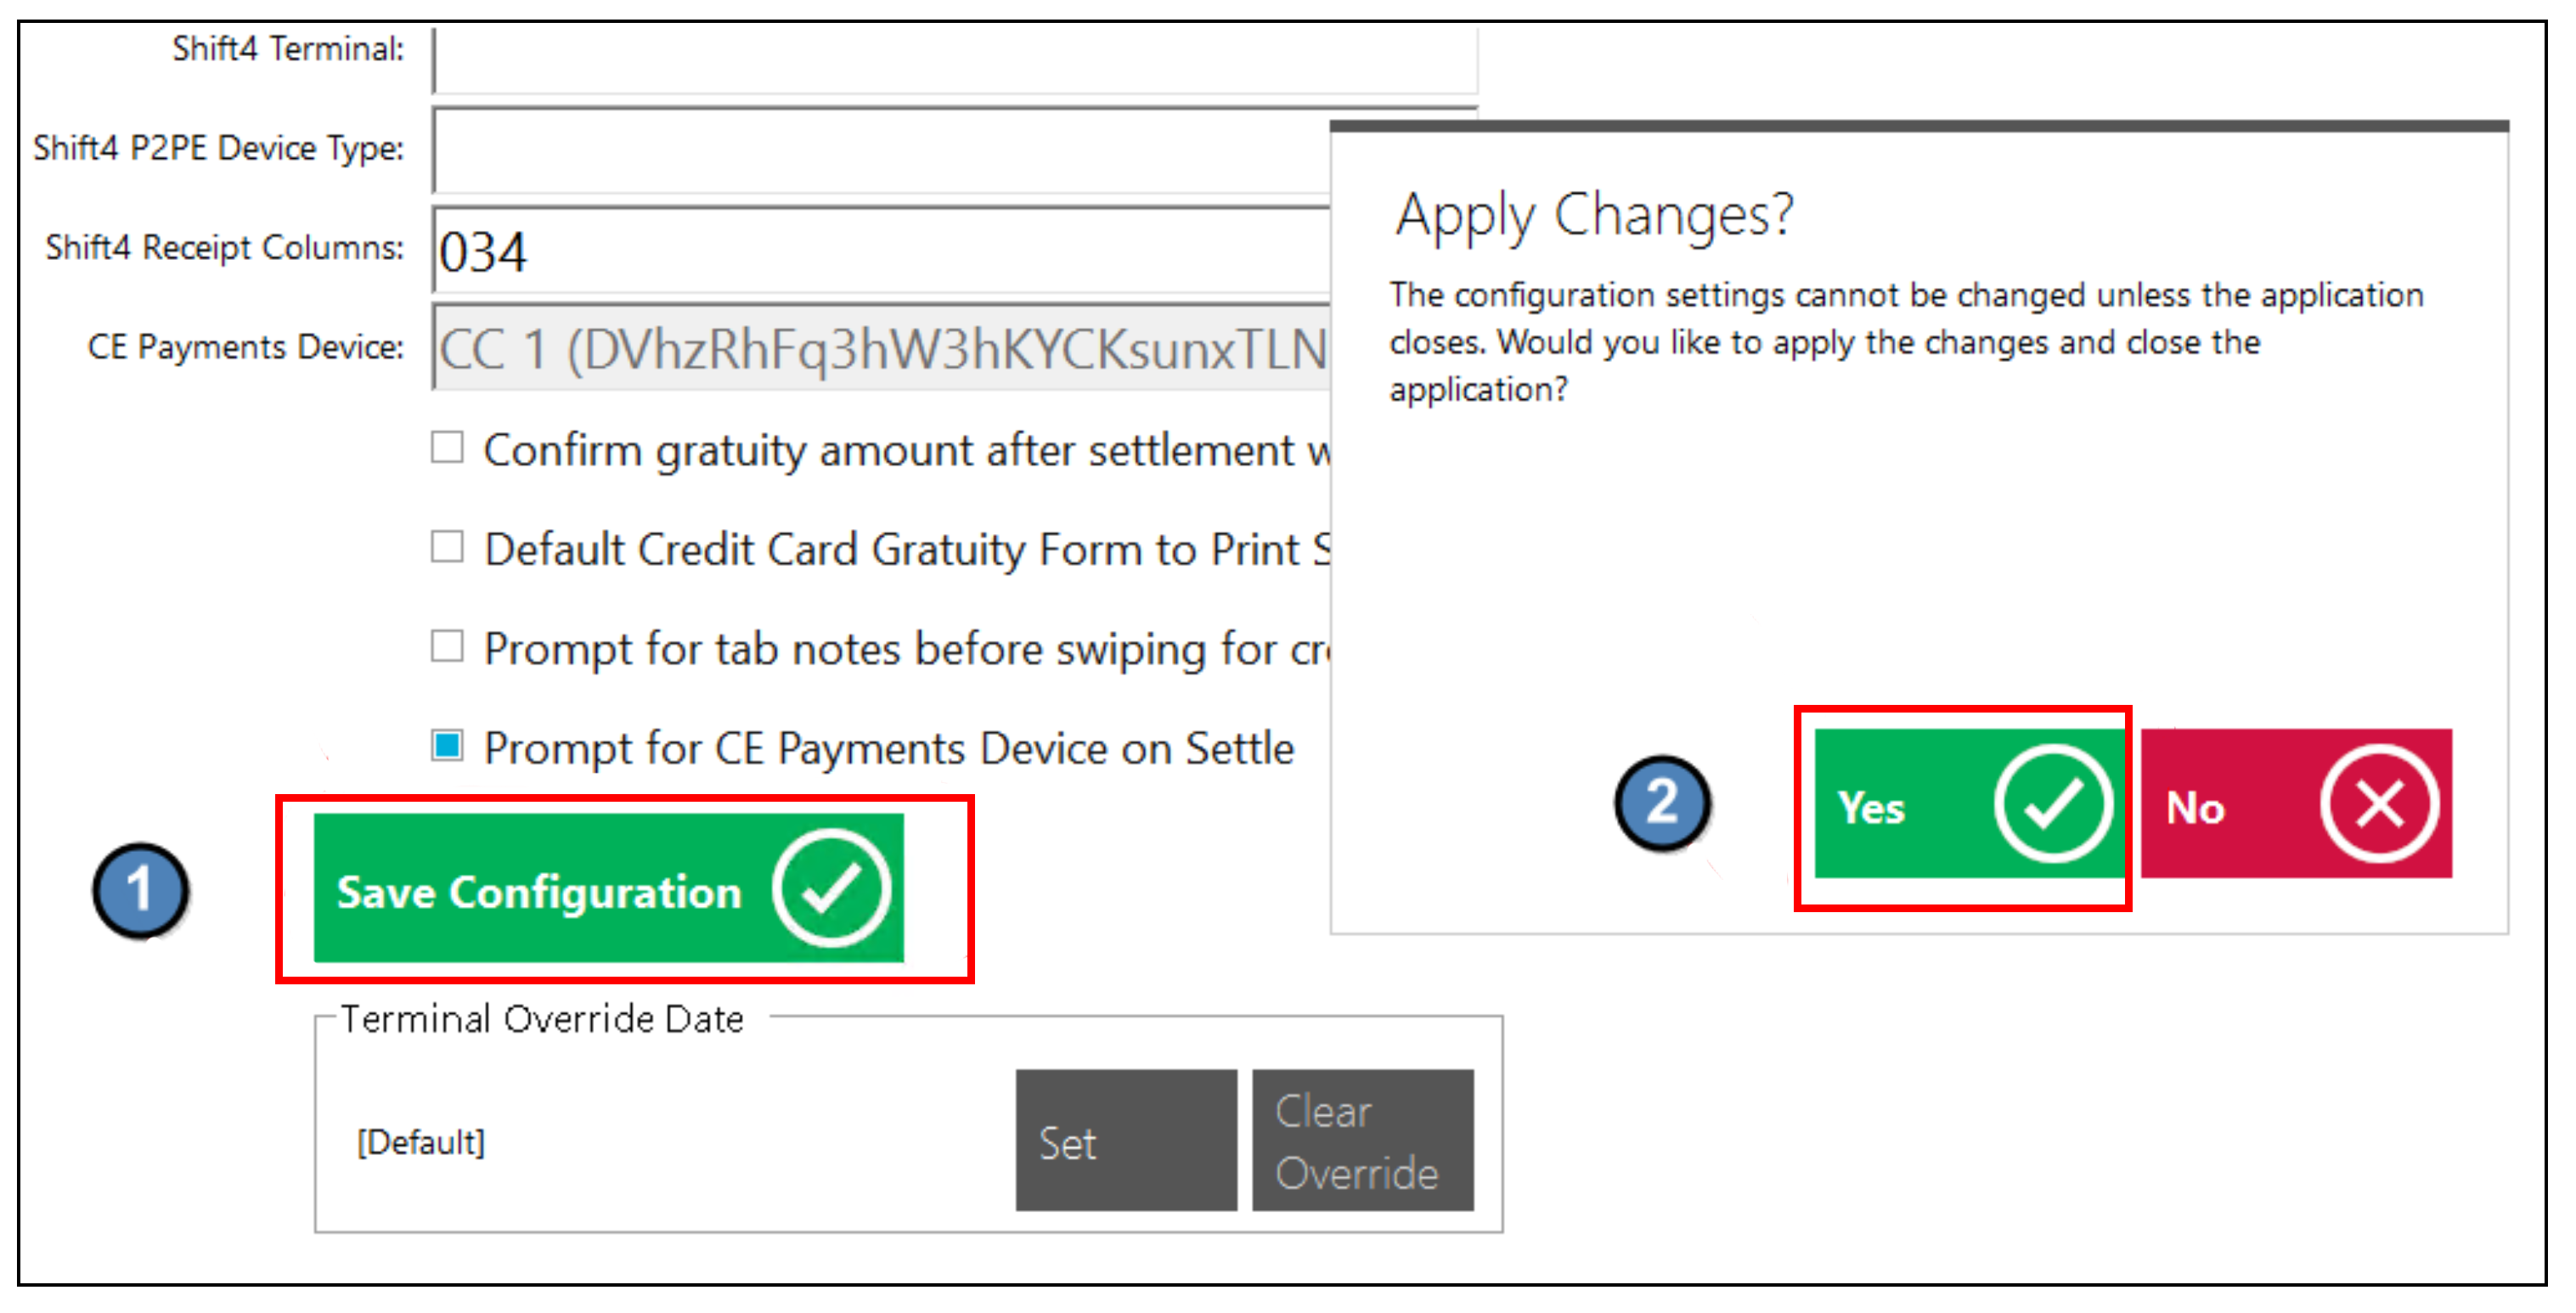
...
When enabled, this setting will prompt the user to select a credit card reader when settling a ticket.
Please Note: For those using Classic POS, this option should generally not be checked, as the POS systems do not typically move and should be sent to the same Payment Device.
Test Credit Card Transaction in Classic
Next step is to test a Credit Card Transaction.
Build the Ticket
Double click the POS Application to launch the Point of Sale.
...
Select Select the applicable POS Device. (Eg. F&B GrillPOS).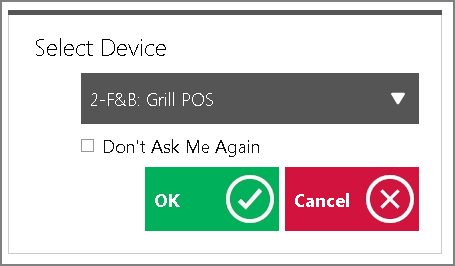
...
Enter your POS POS Pin Code (Consult Club Admin if you do not know your code).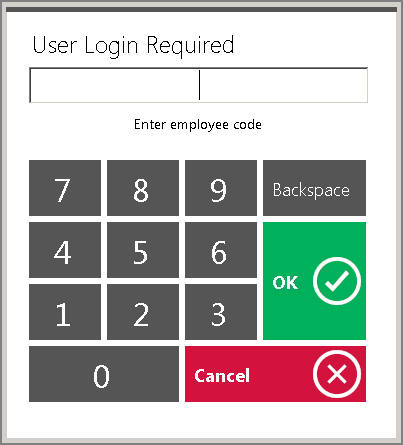
...
Depending on the nature of the POS Station, choose choose Select Table/New Transaction to to start a new ticket.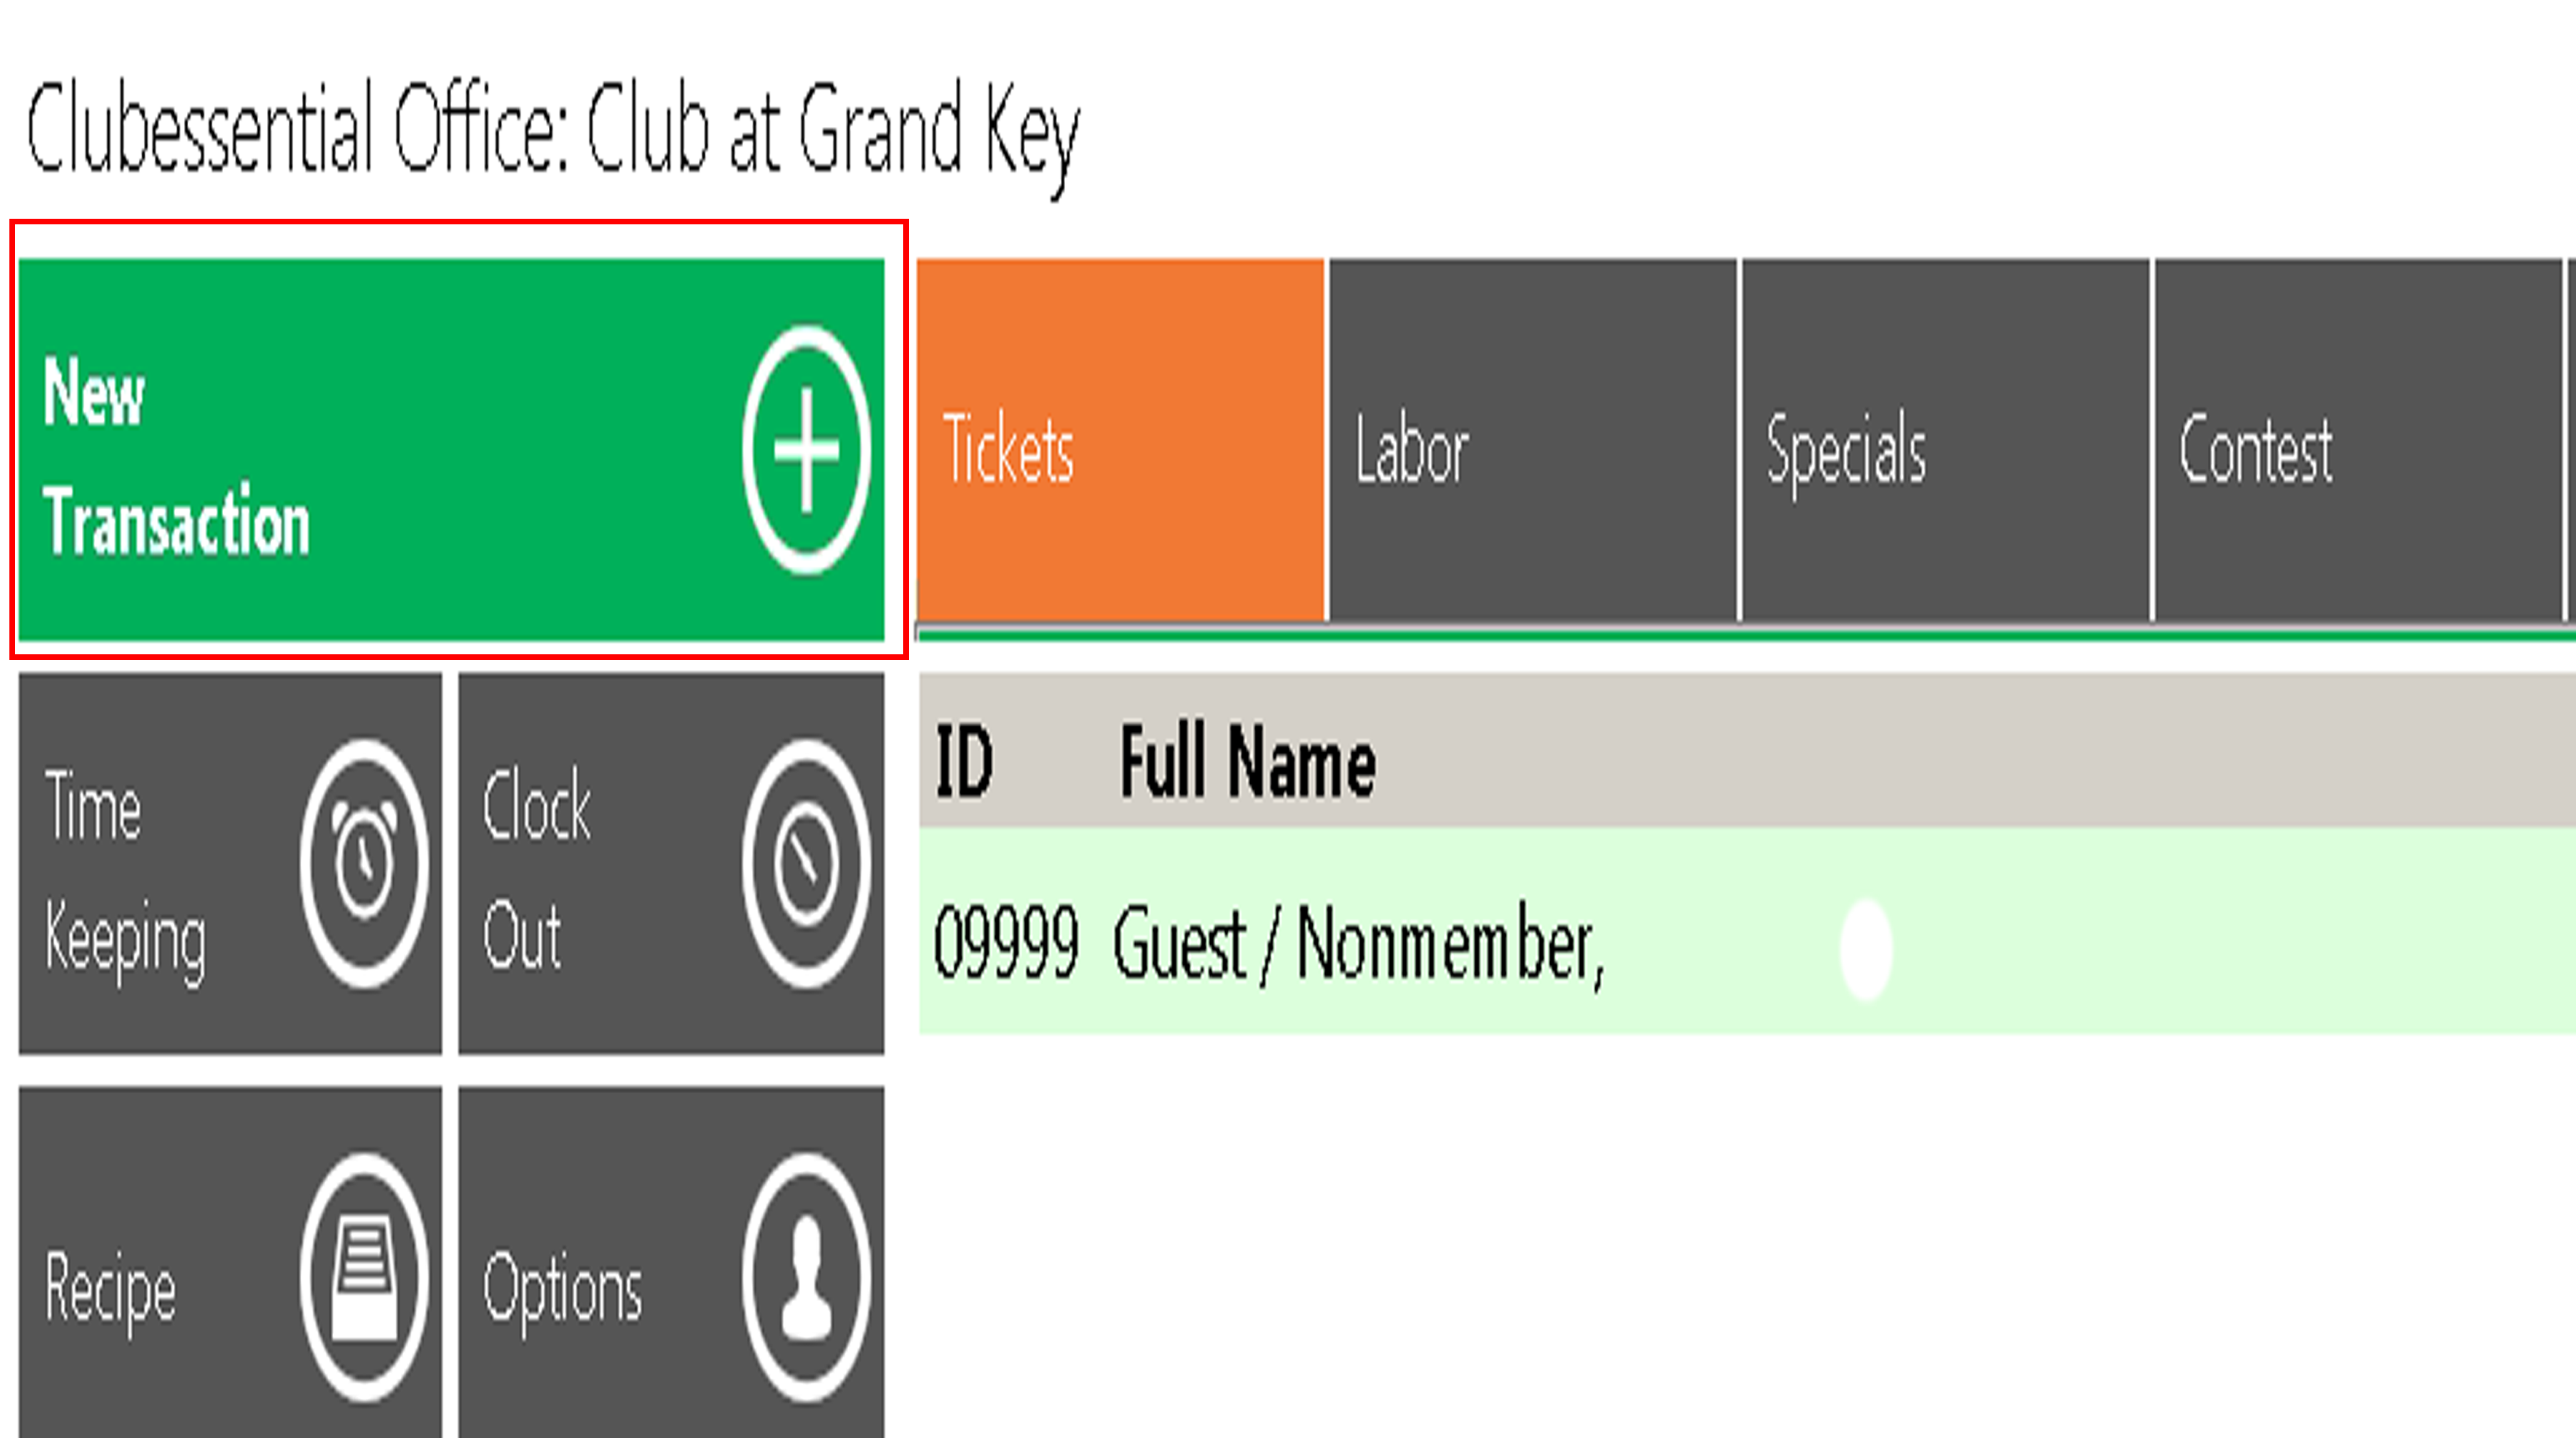
...
If the POS is an F&B Environment choose any table. If Retail, skip this step.
Choose Guest Choose Guest to start a guest ticket.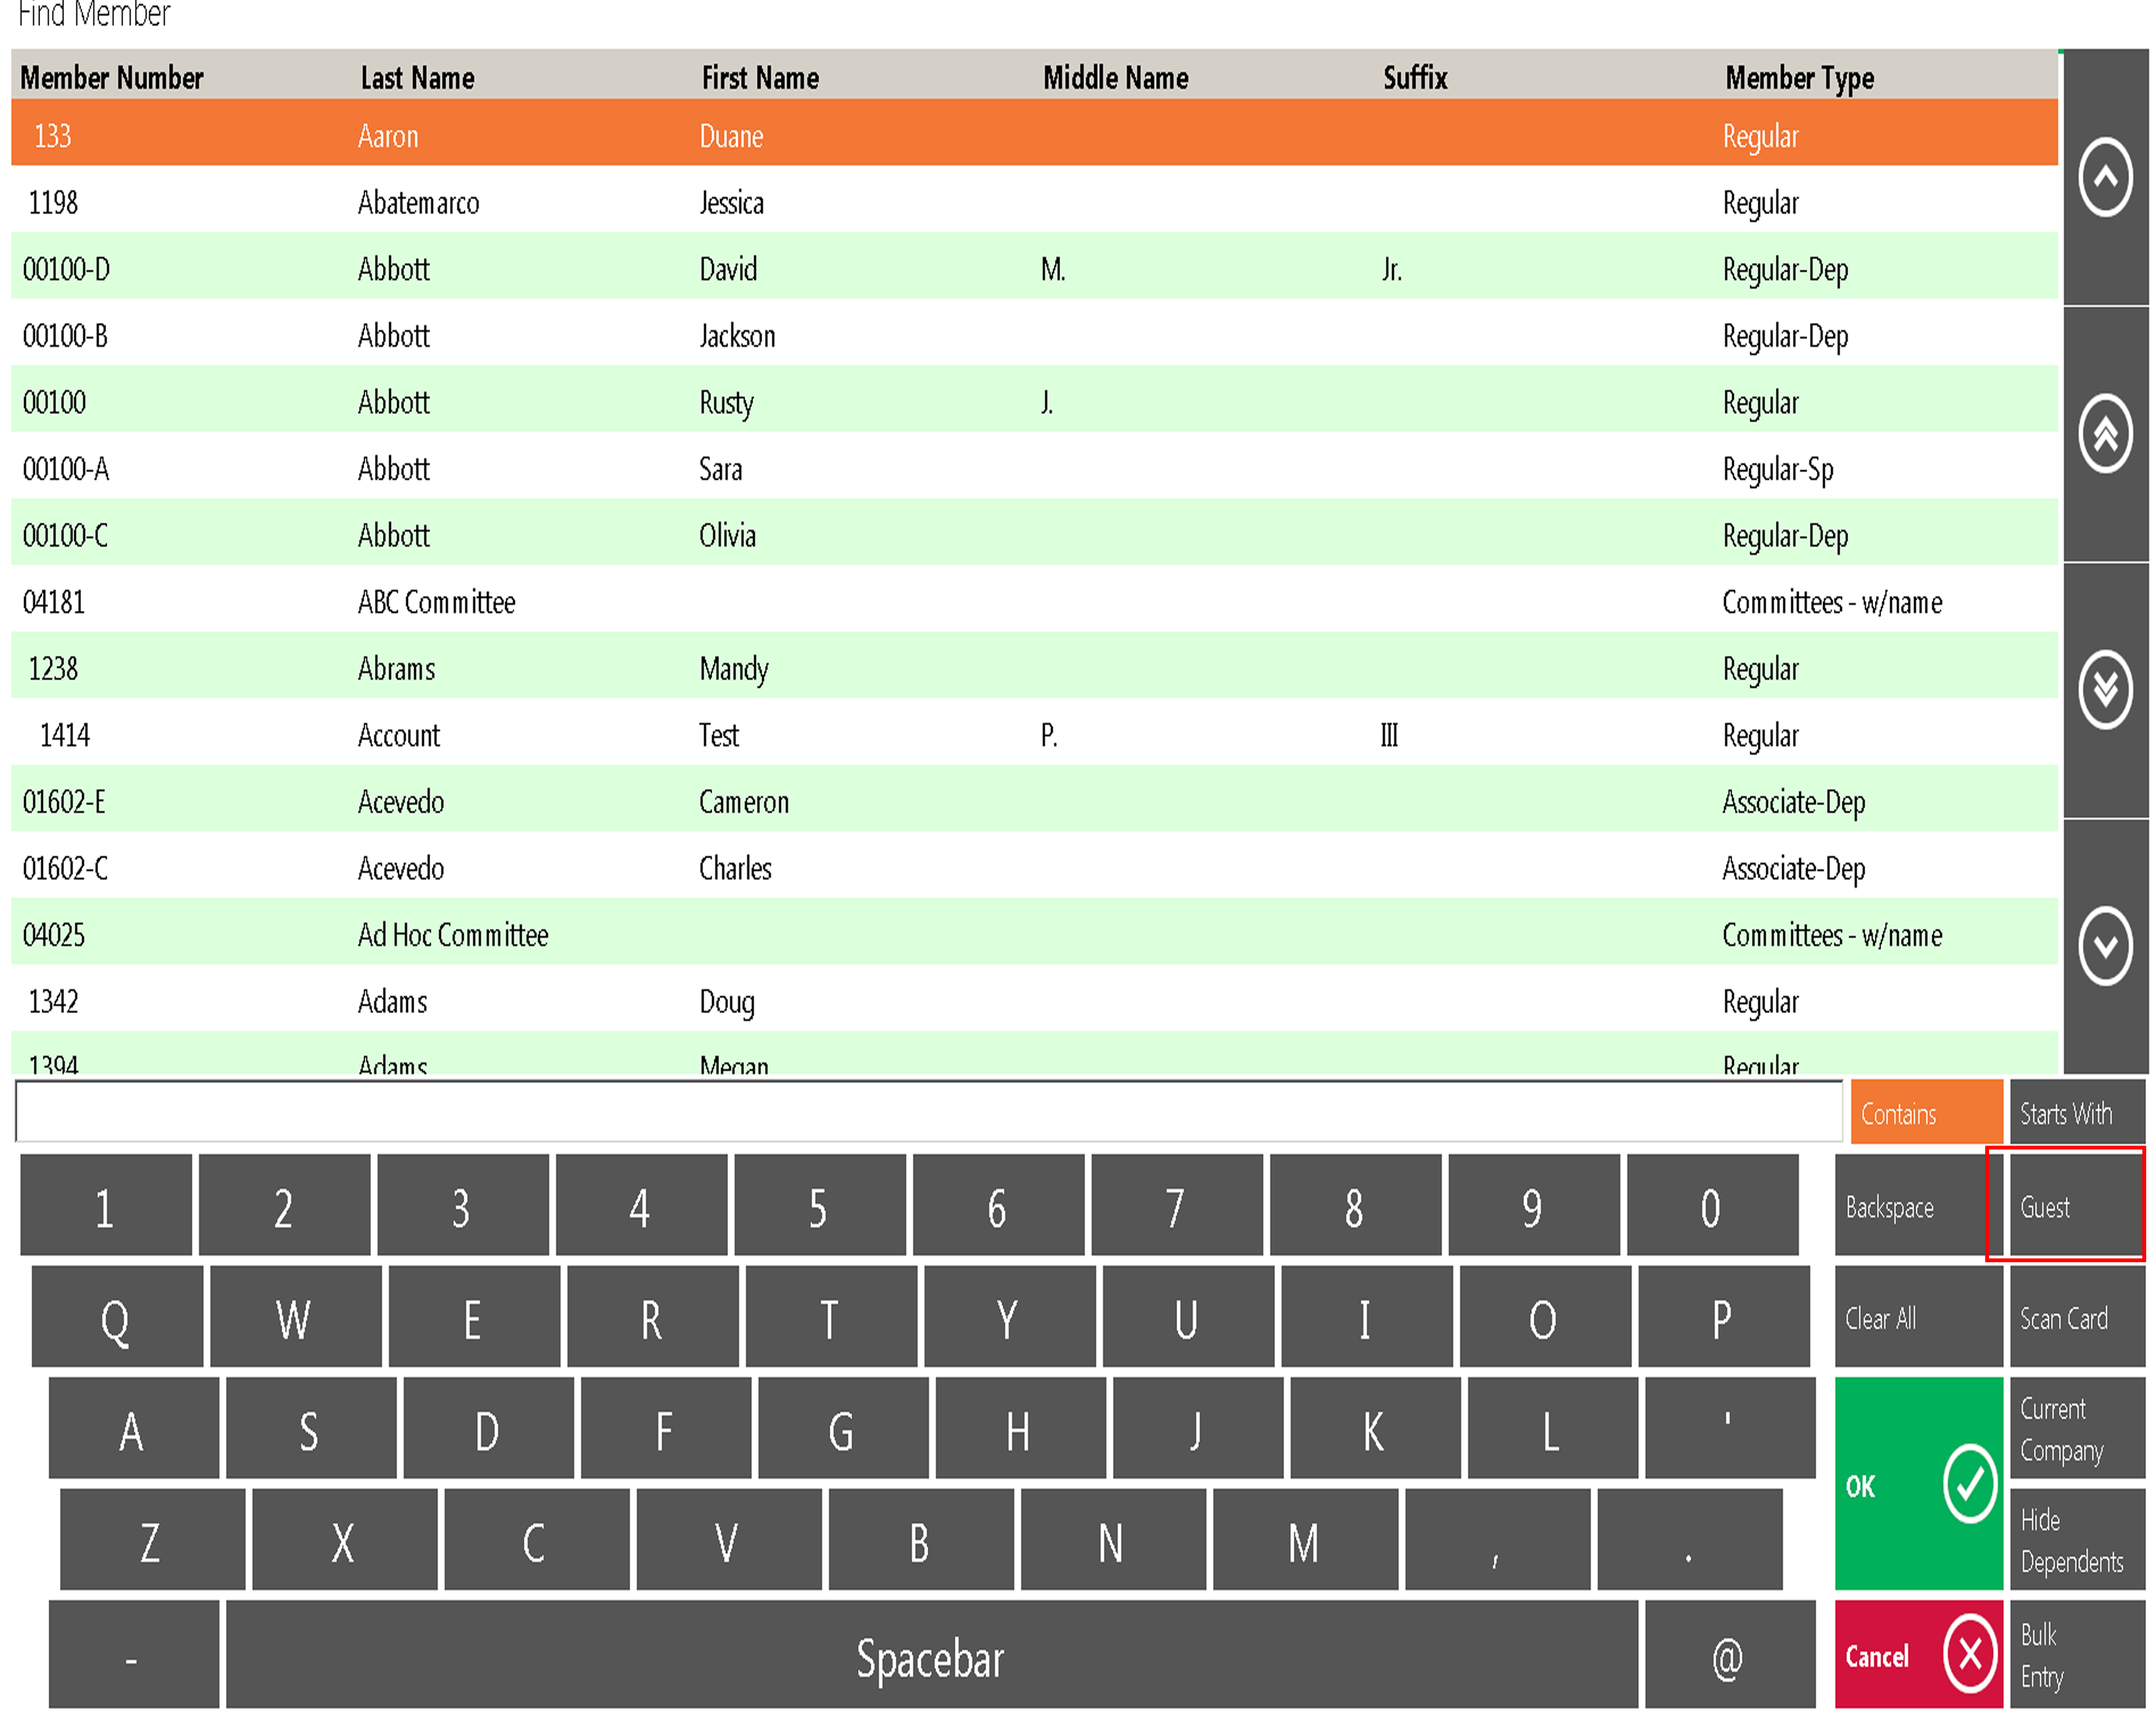
...
Add Add any item the ticket.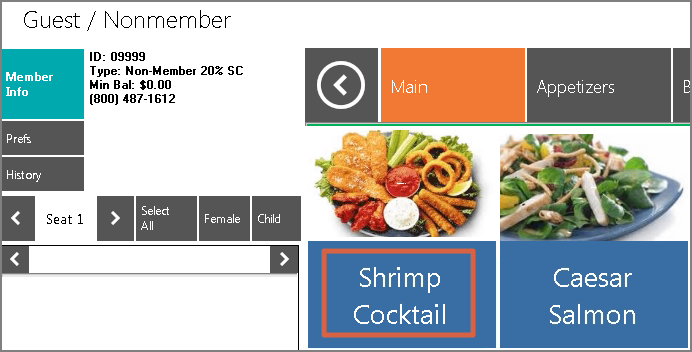
...
Settle the Ticket
In the POS ordering screen, select select Close Ticket.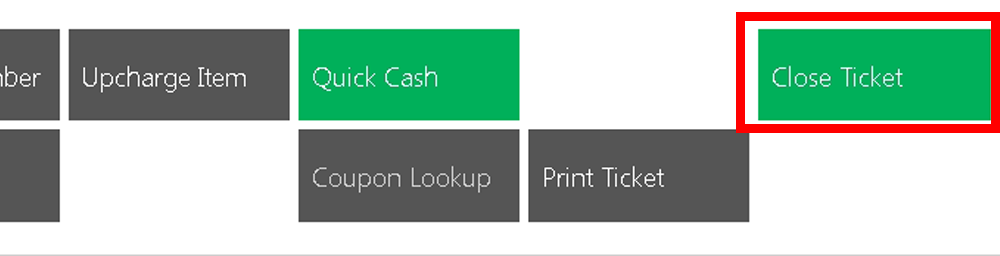
...
Select the the Credit Card Settlement Settlement Type.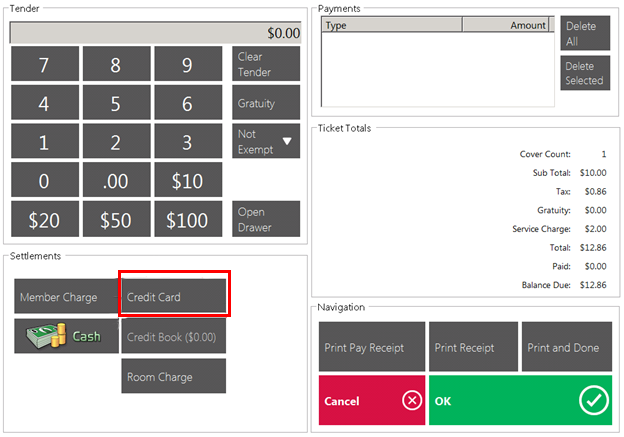
...
Select Select OK (or or Print and Done).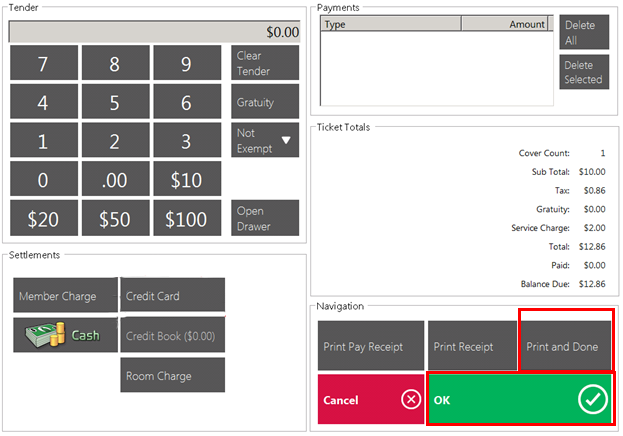
...
If this is a a Stationary Device configured configured to work with only one reader, you will move straight to inserting the Card. If this is a a Roaming Tablet, select the Reader that is closest to you and then insert the card.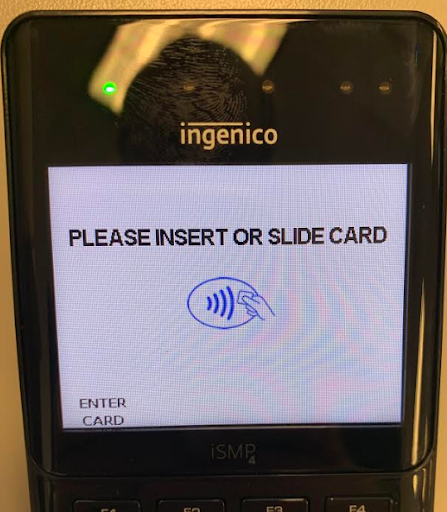
...
Insert the Card.
Additional Gratuity Prompt
This is the 2nd step 2nd step to processing a Credit Card Transaction and where the user enters any additional gratuity. Remember, ALL Credit Credit Card tickets must complete this step even if they do not have any additional gratuity to add to the ticket.
After the credit card has been swiped/inserted, an authorization is created. If the authorization is successful, the ticket is sent back to the main Open Tickets Tab highlighted main Open Tickets Tab highlighted in yellow.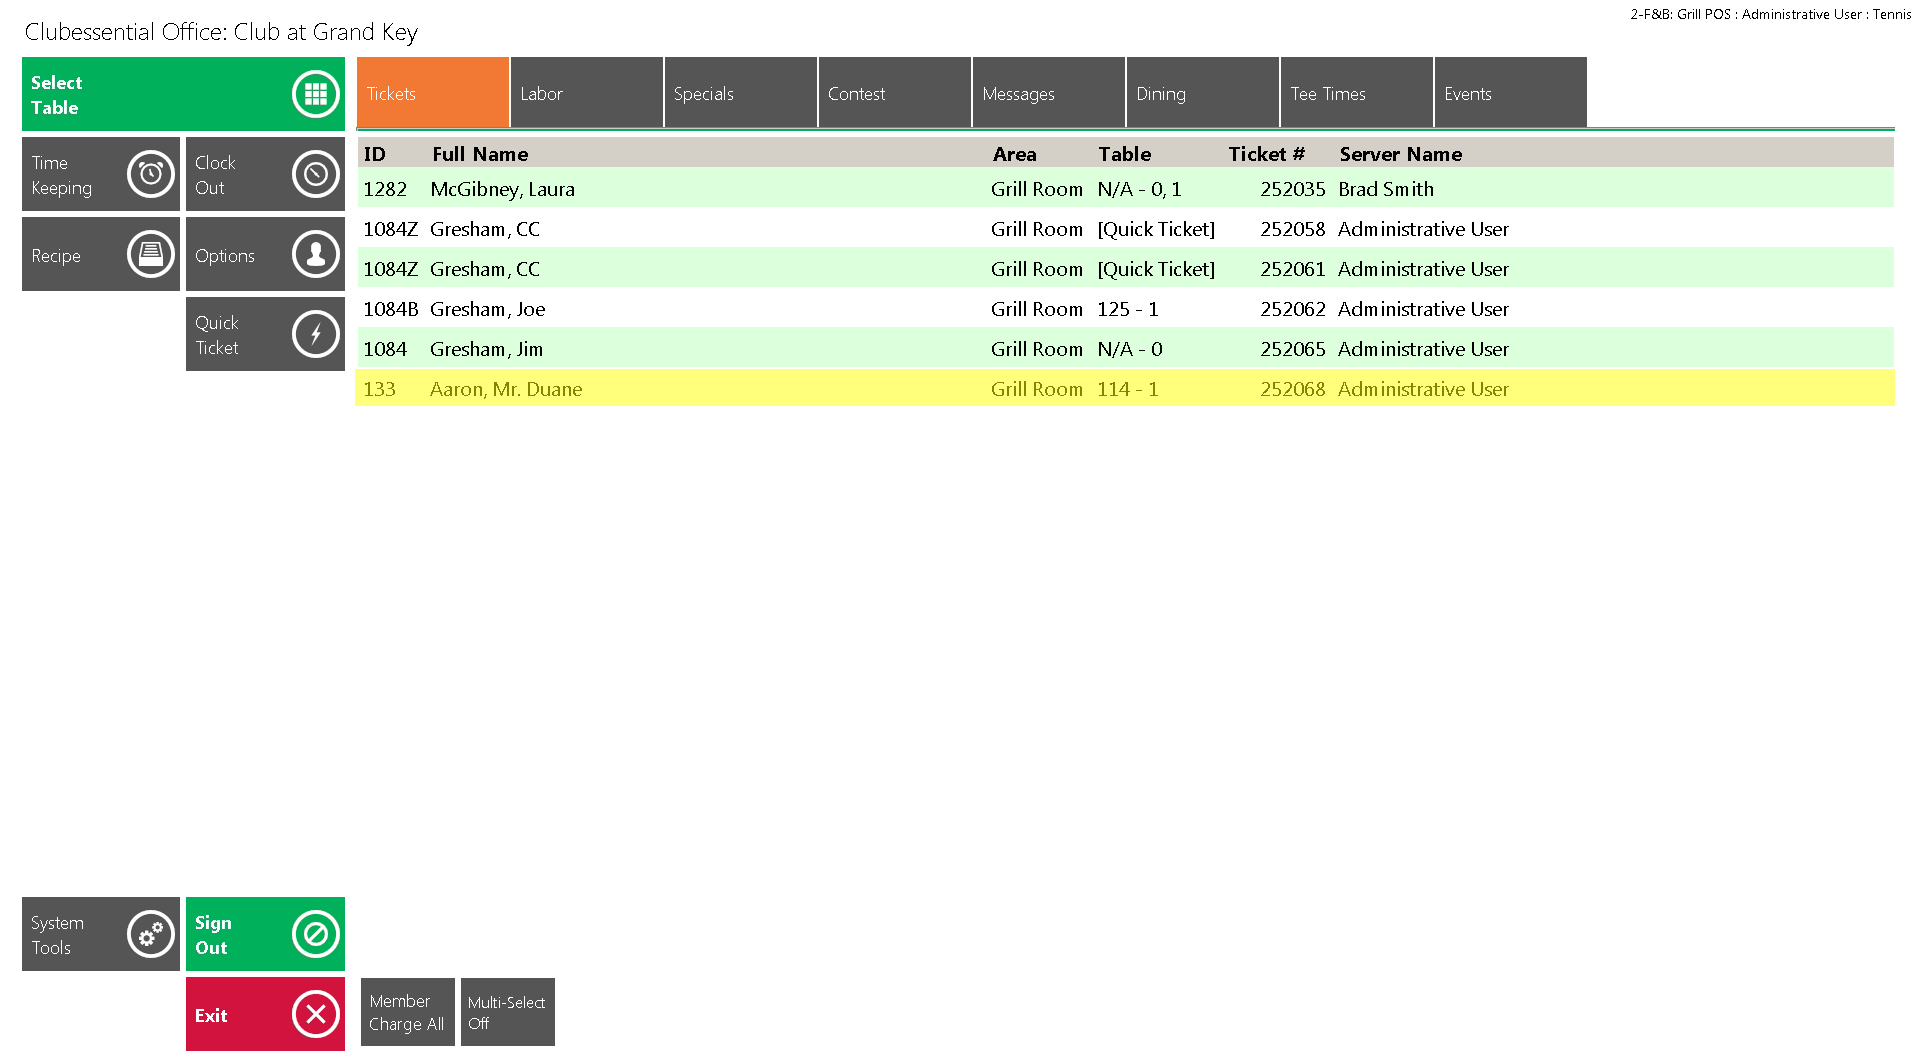
...
In order to complete the transaction and create a credit card capture, select the ticket in yellow and the Gratuity Prompt will populate.
Please note: This step must be completed to fully process the transaction.
Enter the additional Gratuity amount (the user can either use the percentages or manually key in the amount).
To print a receipt showing the added tip, select
PrintPrint settle ticket on close.
If there is no tip to add, simply
select OKselect OK to specify a $0 tip.
The ticket can also
be Reopenedbe Reopened from this screen if necessary.
Click OK Click OK to complete the transaction.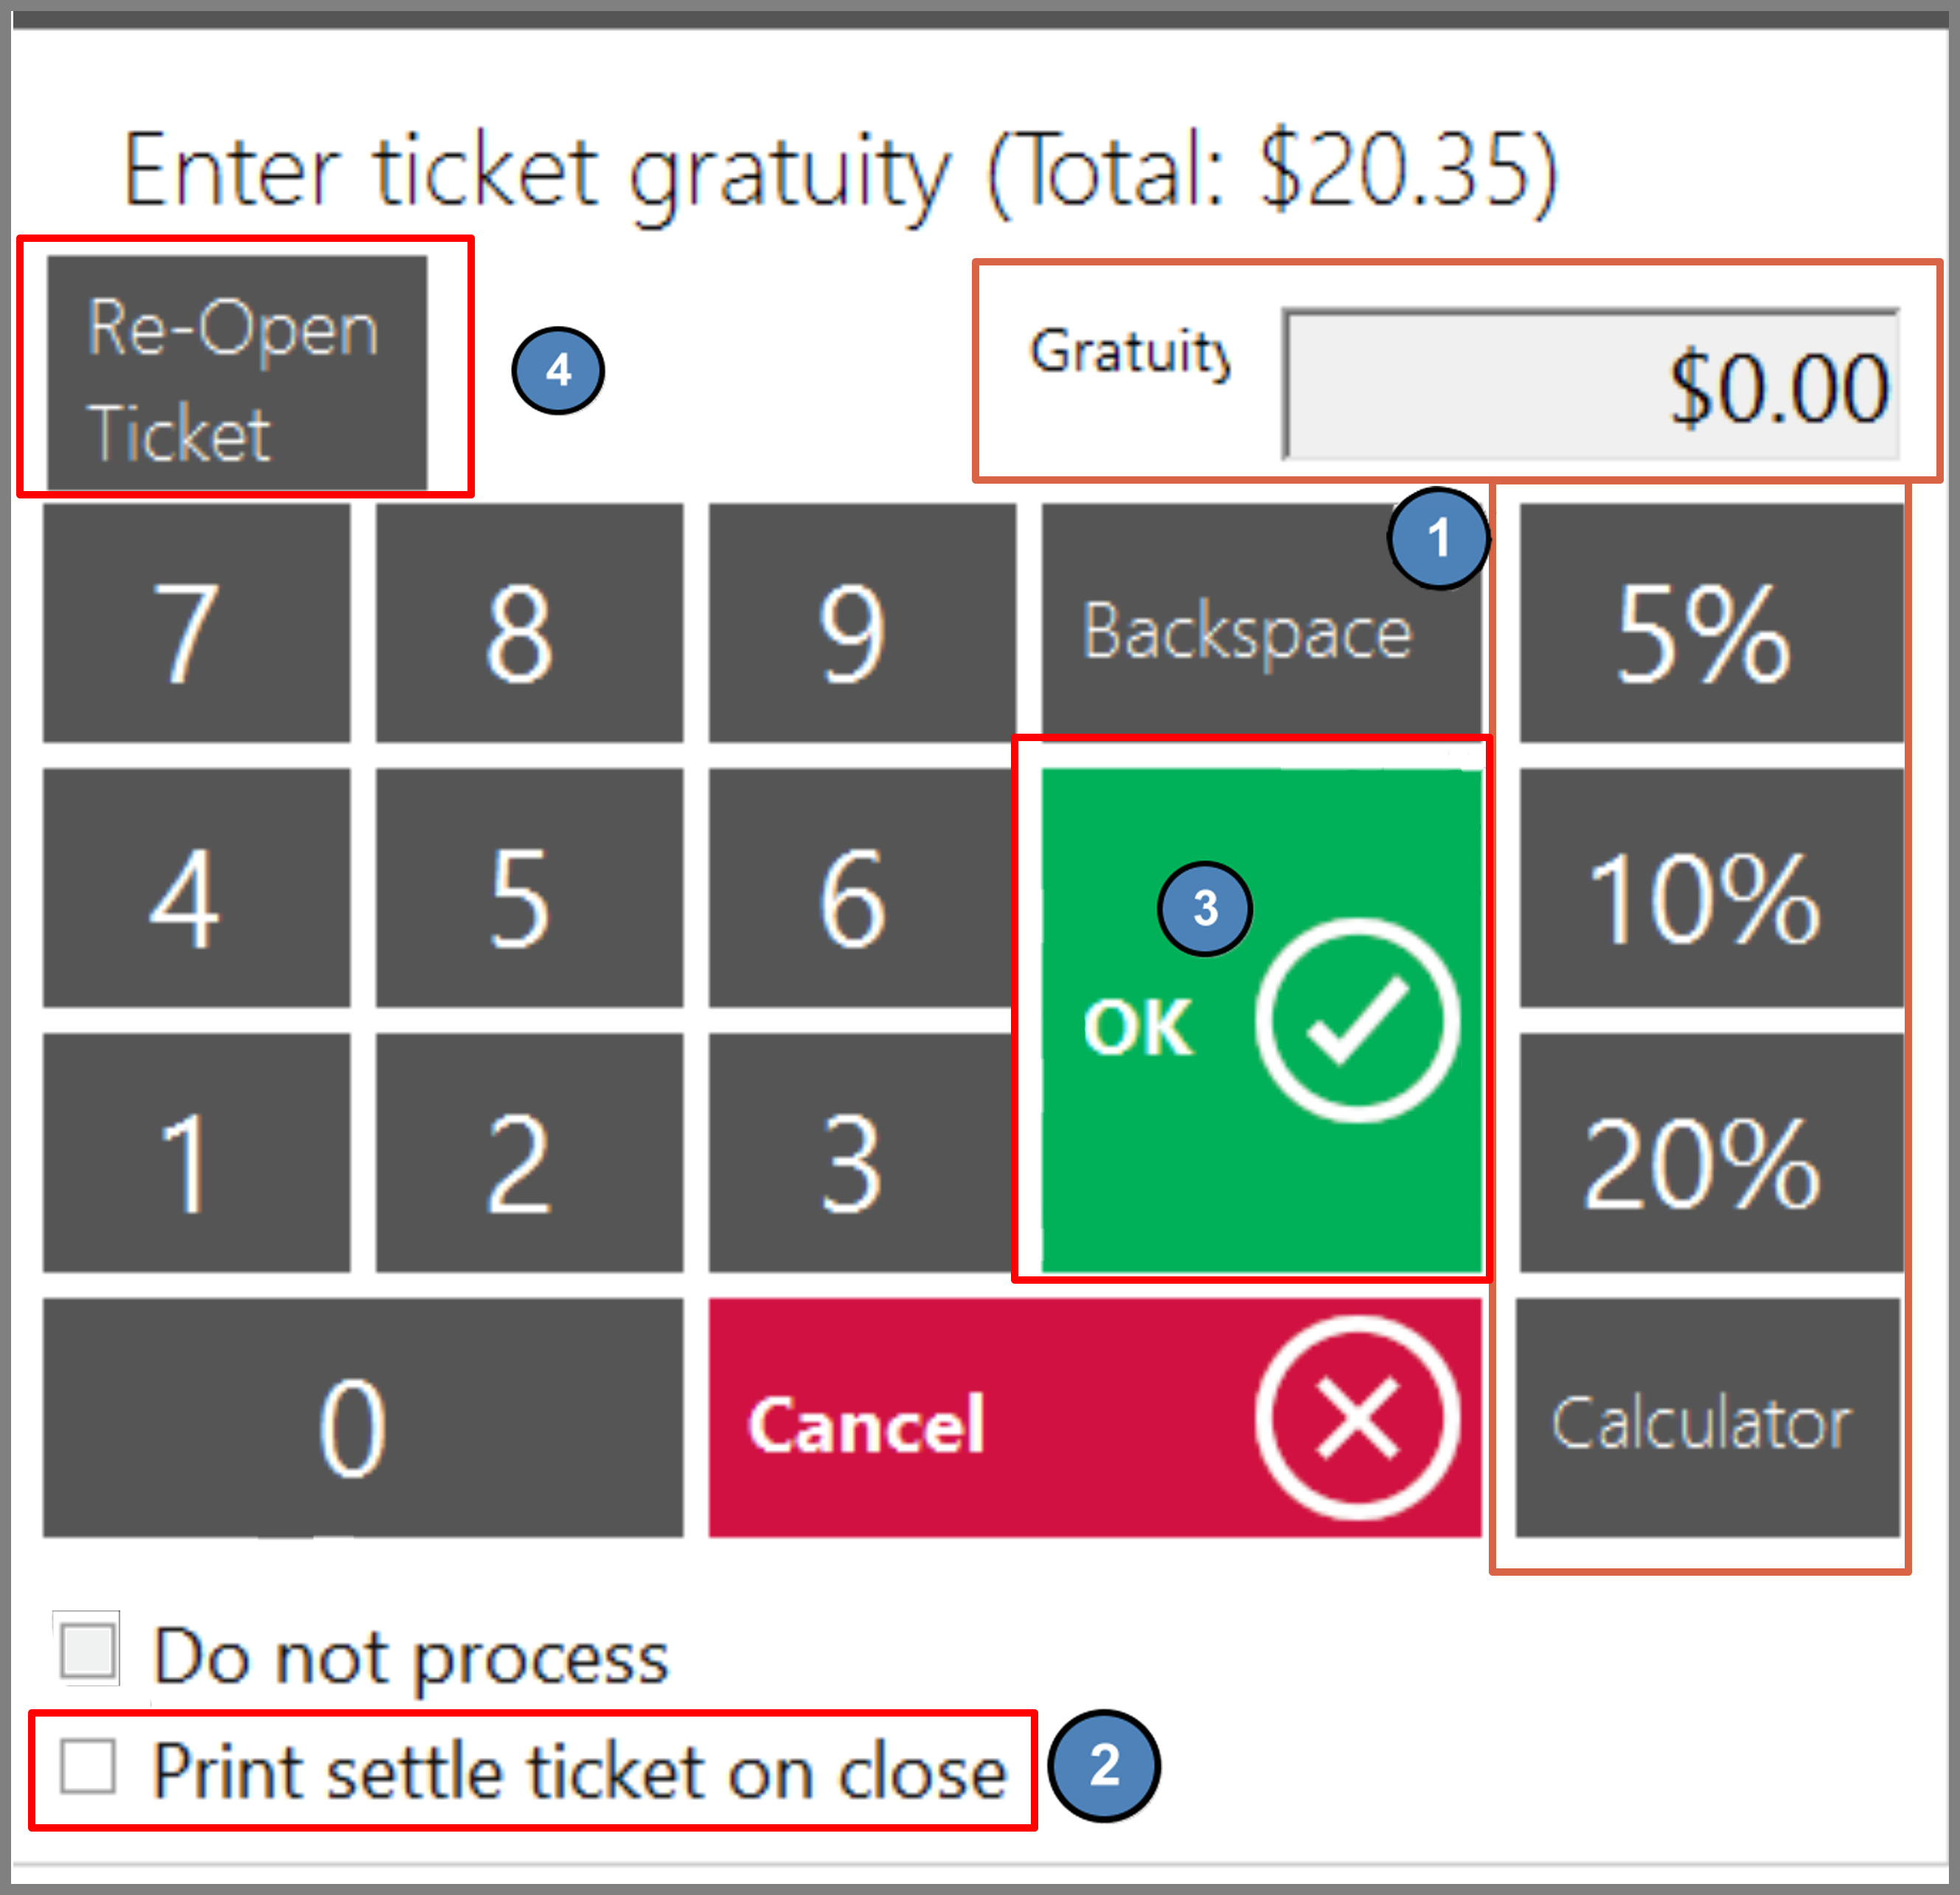
...
Starting a Tab
Charge Tab Tab is used to store the Credit Card on the ticket at the time the ticket is open as opposed to using the card at the end when closing. Mainly used by clubs who allow non-member visits; this allows them to capture the Credit Card information before the sale.
Select Select Charge Tab, and then then Insert the card.
Please Note: If this is a a Set Device configured configured to work with only one reader, you will move straight to inserting the card. If this is a a Roaming Tablet, select the Reader that is closest to you and then insert the card.
...
Proceed to enter the order as normal. When finished, select select Close Ticket.
...
Select the the Tab Button Button (located on the keypad under the Exempt button). The Credit Card information is stored on the ticket so you do not need to insert the card again. Click Click OK to to complete the transaction.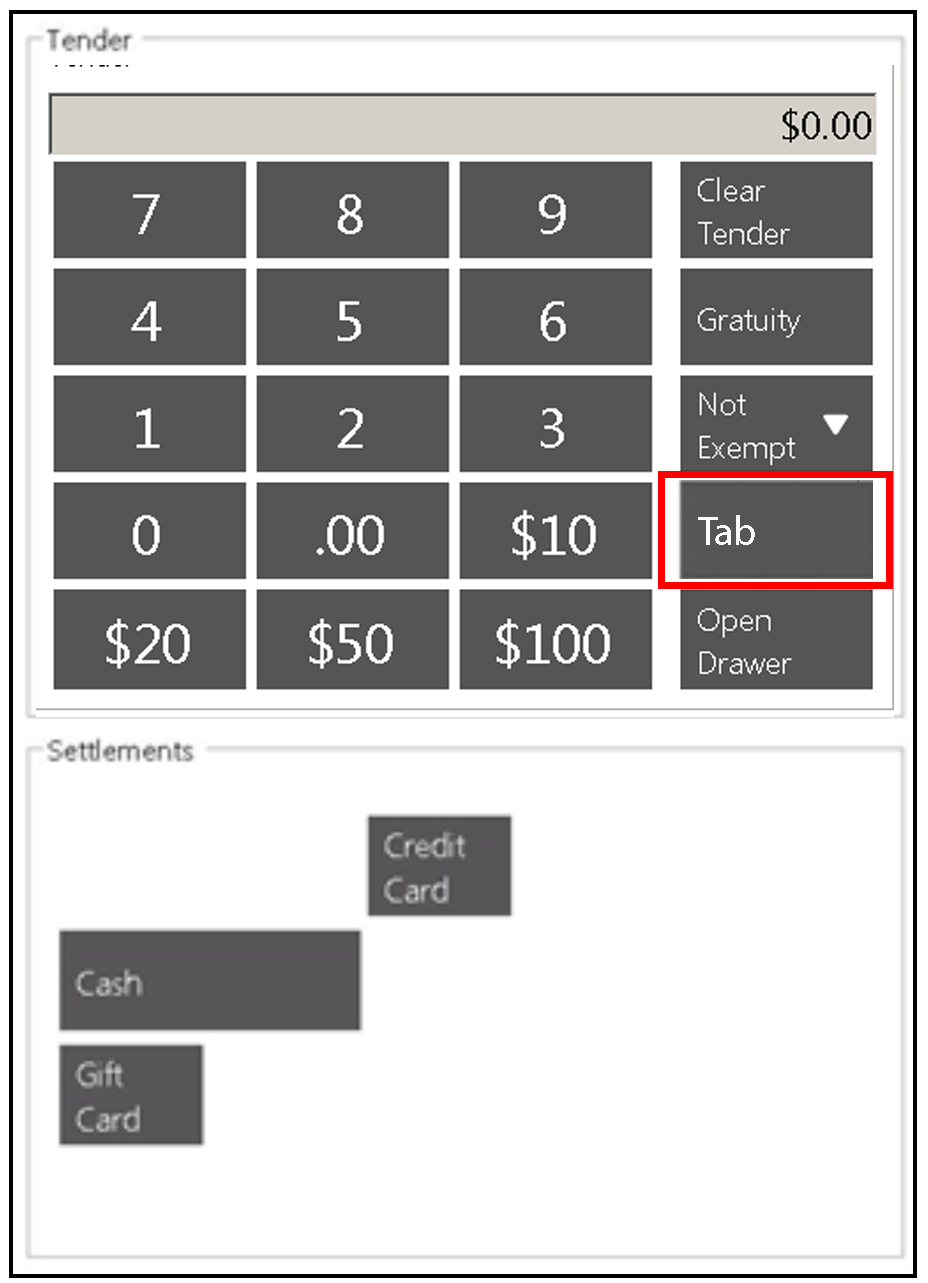
...
Select Select OK (or or Print and Done).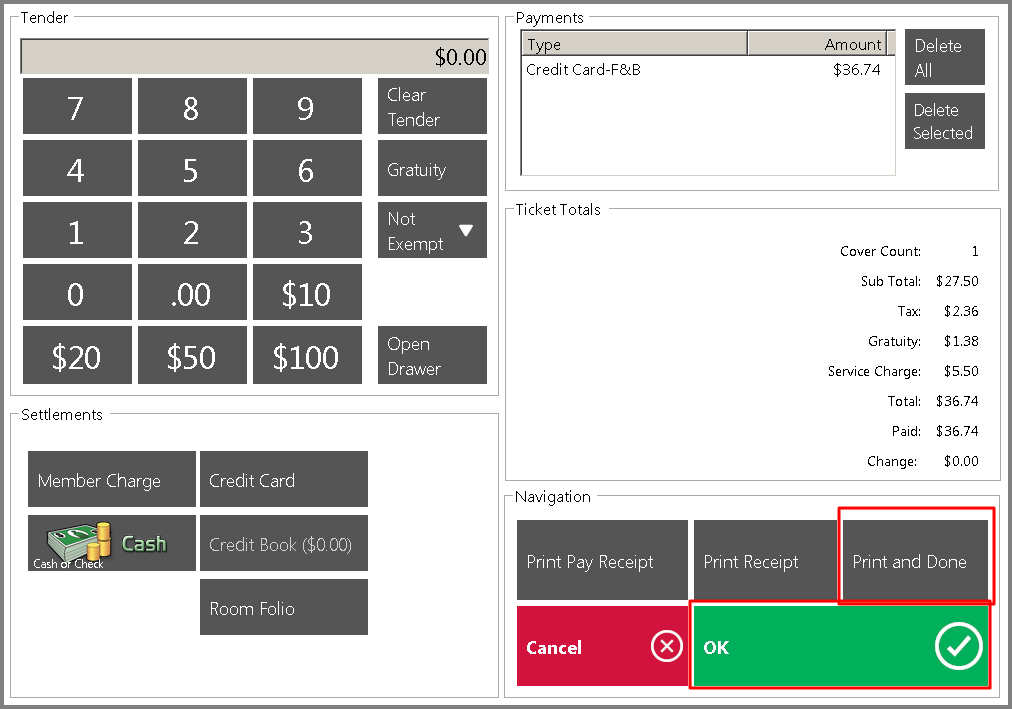
...
Please Note: If you have not inserted the card the the Tab button button will not appear.
Delete/Refund Credit Card Tickets
The most important thing to remember when attempting to refund a Credit Card ticket is that the ticket must be be completely closed first (both settled and 2nd step2nd step) before it can be refunded through the POS. This is the only way the deleted transaction will communicate back to the CE Payments.
Select Select System Tools on on the bottom left corner of the main POS screen.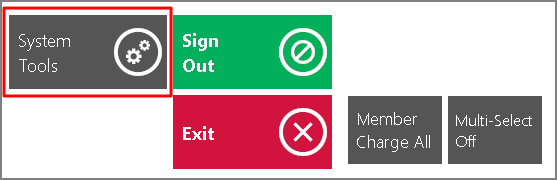
...
Navigate to
...
the Closed Tickets
...
tab.
Highlight the ticket.
Select Delete.
The user will be prompted, Are you sure you want to delete ticket #XXXXX? Click Yes.
...
This will communicate back to CE Payments and Refund the Ticket.
...
Reopen a Credit Card Ticket
If a user needs to reopen a credit card ticket to make corrections, remember the user cannot use the Credit Card Settlement Button again.
Select Select System Tools on on the bottom left corner of the main POS screen.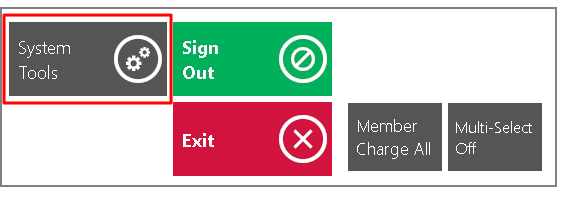
...
Navigate to
...
the Closed Tickets
...
tab.
Highlight the ticket
...
Select Re-Open.
The user will be warned that all Payments made on this ticket will be erased.
...
Click Yes.
...
Navigate back to the main POS screen, select the reopened ticket, and make the necessary corrections. When finished, select select Close Ticket.

On the settlement screen, select the the Tab button button (located on the keypad under the Exempt button). The Credit Card information is stored on the ticket so the user does not need the Credit Card to reclose the ticket.
...
Click Click OK to to or Print and Done reclose the ticket.
...
Contactless Payments
All CE Payments Card Present Devices are configured for Contactless Payments out of the box. Once the prompt appears on the device to Insert/Swipe the card, hold the Contactless Payment form within a few inches of the device to complete payment.