| Table of Contents | ||||||||||
|---|---|---|---|---|---|---|---|---|---|---|
|
Overview
...
System Tools contain useful reports, helpful views, and other functions relevant to ticket management and administration of the POS system. The proper security rights are needed to access this toolset. In this manual, we will discuss the various features within System Tools. Use Case(s)
|
...
Accessing the Tool
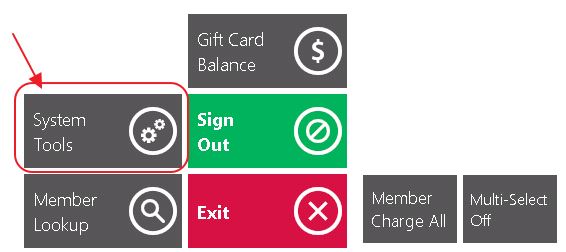
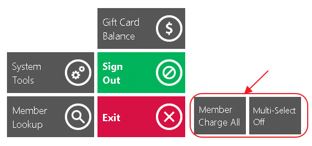
To access System Tools,
The splitting feature, Split Ticket button, is found in the bottom right hand 1) Select System Tools on the bottom left corner of the main POS Order Screen as shown belowscreen.

1) To perform a Ticket Split, first enter Items as usual. You can split before or after the items have been sent.
2) Then, click or touch Split Ticket to open the Split Ticket Screen.

Note: If you split the ticket before you hit Send, all Items will still print to the remote printer (kitchen, bar, etc.) on one prep ticket.
Split Ticket Screen Overview
On the Split Ticket Screen, the ticket on the far left will display the Item details (from the “Selected” ticket) such as modifiers, price, QTY, seat position, and course. It is from this area that you will be moving the items from one ticket to another.
The ticket with the black top/bottom border labeled “Selected” only shows the QTY and Item name. This helps make more room for multiple ticket display.
When more than one ticket is displayed, the ticket labeled “Selected” is the one that will have its items displayed in the far left area.
Important: You cannot do anything with the items from the “Selected” ticket other than view; all action is done from the far left area.

Split Ticket Options
Once the ticket is displayed in the split ticket screen, there are various ways a ticket may be split.
Split By Ticket
One of the simplest splits to perform is the Split by Ticket. A Split by Ticket is when you have more than one member on the table and each wants their own ticket.
1) Within the Split Ticket screen, click the Add Ticket button to create the additional ticket(s) you want for the table. (Before you can move Items you must add the ticket(s) first).
2) Once you have created your ticket(s), highlight the Item from the far left ticket display, then click/touch the ticket you would like the item(s) moved to.
Note: you can highlight more than one item at once.
3) Notice the first ticket is still the “Selected” ticket, and the far left display shows only the Items remaining on the “Selected’ ticket.
4) If you make a mistake and want to move an Item from one ticket to another ticket, first click the ticket that has the item to move; the far left now displays the new “Selected” ticket Items.

5) Once you have the appropriate ticket “Selected”, highlight the Item from the left ticket display, then click/touch the ticket to move the Item to.
Note: You can move multi items by highlighting more items before moving.

6) To change the member assigned to a ticket, click the ticket to make it the “Selected” ticket and select Change Member on the top left corner of the screen. Follow prompts to select new Member.

7) Select OK on the bottom right corner of the screen and your changes will be saved.

Split By Multiplier
Split by Multiplier provides the ability to split an Item or an entire ticket by a specified number.
Example 1 - Item: if you have 3 tickets on one table and they all want to split the bottle of Wine, you can split the Item by 3.
Example 2 - Ticket: if you have 3 members and they want to split the ticket evenly, you can split a single ticket by using the multiplier.
Split by Multiplier - By Item
1) Click Add Ticket and create the number of tickets needed for the split.
2) Touch/click the ticket that has the Item to split, to make it the “Selected” ticket. Highlight the Item you wish to split from the far left display. Click the < > arrows under Split by Multiplier to increase or decrease the multiplier. Select Split Item.
3) The Item will be split by the number you selected. In this example it was split by 3. Highlight one of the splits and touch the ticket to move the Item.

Notes:
- The Split by Item changes the QTY to fractions to calculate the Item price to meet specified amount.
- Once you click OK, the changes have been saved. Once the changes have been saved there is no way to merge the amounts and QTY back to original state. You will have to delete the ticket and start again.
Split by Multiplier - By Ticket
You do not need to Add Tickets; the system will create the number of tickets based on your multiplier.
1) Click the < > arrows under Split by Multiplier to increase or decrease the multiplier. Select Split Ticket.

Notes:
- The Split by Ticket changes the QTY to fractions to calculate the Item price to meet specified amount.
- Once you click OK the changes have been saved. Once the changes have been saved there is no way to merge the amounts and QTY back to original state. You will have to delete the ticket and start again.
- Once you click OK, all subsequent items entered on a ticket will be added to the ticket as a full amount and QTY.
Split By Dollar
Split by Dollar can be used when one party wants to pay a specified amount; in this example one party will only pay $100 out of $206.97. It is advisable to wait until you are ready to close the ticket before performing this option, see notes for more information.
1) Select Dollar under the Split section.

2) Enter the dollar amount to split. Click OK when finished.

3) The system will create a ticket for the amount specified.

Notes:
- The Split by Dollar changes the QTY to fractions to calculate the Item price to meet specified amount.
- Once you click OK the changes have been saved. Once the changes have been saved there is no way to merge the amounts and QTY back to original state. You will have to delete the ticket and start again.
- All subsequent Items entered on a ticket after the ticket has been Split by Dollar will be added to the ticket as a full amount and QTY.
Include Tax
The Include Tax feature is utilized to calculate tax into the the split.
Example - we have one Item on a ticket with a price of $8.00, including tax and service charge totals to $10.30. So let’s say two kids are splitting that Item. One of them only has $4.00, so I need his ticket to only charge him $4.00 tax included. I navigate to the Split Ticket screen, check the Include Tax box and click Dollar. I enter the amount of $4.00. Now I have two tickets – one for $4.89 and one for $3.11. When I click OK and the tickets are created, the original ticket is for $6.30 total and the new ticket is for $4.00.

Split By Seat
Split by Seat allows the user to split a ticket based on seating. This option can only be used if the user is using seat positioning.
1) Assign the seat position to each Item on the ordering screen and select Split Ticket.

2) Select Seat under the Split section. The system will create a ticket for each different seat position.
Split By Course
Split by Course allows the user to split a ticket by course. For instance, one member will be paying for the Appetizer and another member will be paying for the Entrees. Please note that this option can only be used if the user is using courses.
1) Assign the course to each Item on the ordering screen if it is not set by default. Select Split Ticket.

2) Select Course under the Split section. The system will create a ticket for each different course.

Combining Tickets
In the event a member decides to pay for another member sitting at a separate table, the Split Ticket feature can be used to combine the 2 tickets into 1. Please note that in order to combine the tickets, the two tickets will need to be moved to the same table.
1) Use the Change Table feature to move the ticket the member is paying for over to their Table.

2) Once the 2 tickets are on the same table, select Split Ticket.

3) Select the ticket that was moved to make it the “Selected” ticket. Highlight the Items from the far left ticket display then click/touch the ticket to move the Items to.

4) All Items will be moved to the paying member’s ticket and the ticket the Items were transferred from will be automatically deleted.

Best Practices
When ticket splitting is required, ensure to enter Items as normal, and then hit the Split Ticket button to launch the Ticket Splitting screen.
Ensure ticket to be split (or tickets with Item(s) to split) is marked as “Selected” in the Split Ticket screen, prior to attempting to move Items to another ticket.
When combining Tickets, ensure all tickets are at the same table prior to merging them by utilizing the Change Table feature in the main POS screen. Once all tickets are at the same table, utilize the Split Ticket feature to combine the tickets.
FAQs
Q: I need to move an Item back to its original ticket - how do I do that?
A: Ensure the new ticket created is marked as “Selected” in the Split Ticket screen. Then, highlight the Item from the left screen on the Split Ticket screen, and then click on the original ticket to return the item to it.
Q: When splitting a ticket by a fixed amount (ie - $10.00 on one ticket, and the remainder on another), how do I ensure the $10.00 ticket is the final amount due, inclusive of all tax, etc?
A: When splitting a ticket to a fixed all-inclusive amount, ensure to check the Tax Included box, located on the Split Ticket screen when splitting the ticket.Can I give a rain check a fixed expiration date, like 12/31/2017, rather than having it expire in 365 days?
Downloadable Guide
...
2) System Tools opens on the Locked Tickets tab.
Tab Overview
In this section we will review the various tabs within System Tools.
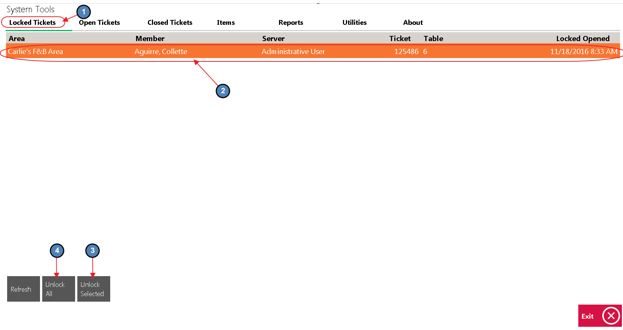
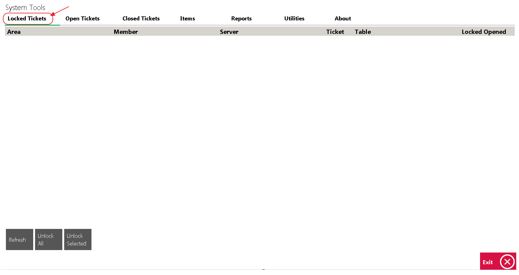
Locked Tickets
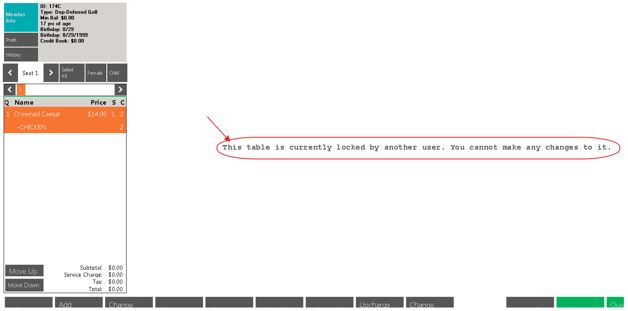
The Locked Tickets tab allows the user to unlock any tickets that are “Locked’" in the POS. A ticket is locked when another user is in the ticket, but could also become locked when there is a disruption of service or other connectivity error. If a ticket is locked, the below message will display:
To unlock a ticket: Navigate to the Locked Tickets tab within System Tools and highlight the locked ticket. The user can then select Unlock Selected, to unlock just the highlighted ticket, or Unlock All to unlock all locked tickets. This function is particularly useful when the person who has the locked ticket has already left, or is unavailable.
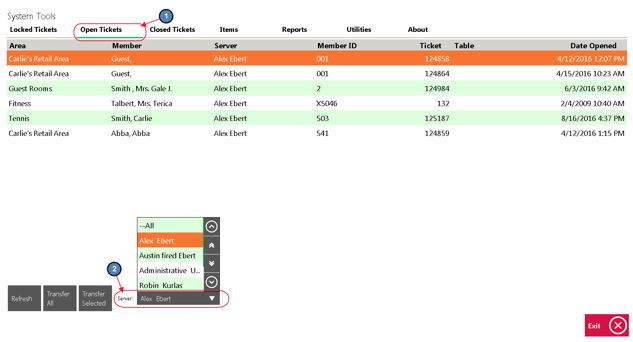
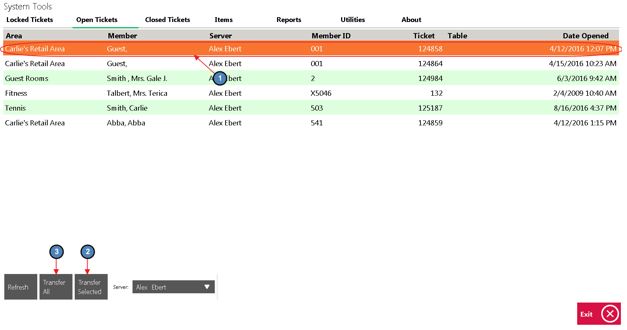
Open Tickets
The Open Tickets tab allows the user to transfer tickets between servers. This function is useful when a Member decides to change tables, or when servers have a shift change.
To transfer a ticket,
1) Navigate to the Open Tickets tab within System Tools and by default the system will display all open tickets under the server who is currently logged in. To view open tickets under another server, simply select the Server drop-down and choose the applicable server; select ALL to view all open tickets.
2) Highlight the ticket to be transferred and select Transfer Selected. If all open tickets need to be transferred, select Transfer All.
3) Select the server to transfer the ticket to. Clocked-In Users will display by default. If the ticket needs to be transferred to someone who is not clocked-in, select Other and choose the appropriate server.
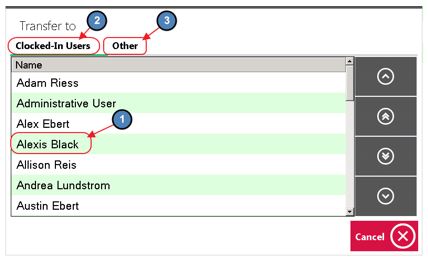
Note: The column headings displayed on the Open Tickets tab can be altered if necessary. For more information, please see the POS Grids section of our F&B Areas or Retail Areas manuals.
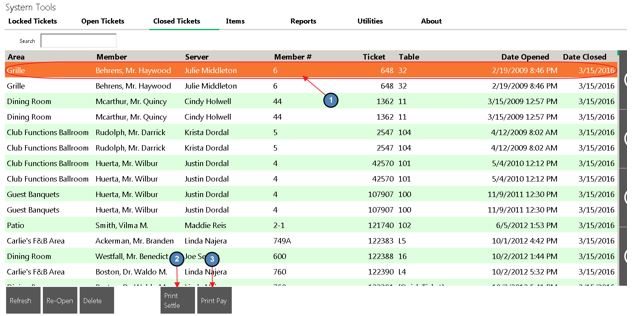
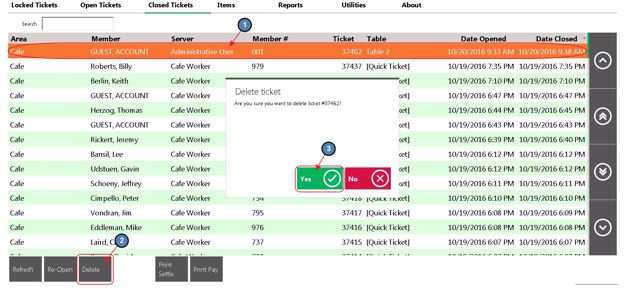
Closed Tickets
The Closed Tickets tab allows the user to Re-Open, Delete, and Re-Print previously closed tickets. Please be aware that users must have the proper security rights to Re-Open or Delete Tickets on this tab.
Important: Only tickets that have NOT been posted will show in the Closed Tickets tab.
Re-Open a Ticket
Please do NOT attempt to Re-Open a Credit Card ticket without first reviewing our Credit Card manuals. Depending on your processor, please review our ETS or Openedge Credit Card Transactions manuals for more information on Re-Opening Credit Card tickets.
To Re-Open a closed ticket:
On the Closed Tickets tab, highlight the ticket that needs Re-Opened and select Re-Open. The user will be warned that all Payments made on this ticket will be erased. Click Yes.
Delete a Closed Ticket
Please do NOT attempt to Delete a Credit Card ticket without first reviewing our Credit Card manuals. Depending on your processor, please review our ETS or Openedge Credit Card Transactions manual for more information on Deleting Credit Card tickets.
To Delete a closed ticket:
On the Closed Tickets tab, highlight the ticket that needs deleted and select Delete. The user will be prompted, Are you sure you want to delete ticket #XXXXX? Click Yes.
Re-Print Closed Ticket
The Settle and Pay Tickets can be Re-Printed for previously closed tickets.
To Re-Print a Closed Ticket,
1) On the Closed Tickets tab, highlight the ticket that needs reprinted and select Print Settle to Re-Print the Settle Ticket, or Print Pay to Re-Print the Pay Ticket.
2) A Print Preview will display. The user has 3 options:
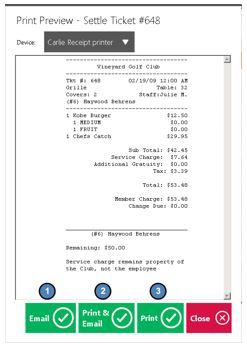
Email - Emails a copy of the ticket to the member. Member must have valid email address on file to function properly.
Print & Email - Prints the ticket and emails the member a copy of the ticket.
Print - Prints the ticket.
Notes:
If a Print Preview does not display, the Area is not configured to show Print Previews. Please see our F&B or Retail POS manual for more information enabling the Print Preview.
The column headings displayed on the Closed Tickets tab can be altered if necessary. For more information, please see the POS Grids section of our F&B Areas or Retail Areas manuals.
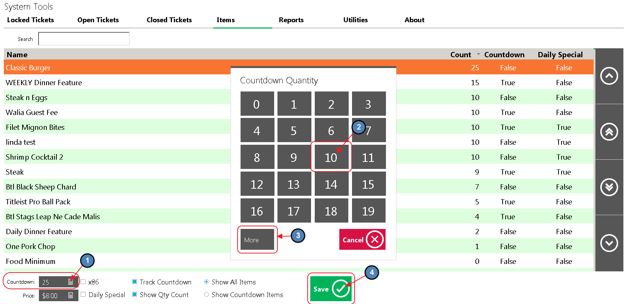
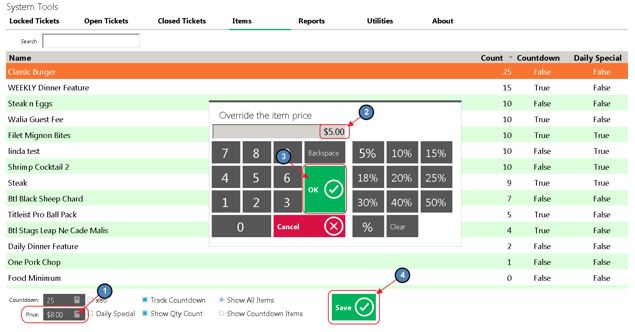
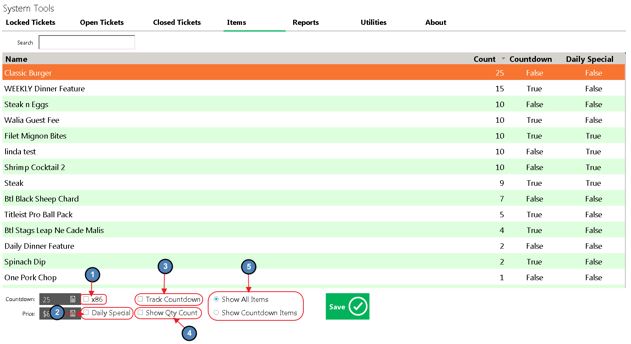
Items
The Items tab is designed as a quick edit feature mostly pertaining to Price, Daily Special and Count Down features. Please note that users will need the proper security rights to use this tool. Below we discuss the available options.
Important: Please be aware that all changed made on this tab will also change the Item setup in CMA.
Options
Countdown - Users can change the count of an Item using the Countdown feature.
1) Select the Countdown field.
2) Enter the correct quantity. If the predefined quantities do not suffice, select More and enter the correct quantity.
3) Select Save.
Price - Users have the ability to change the Price of Items on this tab.
1) Select the Price field.
2) Enter the correct Price and select OK.
3) Select Save.
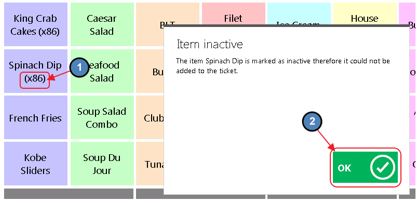
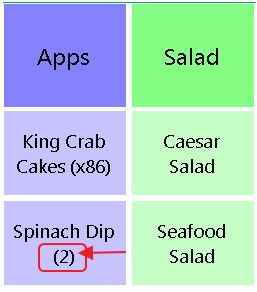
X86 - If selected, the Item will be marked as Inactive so it cannot be sold at the POS. x86 will show on the screen group button for the Item in POS. If the Item is selected, the below message will display.
Daily Special - If selected, the Item will be marked as a Daily Special.
Track Countdown - If selected, the system will track quantity based on the countdown entered.
Show QTY Count - If selected, the quantity of the Item will show on the Item’s screen group button.
Show All Items/ Show Countdown Items - Select Show All Items for all Items in the system to be listed on the Items tab, or select Show Countdown Items for only Items marked as Track Countdown to show.
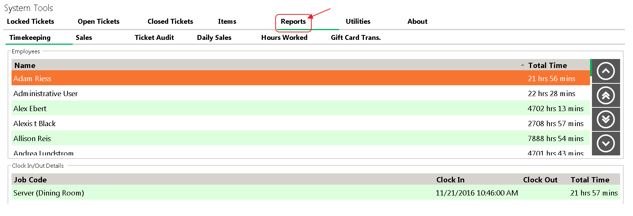
Reports
The Reports tab allows the user to run specific reports directly within the POS. Please see below for an explanation of each option.
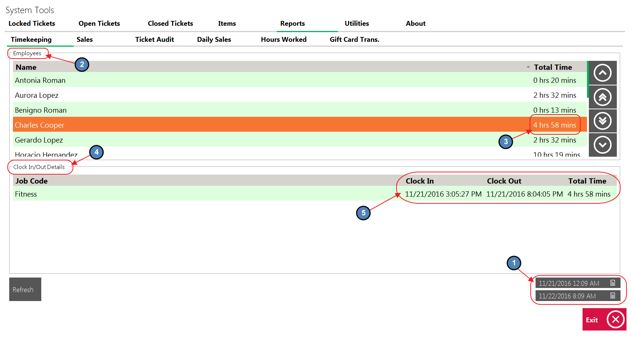
Time Keeping
The Timekeeping option provides the user with a view only report of employees who have worked within a specific time frame. This report will also show total time worked within the specified time frame.
Note: Please note that only employees with clock-in or clock-out activity within the time frame specified will show.
1) Select the time frame in the bottom right hand corner of the screen. The top date field is the Start Date and the bottom is the End Date.
2) The top portion labeled, Employees, will display all employees who have clock-in or clock-out activity during the specified time frame, along with their Total Time worked. The bottom portion labeled, Clock-In/Out Details, will display all instances of clock-in/ out activity during the specified time frame.
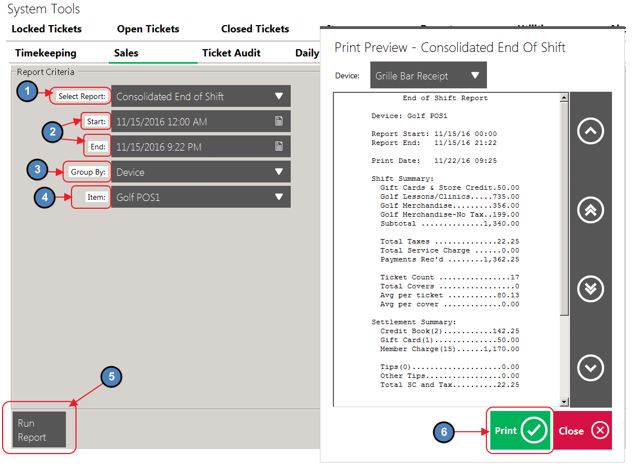
Sales
The Sales option provides the user with 3 shift reports. Reports include:
Consolidated End of Shift - Consolidates all employees into a single End of Shift report within a certain time frame. This report can be grouped by:
1) Device
2) Area
3) Area Group
4) Area Category
5) Terminal
Each time Run Report is selected a Print Preview will display. Select Print to print the report.
Shift Summary by Area - Provides the user with a shift summary report by Area. This report is strictly sales specific, providing the user with sales figures by ticket number and member.
Each time Run Report is selected a Print Preview will display. Select Print to print the report.

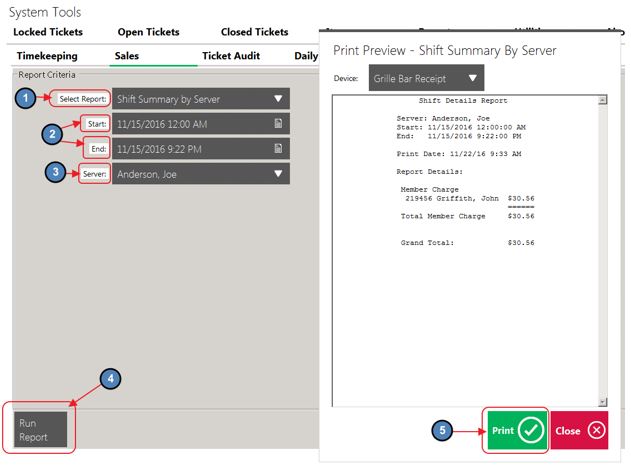
Shift Summary by Server - Provides the user with a shift summary report by Server. This report is strictly sales specific, providing the user with sales figures by ticket number, member, and Tender type.
Each time Run Report is selected a Print Preview will display. Select Print to print the report.
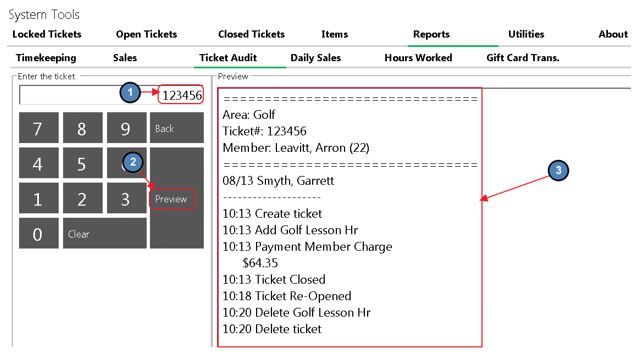
Ticket Audit
The Ticket Audit allows the user to preview all entry details of a particular POS Ticket. This preview does include deleted tickets. This is a great tool to use if a particular POS Ticket is missing in the system.
To preview a ticket, simply enter the ticket number and select Preview.
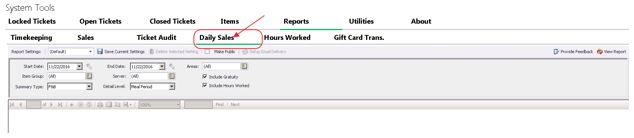
Daily Sales
Allows the user to run the canned Daily Sales report directly within the POS.
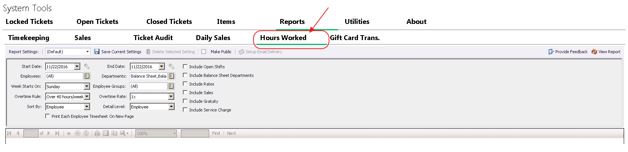
Hours Worked
Allows the user to run the canned Employee Hours report directly within the POS.
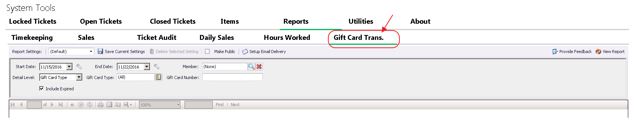
Gift Card Trans
Allows the user to run the canned Gift Card Transactions report directly within the POS.
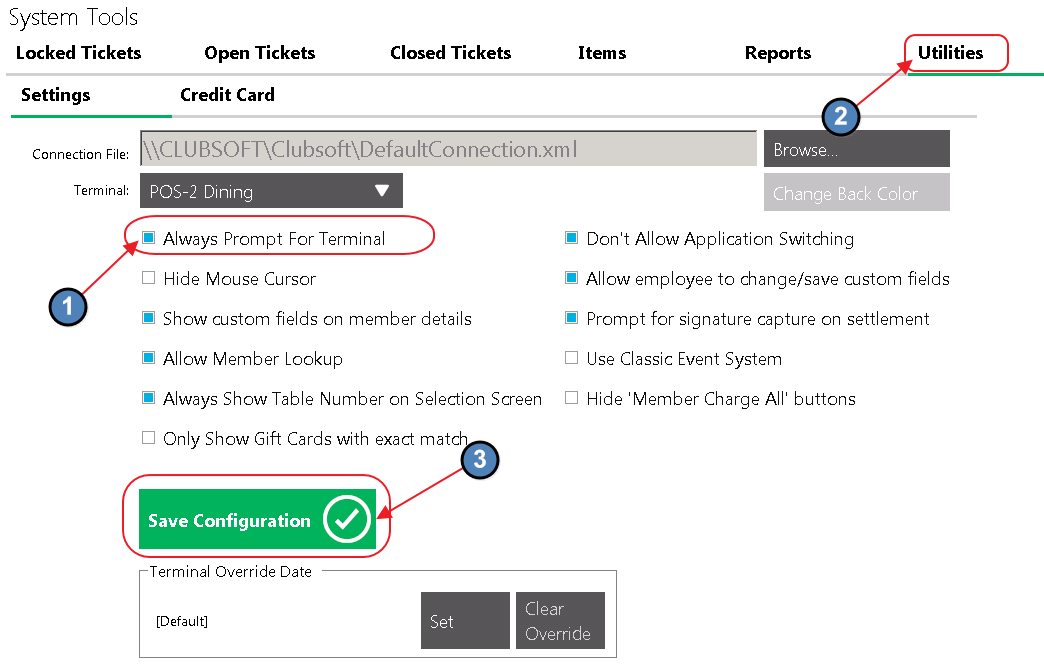
Utilities
The Utilities tab allows the user to activate/ deactivate certain features within the POS. Please see below for a description of each highlighted option.

1) Always Prompt for Terminal - If the Select Device drop-down does not populate when launching the POS, please follow the below instructions to get the Select Device drop-down back:

Navigate to System Tools and select the Utilities tab.
Highlight Always Prompt for Terminal, and select Save Configuration.
4) Allow Member Lookup - If selected, the Member Lookup button will show in the main POS screen.

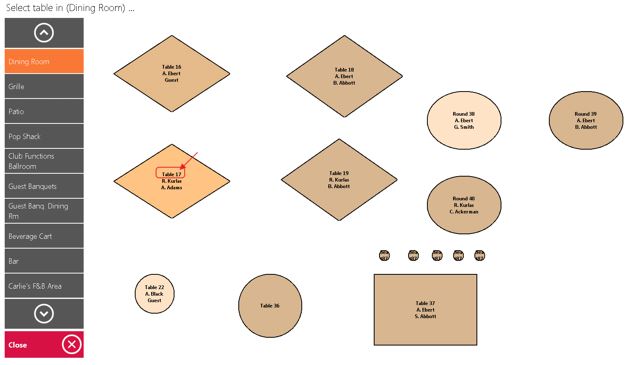
5) Always Show Table Number on Selection Screen - If unselected, the table number will not populate if a member is currently sitting at the table. If selected, the table number will always populate even if a member is sitting at the table. This information is relevant to the Select a Table phase in an F&B POS.
6) Only Show Gift Cards with Exact Match - If selected, the Gift Card Settlement button will only show Gift Cards that meet the exact price of the ticket being settled.
7) Don’t Allow Application Switching - If selected, the user will not be able to switch (ALT- TAB) to other applications when the POS is running.
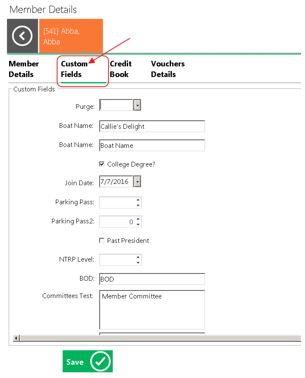
8) Allow Employee to Change/ Save Custom Fields - If selected, employees will be able to change/ Save Custom Fields within the Member Details screen. If unselected, employees will have a view only mode of the Custom Fields tab.
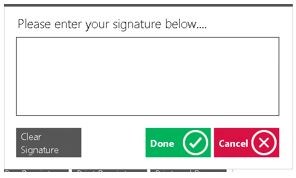
9) Prompt for Signature Capture on Settlement - If selected, the system will prompt for the member/ guest’s signature with each settlement.
10) Use Classic Event System - Only applicable if the Event system within the Back Office (CMA) application is utilized. If the club has a Links or Axis/ Clubessential website, be sure that this is UNSELECTED.
11) Hide ‘Member Charge All’ Buttons - If selected the Member Charge All buttons will not show in the POS.
Terminal Override Date
In the event a ticket needs to be back dated or completed under a previous date, the user can override the time and date of the POS using the Terminal Override Date feature.
To override the time and date of the POS,
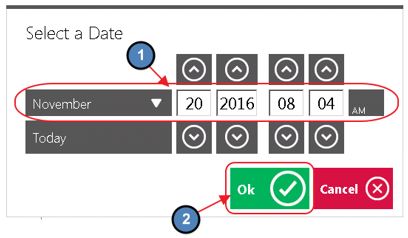
1) Select Set in the Terminal Override Date section of the Utilities tab.

2) Select the appropriate date/ time and click OK.
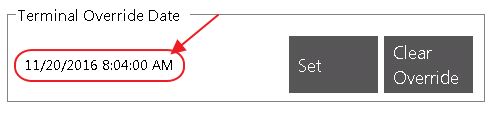
3) The overridden date will show in the Terminal Override Date section.
4) Select Exit in the bottom right hand corner of the screen to exit System Tools. Do NOT select Save Configuration as this will kick the user out of the POS and reset the POS Terminal date back to Default (Current Time).
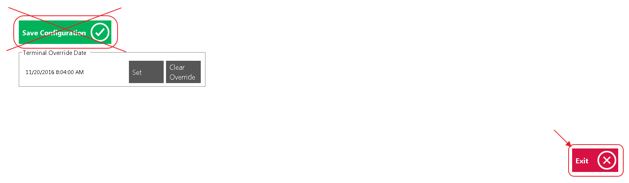
5) Complete the transaction and completely shut down the POS application. When the application is closed the POS Terminal date will reset back to Default (Current Time).
Best Practices
System Tools provide an extremely useful toolbox to assist your Management and/or Leads with functions and reporting beyond the normal scope of base level POS usage. Ensure your Management/Lead team is familiar with the functions described within this guide to promote elevated Member and Guest experience, staff guidance and system troubleshooting as required.
FAQs
Q: Can someone have rights to System Tools without having rights to adjust Items?
A: Yes. In addition to the Allow System Tools security role, a separate role, Allow Item Management, is available to differentiate those who have the ability to access System Tools with those who have the ability to edit items within the Items tab of System Tools. By disabling the Allow Items Management role, users who may have access to other System Tools will be unable to make edits to Items within the toolset.
Downloadable Guide