...
Note: If you have more than one item to delete follow the Multi-Select (On) instructions.
| Anchor | ||||
|---|---|---|---|---|
|
...
Note: If you have more than one item to delete follow the Multi-Select (On) instructions.
| Anchor | ||||
|---|---|---|---|---|
|
...
The Close Ticket function gives you additional options on how the ticket is settled. In this section we will cover the various options available.

Tender Keypad
Top left corner of the screen is the Tender keypad.
...
2. Tax/Service Charge Exempt - Select drop down arrow next to Not Exempt and a list of exemptible features will display. Select the option relevant to the current charge (requires security rights).

Options Include:
Not Exempt
Tax Exempt
Service Charge (SC) Exempt
- Tax & Service Charge (SC) Exempt
...
| Anchor | ||||
|---|---|---|---|---|
|
Coupon Lookup
The Coupon Lookup works in conjunction with Member Marketing and Item Price Scheduling.
Please see our Coupons manual for more information on their setup.
1) Place the order, and click on Coupon Lookup.

2) The screen will display all available coupons for redemption. Touch or click the one you want.

Note: If the member does not have any active coupons the button will be grayed out.
If a coupon has been applied to an item and you wish to remove the discount, click or touch the Remove Coupon button.
| Anchor | ||||
|---|---|---|---|---|
|
Print Ticket
Print Ticket is used when you want to print a receipt before closing a ticket. This will print out the Pay Ticket when selected. Most often used to acquire a signature prior to closing the ticket.
1) In POS ordering screen, select Print Ticket to print out the Pay Ticket.

2) Select Exit when finished.
Notes:
Use Print Ticket to give the customer information on the charges and to get a signature before closing the ticket.
The Pay Receipt can be modified to display discounts, service charge, additional tip, and taxes in a few different formats.
You also have the option to have messages, minimum balances, store credit balances, and other information included on the pay receipt.
See Office - POS Retail Manual as an alternative to Printing directly.
...
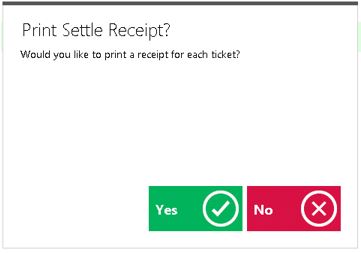
Upon clicking the button, a prompt will display telling the user that one ticket is assigned to guest members and cannot be member charged. The 3 remaining open tickets assigned to members however, will be settled to Member Charge. Select Yes.
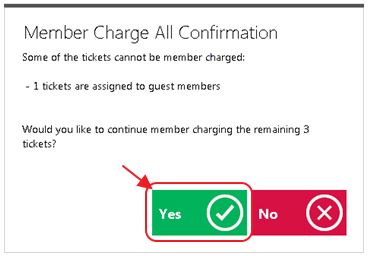
Option will exist to Print a receipt.
Member charge will commence.
...
2) The Add Preference Category box will appear, enter the new Category name, and select OK when finished.

Member History
Member History will the list the member’s previously purchased Items.
To access Member History, select History in the top left corner of the POS Screen.
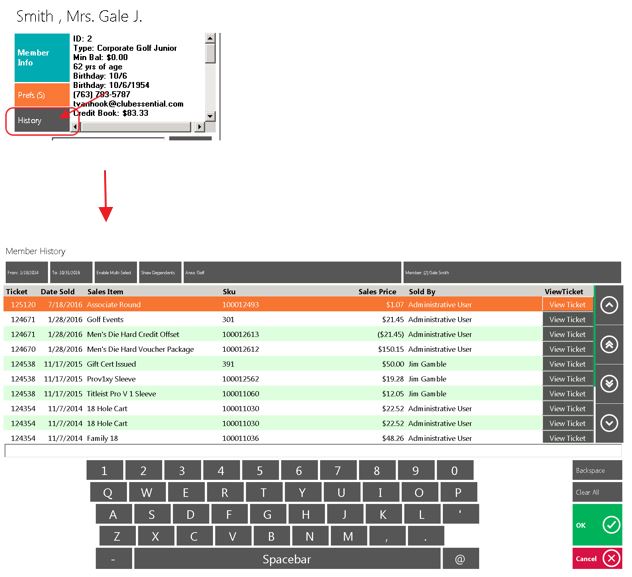
Notes:
- In the Search box you can search the name of the item to narrow down the search.
...
From and To Dates - enter the start and end date to narrow down the search.
Enable Multi Select more than one ticket to print.
Show Dependents - if selected, the system will display all family member tickets. If unselected, only the tickets rung under the member selected will show.
Area name will be the name of the Area you have the ticket open.
The tickets listed will be tickets that were closed in that Area only.
To see tickets closed from a different Area, select the Area button, select the applicable Area.
It is important to remember that if you do not see an Area listed, then the member has NO closed tickets in that Area.
Member Name and Number is displayed at top right corner; you can click on the name to search a different member. When you hit cancel it will take you back to the ordering screen and the original member will still be displayed.

View Ticket - ticket detail can be viewed on the right middle of the screen; highlight the item to view ticket details and select View Ticket.
Print Settle Receipt and Print Pay Receipt; you can reprint a ticket from history at any time.
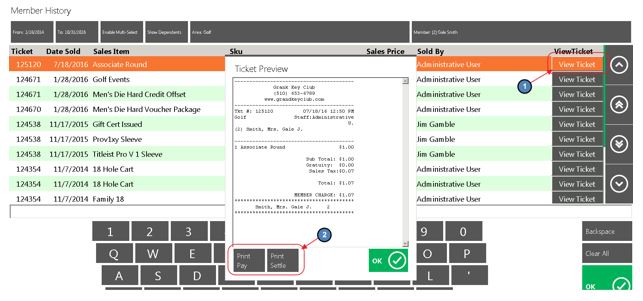
Print Preview
The Print Preview feature allows the user to see a Print Preview before any ticket is printed from the POS system. This Print Preview will display exactly how the ticket will look when printed and exactly what Device/Printer it will print to. Furthermore, the Pay and Settle ticket Print Preview will provide the user the option to email a copy of the ticket to the member as long as the member has a valid email address on file.
...
3) Navigate to the POS Options tab and select Show Print Preview on Pay/Settle in POS to get the Pay/Settle ticket preview, and Show Print Preview on Send in POS to get the Send ticket preview.

Print Preview Examples
In this section we will provide a few examples of the Print Preview feature.
...
- Select Print Ticket from the Close Ticket screen.

- The Print Preview - Pay Ticket prompt will display. Please see below for available options:
a) Email - Emails a copy of the ticket to the member. Member must have valid email address on file to function properly.
b) Print & Email - Prints the ticket and emails the member a copy of the ticket.
c) Print - Prints the ticket.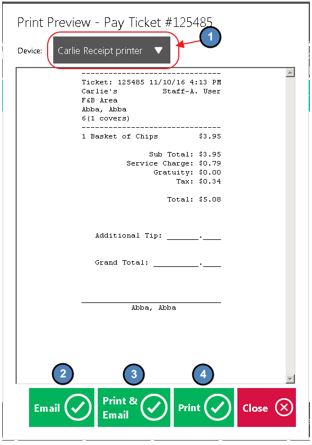
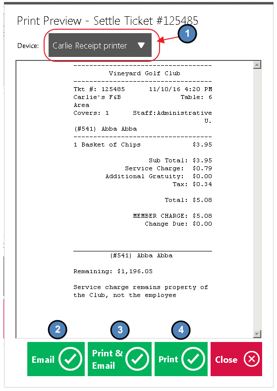
- Select Print Ticket from the Close Ticket screen.
...
2) The Print Preview - Settle Ticket prompt will display. Same options as Print Preview - Pay Ticket are available.
Returning an Item
To return an Item,
...
Credit Book – To issue store credit to the customer, the user would simply select the Credit Book settlement button and hit OK / Print and Done. In the image below you will see where credit book was issued to the customer in the amount of the returned Item. The customer may apply this credit towards future purchases.

Rain Checks
To utilize the rain check feature you must first create two Items; an Item to Issue a rain check and an Item to Redeem a rain check. These items are set up like any other Item in the Manage Items section of the Items Module. (See the Clubessential Items Manual for instructions on how to create an item) Then, you must select these items in the Rain Check Settings of System Settings and enter a default expiration day count.
...
b) Create Tickets - If you would like to open the tickets so that you may add additional items separately and close each ticket out individually, you will click Create Tickets. A ticket for each member selected will appear in the open tickets screen. Click to access the individual tickets and close each ticket as you wish.

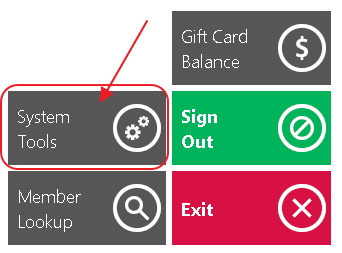
System Tools
Please see our POS System Tools manual for in-depth information regarding functionality contained within the System Tools button and associated tabs.
Employee Time Keeping Actions
...
Select Clock Out and hit Done.

Notes:
- Again, either of these options will clock the user out but NOT end their shift. Meaning that the employee can clock back in and continue working on the same shift.
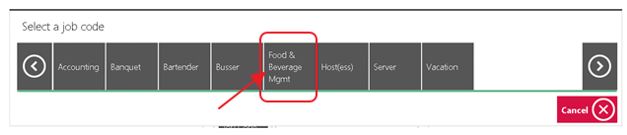
- When clocking back in after a break it is important to remember to clock-in under the SAME Job Code that started the Shift. For instance, if I began my shift under the Food & Beverage Management Job Code and I clocked out for lunch, when I clock back in I need to select the Food & Beverage Job Code again for timekeeping to report properly.
End of Shift Processes
Before an employee ends their shift, the Tickets screen must be blank reflecting that the employee has no open tickets. Close all tickets before proceeding.

End of Shift Report
Once the Tickets display is blank reflecting no open tickets, an End of Shift Report can be printed. This report can be printed as many times as the user wants at any time. In addition, the system also keeps an archive of past End of Shift reports for the user to access and print at any time.
...
4) Clock Out - explained in the Clocking-Out for Breaks section of this document.
5) End Shift - this is the last step needed before the shift is considered ended. As previously mentioned, Clock Out will automatically select itself when End Shift is selected.
Other Ways to End a Shift
...