| Table of Contents | ||||||||||
|---|---|---|---|---|---|---|---|---|---|---|
|
...
Note: If you have more than one item to delete follow the Multi-Select (On) instructions.
Change Qty
...
Note: If you have more than one item to delete follow the Multi-Select (On) instructions.
Comp Item
Give users the ability to comp an item. Requires security rights.
...
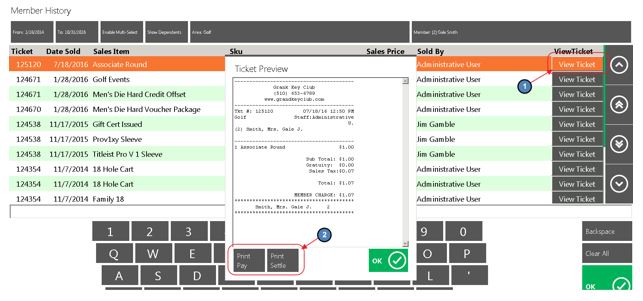
From and To Dates - enter the start and end date to narrow down the search.
Enable Multi Select more than one ticket to print.
Show Dependents - if selected, the system will display all family member tickets. If unselected, only the tickets rung under the member selected will show.
Area name will be the name of the Area you have the ticket open.
The tickets listed will be tickets that were closed in that Area only.
To see tickets closed from a different Area, select the Area button, select the applicable Area.
It is important to remember that if you do not see an Area listed, then the member has NO closed tickets in that Area.
Member Name and Number is displayed at top right corner; you can click on the name to search a different member. When you hit cancel it will take you back to the ordering screen and the original member will still be displayed.

View Ticket - ticket detail can be viewed on the right middle of the screen; highlight the item to view ticket details and select View Ticket.
Print Settle Receipt and Print Pay Receipt; you can reprint a ticket from history at any time.
...
- Select Print Ticket from the Close Ticket screen.

- The Print Preview - Pay Ticket prompt will display. Please see below for available options:
a) Email - Emails a copy of the ticket to the member. Member must have valid email address on file to function properly.
b) Print & Email - Prints the ticket and emails the member a copy of the ticket.
c) Print - Prints the ticket.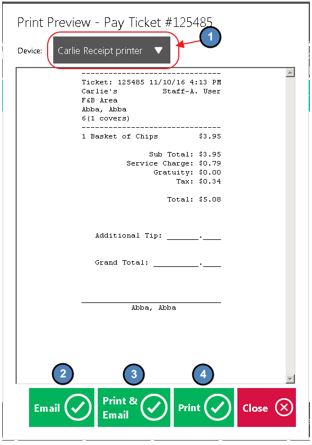
...
Clocking- Out and Ending a Shift have a few differences in the Office system. Clocking- Out simply stops the system from recording time on the employee’s timesheet. When an employee ends their shift, the system is prompted to stop recording sales under the employee, until the employee clocks back in. It is important to remember that an employee cannot end their shift without clocking out as well. When an employee clocks back in for the first time after their last End of Shift, this is when the employee’s next “Shift” begins. During this time, employees have the ability to Clock-out without ending their shift at any time. This is mostly used to allow employees to clock-out for breaks, lunches, etc. without ending their shift. This keeps reporting and timekeeping clean as the End of Shift Report will display all sales and transactions completed during the employee’s “Shift” regardless of how many times they clocked out during their shift. Furthermore, an employee’s timesheet will reflect all instances of when an employee clocked in and out during their shift.
Clocking-Out for Breaks
As previously mentioned, employees have the ability to clock-out for breaks without ending their shift. However, before an employee can clock-out the Tickets screen must be blank reflecting that the employee has no open tickets.
...
4) Clock Out - explained in the Clocking-Out for Breaks section of this document.
...