...
Note: If you have more than one item to delete follow the Multi-Select (On) instructions.
| Anchor | ||||
|---|---|---|---|---|
|
...
Note: If you have more than one item to delete follow the Multi-Select (On) instructions.
| Anchor | ||||
|---|---|---|---|---|
|
...
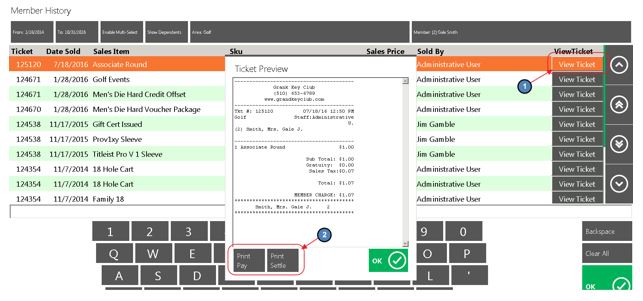
From and To Dates - enter the start and end date to narrow down the search.
Enable Multi Select more than one ticket to print.
Show Dependents - if selected, the system will display all family member tickets. If unselected, only the tickets rung under the member selected will show.
Area name will be the name of the Area you have the ticket open.
The tickets listed will be tickets that were closed in that Area only.
To see tickets closed from a different Area, select the Area button, select the applicable Area.
It is important to remember that if you do not see an Area listed, then the member has NO closed tickets in that Area.
Member Name and Number is displayed at top right corner; you can click on the name to search a different member. When you hit cancel it will take you back to the ordering screen and the original member will still be displayed.

View Ticket - ticket detail can be viewed on the right middle of the screen; highlight the item to view ticket details and select View Ticket.
Print Settle Receipt and Print Pay Receipt; you can reprint a ticket from history at any time.
...
- Select Print Ticket from the Close Ticket screen.

- The Print Preview - Pay Ticket prompt will display. Please see below for available options:
a) Email - Emails a copy of the ticket to the member. Member must have valid email address on file to function properly.
b) Print & Email - Prints the ticket and emails the member a copy of the ticket.
c) Print - Prints the ticket.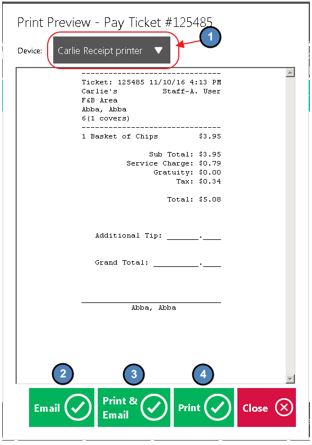
...
3) Most clients place buttons on their POS home screen for the two rain check items. This is optional as you can use the Lookup ItemOffice - POS Retail Manual Feature to look them up when necessary.
...
1) Open a ticket for the customer as you would normally, select the Issue Rain Check button (or look up the Issue Rain Check item using the Lookup ItemOffice - POS Retail Manual feature), the Issue Rain Check Window will display as shown in the image below.
...
1) The user will open a ticket for the customer as usual, click the Redeem Rain Check button (or look up the Redeem Rain Check Item using the Lookup ItemOffice - POS Retail Manual feature). The Redeem Rain Check window will open and any rain checks that have been issued will display as shown below. Select the Rain Check being redeemed and then click OK.
...
4) Clock Out - explained in the Clocking-Out for Breaks section of this document.
...