...
| Table of Contents | ||||||||
|---|---|---|---|---|---|---|---|---|
|
Overview
Although Area Groups are set up during Implementation, it is good to have an understanding of their functionality. Primarily, Area Groups are used to group Areas for POS Batch Reporting purposes. This keeps POS Batch Reporting clean and easy to track. For instance, by creating a Food & Beverage Area Group that is linked to all F&B Areas, the user will only have one batch to post at the end of the day, rather than numerous batches. As you will see, the Area Group shows as the Batch Location within Approved Charge Batches. Furthermore, Area Groups are also applied within Credit Book Types. This tells the system which Areas Credit Book can be redeemed at the POS. Please see our Credit Book manual for more information on Credit Book Types. Most Clubs will have a Food & Beverage Area Group along with a separate Area Group for each of their Retail Areas. This helps the client separate out Credit Book if they want separate Credit Book Types for each Area. Use Case A Club set up a Food & Beverage Area, a Golf Shop Area, and a Courts Area when they originally went live a few years ago. Since then, they have opened a Spa, and due to the nature of the change, decided to set up a new Area Group for the Spa. |
...
Accessing the Tool
To access Area Groups,
...
1
...
Voucher Item (Redeemed) - Single Item of the Package redeemed (Example: (1) 1-hour lesson; Retail Price is $80.00)
...
Credit Item - Offset to the Redeemed Item (Example: (1) Lesson Credit; Retail Price is ($80.00)
When Member purchases initial package, Member pays $800.00 up front for the Voucher (Package) Item.
When Member takes their first lesson, Member pays $0.00, and (1) Voucher is used. Voucher Item (Redeemed) $80 + Credit Item ($80) = $0 due at time of lesson.
Key point to remember during the setup:
Once a voucher is sold, changes to the voucher setup will not affect vouchers previously sold. Only vouchers sold after that change will contain the new setup.
Accessing the Tool
Prior to building the Voucher (Package) Item, the Credit Item and the Voucher Item(s) (Redeemed) must exist, as they are utilized in the Voucher (Package) Item setup.
Navigate to Items, Manage Items, and click New to create or Edit to use existing Items in the process documented below.
Credit Item Setup
First, create the Credit Item. Create Credit Item as regular POS item; however, set the Price to $0.00.
Set the Item Category to the same Category as the Voucher Items (Redeemed) to ensure the default GL and Tax Codes match.
It is appropriate to click the Don’t Display at POS because this Item will be automatically attached, and not sold individually.
When finished, click Save and Close.
Voucher Item(s) (Redeemed) Setup
Next, create the Voucher Item(s) (Redeemed). Create Voucher Item(s) that will be redeemed as regular POS item(s).
In instances where a (1) hour lesson or (2) ½ hour lessons would equate to (1) unit of the Voucher, ensure Items exist for both the 1 hour lesson, and the ½ hour lesson.
Enter a Name, Price and Category. Category needs to match Voucher Credit Category.
Additionally, Button Options may be saved so that the Item is available on the POS screen.
When complete, click Save and Close.
Voucher (Package) Item Setup
Finally, create the Voucher (Package) Item. Create Voucher (Package) Item as regular POS item; however, set the Price to the total amount of the Package.
In this example, a 10 pack of lessons costs $800.00.
Enter a Name, Price and Category. Again, Category should match other Items created.
Then, click on the Voucher tab for the Item.
Designate the Item as a Voucher. Indicate whether the Voucher can be utilized by Family Members.
Indicate the number of vouchers or quantity that will be included in this Voucher package. Designate the Credit Item (previously set up).
Enter an Expiration, either based on a specific date, or based on number of days from purchase.
Next, attach the Voucher Items (Redeemed) that were also previously built. To do, click the New button.
Select the Voucher Item (Redeemed), enter price, and quantity assigned. Then, click Save and Close.
Attach additional Items as necessary by repeating the above.
For example, setup for a ½ hour lesson could look as follows.
Once attached, Voucher Items will be listed in the Voucher grid.
Additionally, Button Options may be saved so that the Voucher Package Item is available on the POS screen.
When complete, click Save and Close.
POS - Voucher Sale and Redemption
Voucher Sale
Within the Point of Sale System, once a new transaction has been started and a Member has been selected, a Voucher (Package) may be selected for purchase.
Depending on setup, buttons may appear in various places.
In this example, selecting the Lesson/Fitting Group Button provides a list of additional options where the Voucher (Package) Item is included.
The Voucher Package Item - 10 Pack 1 hr Golf Lessons has its own button and is the item initially sold for future redemption. In this example, the 10 pack retails for $800.00.
Once selected, the Item is added to the ticket, and the ticket can then be closed based on Member payment preference.
Voucher Redemption
When the Member redeems their first lesson, a separate button (for the Voucher Item (Redeemed)), is selected.
When the Item is selected, the system automatically provides a prompt/alert that the Member has an existing Voucher for the item, and asks for permission to use the Voucher.
Click Yes to use voucher, and add Item to ticket.
Note that the 1 Hour Lesson, as well as an equal credit for the item, is displayed in the ticket, and therefore, the resulting charge is $0.
After closing out the ticket, the system will automatically deduct (1) voucher from the original quantity purchased(10), leaving (9) available for future use.
Upon next visit, the prompt/alert will again appear, and will reflect that (1) voucher has been utilized, leaving (9) available for use.
If Member would like the Item, but would not like to use a Voucher for this lesson and instead would like to purchase the lesson outright, click No to add item to ticket, without using a voucher.
Close ticket based on Member payment preferences.
Best Practices
Ensure the Categories for the Voucher Package Item, Voucher Item (Redeemed), and Voucher Credit are set to the same Category.
Generate POS buttons and placement that makes finding Voucher Packages as well as Voucher Items easy to find. Use same color to tie related Items together.
FAQs
Q. When is Revenue recognized in the system?
A. Revenue is recognized either at the time of sale of the original Voucher, or when the Voucher Item is redeemed, depending on Club setup.
Q. What if I add a new Voucher Item to the Voucher Package after initial setup and sale?
A. Only Vouchers sold after the change, would reflect the additional item. For example, if a Voucher was originally set up to only include a ½ hour lesson (in exchange fo .5 voucher), or an hour lesson (in exchange for 1 Voucher), but later was adjusted to also include a 15 minute lesson (in exchange for .25 Voucher), Members purchasing the voucher prior to the 15 minute lesson being added would be required to pay for a 15 minute lesson, rather than exchanging it for .25 Voucher. Members purchasing the Voucher after the change, would be able to exchange .25 Voucher for a 15 minute lesson.
Downloadable Guide
...
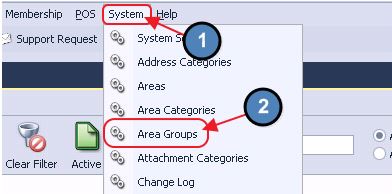
) Navigate to System across the top toolbar and select Area Groups.
2) The Area Groups Grid will launch.
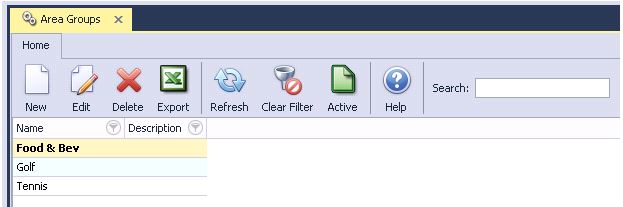
3) The primary functions associated with managing Area Groups are embedded in the Member Type setup screen, which can be accessed by double-clicking on an existing Group, or clicking the New button.
Creating a New Area Group
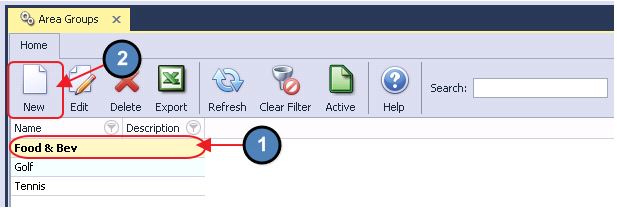
1) Navigate to the Area Groups Grid and perform either of the following to launch the Area Group setup screen:
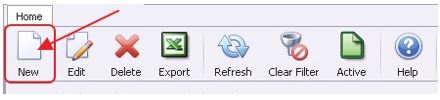
a) Click the New icon on the toolbar.
b) Right-click anywhere on the Member Types Grid and select New.
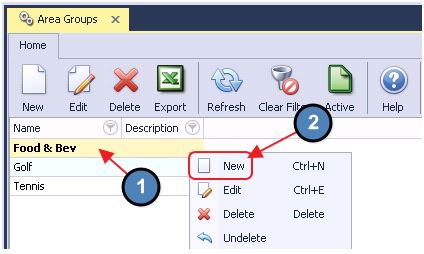
2) The Area Groups setup screen will launch.
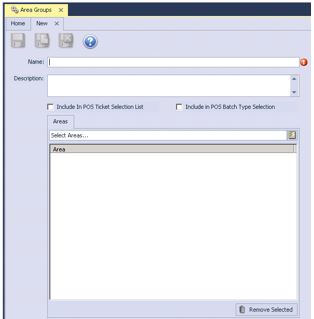
General Information
To set up an Area Group, begin by entering the following info/settings:
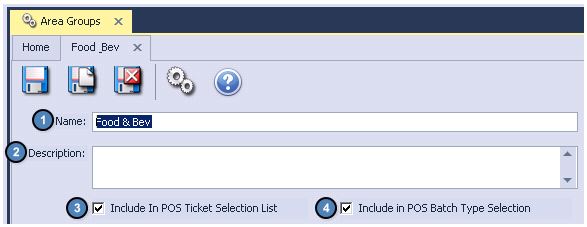
1) Name - Give the Area Group a name.
2) Description - An optional description can be added to the Area Group for internal purposes.
3) Include in POS Ticket Selection List - Must be checked for tickets completed through the Areas selected in the Area Group to show within the Open Tickets, and Closed Tickets section of System Tools in the POS.
4) Include in POS Batch Type Selection - Must be checked for the Area Group to group transactions completed through the Areas selected in the Area Group into one batch.
Areas
To Add Areas to the Area Group:

1) Click the Lookup Value.
2) Select the Areas that should be included in the Area Group.
3) When the appropriate Areas are selected, click Select at the bottom of the lookup value.
4) Selected Areas will then show within the Areas section.
To Remove an Area from the Area Group:
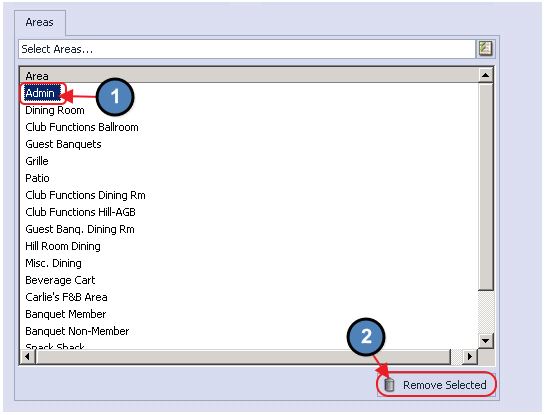
1) Highlight the Area from the selected Areas section.
2) Select Remove Selected.
Save & Close
When finished, click Save & Close.
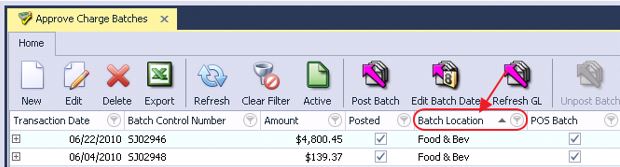
Approved Charge Batches
As mentioned, Area Groups are used to group POS transactions from multiple Areas into a single batch. For instance, if an Area Group titled Food & Bev has all F&B Areas selected within it, all POS transactions completed within F&B Areas will group into one batch for the day. The Area Group will show as the Batch Location within Approved Charge Batches.
Best Practices
When determining whether or not to set up a new Area Group, determine whether a new Group is required to perform reconciliations easier, to allow better flow for Management review of transactions, and/or to enable a separate Credit Book from being established. If these answers are yes, it is likely that a new Area Group should be established.
FAQs
Q. Can I consolidate Area Groups?
A. As long as the area is uniquely assigned to an Area Group, Areas may be re-assigned and/or consolidated to a different Group Area in an effort to accommodate Management or other Club changes since the original implementation.
Downloadable Guide