...
| Table of Contents | ||||||||||
|---|---|---|---|---|---|---|---|---|---|---|
|
Overview
The Manage Credit Memo tool allows users to access, manage, create, and delete Vendor credit memos. Credit Memos are used to adjust the cost and quantity of inventoried items when credit is issued from the vendor for returns. Credit Memos are added to Vendor Invoice Batches and are available to apply against invoices for payment once the Vendor Invoice Batch containing the Credit Memo has been postedIn this guide we will discuss how to Pay Bills, Print Checks, and Void Checks in the Accounts Payable module of the system. Use Case(s) Goods received in the Pro Shop were paid for; however, after further review the goods were determined to be faulty, and were returned to the Vendor. The Vendor issued a Credit Memo for the returned goods, which will be applied to the Vendor’s account, and will offset future amounts owed to the Vendor. Clubs use the Accounts Payable module to enter invoices from Vendors according to their agreed upon Payment Terms. When the invoices are due, the Club selects the invoices to pay, and prints checks to send to the Vendors. Once in awhile a check won’t make it to a vendor, and a Club will need to reissue payment. The Club will void the original check, and re-issue one. |
Content
|
|---|
...
Pay Bills
To access the Manage Vendor Invoices Screen:
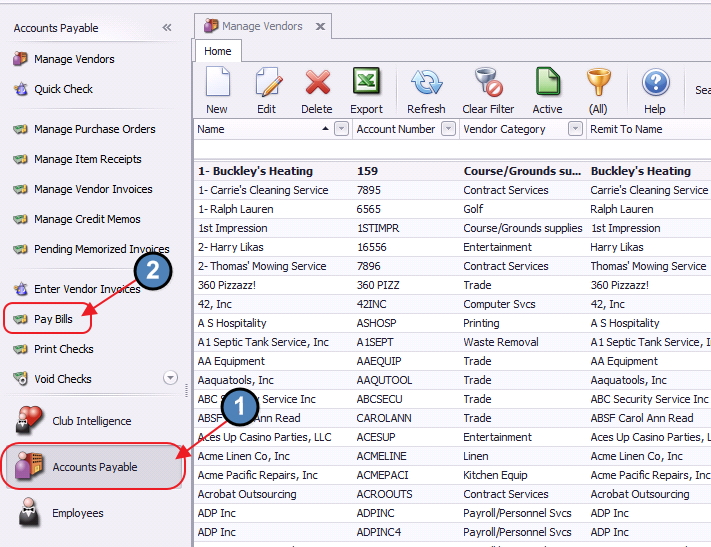
Click on Accounts Payable
Then, click Manage Credit Memos
Entering Credit Memos
To enter a Credit Memo:
Click the New icon on the Manage Credit Memo Screen.

The Lookup Value screen will appear to assist with locating a specific batch, amount, or other filter as specified, or to begin a new batch.
Click the Quick Add button, or to add a credit memo to an existing batch, select the batch from the list by double-clicking on it.
The Credit Memo entry screen will load.
Select the Vendor. Start typing the name of the vendor or click on the Lookup icon to launch the Lookup screen.
Once Vendor appears in the list, select the Vendor to populate the Vendor field by double-clicking on it.
Once Vendor is populated, complete Credit Memo screen by selecting the Contact (if applicable), populating the Credit Memo Number (usually provided by Vendor), and entering the Credit Memo Date.
Then, create a line on the Credit Memo to apply the Credit Memo appropriately.
Select Item, when an inventoriable item has been returned to a Vendor.
Use a Comment line to enter additional verbiage as desired.
Use Account when receiving credit for a non-inventoriable good or service.
For Item type, select the Item returned to Vendor in the Name field.
For Account type, populate the Name field with the G/L account to apply the Credit Memo amount.
More than one account line may be added if necessary, and amount on each line may be adjusted accordingly.
Next, complete the remaining fields of the Credit Memo.
For Item type, Description field will auto-populate with Item Description.
Enter Quantity and Amount fields as positive. Total field will calculate.
Memo and Reference fields may be completed if desired.
For Account type, Description will auto-populate with name of G/L account selected.
Leave Quantity field at 1, and enter total amount to credit in the Amount field. Total will populate.
For Comment line(s), enter Comment in the Description field.
When complete, click Save and Close.
Posting Credit Memo Batch
Just like Invoices, Credit Memo batches (or the batch containing the credit memo) may be posted via the Approve Vendor Invoice Batches tool.
Click Accounts Payable, and then select Approve Vendor Invoice Batches.
Select Batch to post by highlighting the batch, and clicking edit, or simply double-click on the batch.
Batch Report will launch. Review Batch Report, and when appropriate, Post Batch.
Once the Invoice batch is posted, the Credit Memo will display in the Pay bills screen to be applied to Invoices for payment.
To access, click Accounts Payable and then click Pay Bills.
Credit Memos will display as negative amounts in this screen.
Editing Credit Memos
Credit Memos cannot be changed once they have been saved. Corrections would be made using a Vendor Invoice and an Inventory Adjustment.
They may, however, be deleted and re-entered prior to posting.
Deleting Credit Memos
To delete a Credit Memo prior to posting, click on Accounts Payable, Manage Credit Memos.
Next, highlight the Credit Memo, and click Delete.
To delete an entire batch containing the Credit Memo, click Accounts Payable, and then click Approve Vendor Invoice Batches.
Highlight the desired batch to delete, and then click Delete.
Confirm deletion by clicking Yes.
Acknowledge successful operation by clicking OK.
Close Window.
Best Practices
It is recommended that all non-inventoriable credit memos be entered as negative invoices through the Enter Vendor Invoices screen.
FAQs
Q. Do I enter a Credit Memo as a Negative or a Positive Amount?
A. Enter all credit memos using positive amounts and quantities. The system will adjust it appropriately.
Q. How do I edit a Credit Memopay Vendors where invoices and credit memos are selected for payment,
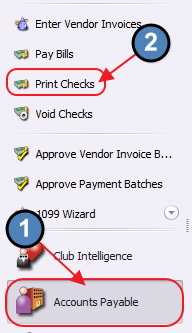
1) Select Accounts Payable from the user menu and choose Pay Bills.
2) The Pay Bills screen will launch.
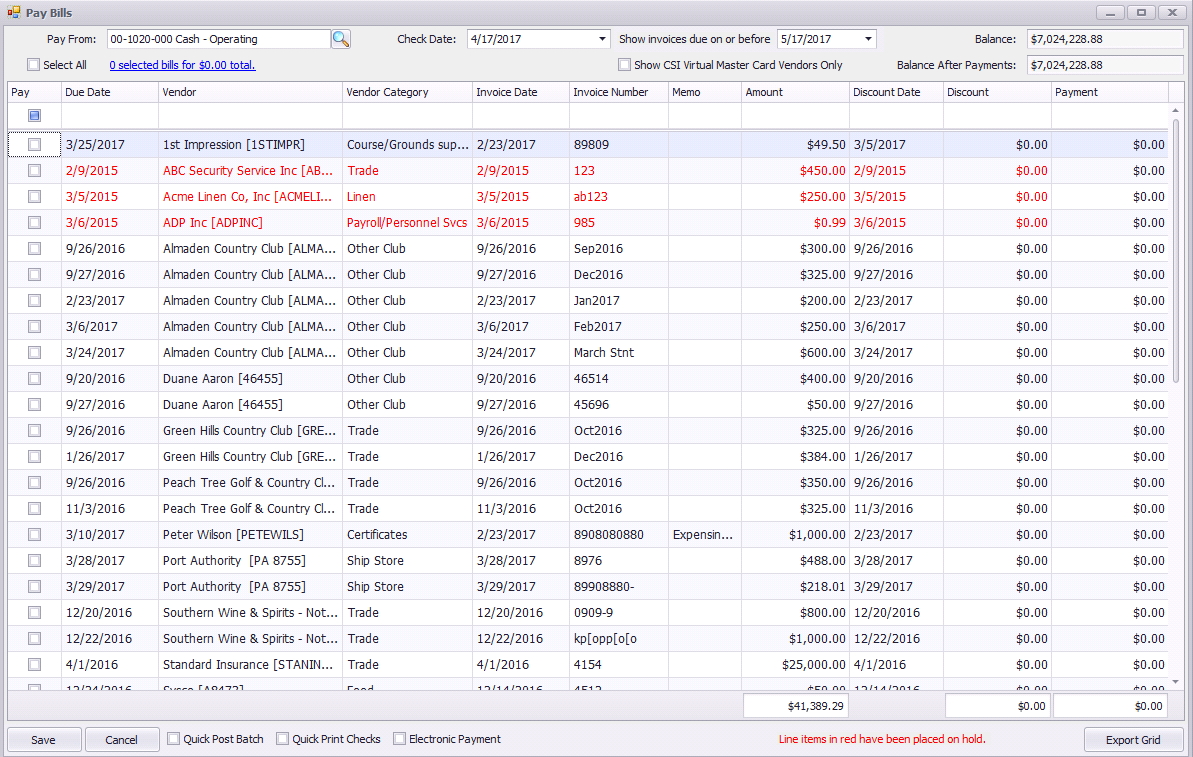
3) Use the filters and drop down menus below to help specify the invoices and credit memos to pay.
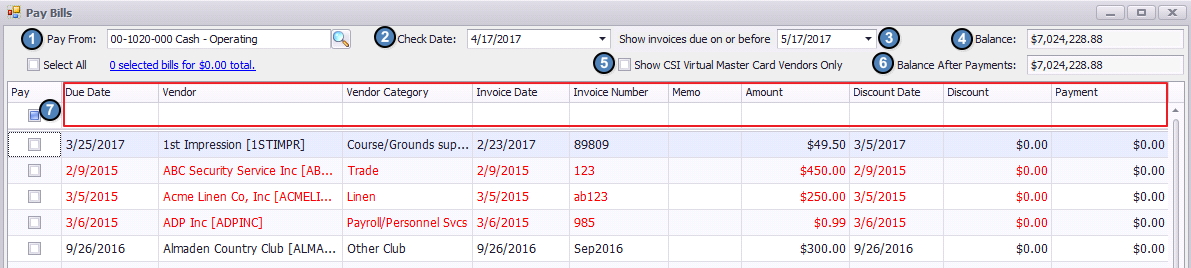
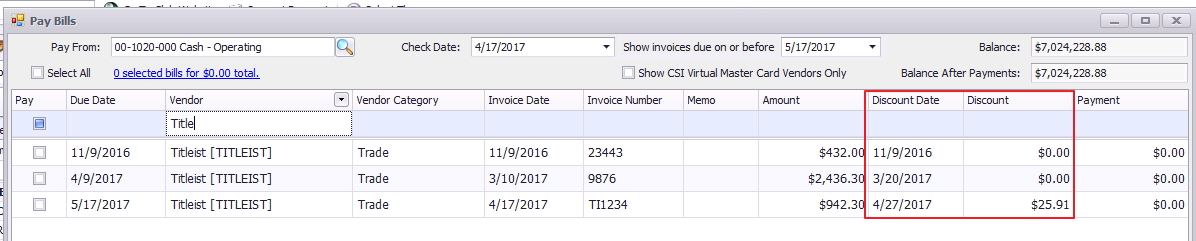
(1) Pay From - Select the Bank Account that checks are to be written from.
(2) Check Date - The date entered here will be the date the checks are created, and the transaction date for the batch (will post to General Ledger on this date). Note: Invoices cannot be paid Prior to their Invoice Date. Only invoices with a date on or before the Check Date will show.
(3) Show Invoices Due ON or Before - Defaults to current date. Only invoices and credit memos with a Due Date on or before this date will show.
(4) Balance - Current balance of the General Ledger Account selected.
(5) Show CSI Virtual Master Card Vendors Only - Only used when CSI Global VCard integration is utilized.
(6) Balance After Payments - Will adjust as invoices are selected.
(7) Auto-Filter Row - Used to select invoices and credits for one particular due date, Vendor, Vendor Category, Invoice Date, Invoice Number, Memo, Amount, Discount Date, Discount, and/or Payment. Type in boxes to auto-filter results returned in grid below.

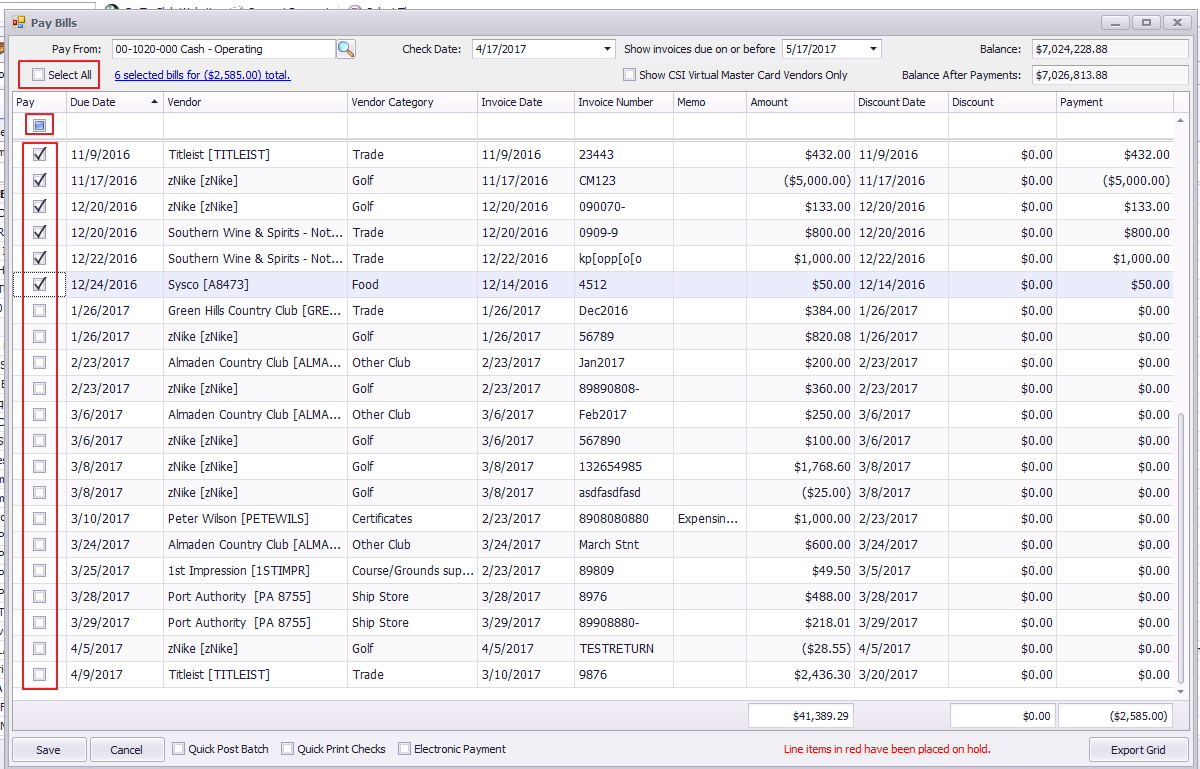
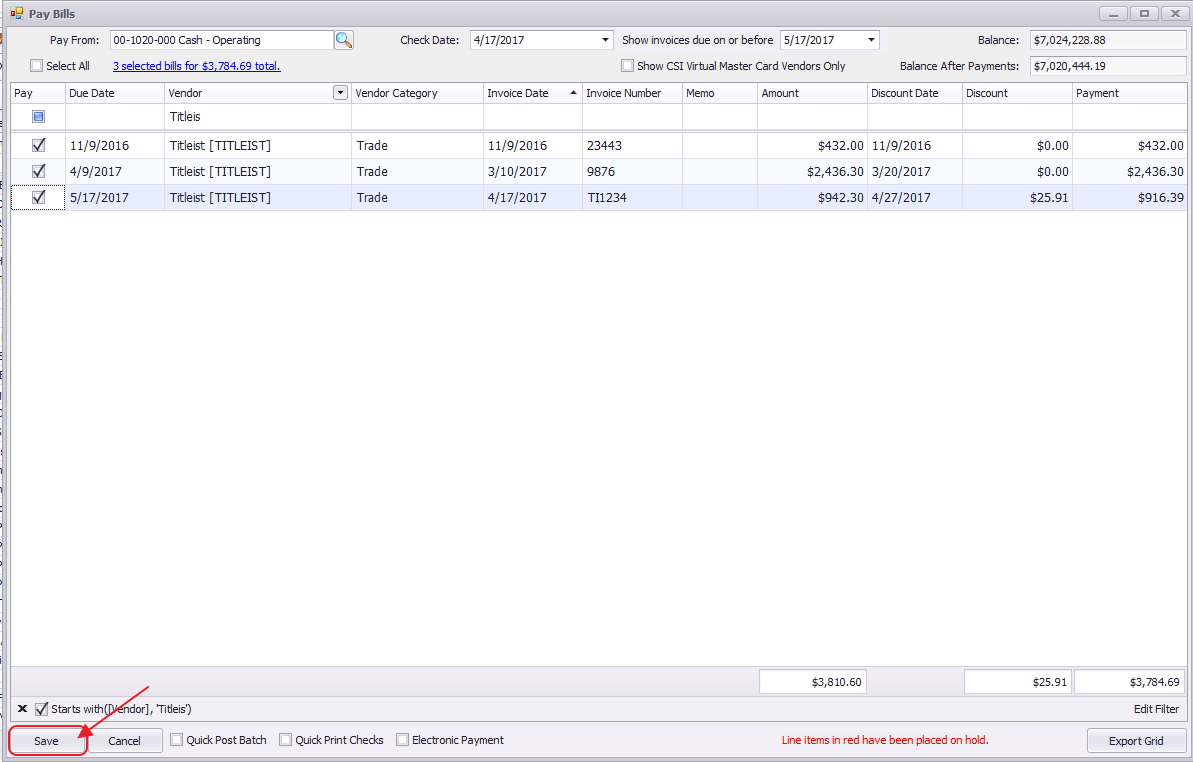
4) Select invoices and credit memos to pay:
Select All - will select all invoices and credits displayed on the Pay Bills grid for payment. Alternately, click the Pay Button in the Auto-Filter box to check all bills showing in the grid for payment.
Pay Column - Check individual invoices and credits.
Discounts
Discounts are calculated automatically by the system based on the payment terms of the invoice. The Discount column will automatically populate if the check date meets the criteria of the discount terms.
Create Payment Batch
Once the appropriate invoices are selected for payment,
1) Select Save and a Payment Batch will be generated.
2) Post the Batch, and close the Post Batch Preview window.
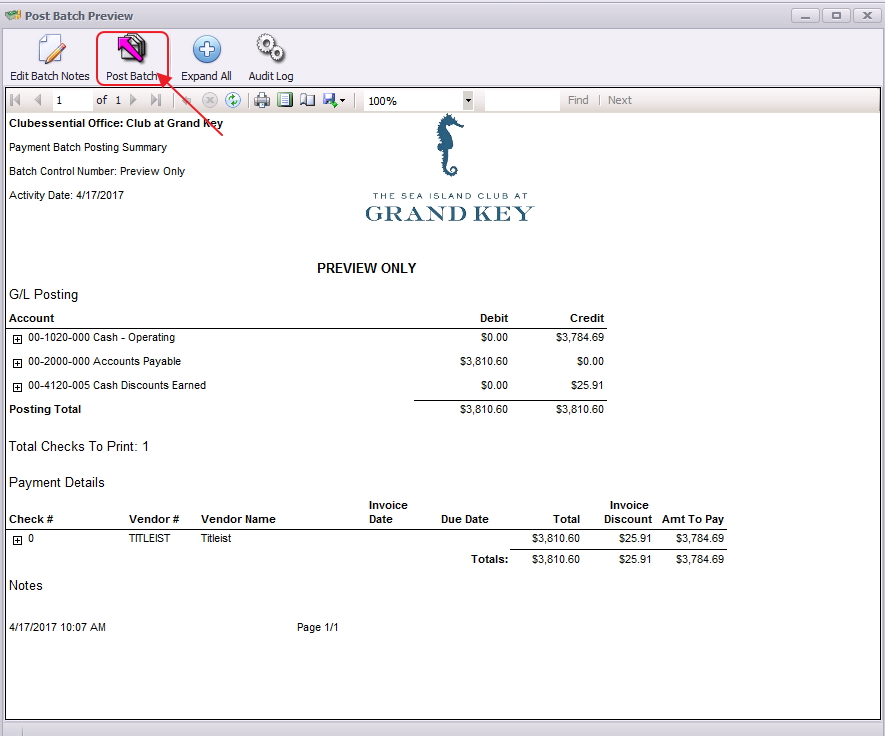
3) The System will prompt, Would you like to print these checks?
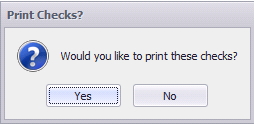
Yes - Print Checks will load.
No - Checks can be printed later via Print Checks.

Other Options
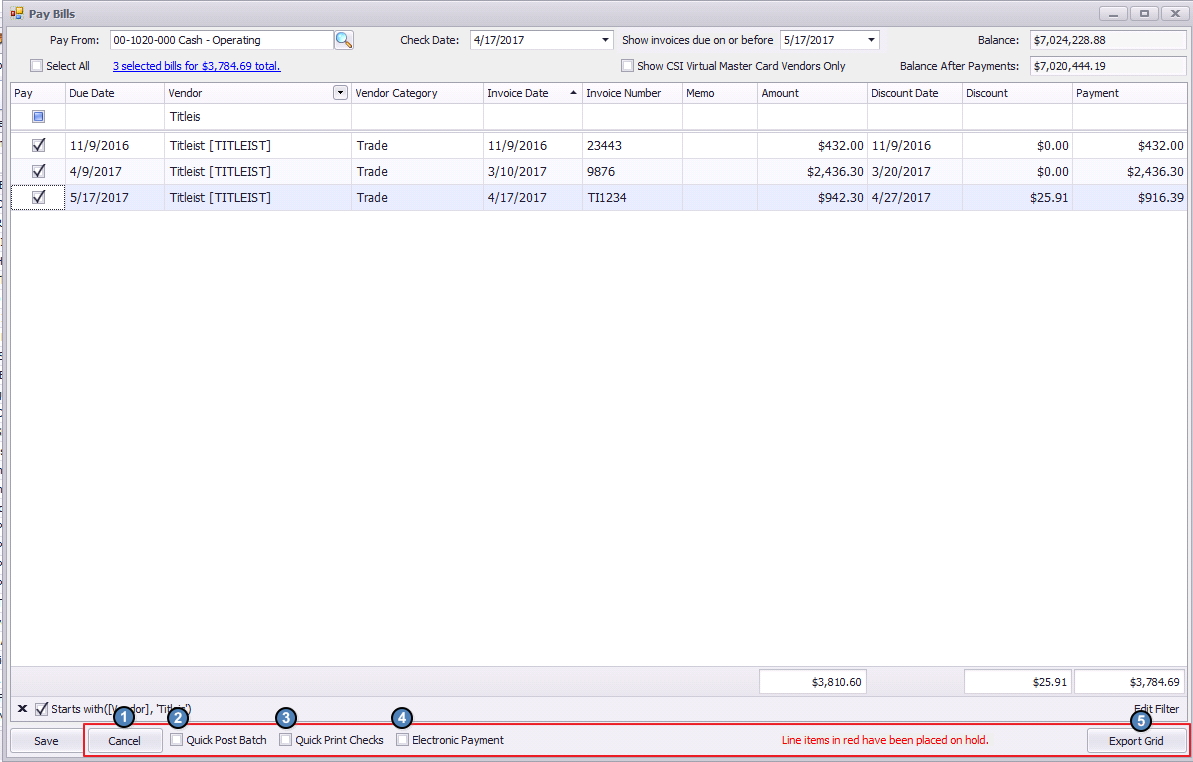
(1) Cancel - Closes the screen and does not create a Payment Batch.
(2) Quick Post Batch - When Save is selected and this box is checked, the system will post the batch immediately. You have the option to Print Checks now or later.
(3) Quick Print Checks - If checked and Save is selected, the system skips the prompts that asks Would you would like to print these checks? Once the batch is posted Print Checks will automatically display.
(4) Electronic Payment - Used for automatically drafted payments (EFT).
(5) Export Grid - Used to export the Pay Bills Grid to Excel.
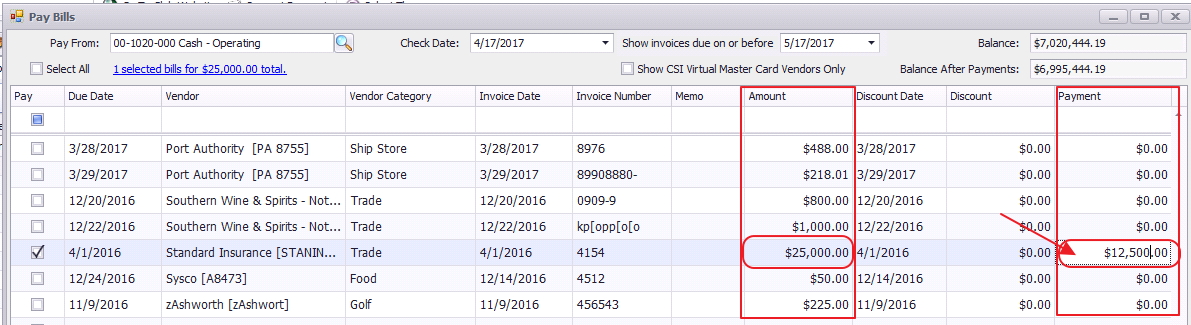
Partial Payments
To make partial payments, first select the invoice. Then, change the Payment amount to the amount you want to pay. The remainder amount of the invoice will display in Pay Bills until it is fully paid.
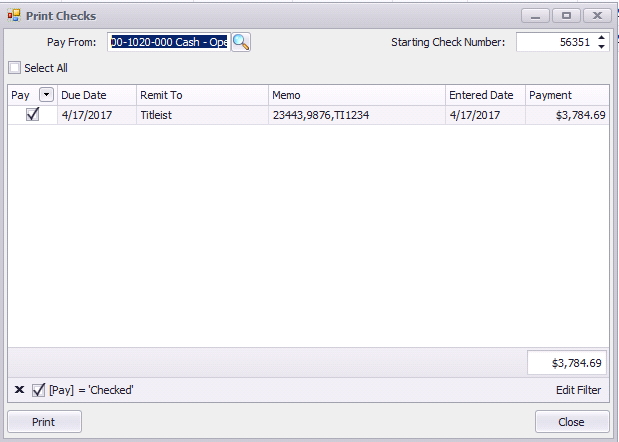
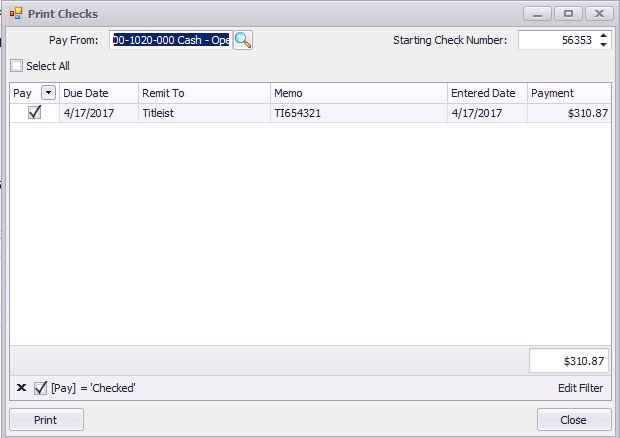
Print Checks
Print Checks allows the user to print checks for invoices that have been selected for payment and were not printed during the Pay Bills process. Print Checks does not create a posting to the General Ledger, rather it just prints checks for the payments already posted, but not printed.
To access Print Checks,
1) Select Accounts Payable from the user menu and choose Print Checks.
2) The Print Checks screen will launch.
Note: This screen will also show when yes is selected on the prompt, “Would you like to print these checks?” in Pay Bills.
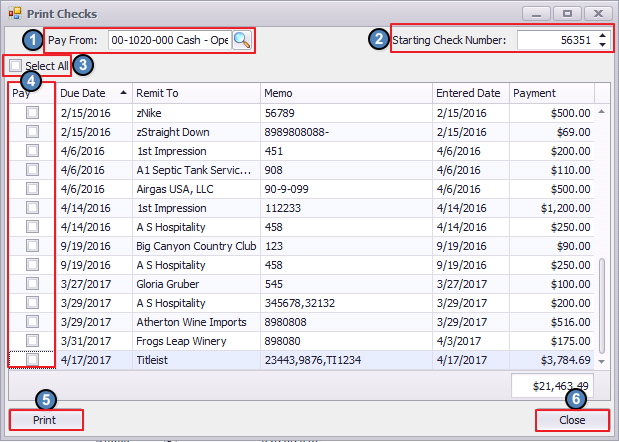
(1) Pay From - Select the bank account from which to issue the payments. Only checks that have been selected in Pay Bills will display.
(2) Starting Check Number - Next system check number (can be changed).
(3) Select All - Selects All checks to print.
(4) Pay Column - Used to select individual checks to print.
(5) Print - After selection, click to print the checks.
(6) Close - Closes screen without printing checks.
3) Confirm check printing.
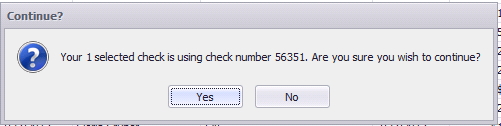
Yes - Click to print Checks. Select printer, and print.
No - Click to close the prompt, and return to the Print Checks screen.
Check Printed Prompt
Verify that the physical checks printed correctly before clicking yes.
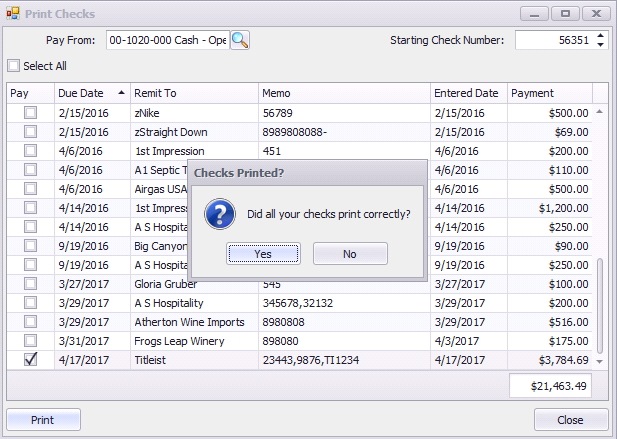
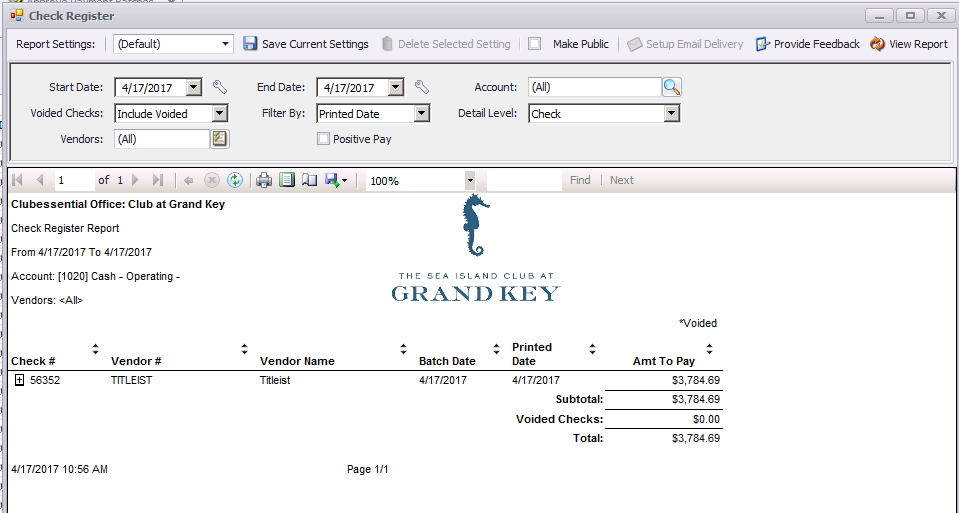
Yes - Click once Checks have printed correctly. Check Register will display.
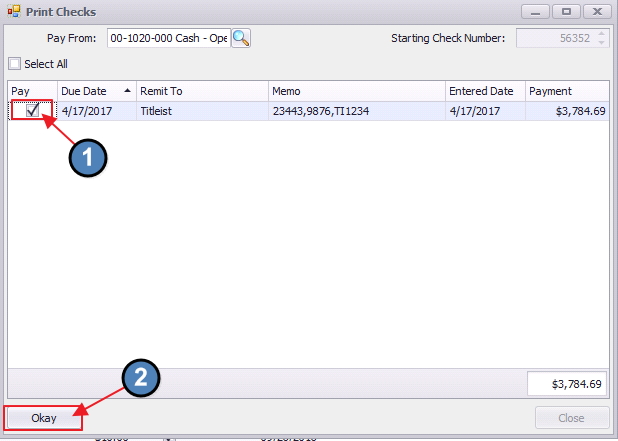
No - Click if one or more checks did not print properly, to prompt the following message. Click OK to acknowledge the message and return to Print Checks screen.
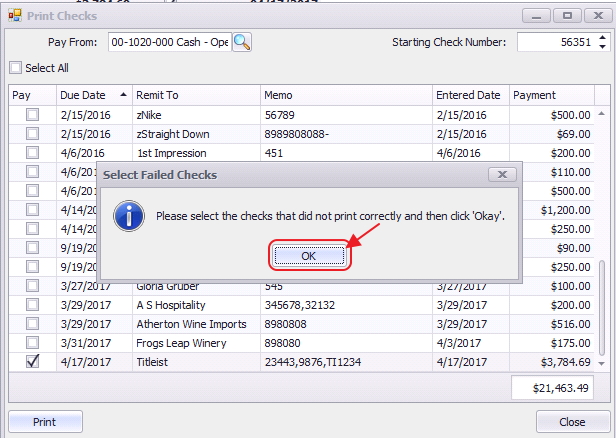
Select check(s) to reprint, and click Okay. The check will then be available for selection in the Print Checks process documented above. Repeat the check selection process until print is successful.
Quick Check
Quick Check allows the user to enter an invoice and print a manual check all in one step.
To access Quick Check,
1) Select Accounts Payable from the user menu and select Quick Check.

2) The Quick Check screen will launch.
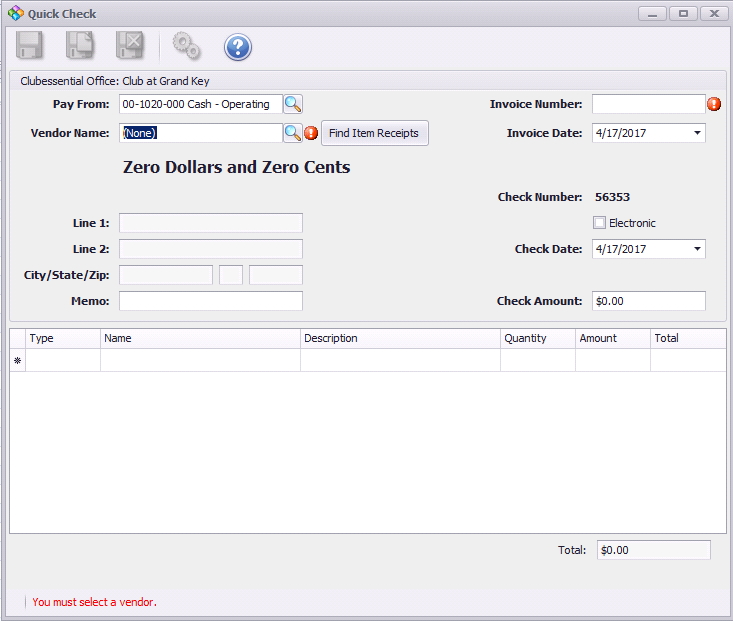
3) Enter the below information:
(1) Pay From - Select the bank account the check will be written from.
(2) Vendor Name - Select the Vendor (Once the Vendor is selected, all address information will populate). (Required Field)
(3) Find Item Receipt - Select to find Item Receipts related to the selected Vendor. Note, if Vendor is selected with open Item Receipts, screen will automatically launch for selection.
(4) Invoice Number - Enter the Invoice number. (Required Field)
(5) Invoice Date - Will default to today’s date. Enter the Invoice date. (Required Field)
(6) Check Number - Defaults to the next check number from the account selected under Pay From.
(7) Electronic - Check if payment is to be made via electronic funds transfer (EFT). If selected Check number will change to 0.
(8) Check Date - Will default to today’s date. Enter Check/Payment date. (Required Field)
(9) Check Amount - Enter total for payment. Must equal line total (total of invoices). (Required Field)
(10) Memo - Notes field, may be printed on check.
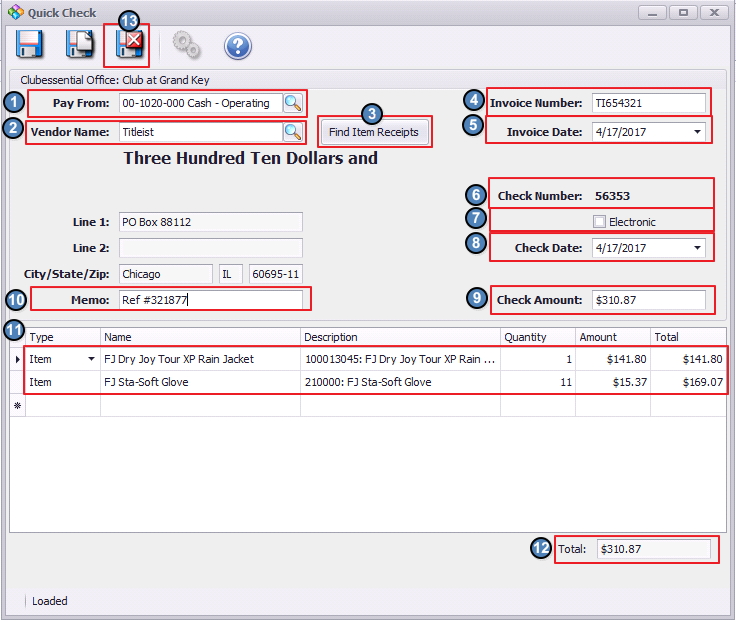
(11) Details of Check - If Item receipt was selected, these should automatically populate. If not, enter info as follows for each line entry.
Type - Select Type of charge to be incurred.
Item - Defaults when creating an invoice using an Item Receipt
Account - Used to select General Ledger Expense Account
Comment - Used to add additional comment line to an invoice (only shows in this screen)
Member - Used to select a Member.
Name - Select the appropriate option based on the Type selected.
When Type is Item - Select the item.
When Type is Account - Select the General Ledger account.
When Type is Comment - Leave blank.
When Type is Member - Select the Member.
Description
When Type is Item - Defaults to the Item SKU: Item Name.
When Type is Account - Defaults to General Ledger account name.
When type is Comment - Type in comment.
Quantity - Will default when using an Item Receipt, otherwise leave at 1.
Amount - Dollar amount for the line.
(12) Total - System will calculate based on Quantity and Amount.
(13) Save & Close - Click when finished.
4) Print Checks screen will launch.
5) Click Print to Print check, or Close to save printing for later. Follow prompts as previously covered in Print Checks section of this guide.
Best Practices
- Use the Auto-Filter row to help identify Invoices to select for Payment.
- Use Quick Check feature to enter invoice and cut a check simultaneously.
FAQs
Q. How do I cut a zero check without wasting a check number?
A. Change the Pay From field to the proper account in the Print Checks screen to reflect the proper account.
Q. How do I change bank account on pending payments in print checks?
A. Credit Memos cannot be changed once they have been saved. Corrections would be made using a Vendor Invoice and an Inventory Adjustment. They may, however, be deleted, and re-entered prior to posting if desired.
Q. If I pay a vendor via ach/wire, how do I enter the invoice and show payment?
A. If you paid an invoice using ach/wire payment so that the money has already been taken out of the bank account, use the Pay Bills option, and choose electronic check. The electronic check option assigns a check number 0 to any invoice that is paid using this option, and doesn't print out a physical check unless you want a copy of it. Go to "pay bills" as if you were going to cut a check for the invoice. Ensure the "pay from" is the same bank account that you used with the ACH payment. Then, find the invoice that you paid using the ACH payment and check the checkbox next to it. Lastly, check the "electronic payment" option at the bottom and click save.
Downloadable Guide
Manage Credit Memos That will bring up the payment batch so that it can be posted and after posting the batch, it will ask if you would like a copy of the check printed. From there you can click "yes" and have it print a copy or "no" and then it will just post the batch. If printing, remember to replace check paper with plain paper to preserve your check stock.
Downloadable Guide
Pay Bills and Print Checks - Guide