...
| Table of Contents | ||||||||
|---|---|---|---|---|---|---|---|---|
|
Overview
In the event a refund check needs to be written for a member, the Office system offers a simple solution to this occurrence similar to billing reciprocal chargesThe Invoice Transfer Wizard is used to transfer posted invoices, from both the POS and Member Charge Wizard, from one member account to another. However, please keep in mind that ONLY invoices settled to Member Charge can be transferred using the Invoice Transfer Wizard. Any other type of settlement CANNOT be transferred between member accounts using this tool. Furthermore, please remember that only invoices within a POSTED batch will show in the Invoice Transfer Wizard. Use Case
|

Content
|
|---|
Setup Member as a Vendor
To properly process a refund check, the member in question will also need to be setup as a Vendor. Please see our Manage Vendors manual for more information on how to setup a new vendor.
Create a Refund Check
Access the Invoice Receipt screen by selecting Accounts Payable from the user menu and choosing Enter Vendor Invoices (the invoice entry screen).
Follow instructions for Standard Invoice Entry. Complete the heading of the Invoice Receipt Screen. Please be sure to select the newly created Vendor.
The Invoice Amount should equal to the amount needed to net the member’s credit balance to zero.
Under Type option, select Member.
Then, in the name section, select the member to be charged. Use the lookup feature for assistance. Once Member is located, double-click to select and populate the Name field.
The Description will default to Vendor Name. It is recommend to add a reference to a refund check in this field. This will display on the member statement, and can be adjusted if necessary. Leave Quantity at the Default. Enter the Amount of the refund, and click, Save and Close.
Click Finish, and proceed to post batch.
The invoice will then need to be paid and printed as normal. Please see our Pay Bills and Print Checks guide for more information.
Post Charge Batch to Member Account
Once the invoice batch has been posted, the system creates a charge batch under Approve Charge Batches in Membership, which is then posted to charge the member’s account. This will net the Balance Due on the member’s account to zero.
Select Membership from the user menu and choose Approve Charge Batches.
A new batch will auto-populate based on the Invoice Batch. Click to select the batch and choose Post Batch.
This will open the batch for review. Select Post Batch after review is complete.
Member Balance
Once the Charge batch is posted, the member will have a net balance of zero on their account.
Best Practices
Use the Manage Members grid and associated filters to review Credit Balances on Member Accounts regularly to ensure timely handling of excess Member funds.
FAQs
Q. How do I set a filter to review Credit Balances for my Members?
A. In Membership, Manage Members grid, ensure the Current Balance column is included in the grid. (If not, right-click, choose customize columns, and add field to the grid.) Then, click the arrow next to Current Balance column, choose Custom, and set filter to return credit amounts.
Downloadable Guide
...
Accessing the Tool
To access the Invoice Transfer Wizard,
1) Navigate to the Membership module on the left user menu and select Invoice Transfer Wizard.

2) The Invoice Transfer Wizard will launch.

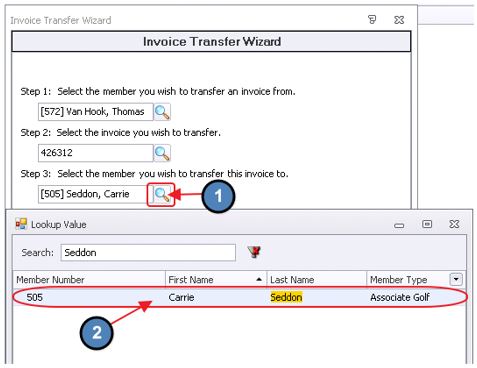
Invoice Transfer Wizard
Once the Invoice Transfer Wizard is launched, please follow the below instructions:
Step 1 - Select the member to transfer the invoice from using the Lookup.

Step 2 - Select the invoice to transfer using the Lookup. Remember, only POSTED invoices will show in this list.

Step 3 - Select the Member to transfer the invoice to using the lookup.
Select Next.

Select Finish (Finished at 100%).
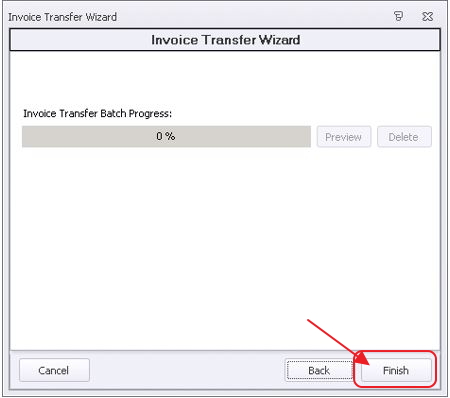
Select Preview and Post the Batch.


AR Activity
Once the batch is posted, a credit is placed on the account the invoice was transferred from to offset the original ticket.

The invoice will then show on the account it was transferred to.

Best Practices
When performing transfers, ensure documentation to support the transfer is saved, and easily accessible in the event of a Member dispute.
FAQs
Q. The invoice I need to transfer is not showing up - now what?
A. Remember that only Invoices in Posted Batches with a settlement type of Member Charge will appear for selection. If the batch is unposted, you can edit the Ticket and/or post the batch, and then perform the transfer.