...
|
|---|
Accessing the Tool
The first step to configuring Minimums is to set up the Minimum. This is where the user configures the rules and frequency to be associated with the Minimum.
To access Minimums,To access Late Fees,
1) Navigate to Membership System across the top toolbar and select Minimums Late Fees.


2) The Minimums The Late Fees Grid will launch.

The 3) The primary functions associated with managing MinimumsLate Fees are embedded in the Minimums Late Fee setup screen, which can be accessed by double-clicking on an existing Minimum (to edit an existing minimums)Fee, or clicking the New button (to create a new minimum).
Minimum Setup - Tab Overview
In this section we will review the various tabs within a Minimum.
General Information
1) Enter the Name and Description of the new Minimum.
2) Select the Billing Item. This is the item that will be charged at Month End for any unspent minimums.
3) Check Prepaid Minimum if members are to be billed their minimum amount in advance.

Schedule

1) Frequency - Select the frequency of the Minimum (Monthly, Quarterly, Semi- Annual, Yearly, or Custom).
2) Amount - Enter the amount of the Minimum.
3) Start Month - Select the month the Minimum will begin.
4) Day Ends - Select the day the Minimum ends. Any unspent Minimum balances as of this day will be billed to the member.
5) Annual Maximum - Specify an annual maximum. If there is not an annual maximum, check No Max.
6) Includes Tax - If any tax charged on minimum eligible items should count toward the Minimum amount, check this box
Includes Service Charge - If any service charge charged on minimum eligible items should count toward the Minimum amount, check this box.
Includes These Item Groups
The Includes These Item Groups tab is where the user will select the Item Groups that will apply toward the Minimum. Furthermore, based on the embedded hierarchy, all Items within these Item Groups will count toward the member’s Minimum balance.
To add Item Groups to the Minimum, select the Item Groups Lookup, click to select the applicable Item Groups from the Lookup value, and choose Select at the bottom of the screen.

To remove an Item Group from the Minimum, highlight the Item Group in question from the selected Groups screen and choose Remove Selected.

Excluding These Areas
The Excluding These Areas tab allows the user to exclude certain Areas from the Minimum. For instance, if the user does not want any transactions completed within the Fitness Area to be counted toward the Minimum, they would select the Fitness Area on this tab.
To add excluded Areas to the Minimum, select the Areas Lookup, click to select the applicable Areas from the Lookup value, and choose Select at the bottom of the screen.

To remove an Excluded Area from the Minimum, highlight the Area from the selected Areas screen and choose Remove Selected.

Custom Scheduling
Minimums can also be applied on a custom basis. For instance, with Custom Scheduling the user can specify which months out of the year the Minimum will apply to their members, or they can specify varying Minimum amounts depending on the month.
To set up a Custom Schedule, first set the Frequency on the Schedule tab to Custom. As evidenced in the below screen shot, when the Frequency is set to Custom, the Start Month and Amount become Null.

Navigate to the Custom Scheduling tab and enter the Minimum amount next to the corresponding month.

Create A New Minimum
To create a new Minimum, navigate to the Minimums Grid and perform either of the following to launch the Minimum setup screen:
1) Click the New icon on the toolbar.
2) Right-click anywhere on the Minimums Grid and select New.

3) The Minimum setup screen will launch.

4) Complete the General Information, and then navigate to each of the below tabs and enter all relevant information. It is recommended to enter information on these tabs in sequential order. Please see the Tab Overview section of this document for further instructions on each tab.
- General Information
- Schedule
- Includes These Item Groups
- Excluding these Areas
- Custom Scheduling (if applicable)
5) Lastly, click Save & Close to complete the setup of the new Minimum.

Minimum Group Setup
Once a new Minimum is created, a corresponding Minimum Group will need to be created as well. A member’s inclusion in a Minimum Group is what applies the Minimum to their account.
To create a new Minimum Group,
1) Navigate to Membership across the top toolbar and select Groups.

2) Then perform either of the following to launch the Member Group setup screen:
a) Click the New icon on the toolbar.
b) Right-click anywhere on the Member Groups Grid and select New.

3) The Member Group setup screen will launch.
4) Enter a Name and Description.
5) Select Minimums from the Group Type Lookup.
6) Because this is a Minimum Group, Tax Exempt and Allow members to join this group online can be ignored.
7) Leave the Group set to Static.
8) When the Group Type is set to Minimums an additional tab will populate also called Minimums.
9) Navigate to this tab and add the corresponding Minimum by selecting the Minimum Lookup. Then, click to select the applicable Minimum from the Lookup value, and choose Select at the bottom of the screen.
10) To add members to the Minimum group perform either of the following below:
a) Navigate to the Members tab with the Minimum Group and select the Member Lookup, click to select the applicable Members from the Lookup value, and choose Select at the bottom of the screen.
b) Navigate to the Groups tab within the member’s profile, select the Member Group Lookup, click to select the applicable Minimum Group from the Lookup value, and choose Select at the bottom of the screen.
11) To remove a member from a Minimum Group, perform either of the following below:
a) Highlight the Member in question from the selected Member’s screen within the Minimum Group and choose Remove Selected.
b) Navigate to the Groups tab within the member’s profile, highlight the Minimum Group in question from the selected Member Group’s screen and choose Remove Selected.
Membership Profile - Minimums Tab
Once a member is assigned to a Minimum Group, the appropriate Minimum information will populate on the Minimums tab within the Member’s profile.
The Minimum information attached in this section is dependent on the Minimum attached to the Minimum Group to which the Member is linked.
Non-Editable (from Member's Profile) Member Minimum Details:
Minimum - Name of the Minimum attached to the Minimum Group.
Minimum Total - Assigned Minimum amount assigned to the group.
Spent in Period - How much the member has spent in the period.
Amount to Spend - How much the member has left to spend in the period.
Ending On - Ending date of the current period.
Adjustment Amount
If for any reason the amount of a member’s minimum needs to be reduced on an individual basis, the user can enter an adjustment into the Adjustment Amount field. This will reduce the amount the member has to spend to reach their minimum.
The Adjusted to Spend field will populate with the true reflection of what the member will need to spend in their current period. (Note - this will properly display after adjustment amount has been saved.)
Important - Please remember to clear any adjustment amounts after Month End has been run. Otherwise, the adjustment amount entered on the member’s profile will roll over to the next period. For more information on clearing Minimum Adjustments, please see our Membership - End of Month manual.
Minimum Reports
To review a member’s Minimum Activity on an individual basis, best practice is to select View Minimum Activity on the Minimums tab within the member’s profile.
The Member Minimum Activity Report will launch specific to the member. This report can be filtered down to the very items that counted toward the Minimum by selecting the + sign to the left of the activity or by changing the Detail Level of the report.
The Member Minimum Report can also be run on a global basis to display the Minimum Activity of all members.
To run this report, navigate to the Interactive Reports Module, expand Membership, and select Member Minimum Activity.
Select the Start Date, the Groups the user would like to view, the Detail Level of the report, specify if the report should only include members with a certain amount of unspent Minimums, Select View Report.
Best Practices
At least monthly, use the Manage Members Grid to review for Minimum Adjustments that may need reviewed/cleared. Customize columns to include Minimum Adjustment Amount field, and then include all amounts other than zero to review records with a minimum adjustment amount that may need adjusted and/or eliminated prior to next statement generation.
FAQs
Q. Instead of decreasing an individual Member’s required spend, can I increase it?
A. Yes, when entering an adjustment amount (on the Minimums tab in the Member profile), enter the adjustment amount as a negative amount to increase the Adjusted to Spend field. Entering a positive adjustment will result in a negative impact to the required spend.
Downloadable Guide
...

Creating a New Late Fee
To create a new Late Fee,
1) Navigate to the Late Fees Grid and perform either of the following to launch the Late Fee setup screen:
a) Click the New icon on the toolbar.
b) Right-click anywhere on the Member Types Grid and select New.

2) The Late Fee setup screen will launch.
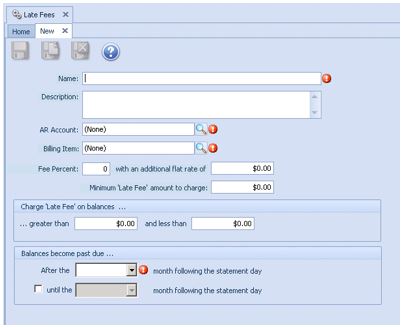
Late Fee Setup

1) Name - Give the Late Fee a name.
2) Description - An optional description can be added to the Late Fee for internal purposes.
3) AR Account - Select the applicable AR Account.
4) Billing Item - Select the Item to be charged when Late Fees are billed at Month End.
5) Fee Percent - Enter the percentage to be charged when Late Fees are billed at Month End.
-With an additional flat rate of - Enter a dollar amount if the Late Fee should have an additional flat rate on top of the Fee Percent.
-Minimum ‘Late Fee’ amount to charge - Enter a dollar amount if there is a minimum amount to be charged on Late Fees. If using a flat rate, this amount should be equal to that of the flat rate.
Note:
If the user would like a flat rate to be charged rather than a percentage, simply leave the Fee Percent set to zero and enter the flat rate.
6) Charge ‘Late Fee’ on Balances - Enter the delinquency balance that needs to be exceeded before a Late Fee is charged.
Less than - Enter the maximum delinquent balance to be reached before Late Fees stopped being charged. Most clubs leave this set to $999,999.00.
7) Balance Become Past Due - Select when a member’s balance becomes past due. Options include the 1st, 2nd, and 3rd month following the Statement Date.
Until - If left blank, the system will continue to charge the same Late Fee each month the member is delinquent. However, some clubs have different Late Fees for 30, 60, and 90 days delinquencies. If this is the case, check the until field and populate the appropriate month.
Applying Late Fees to Members
As mentioned, it is most efficient to apply Late Fees at the Member Type level; however, Late Fees can also be applied at the individual member level if desired. In this section, we will review how to apply Late Fees at both the Member Type and individual member level.
Note:
By default the system will look at the individual member level first, and if there is nothing selected there, it will look at the Member Type level.
Member Type
To apply a Late Fee at the Member Type level:
Important: Please note that if a Late Fee is applied at the Member Type level, all members within the Member Type will be susceptible to Late Fees.
1) Navigate to Membership across the top tool and select Types.

2) Double click the applicable Member Type, and on the Late Fees tab, select all Late Fees that apply. The Percentage to Apply and Flat Rate will show on the Late Fees Grid within the Member Type.

3) The Late Fee will then show on the Late Fees tab within the member’s profile. Late Fees applied at the Member Type level will show in the Late Fees at Member Type section.

Member Level
If Late Fees are not applied at the Member Type level and a specific member needs to be charged Late Fees,
1) Navigate to the Membership module from the left user menu and select Manage Members.

2) Double click on the applicable member and navigate to the Late Fees tab.

3) In the Member Specific Late Fees section, select the applicable Late Fees.

Late Fee Exempt
If for any reason a particular member needs to be Late Fee Exempt,
1) Navigate to the applicable member’s profile in Manage Members and select the Financial Information tab.

2) Select Late Fee Exempt. The member will not be charged Late Fees at Month End if this flag is checked.

Best Practices
- Oftentimes, the biggest challenge in late fees, is either not assessing people that should be charged for them, or assessing those whom no longer should be charged. Outside of the system, develop the policy that will define how late charges will be assessed (based on Member Type, etc), and the triggering events that will preclude a member from being responsible for late fees (resigned members).
- Ensure resigned Members are moved to Resigned Member Type and Resigned Member Status to prevent further billings (including late charges).
- If Members are part of a Member Type that is subject to Late Fees, but they are exempt, ensure to flag the Member as late fee exempt in the Member’s Profile, Financial Information tab.
FAQs
Q. We have members (resigned) who we don't want to incur any additional late fees - how can we ensure they are no longer charged?
A. First, ensure the Member has been set to Resigned Member Type and Resigned Member Status. This ensures billings (minimums, late fees, etc) are no longer generated for that Member. Then, ensure any Member specific late fees are removed from the individual’s account through the Late Fee tab of the Member’s profile. While in the Late Fees tab, confirm the Late Fees at Member type are also blank.
Q. What is the best way to exclude a Member from incurring late fees on a one-time only basis?
A. If the Member is only exempt from one month’s billings, when generating the Member’s billing, simply delete out the line of late fees prior to finalizing it, rather than marking Member Late Fee exempt to ensure they are subject to late fees on a go-forward basis.
Q. How can I see the details of when a Member was moved out of a status (so I can verify why they were hit for a late fee)?
A. Within the Member’s profile, click on the Audit Log (gear icon), to view changes regarding the Member’s status.
Downloadable Guide