...
| Table of Contents | ||||||||
|---|---|---|---|---|---|---|---|---|
|
Overview
In the event a refund check needs to be written for a member, the Office system offers a simple solution to this occurrence similar to billing reciprocal chargesPlease follow the steps in this document to process a payment with CSI Global VCard in Clubessential Office. These steps are to be followed once vendors have elected to receive payments from CSI, and CSI has added the vendors to their GPS (Global Payment Solution) account. If the vendor is not set up as such, the payment will not reach the vendor. Use Case
|
Content
|
|---|
Setup Member as a Vendor
To properly process a refund check, the member in question will also need to be setup as a Vendor. Please see our Manage Vendors manual for more information on how to setup a new vendor.
Create a Refund Check
Access the Invoice Receipt screen by selecting Accounts Payable from the user menu and choosing Enter Vendor Invoices (the invoice entry screen).
Follow instructions for Standard Invoice Entry. Complete the heading of the Invoice Receipt Screen. Please be sure to select the newly created Vendor.
The Invoice Amount should equal to the amount needed to net the member’s credit balance to zero.
Under Type option, select Member.
Then, in the name section, select the member to be charged. Use the lookup feature for assistance. Once Member is located, double-click to select and populate the Name field.
The Description will default to Vendor Name. It is recommend to add a reference to a refund check in this field. This will display on the member statement, and can be adjusted if necessary. Leave Quantity at the Default. Enter the Amount of the refund, and click, Save and Close.
Click Finish, and proceed to post batch.
The invoice will then need to be paid and printed as normal. Please see our Pay Bills and Print Checks guide for more information.
Post Charge Batch to Member Account
Once the invoice batch has been posted, the system creates a charge batch under Approve Charge Batches in Membership, which is then posted to charge the member’s account. This will net the Balance Due on the member’s account to zero.
Select Membership from the user menu and choose Approve Charge Batches.
A new batch will auto-populate based on the Invoice Batch. Click to select the batch and choose Post Batch.
This will open the batch for review. Select Post Batch after review is complete.
Member Balance
Once the Charge batch is posted, the member will have a net balance of zero on their account.
Best Practices
Use the Manage Members grid and associated filters to review Credit Balances on Member Accounts regularly to ensure timely handling of excess Member funds.
FAQs
Q. How do I set a filter to review Credit Balances for my Members?
A. In Membership, Manage Members grid, ensure the Current Balance column is included in the grid. (If not, right-click, choose customize columns, and add field to the grid.) Then, click the arrow next to Current Balance column, choose Custom, and set filter to return credit amounts.
...
Create a New Ledger Account for CSI Global VCard Clearing
This GL account will be used when sending the Global VCard payment to the vendor.
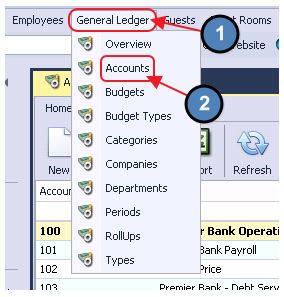
1) Select General Ledger, Accounts across the top ribbon and create a New account.
2) Set up the the account as follows:

(1) Account Category should be Current Assets.
(2) Assign an Account Number that is in the same range as your current banking accounts.
(3) Type should be Other Bank Account.
(4) Select Balance Sheet as the Department.
3) On the Banking tab begin a new check sequence for Global V Card by specifying the Next Check # to use.

****Note: This step is up to the interpretation of the club. The check sequence may begin in any order the club deems fit, or continue in the order of their current check sequence.
Mark Vendors for VCard Payment
Once CSI has enrolled eligible vendors to their GPS account, the vendors will also need to be flagged for VCard Payment within Clubessential Office.
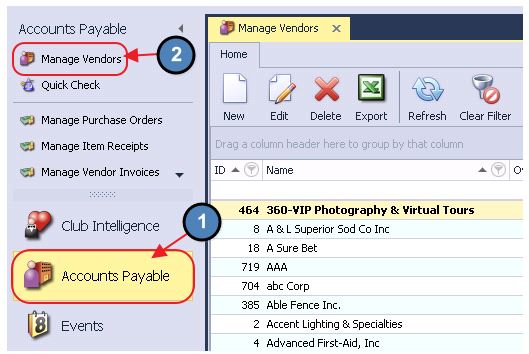
1) Select Accounts Payable, Manage Vendors and choose the vendor to be added.
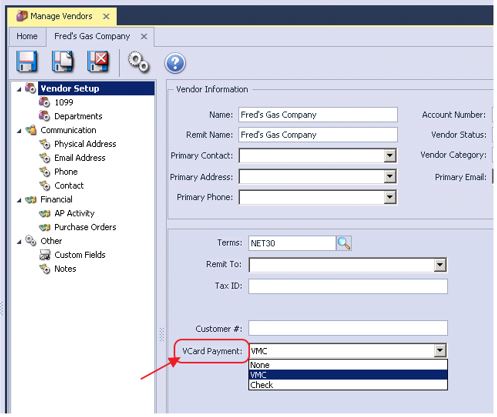
2) Select Vendor Setup on the left pane of the vendor and choose VMC for the VCard Payment option.
Create a Vendor Invoice
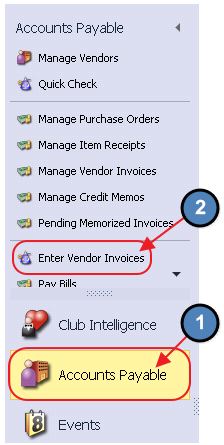
1) Navigate to the Accounts Payable user menu and select Enter Vendor Invoices.
2) Add a New batch or choose an existing one and add another invoice.
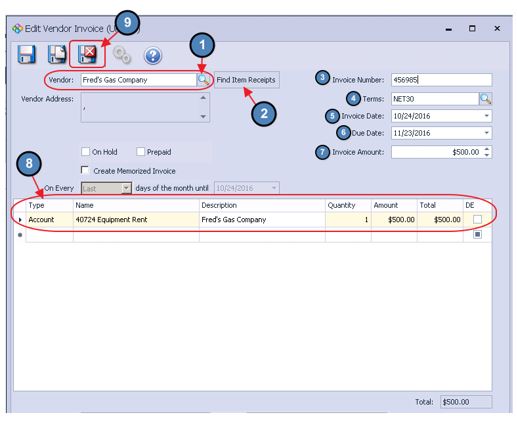
(1) Search for the Vendor.
(2) If the Vendor has outstanding Item Receipts you may add those as well by clicking Find Item Receipts.
(3) Enter the Invoice Number.
(4) Ensure Terms of the Invoice are appropriate.
(5) Enter the Invoice Date.
(6) Due Date will populate based on Terms. Override if necessary.
(7) Enter Invoice Amount.
(8) Enter the Invoice line(s).
(9) Once complete, click Save & Close.
3) Select Finish and Post the batch.

Pay the Vendor
1) Navigate to the Accounts Payable user menu and choose Pay Bills.
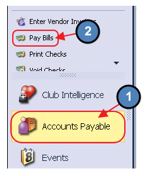
2) Then, complete the Pay Bills screen as follows:

(1) Pay From: Choose the CSI Global VCard Clearing account.
(2) To easily find the vendors marked for CSI Global Vcard, check ‘Show CSI Virtual Master Card Vendors Only’.
(3) Click the Pay box next to the vendors you wish to pay.
*NOTE: Do not choose the Electronic Payment box as that is not related to the CSI Global VCard function.
(4) Click Save.
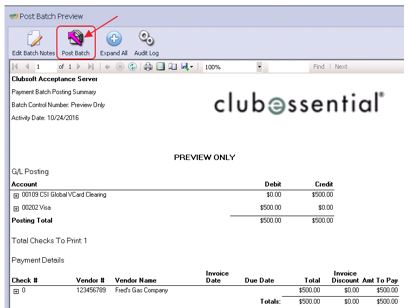
3) Post the batch on the Post Batch Preview screen.
Run Aged Open Vendor Invoices Report
1) Go to Interactive Reports, then choose Vendor, Aged Open Invoices.

2) Within the report, do the following:
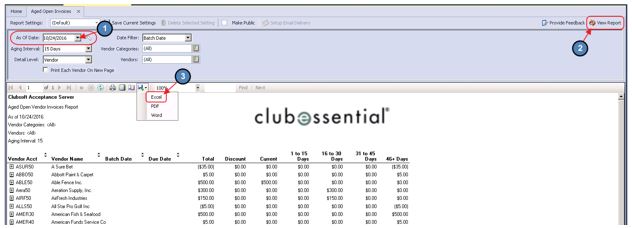
(1) Set the date to the last day of the previous month and click View Report.
(2) Click on the Save icon and choose Excel.
(3) Send this report to CSI monthly to help enroll your vendors for VCard Payment.
Best Practices
Reconcile your Global VCard Clearing Account on a timely basis to identify any issues that need resolution.
FAQs
Q. What does VMC stand for?
A. Virtual Master Card - to learn more, click here.