| Table of Contents | ||||||||||
|---|---|---|---|---|---|---|---|---|---|---|
|
...
- Bottom – The buttons across the bottom of the screen are system defined and triggers different functionality; see below for a brief and then more in-depth description of each button.

POS Main Button Functionality
Top Row
Lookup Item - Allows you to look up an item that has not been set up on the POS screen layout.
Remove Item - User can delete an item from the order.
Delete Ticket - Will delete current ticket.
Change Qty - User can change the QTY on an item (including making quantity negative for a credit).
Discount Item - Gives users the ability to discount an item. Requires security rights.
Comp Item - Give users the ability to comp an item. Requires security rights.
Add Ticket - Gives the ability to open another ticket without exiting the POS before completing the first ticket. You can move back and forth to all open tickets from the POS screen.
Change Member - Used if the member to be billed needs to change for any reason.
Upcharge Item - Will prompt for an amount to override and increase the price of the item.
Quick Cash - One step process to close the ticket to Cash.
Quick Charge - One step process to close the ticket to Cash.
Close Ticket - Take users to a settlement screen with more closing options.
Bottom RowExit - Will exit the POS screen back to the main screen.
Change Price - Gives users the ability to reduce the price without using a discount.
Duplicate Ticket - Ability to create a duplicate ticket from another displayed ticket. This is useful if several members are to be charged the exact items.
Multi Off - Used in conjunction with Remove Item, Discount Item, and Comp Item; when (ON) users can select multiple Items.
Split Ticket - Used if more than one ticket is required on a transaction and to edit separate tickets.
Coupon Lookup - This button will turn Green to alert the server if the member has a promo coupon available to redeem.
Print Ticket - Prints the pay receipt ticket for signature prior to closing the ticket.
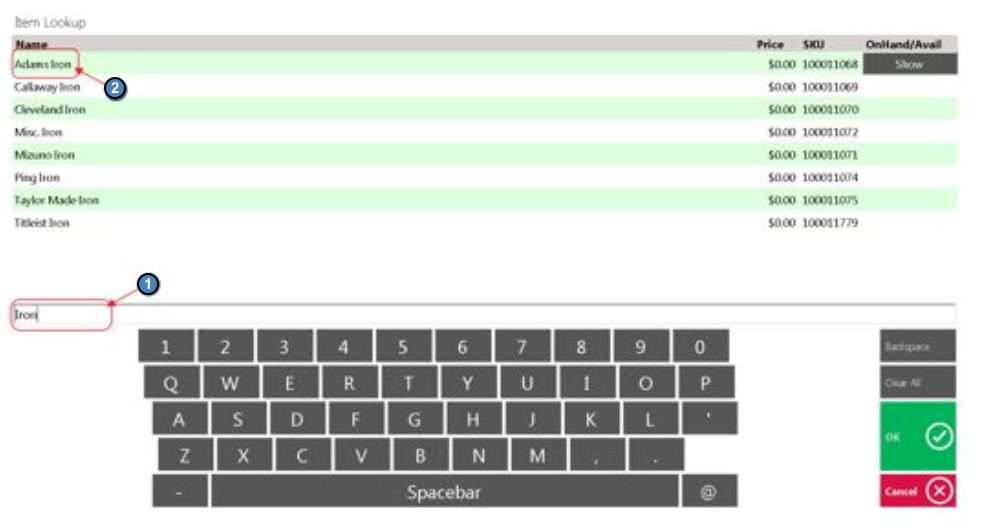
Lookup Item
Allows you to look up an item that has not been set up on the POS screen layout.
1) Select Lookup Item.

2) Enter the Item Name in the search field and click or touch to select the Item.
Remove Item
User can delete an item from the order.
1) Highlight the Item to be removed from the ticket and click Remove Item.

Note: If you have more than one item to delete follow the Multi-Select (On) instructions.
Change Qty
User can change the QTY on an item (including making quantity negative for a credit).
1) Highlight the Item and click Change QTY.

2) Enter QTY. When entering a negative QTY, select the minus (-) sign first and then select the amount of the negative QTY. Use the More option to enter quantities greater than 19.

Discount Item
Gives users the ability to discount an item. Requires security rights.
1) Highlight the item to discount and click Discount Item.

2) A message box will pop up if you do not have security rights to Discount. You will need to get a manager to continue. Select YES and Enter Pass Code.

3) Select a Discount reason or key in a reason. Discount reasons are optional, if you do not get this prompt then you are not setup to track reasons. For more information on setting up Discount reasons, please refer to the Buttons section of our Retail Areas manual.

4) Enter the Discount (on the right side are pre-set percentages, if none of these are what you want click on the % sign to manually enter the desired percentage). If it is a flat dollar discount amount, then use the numbers on the left of the screen. Click OK when finished.

Note: If you have more than one item to delete follow the Multi-Select (On) instructions.
Best Practices
When setting up areas, ensure the settings in the system, align with the best possible operational flow of your respective Retail area. If settings are not necessary/used, ensure they are disabled to prevent staff from clicking unnecessary buttons.
...