| Table of Contents | ||||||||
|---|---|---|---|---|---|---|---|---|
|
Overview
The Unified Platform allows Clubs to manage their Dining Reservations seamlessly across the Reservations System into the Office Food and Beverage POS System; ensuring Administration, Members, and the Dining Staff have the tools they need to reserve and manage the Club’s Dining experiencePhotos and Photo Albums are managed completely through the Image Explorer. This article will review how to upload and manage the Image Explorer, how to crop and resize images, and how to manage Photo Albums. Use Case(s) A Club may wish to allow their Members to register for Dining Reservations utilizing the on-line Reservations system. Additionally, the Club may also utilize the Clubessential Office Product, with Food and Beverage POS fully implemented in their Dining facilities. In addition to allowing the Members to make reservations online, the Club is interested in assisting Members who call-in or walk-up with making a Dining Reservation. Daily, the Club would also like the Food and Beverage areas of their Club to have integrated visibility and editing capabilities to the Dining Reservations, be able to easily convert the reservations into POS dining tickets; assign tables and servers to the Reservations, add items to the Tickets, and ultimately charge their Members. The Unified Suite provides the Club with the ability to meet their goalsImages are an extremely important part of your website. Through imagery, we can bring the website to life, tell a story, and evoke emotion. It is easy to enhance your site design, or to emphasize your message by placing quality photography throughout the website. There are also practical uses for images, such as showcasing upcoming events and to show photos from past events. |
Video
This video contains highlights from a training Webinar given on the Dining Unification processImage Explorer.
Note: Sections of the video have been referenced below with corresponding times in the video for ease of access
...
|
|---|
Reservations/Dining
Make a Reservation (as a Member)
Once a Member makes a Reservation on-line using the Clubessential Dining Reservations product, the Reservation fully integrates into the Food and Beverage POS application.
For example a member could make a reservation on the website as follows:
Navigate to Book a Table
Select Reservation Date/Dining Room/Time
Select the Date, scroll to the desired Dining Room (if more than one exist), and select specific time slot by clicking on the Booking block.
Complete Registration Booking Form
Once a time is selected, the Reservation form will appear. Complete the form, and click “Make Reservation.”
Confirmation screen of reservation being received will appear.
Once a Member makes a Reservation online using the Clubessential Dining Reservations product, the Reservation fully integrates into the Food and Beverage POS application.
Point of Sale (POS)
To view the existing Dining Reservations, log in to the Food and Beverage POS Terminal associated with the Dining area.
Dining Tab (as a Dining Manager)
Once logged in, navigate to the “Dining,” tab.
Main Grid
All Dining reservations for Today (default date) will appear on this tab.
Colors Displaying on Main Grid
To learn more about the Color meanings on the grid, click on the “Colors” button in the bottom right hand side of the screen. A Color Picker window will launch.
Default colors are as follows:
Dark Green: Paid/Closed Reservations
Yellow: Partially/Open Tickets(Converted from Reservations)
Light Green: Alternating (Used in every other row of the grid for tickets with no status to make grid display easier to read.)
Colors may be changed by clicking on the color, selecting a new color, and clicking, “OK.”
Club Display
This filter contains the Club(s) available in the POS. In the event more than one Club exists in the system, selection of a particular Club will be available here.
Dining Rooms Display
The filter (below) contains the Dining Rooms. Most Clubs have more than one Dining Room, and as a Dining Room Manager, it is common to utilize the “All Resources” option within the drop-down to display all dinings reservations in the Club.
Show Admin Dashboard
Click on the “Show Admin Dashboard” button in the upper right-hand corner of the screen to make/edit reservations directly from the POS.
Once clicked, the Admin Webview functionality launches.
Make/Edit Reservations within POS
To make a new Reservation, click on the desired time of the reservation to launch the Reservation form.
Complete the Reservation form, and click, “Make Reservation.”
To edit or cancel a Reservation, click on the Reservation.
Make changes as necessary to the Reservation Form, and click “Update Reservation.”
Click, “Cancel Reservation” to eliminate reservation from the Dining System.
Choose, “Discard Changes,” to exit form without making any changes.
To navigate to a different Dining Room within the Admin Dashboard, click on the tab of the Dining Room desired.
Click “Hide Admin Dashboard” to return to main Dining Reservations grid.
Convert Dining Reservations to Open Tickets
To convert a Dining Reservation into an Open Ticket, click on the desired Dining reservation.
Next, ensure the Dining Room is set correctly, and then select a table.
Once a table has been selected, assign a server to the table. Click on Server’s name to assign the server to the table.
Note, the ticket is open, the Table and Server have been assigned, and the Reservation moves to Partial/Open status (yellow).
Review Dining Room Status
To review the status of the open Dining Room tickets, click on an open (Yellow) ticket to launch the “Ticket Audit Preview,” screen.
The food ordered can be viewed, and therefore an estimate of when the table may be available could be obtained.
In the example below, entree salads were just ordered, so it is likely the table will not be finishing up in the very near future.
Dining Tab (As a Server)
The Dining tab and associated reservations are also viewable to the Servers.
Convert Open Ticket to Member Charge
Once ticket has been assigned to a Server, the Server can access the Ticket on the Tickets tab. Server will click ticket to open.
Once open, items can be added utilizing normal POS functionality.
When complete, ticket can be closed based on Member/Guest payment preference.
Review Dining Tab (Reservations)
Servers also have access to the Dining Tab, and can review upcoming reservations.
Best Practices
At the end of the shift or evening, go into System Tools, go to the Open Tickets tab, review open tickets and ensure all open tickets are closed appropriately.
FAQs
Q. How do I re-open a closed ticket?
A. Go to System Tools, Closed Tickets, find ticket, and click Re-Open Ticket. Confirm Re-Open, and modify as necessary.
Q. How does the Member Charge All function work?
A. This feature is not applicable in the Dining Reservations system. It is applicable for Events and Tee Times. See respective guides for more information.
Q. Can Birthday cake be added as an Option when making a reservation?
A. Yes, Birthday Cake can be created as an option, similar to the High Chair/Booster seat options that can be set up. The Options do come over to the POS, and are visible in the Options column in the main Dining Grid.
Q. Can a Reservation be made directly from the Point of Sale?
A. Yes, a reservation can be made directly from the POS by utilizing the Admin Dashboard. Once the Dashboard has launched, select the Dining Room, the time, and then make the reservation utilizing the Reservation form. The information exists in real-time within the POS once the Reservation has been booked.
Q. How do I know if I am set up for Dining Unification?
A. Contact your Account Manager. If you don’t know who your Account Manager is, email am@clubessential.com, and someone will follow up with you to let you know.
Downloadable Guide
...
Accessing the Tool
To access the Image Explorer, follow the steps below depending on your access role.
Admins: Hover over Admin bar in the left hand corner of the screen, select Image Explorer.

Editors: Hover over Admin in the main navigation, select Main Tools, and then Image Explorer.

The following Image Explorer Interface screen will launch.
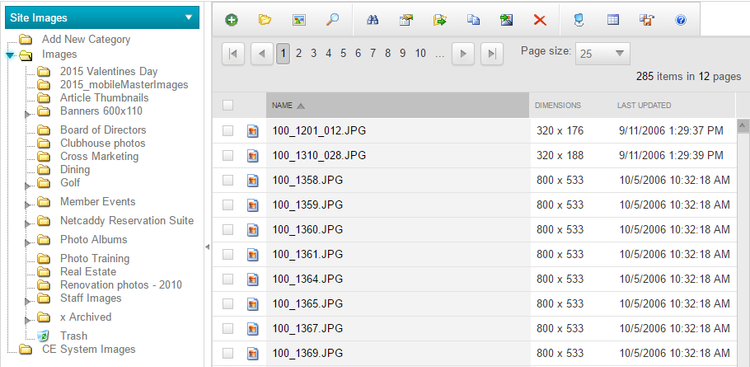
Image Explorer Interface
The Image Explorer is a repository for all images used on the website. It is simply a holding place to organize imagery, and allows for images to be edited.
Organizing Images
It is important to organize images, so the images are easy to find. Organizing folders is extremely important when working within Photo Albums, as Photo Albums pull images from an entire folder, or multiple folders. There is never a reason to delete images from the website, as there is no limit to the amount of images stored.
Folders are typically named after year, event, topic, dimension, or Photo Album title.
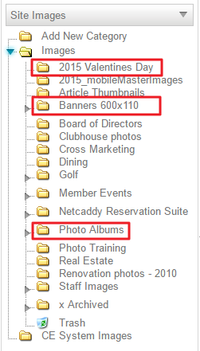
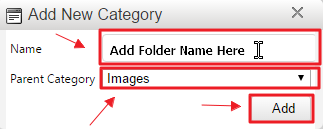
To add a New Folder, click the Add New Category folder at the top of the folder structure.

You may name your Folder and then even choose where the Folder is nested in the Folder structure.
Images may be moved from one folder to another by right clicking on the image > Move.

This will bring up the Folder Structure, where you can click on the desired folder, and then click the Move button to transfer the image.

Uploading Images
To upload a photo, select the category or Folder into which the image will be uploaded.
Click the Green Plus sign to start uploading.

Once the upload interface is launched, we can upload imagery in several ways.

Images can be resized on upload by choosing the Resize on Upload button.

You may also choose the the folder destination from the Upload Interface by using the Category drop down.

Images can be Dragged and Dropped from your local system into the upload interface. Note: this will not work with older browsers. If you are using an older browser, please use the next step by adding imagery via the Select options.

Images can also be added by using the Select buttons.

Once the desired images are added to the upload interface, the upload will occur automatically.
The upload interface will show a ‘completed’ notification, and there is an option to then upload more imagery, or simply ‘X’ out of the interface.

Resizing and Cropping Images
Once images are uploaded to the Image Explorer, they may need to be resized and cropped to meet the appropriate image dimensions used throughout the website. Image dimensions are provided after the website comes out of coding.
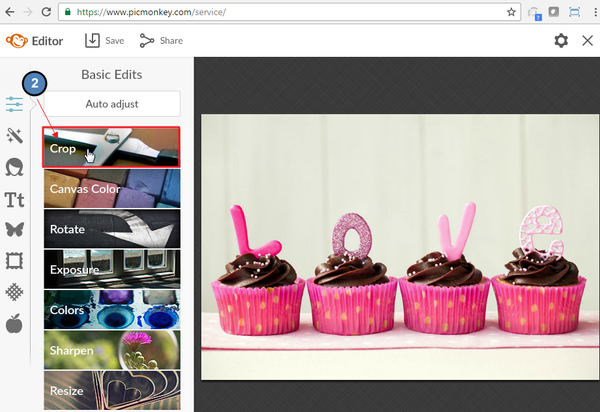
To edit images, right click on the image and choose Edit Image.
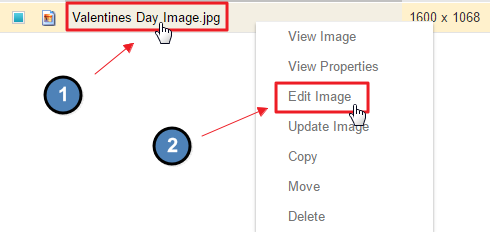
This will launch a free editing website, PicMonkey.
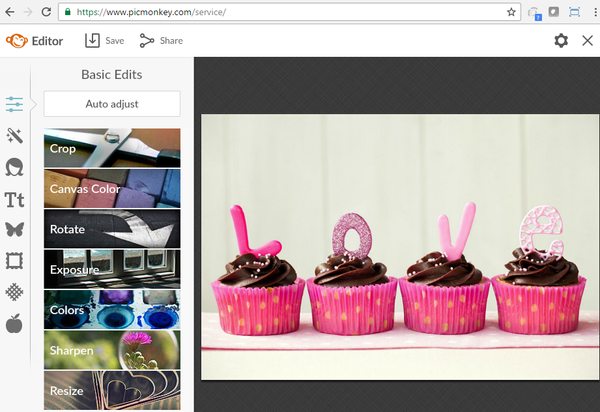
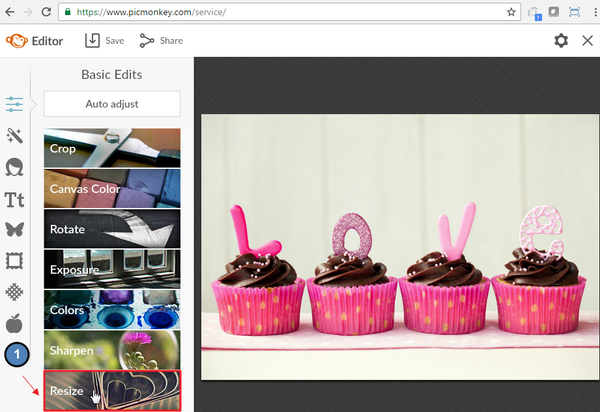
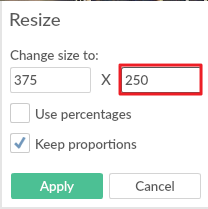
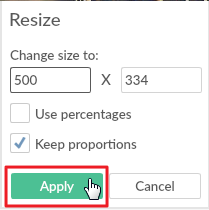
First, the image will need to be resized to reach the desired width or height. Open the Resize button to begin.
The Keep Proportions option is checked by default, which should remain enabled as this ensures that when the image is resized the appropriate aspect ratio is kept.
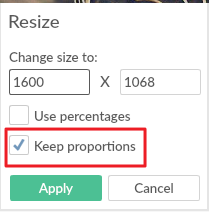
Change either the width box (on the left) or the height box (on the right) to get as close to the desired size.
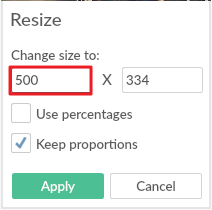
Width
Height
When the width box size is changed, the height box will change accordingly to the appropriate aspect ratio and vice versa.
Once the desired height or width is reached, Click Apply.
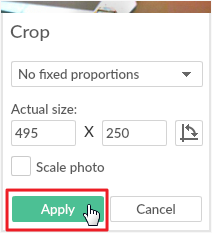
Next, Click Crop the image to meet the desired dimensions if Resizing did not meet the proper dimensions.
With the Crop option, both the width and height box may be changed to the desired dimensions.
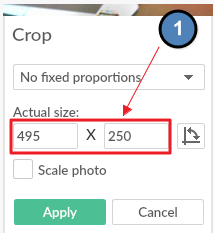
A box will show laying over the image. Drag the box around the image to choose the portion of the image you would like to keep. The opaque areas of the image will then be cropped out.
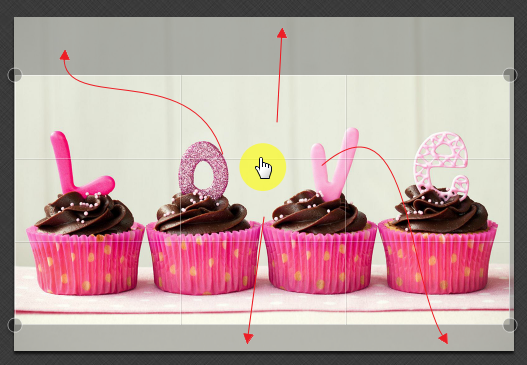
Click Apply to complete the Crop.
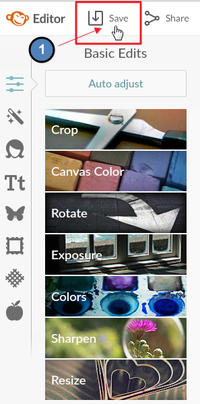
To Save the image in the Image Explorer, click Save at the top left of the PicMonkey screen.
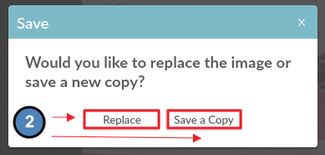
An option to Save and Replace or Save a Copy prompt.
- Save and Replace: this will replace the original image in the Image Explorer. Not recommended, as it’s best to keep the original dimensions so the image may be edited again at a later time.
- Save a Copy: this will keep the original image and save the new editing image separately. Note: both images will have the same name once added in the Image Explorer. The images will need to be renamed in order to tell the edited and original image apart.
Once the image is saved into the Image Explorer, the browser may need to be refreshed to see the image.

Rename the image if desired, by right clicking on the image > View Properties.

Enter the desired name and click save.

Placing Images on a Page
Images may be placed on page, by using the click to edits throughout the website. This will open the Axis Editor.
First, navigate to the page you wish to add the photo and open the click to edit in the desired area where you would like to add the image. Note, this may be in a content area, sidebar marketing area, or a banner image.

Once the Axis Editor is launched, images can be added in two ways.
Choose Insert > Image:

Or, click the Image Explorer icon from the Quick Tab Toolbar.
![]()
Either option will launch the Image Explorer interface.

Choose the folder in which the image is placed and click the image.

Images can be inserted in two ways, by double clicking on the image or using the Image Icon in the Image Explorer Toolbar
- Double click the image to insert.
- Click the Image Icon in the Toolbar.

Once the image has been added, click Save.

Styling Images
Images can be styled alongside page content in several ways. Adding imagery enhances the site design and helps to reinforce the website’s message, however, if imagery is not styled properly on a page it may not be as effective.
Image Styling can be applied by using image Properties.
First, open the click to edit of the page the image is on that needs Image Styling.

Right Click on the image and choose Properties.

From the Properties, styling such as text alignment and padding can be added to the image.

Text Alignment: this allows for text to be wrapped around the image. Choose the text orientation by clicking the dropdown on Image Alignment.

Padding: this allows space to be added between the image and the text. By adding padding, the readability of the content on the page is increased.
Add a desired pixel amount to either the top, bottom, right, or left box to add padding to the top, bottom, right, or left of the image.
- Pixel Amount: standard pixel amounts are typically 5, 10, or 15 px.

Click OK once finished to apply the styling.
Save image and content on the page.

Note: Padding now displays in the saved page.

Photo Albums
Most websites use the Photo Album plugin, which allows for various types of slideshow imagery. Clubessential can help assist to set up Photo Albums on pages, along with determining the right style. Managing Photo Albums are simple, by using the folders within the Image Explorer.
Managing Images in Albums
Before the Photo Album can be managed, we first must know what folder is assigned to the album.
First, navigate to the Photo Album and then click on the Photo Album Properties icon.

Click Categories, which will pull up the Image Explorer Folder Structure.

Scroll to find the folder that has a check mark next to its name. This is the Folder that the Photo Album is assigned to. Note: multiple folders may be assigned to a Photo Album.

To manage a Photo Album, navigate to the Image Explorer.
Admins: Hover over Admin bar in the left hand corner of the screen, select Image Explorer.
Editors: Hover over Admin in the main navigation, select Main Tools, and then Image Explorer.
Navigate to the folder in which the Photo Album is tied to.

From here, images can be added, moved, or removed.
To Add: click the green plus button sign.

To Move: right click on the image and click move.

To Remove: click on the image in the folder and click the red X in the toolbar.

Adding Text and Hyperlinks to Photos
Depending on the type of Photo Album, there may be text and hyperlinks associated with the imagery. This is mostly the case on Member Home Page Photo Albums.
To edit the information, navigate to the Folder associated with the Photo Album.
Right Click on the image, and choose View Properties.

From here, a name, description, URL, and Additional Info may be added.
Name: this is the title of the image. This will not show up in the Photo Album, but the name will show when one hovers over the image.
Description: typically, this is used for the Title seen by members. It is most common to add the name of the event, or marketing piece here.
URL: place the URL of where the slide should be linked to. Change the name of the link text in Additional Info 2.
Additional Info 1: this is not always used, but if the album has a space for a long description this is where the long description can be added.
Additional Info 2: this is the link text for the URL.

Save once complete for changes to publish to the Photo Album.
Best Practices
It is best to keep the Image Explorer as organized as possible so images can easily be found. By creating multiple folders named by year, event title, or image size it can be easy to find where images are located at a glance.
Create an Archive folder in the Image Explorer and move imagery here when not in use. Since there is no limit to the amount of imagery in the Image Explorer, move unwanted images here. If images are deleted from the Image Explorer, they then must be re-uploaded in order to use them on the website. Deleting an image in use will create a black box on the website where the image was located.
Resizing and cropping images ensures that imagery to sized to the proper dimensions for the site design. It is not recommended to resize imagery on the page as this could cause the image to become pixelated.
- Name imagery something descriptive of the image so images are easy to locate within the folders.
FAQs
Q: I am seeing a black box where an image once was, what happened to it?
A: If an image is deleted from the Image Explorer and in use on page, this will cause a black box on the page. It is best to never delete imagery, but rather create an Archived folder where images can be moved to when not in use.
Q: Why is the image I added to the Photo Album not showing up right away?
A: It can take a few minutes for the image to show in the Photo Album. This is due to caching. To refresh the Photo Album, open the Album settings and click save at the bottom of the Album interface. This should refresh the album, so you can see the image right away.
Downloadable Guide