...
1) Office - POS F&B Manual/Office - POS F&B Manual - User can delete an item from the order providing it has not been sent to the remote printer. Button will change to Void Item once item sent to remote printer.
2) Office - POS F&B Manual - User can add additional message or prep instruction for an Item.
...
17) Office - POS F&B Manual - Give users the ability to comp an item. Requires security rights.
18) Office - POS F&B Manual Multi-Off - Used in conjunction with Delete Item, Void Item, Discount Item, and Comp Item; when (ON) users can select multiple Items.
...
- If you have more than one item to delete, follow the Multi-Select (On) instructions.
- Delete Item button only displays if you have not sent the item. Un-Sent items will be listed in Black.
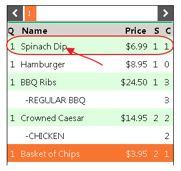
- The button name changes to Void Item if an item has been sent and will display in Red.

...
Note: If you have more than one item to delete, follow the Multi-Select (On) instructions.
| Anchor | ||||
|---|---|---|---|---|
|
...
| Anchor | ||||
|---|---|---|---|---|
|
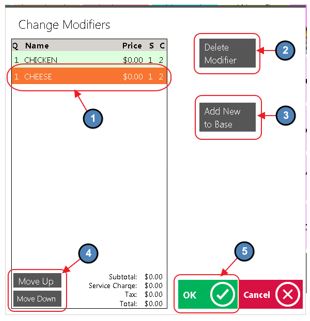
Change Modifiers
User can add, change, and delete item modifiers.
1) Highlight the Item to modify and click Change Modifier.

2) A box will display listing of all modifiers on the Item.
...
Use the Move Up and Down buttons to rearrange the modifier order.
Click OK when finished.
Anchor Change Qty Change Qty
...
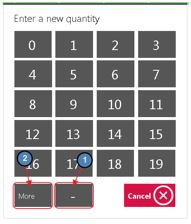
2) Enter QTY. When entering a negative QTY, select the minus (-) sign first and then select the amount of the negative QTY. Use the More option to enter quantities greater than 19.
| Anchor | ||||
|---|---|---|---|---|
|
Seat Position
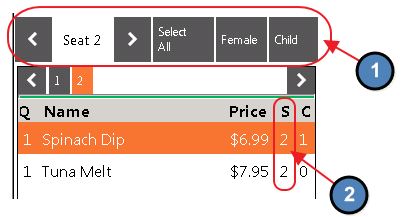
Before selecting any Items, use the arrows above the Item details to set the seat position. Select Female or Child if applicable (optional, see notes). Begin selecting Items to order.
...
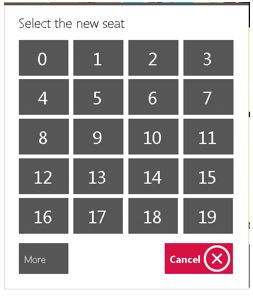
1) If you need to change the seat position, click Change Seat.

2) Select the correct seat number.
Notes:
You can add or remove the Female and Child button.
1) In CMA, navigate to System across the top toolbar and select System Settings.
2) Select Point of Sale on the left pane and check/ uncheck Display Seat Types.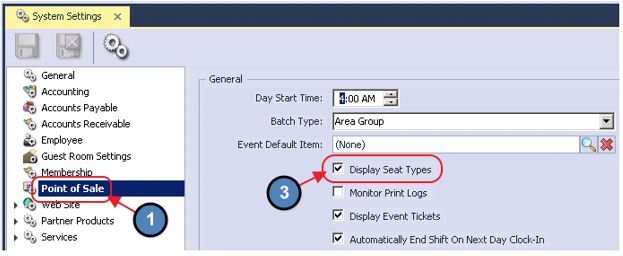
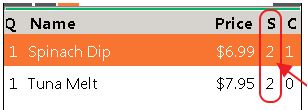
The seat position selected for the Item is displayed in the ordering screen in the column labeled S.
Seat number can be modified before and after Items are sent.
Seat numbers can be used for splitting tickets.
| Anchor | ||||
|---|---|---|---|---|
|
Add Ticket Ticket
Gives the ability to open another ticket without exiting the POS before completing the first ticket. You can move back and forth to all open tickets from the POS screen.
1) Click Add Ticket.

2) Search and select the member or select Guest if this is not a member.
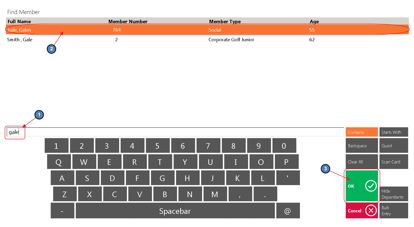
3) If you have more than 1 ticket open you will see buttons labeled 1, 2, 3, etc. For each ticket, click on the button you wish to work with.
Notes:
User can see what member is assigned to a ticket by the information at the top left corner; which will show member number and name. Other information displayed is also specific to the member on the ticket.
There is no limit to how many tickets you can have open.
You can place orders on all tickets; when you hit send the orders will be combined on 1 prep ticket for the kitchen or bar.
Please see our Split Ticket manual for further information on editing separate tickets.
| Anchor | ||||
|---|---|---|---|---|
|
Upcharge Item Item
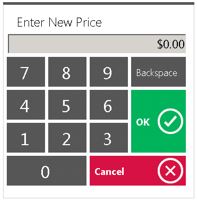
Will prompt for an amount to override and increase the price of the item.
1) Highlight the Item, click Upcharge Item.

2) Enter the amount to override the price.
Note:
- The amount entered must be greater than the item price. If you want to decrease the price, use the Discount Item option.
- You can upcharge before or after Send.
...
Anchor Change Table Change Table
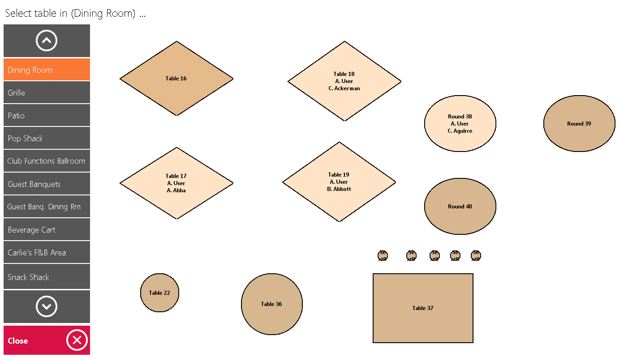
Change Table
Use if a member wants to move to a different Table or Area, or to join tickets.
1) Within the ticket, select Change Table.
.

2) The user will then be prompted to select a new Table or Area.
Notes:
- When moving tickets to a different sales Area; the screen layout might change depending on the setup. The orders placed previously will remain on the ticket but get credited to the Area in which the ticket is closed.
- You can use this function to join tables by selecting an occupied table. It will be handled the same as the Add Ticket function.
...
| Anchor | ||||
|---|---|---|---|---|
|
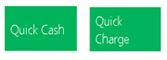
Quick Settlement Close
There are two settlement types available for closing the ticket with one step, Cash and Member Charge. These options do not give you the ability to add additional tip, get change amount, or split tender. For more closing capabilities select Close Ticket.
In the POS ordering screen, select Quick Cash or Quick Charge.
Notes:
Quick Cash will not give you the option to key in the amount of money for change back; it will close the ticket for the exact amount owing.
Quick Settlement is a one step process and will not give you any other options in closing the ticket like adding additional gratuity or split tender. For more closing capabilities select Close Ticket instead.
A Settlement Ticket is similar to the pay receipt except it includes the settlement details on the printed ticket.
- You have the option to hide the Quick Settlement Types from the POS by Area, or to suppress printing a settlement ticket by POS Terminal.
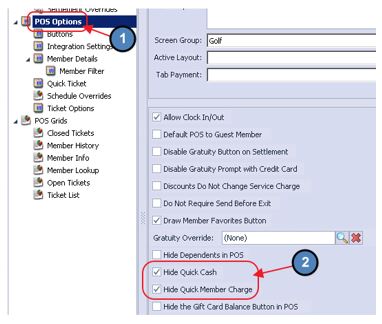
To hide the Quick Settlements Types from the POS by Area,
1) In CMA, please navigate to System across the top toolbar and choose Areas.
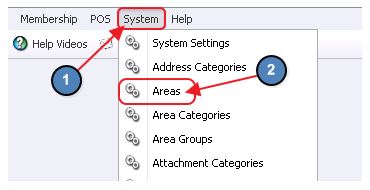
2) Double click on the Area in question and navigate to the POS Options tab on the left pane. Once on the POS Options tab, select the Hide Quick Cash/ Quick Member Charge check box. This will remove the Quick Settlements from the Area specified.
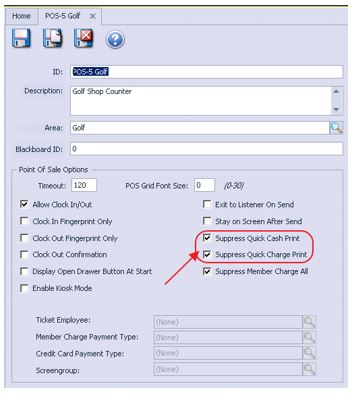
To suppress printing a settlement ticket by POS Terminal,
1) In CMA, please navigate to System across the top toolbar and select Terminals.
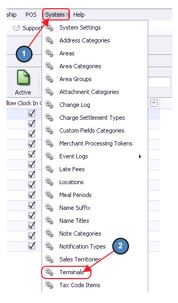
2) Double click on the Terminal in question, and put a check mark on Suppress Quick Cash Print or Charge. This will prevent a settle ticket from printing when the Quick Settlements are selected.
| Anchor | ||||
|---|---|---|---|---|
|
Close Ticket
The Close Ticket function gives you additional options on how the ticket is settled. In this section we will cover the various options available.
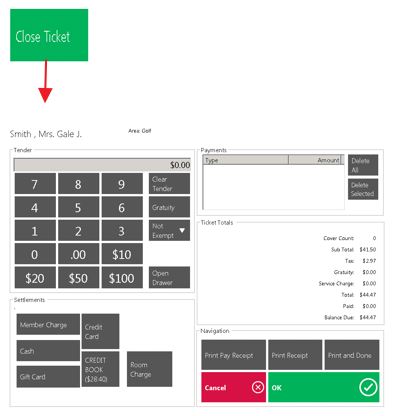
Tender Keypad
Top left corner of the screen is the Tender keypad.
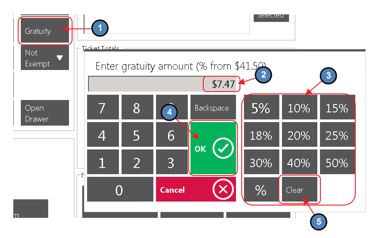
Gratuity - Select the Gratuity button and you will get the Gratuity Prompt. Enter the Gratuity amount (or percentage as applicable) and click OK.
Note: Select Clear on the Gratuity Prompt to clear any wrongly entered Gratuity.
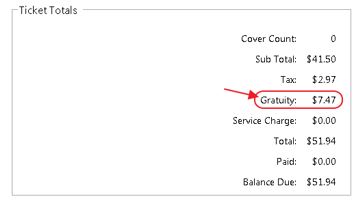
You will see the added gratuity in the Ticket Totals section.
2. Tax/Service Charge Exempt - Select drop down arrow next to Not Exempt and a list of exemptible features will display. Select the option relevant to the current charge (requires security rights).
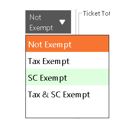
Options Include:
Not Exempt
Tax Exempt
Service Charge (SC) Exempt
- Tax & Service Charge (SC) Exempt
3. Open Cash Drawer will open the cash drawer before completing the settlement.

4. Clear Tender will clear the amount entered to re-enter a new amount.

5. The pre-fixed values $10, $20, $50, $100 are applied to Cash settlement ONLY.
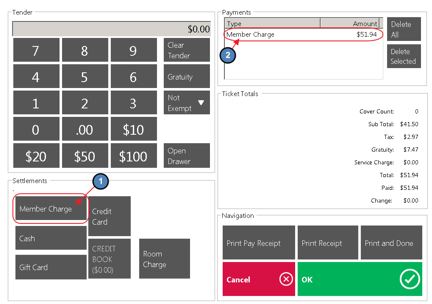
Settlements - Settle Ticket
- Single Settlement Type Used - If you want to settle the full amount to one settlement type do not enter the amount: simply select the Settlement Type and the full amount will be applied.
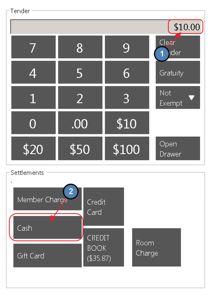
- Split Settlement - Is used when the client wants to use more than one settlement type to pay the amount. For example 10 dollars to Cash, 40 dollars to Credit Card, and remaining amount to Member Charge. Enter the amount to be charged on the Cash settlement type in the Tender keypad and select the Cash settlement type, do the same for the Credit Card settlement type, and then select the Member Charge settlement type and the remaining amount on the ticket will be applied to Member Charge.
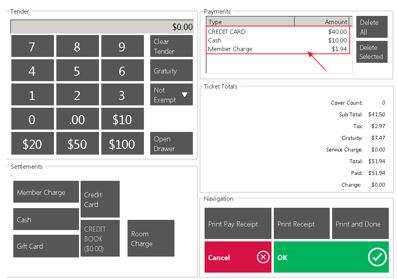
Note: The amount to split must be entered into the Tender keypad first before selecting the settlement type.
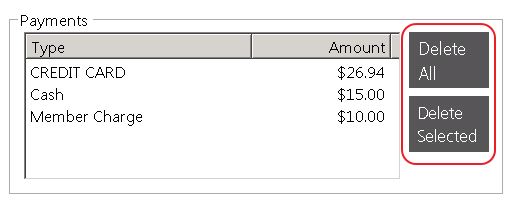
Delete All - will remove all settlements entered to start over.
Delete Selected - highlight the settlement type you want removed and select Delete Selected.
...
Note: If you have more than one item to delete follow the Multi-Select (On) instructions.
| Anchor | ||||
|---|---|---|---|---|
|
...
Note: If you have more than one item to delete follow the Multi-Select (On) instructions.
| Anchor | ||||
|---|---|---|---|---|
|
...
2) Highlight all the items by touching or clicking the Item. Select one of the functions below and follow their respective instructions (These are the only functions that can be used in combination with Multi (On)).
a) Delete ItemOffice - POS F&B Manual
b) Void Item Office - POS F&B Manual
c) Discount ItemOffice - POS F&B Manual
d) Comp ItemOffice - POS F&B Manual
| Anchor | ||||
|---|---|---|---|---|
|
...
2) Using the < > arrows, change the course. Click OK when done.
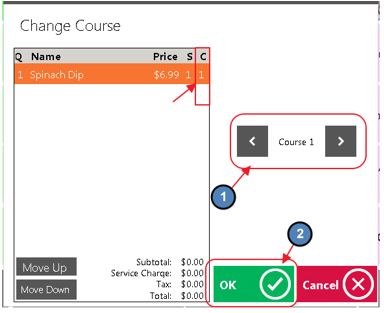
Notes:
Item Categories and individual Items can be set up with a default course number and changed at any time before using this function.
The system will automatically draw a line divider between courses on the Send Ticket.
There are a few setting that need to be turned on for coursing to work. Please see our Coursing manual for more instructions.
...
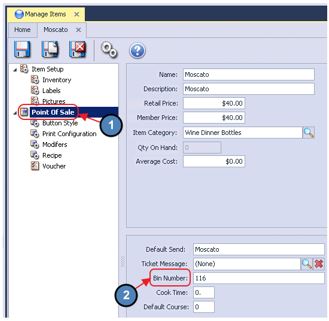
2) Select the Item in question and Navigate to the Point of Sale tab. Enter the appropriate number in the Bin Number field.
...
Anchor Reorder Item Reorder Item
...
2) Enter the correct number of covers.
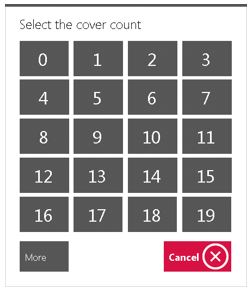
Note: You have 3 options when you want the system to prompt for covers; the options can be changed at any time in CMA.
...
| Anchor | ||||
|---|---|---|---|---|
|
Print Ticket
Print Ticket is used when you want to print a receipt before closing a ticket. This will print out the Pay Ticket when selected. Most often used to acquire a signature prior to closing the ticket.
1) In POS ordering screen, select Print Ticket to print out the Pay Ticket.

2) Select Exit when finished.
Notes:
Use Print Ticket to give the customer information on the charges and to get a signature before closing the ticket.
The Pay Receipt can be modified to display discounts, service charge, additional tip, and taxes in a few different formats.
You also have the option to have messages, minimum balances, store credit balances, and other information included on the pay receipt.
See Print PreviewOffice - POS F&B Manual as an alternative to Printing directly.
...
In the POS ordering screen when ready to send items to their designated remote printers, select Send.

Notes:
Items Categories determine what printer the Item will go to, it can be overwritten on the Item level. Please see our Items manual for more information on Item Categories and how to set up their Print Configuration.
If the item is not set up to print anywhere, the Send button will exit you out of POS ordering screen.
You can tell if an Item has been sent, by looking at its text color. If the order has been sent, it will be listed in Red. Items that have not been sent will be listed in Black.
...
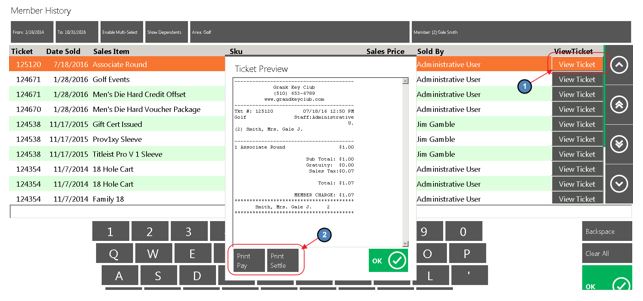
From and To Dates - enter the start and end date to narrow down the search.
Enable Multi Select more than one ticket to print.
Show Dependents - if selected, the system will display all family member tickets. If unselected, only the tickets rung under the member selected will show.
Area name will be the name of the Area you have the ticket open.
The tickets listed will be tickets that were closed in that Area only.
To see tickets closed from a different Area, select the Area button, select the applicable Area.
It is important to remember that if you do not see an Area listed, then the member has NO closed tickets in that Area.
Member Name and Number is displayed at top right corner; you can click on the name to search a different member. When you hit cancel it will take you back to the ordering screen and the original member will still be displayed.

View Ticket - ticket detail can be viewed on the right middle of the screen; highlight the item to view ticket details and select View Ticket.
Print Settle Receipt and Print Pay Receipt; you can reprint a ticket from history at any time.
...
2) Click the down arrow and select the Item Category. You can search for the name or use the scroll bar to find the Item Highlight the item and the recipe will display to the right of the screen.
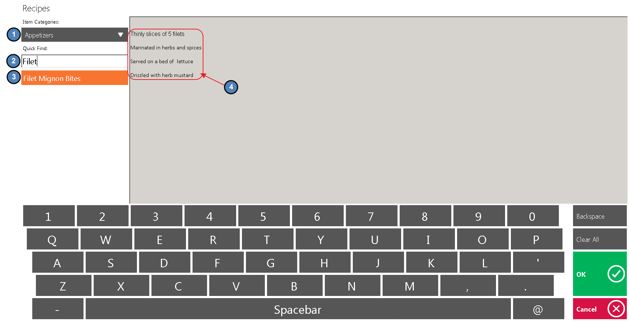
Note: Only servers in an Employee Group with the proper security rights will see the Recipe button on the main POS screen.
...
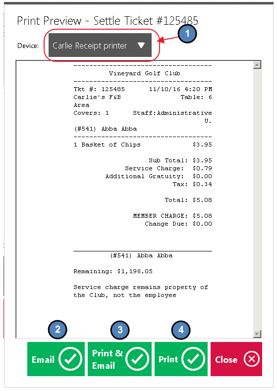
In this section we will provide a few examples of the Print Preview feature.
Print Preview - Send Ticket
...
- Select Print Ticket or Print Pay Receipt from the Close Ticket screen.
- Select Print Ticket or Print Pay Receipt from the Close Ticket screen.
- The Print Preview - Pay Ticket prompt will display. Please see below for available options:
a) Email - Emails a copy of the ticket to the member. Member must have valid email address on file to function properly.
b) Print & Email - Prints the ticket and emails the member a copy of the ticket.
c) Print - Prints the ticket.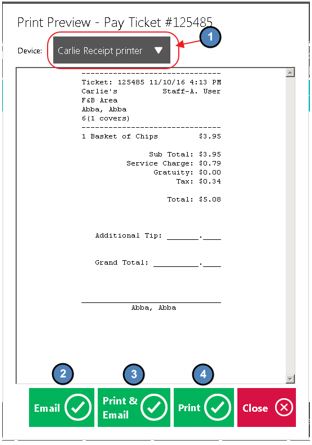
...
2) The Print Preview - Settle Ticket prompt will display. Same options as Print Preview - Pay Ticket are available.
System Tools
Please see our POS System Tools manual for in-depth information regarding functionality contained within the System Tools button and associated tabs.
...
4) Clock Out - explained in the Clocking-Out for Breaks section of this document.
...