...
The Terminals setup screen will launch.
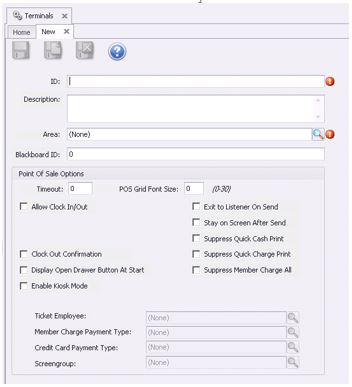
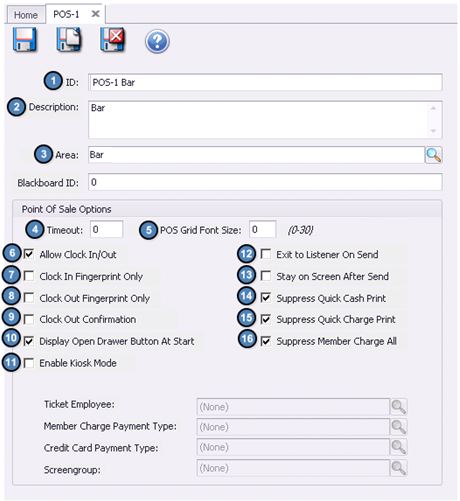
General Information
ID - give the terminal a name that describes which POS workstation or Area it will connect to.
Description - additional description is optional for internal view only.
Default Area - Select the Area that the workstation will default to (keep in mind the Area also determines the default screen group and table layout).
POS Options
Timeout - if idle how long before the terminal signs the server out.
POS Grid Font Size - how wide the member grid lines should be (18 & 19 is the default for touch screens).
Allow Clock In/Out - if using Timekeeping this must be checked.
Clock In Fingerprint Only - only check this field if using a fingerprint device for clock in/out or accessing tickets.
Clock Out Fingerprint Only - only check this field if using a fingerprint device for clock in/out or accessing tickets.
Clock out confirmation - if using timekeeping it is recommended that this field be checked.
Display Open Drawer Button At Start - if checked, a button in the main POS screen will activate allowing the cash drawer to be opened without having to settle a ticket.
Enable Kiosk Mode - Only used when Kiosk Mode is utilized. Please see our Kiosk Mode manual for additional details.
Exit to Listener On Send - if checked, the workstation will exit back to Employee login screen after Send is selected in the POS. This is typically used when more than one server will be using the same Workstation.
Stay on Screen After Send - if checked, the user will stay in the POS screen after send. This setting is mostly used for bar terminals where only one server works the area/terminal.
Suppress Quick Cash Print - if checked, the system will not print a member receipt with Quick Cash Settlements.
Suppress Quick Charge Print - if checked, the system will not print a member receipt with Quick Charge Settlements.
Suppress Member Charge All - if checked, the Member Charge All feature will be removed at the POS.
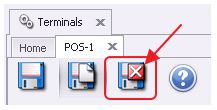
Lastly, click Save & Close to complete the setup of the new Terminal.
Workstation Devices
As mentioned earlier, Workstation Devices are what the user selects when logging in to the POS.
Accessing the Tool
To create a new Workstation Device, navigate to POS across the top toolbar and select Devices.
...