| Table of Contents | ||||||||||
|---|---|---|---|---|---|---|---|---|---|---|
|
...
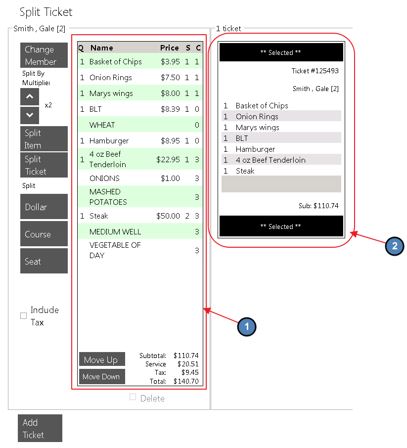
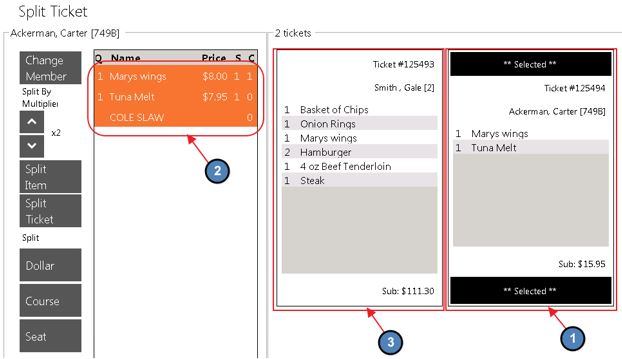
On the Split Ticket Screen, the ticket on the far left will display the Item details (from the “Selected” ticket) such as modifiers, price, QTY, seat position, and course. It is from this area that you will be moving the items from one ticket to another.
The ticket with the black top/bottom border labeled “Selected” only shows the QTY and Item name. This helps make more room for multiple ticket display.
When more than one ticket is displayed, the ticket labeled “Selected” is the one that will have its items displayed in the far left area.
Important: You cannot do anything with the items from the “Selected” ticket other than view; all action is done from the far left area.
Split Ticket
...
Options
Once the ticket is displayed in the split ticket screen, there are various ways a ticket may be split.
...
7) Select OK on the bottom right corner of the screen and your changes will be saved.
Split By Multiplier
Split by Multiplier provides the ability to split an Item or an entire ticket by a specified number.
Example 1 - Item: if you have 3 tickets on one table and they all want to split the bottle of Wine, you can split the Item by 3.
Example 2 - Ticket: if you have 3 members and they want to split the ticket evenly, you can split a single ticket by using the multiplier.
Split by Multiplier - By Item
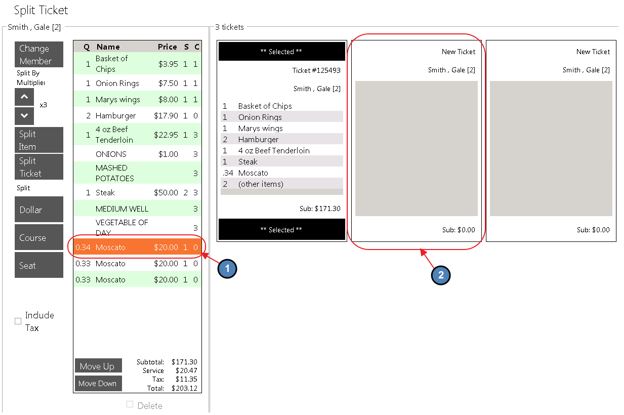
1) Click Add Ticket and create the number of tickets needed for the split.
...
3) The Item will be split by the number you selected. In this example it was split by 3. Highlight one of the splits and touch the ticket to move the Item.
Notes:
- The Split by Item changes the QTY to fractions to calculate the Item price to meet specified amount.
- Once you click OK, the changes have been saved. Once the changes have been saved there is no way to merge the amounts and QTY back to original state. You will have to delete the ticket and start again.
...
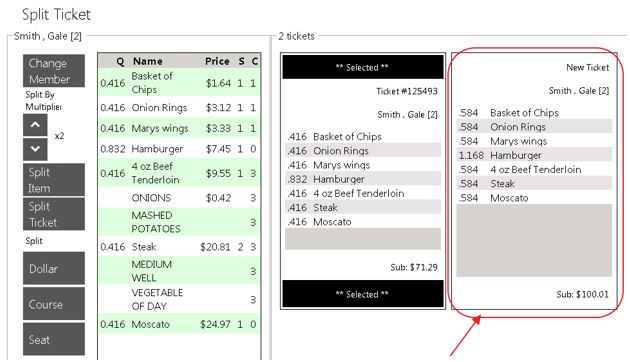
1) Click the < > arrows under Split by Multiplier to increase or decrease the multiplier. Select Split Ticket.

Notes:
- The Split by Ticket changes the QTY to fractions to calculate the Item price to meet specified amount.
- Once you click OK the changes have been saved. Once the changes have been saved there is no way to merge the amounts and QTY back to original state. You will have to delete the ticket and start again.
- Once you click OK, all subsequent items entered on a ticket will be added to the ticket as a full amount and QTY.
Split By Dollar
Split by Dollar can be used when one party wants to pay a specified amount; in this example one party will only pay $100 out of $206.97. It is advisable to wait until you are ready to close the ticket before performing this option, see notes for more information.
...
3) The system will create a ticket for the amount specified.
Notes:
- The Split by Dollar changes the QTY to fractions to calculate the Item price to meet specified amount.
- Once you click OK the changes have been saved. Once the changes have been saved there is no way to merge the amounts and QTY back to original state. You will have to delete the ticket and start again.
- All subsequent Items entered on a ticket after the ticket has been Split by Dollar will be added to the ticket as a full amount and QTY.
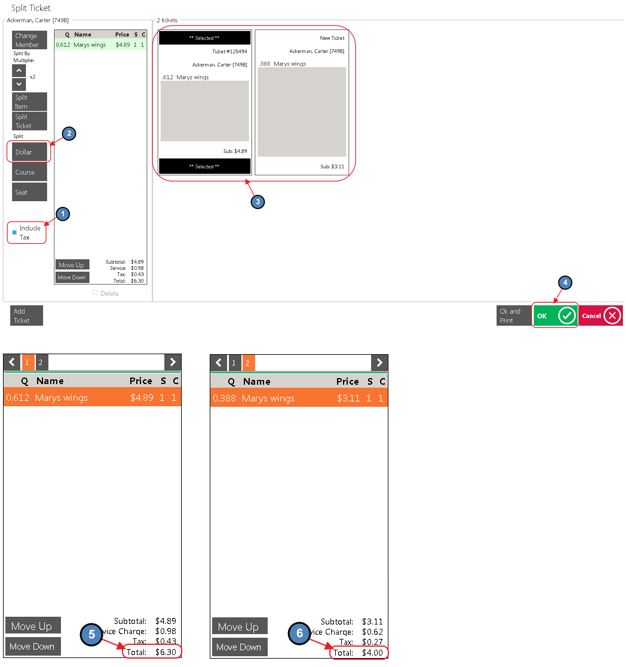
Include Tax
The Include Tax feature is utilized to calculate tax into the the split.
Example - we have one Item on a ticket with a price of $8.00, including tax and service charge totals to $10.30. So let’s say two kids are splitting that Item. One of them only has $4.00, so I need his ticket to only charge him $4.00 tax included. I navigate to the Split Ticket screen, check the Include Tax box and click Dollar. I enter the amount of $4.00. Now I have two tickets – one for $4.89 and one for $3.11. When I click OK and the tickets are created, the original ticket is for $6.30 total and the new ticket is for $4.00.
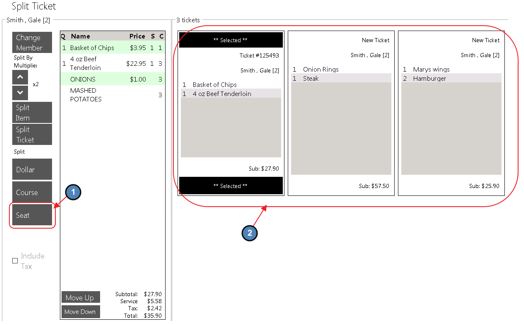
Split By Seat
Split by Seat allows the user to split a ticket based on seating. This option can only be used if the user is using seat positioning.
...
2) Select Seat under the Split section. The system will create a ticket for each different seat position.
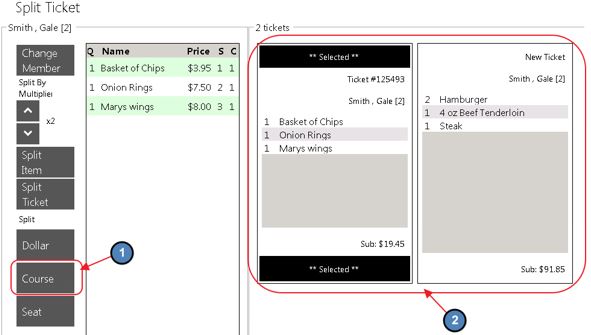
Split By Course
Split by Course allows the user to split a ticket by course. For instance, one member will be paying for the Appetizer and another member will be paying for the Entrees. Please note that this option can only be used if the user is using courses.
...
2) Select Course under the Split section. The system will create a ticket for each different course.
Combining Tickets
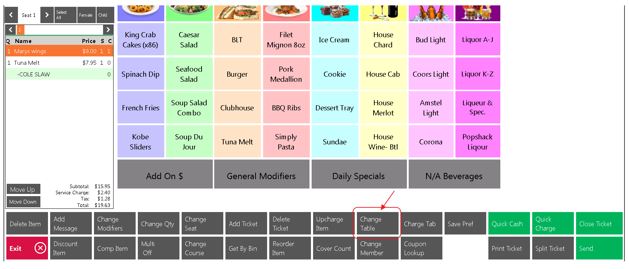
In the event a member decides to pay for another member sitting at a separate table, the Split Ticket feature can be used to combine the 2 tickets into 1. Please note that in order to combine the tickets, the two tickets will need to be moved to the same table.
1) Use the Change Table feature to move the ticket the member is paying for over to their Table.
2) Once the 2 tickets are on the same table, select Split Ticket.

3) Select the ticket that was moved to make it the “Selected” ticket. Highlight the Items from the far left ticket display then click/touch the ticket to move the Items to.
4) All Items will be moved to the paying member’s ticket and the ticket the Items were transferred from will be automatically deleted.
Best Practices
When ticket splitting is required, ensure to enter Items as normal, and then hit the Split Ticket button to launch the Ticket Splitting screen.
Ensure ticket to be split (or tickets with Item(s) to split) is marked as “Selected” in the Split Ticket screen, prior to attempting to move Items to another ticket.
When combining Tickets, ensure all tickets are at the same table prior to merging them by utilizing the Change Table feature in the main POS screen. Once all tickets are at the same table, utilize the Split Ticket feature to combine the tickets.
...
Q: I need to move an Item back to its original ticket - how do I do that?
A: Ensure the new ticket created is marked as “Selected” in the Split Ticket screen. Then, highlight the Item from the left screen on the Split Ticket screen, and then click on the original ticket to return the item to it.
Q: When splitting a ticket by a fixed amount (ie - $10.00 on one ticket, and the remainder on another), how do I ensure the $10.00 ticket is the final amount due, inclusive of all tax, etc?
A: When splitting a ticket to a fixed all-inclusive amount, ensure to check the Tax Included box, located on the Split Ticket screen when splitting the ticket.Can I give a rain check a fixed expiration date, like 12/31/2017, rather than having it expire in 365 days?
Downloadable Guide
...