| Table of Contents | ||||||||
|---|---|---|---|---|---|---|---|---|
|
...
Billing Schedules are designed as a club specific solution to billing members their dues and other club fees associated with rentals, lockers, boat slips, etc. The Office system can generate various frequencies of Billing Schedules including Monthly, Quarterly, Semi-Annual, Yearly, and Custom schedules. In this document, we will explain the various functionalities of a Billing Schedule, and how to create a new schedule. Use Case The Club has a Member Type called Seasonal Membership, which allows a Member to join the Club for a limited number of months during the year. The Club assigns a custom Billing Schedule to the Seasonal Membership Member Type, to ensure fees are only charged to these Seasonal Members during the months of their seasonal Membership (ie - $1,200/month from January - March).
|
Content
|
|---|
...
To access Billing Schedules,
1) Navigate to Membership across the top toolbar and select Billing Schedules.

Area Groups
To set the Areas where the Credit Book may be used:
Navigate to System (across the top of the screen) and select Area Groups.
If an Area Group already exists for the Credit Book Type you are adding, you do not need to add a new one. You can double click into an Area Group to see which Areas are connected to it.
To add a new Group or area:
Click the New icon.
Then,
1) Enter the Area Group Name.
2) Add a Description. (optional)
3) Select the Areas that are to be included in the Area Group.
4) Click Save & Close.
Credit Book Type
Navigate to Membership (across the top of the screen) and select Credit Book Types.
Click the New icon.
Then,
1) Enter the Name of the Credit Book Type.
2) Add Description (optional).
3) Add Default Description - This will be the description that shows in Posting Summaries.
4) Select the Credit and Debit Ledger.
Two scenarios:
a) If a pro owns the shop, a Due to Pro Liability account will need to be selected.
b) If club owns the shop, a Shop Credit Liability account will need to be selected.
5) Select the Area Group.
6) Enter an Expiration Value (in days).
7) Allow Dependents to Spend Credit - If checked, dependents will be able to redeem credit assigned to the Primary Member.
8) Automatically Apply Payment in POS - If checked and the Member has an available balance, the system will automatically apply Credit Book as the settlement type in POS.
9) Include Balance on Statement - If an available Credit Book Balance is desired on monthly statements, please check this box, and contact support so they can make the necessary adjustments to your Statement Template.
10) Click Save & Close.
Credit Book Eligible
During POS item setup, be sure to flag any items that can be purchased with Credit Book as Credit Book Eligible. Members will not be able to use their credit on items not flagged as such.
Issuing Credit Book
Credit Book is issued in the Membership module via the Credit Book Wizard.
To access the Credit Book Wizard, select Membership from the left user menu and choose Member Credit Book.
1) Select Quick Add from the Lookup Value.
2) The issue date of the Credit Book batch will always default to the day it is entered. Click Next.

3) Select the Member to whom the credit should be issued.
4) Select the appropriate Credit Book Type.
5) The Description, Debit Ledger, and Expiration Date will automatically populate based on the rules assigned to the Credit Book Type.
6) Enter the Amount of credit to issue.
7) Click Finish.

8) Post the Batch.

Redeem Credit Book at POS
Credit Book is redeemable at any Area that is selected within the Area Group that is linked to the Credit Book Type.
To redeem Credit Book,
1) Create a transaction and select a Member as normal.
2) Select the item(s) and choose Close Ticket when ready to complete the transaction.

3) If the Credit Book Type is flagged to automatically apply payment at POS and the Member has an available balance, the Credit Book Settlement Type will automatically populate into the Payments tab.

Note: If the Credit Book Type is not configured to automatically apply payment at POS, the Credit Book Settlement Type button will display the amount of the ticket that is redeemable by Credit Book. Select this Settlement.

4) Complete the Transaction.
Multi-Settlement
In many cases, a Member may purchase some items that are redeemable by Credit Book and some that are not.
For instance, if a Member purchases two items, one is Credit Book eligible the other is not, Members can use their Credit Book on the Credit Book eligible item, and choose another settlement for the item that is not.
If the Credit Book Type is flagged to automatically apply payment at POS, when the ticket is closed the system will automatically apply the Credit Book settlement to the balance of the ticket that is Credit Book eligible. Members can then pay the rest of the balance with another settlement type.
If the Credit Book Type is not configured to automatically apply payment at POS, the Credit Book Settlement Type will display the amount on the ticket that is redeemable by Credit Book. Select this settlement and another method of payment to cover the remaining balance on the ticket.

If the Credit Book Type is not configured to automatically apply payment at POS, the Credit Book Settlement Type will display the amount on the ticket that is redeemable by Credit Book. Select this settlement and another method of payment to cover the remaining balance on the ticket.

Display Credit Book Balance at POS
To display an available Credit Book balance at POS, navigate to System< Areas within CMA.
Double click the Area, select Member Info on left pane, check Credit Book Total.

The Member’s available Credit Book balance will now show in the top left corner of the POS screen.

Credit Book Expiration Wizard
This feature allows the user to edit the expiration date or reduce the remaining balance of the Credit Book.
Note: Credit Book balances cannot be increased in this feature.
1) Navigate to the Membership menu and select Credit Book Expiration.

2) The Credit Book Expiration Wizard will launch.
As Of Date and Type
Populate the following fields to designate Credit Memo population to edit.
a) Expired As Of: All Credit Book with a current expiration date on or before the date entered here will be listed on the next screen.
b) Type: Select the Credit Book Type by clicking the lookup icon. Only one Credit Book Type can be selected at a time.
Then, choose to either change an expiration date or reduce a balance.
Change (Credit Book) Expiration Date
1) Once As of Date and Type are populated, change expiration date(s) as follows:
a) Change the Expiration Date: Select this to manually extend, or expire the current expiration date of a Credit Book value. The system will list all Credit Book with the As of Date entered and allow the user to manually choose which Credit Book value to change.
b) Automatically adjust all expired: Enter the new expiration date to which all Credit Book expirations should be adjusted. The system will adjust ALL Credit Book that meets the Expired As Of Date entered above.
Note: Do not choose this option if the Credit Book values require different expiration dates.
2) Then, select Next to move to the next screen.
3) In the New Expire Date Column, enter the New Expiration Date for the corresponding Credit Book value.
Note: If Automatically adjust all expired is checked, the date entered in this step will be entered into the New Expire Date column for ALL Credit Book values that met the As Of Date. However, if desired, the New Expire Date can still be manually changed if any select Credit Book values should have a different expiration date.
4) When complete, click Finish.
Reduce Remaining Balance
To reduce the remaining balance (the balance cannot be increased):
1) Check Reduce Remaining Balance option to reduce all or a portion of the amount.
2) Using Payment Type: Click the down arrow and select the settlement type. The settlement type should be the same POS settlement type for Credit Book at the POS.
3) Automatically reduce all expired: ALL Credit Book values that meet the As of Date will be reduced to zero. For Example; if all Credit Book values expire at the end of the year, use this option. Note: It is possible to change the amount to expire if there are Credit Book values that will not be reduced to zero.
4) Item: Item to use for the credit (see club accountant for this information). This is the unused portion of the Credit Book.
5) Select Next to move to the next screen.
6) Enter the Expire Amount; this is the amount to reduce from the remaining balance.
Example: if the remaining balance is $55 and the new remaining balance should be $50, then enter $5 in the Expire Amount column.
7) When complete, click Finish.
Note: If Automatically reduce all expired is checked, all Credit Book values will be reduced to zero by their remaining amount.
Clean Up Unused Portion of Credit Book
Note: This is typically done at end of year to clean up unused Credit Book balances.
1) Set up an Item called Unused Credit Book.
Note: This item must be set up as a Retail Item and Ask For Price must be checked.
2) Sell the item Unused Credit Book at the POS for the entire balance of the selected Member’s Credit Book. This will clear up the unused portion of the Credit Book.
View Credit Book in Member Profile
To view Credit Book activity within a Member’s profile,
- Redeemed transactions will be represented with a negative balance.
- Credit added to the Member’s account will have a positive value.
Note: Credit added to the Member’s account will display the amount added and an expiration date.
6) To view a summary of any transaction redeemed by Credit Book, simply double click on the transaction in question.
Details will display.
Credit Book Reports
There are two reporting options for Credit Book available in Interactive Reports.
Navigate to Interactive Reports and expand Membership.
Credit Book Transactions Report
This report details the Credit Book transactions for a certain time period. It allows the user to specify the Credit Book Types and Detail Level they would like to view. The report also has the capability to filter results down to a specific member, and drill-down to the transaction level detail.
Outstanding Credit Book
This report details the outstanding balances of all Credit Book values in the system. It can be filtered by Credit Book Type, and Detail level. Furthermore, the report has the ability to include or exclude expired Credit Book.
Best Practices
Establish Credit Book policies, prior to setting up Credit Book in the system. Define when it will be issued, how long it will be valid from date of issuance, where it can be spent, and who can spend it to ensure administration of the Credit Book within the system is aligned with actual practices.
Once policies are in place, ensure periodic processes to manage expired balanced, and/or reduce balances are also in place and utilized consistently so that your Membership can rely on the Credit Book balances in the system.
FAQs
Q. Can Guests receive a credit book credit?
A. While it is possible to issue credit to a Guest, it is not recommended as there is currently no way to track (in the system) who redeems the credit. To issue credit to a Guest, choose Guest as the Member in the Credit Book Wizard, and in the description, include the Guest’s Name for referencing in the POS. This will, however, require a Club to maintain a ledger of usage. It is recommended to issue Gift Cards, rather than Credit Book to Guests.
Q. Are credit book balances transferable?
A. While Club policies will dictate this answer, transferring balances from one Member to another, is accomplished by expiring the existing Member’s credit (Credit transferred from this Member), and issuing a new credit to the other Member (Credit transferred to this Member).
Downloadable Guide
...
2) The Billing Schedules Grid will launch.

The primary functions associated with managing Billing Schedules are embedded in the Billing Schedules setup screen, which can be accessed by double-clicking on an existing Schedule (to edit an existing Schedule), or clicking the New button (to create a new Schedule).
Billing Schedules Setup Screen - Tab Overview
In this section we will review the various tabs within a Billing Schedule.
General Information

1) Name - Enter the Name of the new Billing Schedule.
2) Description - Enter a Description. (Optional)
3) Invoice Description - This will be the Description that appears on the Invoice at the corresponding Month End.
4) Use Item/Use Combo - If the entity to be charged at Month End is an Item, select Use Item (Selected by Default). If the entity to be charged at Month End is an Item Combo, select Use Item Combo.
5) Billing Item - If Use Item was selected in the previous step, select the Billing Item to be charged at Month End. OR
Billing Combo - If Use Combo was selected in the previous step, select the Billing Combo to be charged at Month End.
6) Include This on Memo Billing Statements - If checked, the Billing Schedule will be included on any Memo Billing Statements sent for the corresponding Month End.
7) Rental Schedule - If the Billing Schedule is created for Rental Schedule purposes, please check this box.
8) Pre-Bill - Only applicable to Quarterly, Semi-Annual, Yearly, or Custom Schedules. If checked, the system will bill one month prior. For instance, if the frequency is set to Yearly and the Start Month is October, members will be billed on the September 30th Statement.
9) Show Dependents in Member List - If checked, Dependent members will show in the Member Lookup found on the Member’s tab of the Billing Schedule.
Important: Any Billing Schedule applied to a Dependent Member will also show on the Primary Member’s account.
Schedule
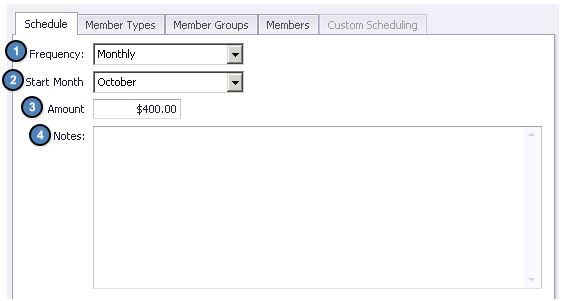
1) Frequency - Select the frequency of the Billing Schedule (Monthly, Quarterly, Semi- Annual, Yearly, or Custom).
2) Start Month - Select the month the Billing will start.
3) Amount - Enter the Amount to be billed.
4) Notes - Add any additional Notes to the Billing Schedule.
Applying the Billing Schedule to Members
Keeping Billing Schedules consistent, and easy to track is an essential process. With this being said, it is most efficient and effective to apply Billing Schedules at the Member Type or Member Group level. It is, however, possible to apply Billing Schedules on an individual Member basis if desired. Please see below instructions on how to apply Billing Schedules at each level.
Important: It is NOT recommended to apply Billing Schedules at multiple levels at the same time.
Member Type
To apply the Billing Schedule at the Member Type level, first navigate to the Member Types tab within the Billing Schedule.
Next, select the Member Types Lookup, click to select the applicable Member Type(s) from the Lookup value, and choose Select at the bottom of the screen.
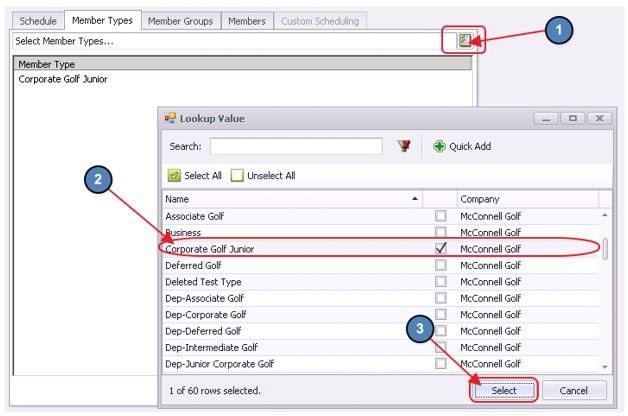
ALL members who are in the Member Type(s) selected on this screen will be billed.
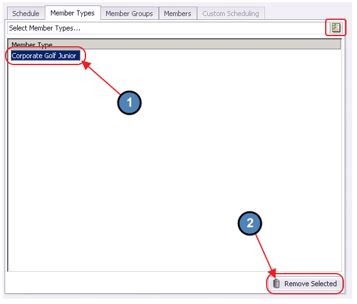
To remove a Member Type from the Billing Schedule, highlight the Member Type in question from the selected Member Types screen and choose Remove Selected.
Member Groups
To apply the Billing Schedule at the Member Group level, first navigate to the Member Groups tab within the Billing Schedule.
Next, select the Member Groups Lookup, click to select the applicable Member Group(s) from the Lookup value, and choose Select at the bottom of the screen.
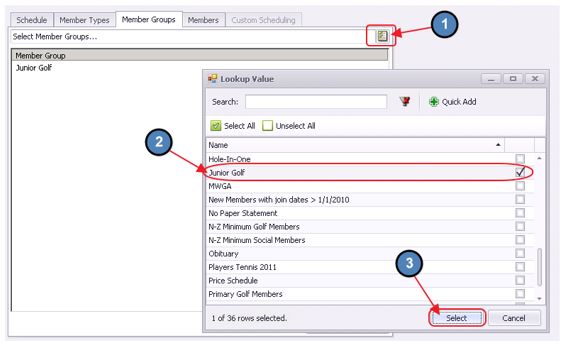
ALL members who are in the Member Group(s) selected on this screen will be billed.
To remove a Member Group from the Billing Schedule, highlight the Member Group in question from the selected Member Groups screen and choose Remove Selected.

Members
Although it is not recommended, Billing Schedules can also be applied on an individual member basis.
To add an individual member to the Billing Schedule, first navigate to the Members Tab within the Billing Schedule.
Next, select the Member Lookup, click to select the applicable Member(s) from the Lookup value, and choose Select at the bottom of the screen.
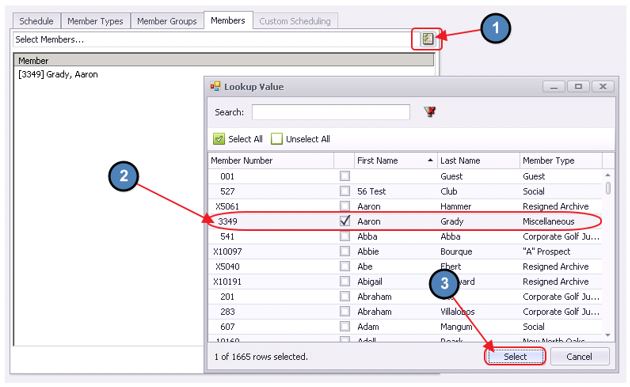
Any Member selected on the Members tab will be billed.
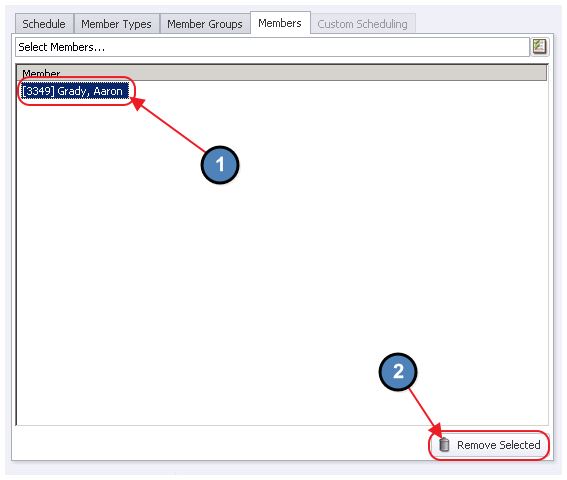
To remove a Member from the Billing Schedule, highlight the Member in question from the selected Members screen and choose Remove Selected.
Custom Scheduling
Billing Schedules can also be applied on a custom basis. For instance, with Custom Scheduling, the user can specify which months out of the year the Billing Schedule will apply to their members, or they can specify varying billing amounts depending on the month.
To set up a Custom Schedule, first set the Frequency on the Schedule tab to Custom. As evidenced in the screenshot below, when the Frequency is set to Custom, the Start Month and Amount become Null.

Navigate to the Custom Schedule tab, and as you will see the amount that was originally entered on the Schedule tab, has now populated into the Amount field next to each Month. This is used to help simplify the entry process. Please navigate through each Month and apply the appropriate amount to be charged.

Create a New Billing Schedule
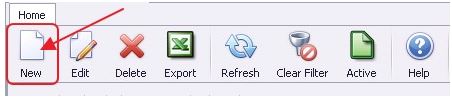
1) Click the New icon on the toolbar. OR
2) Right-click anywhere on the Billing Schedules Grid and select New.

3) The Minimum setup screen will launch.

4) Complete the General Information, and then navigate to each of the below tabs and enter all relevant information. It is recommended to enter information on these tabs in sequential order.
Please see the Tab Overview section of this document for further instructions on each tab.
General Information
Schedule
Applying the Billing Schedule to Members
Custom Scheduling (if applicable)

Billing Summary in Member Profile
A summary of the Billing Schedules applied to a Member (whether via Member Group, Member Type, or Individual Member application) is available on the Billing Tab within the Member’s profile.
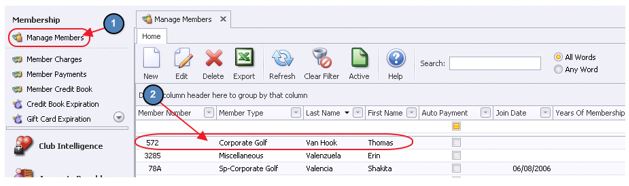
To access this tab, please navigate to the Manage Members Grid and select the Member in question.
Select Billing on the left pane within the member’s profile. A list of the Billing Schedules applied to the member will populate.
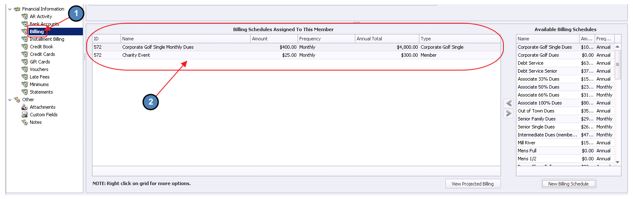
While it is most efficient and effective to add Billing Schedules at the Member Group and Member Type level, it is possible to add and delete Billing Schedules specific to the Member on this tab. Assigned Billing Schedules are on the left. Available Billing schedules are on the right.
Assign a schedule by selecting an Available schedule and clicking on the Left Arrow. Conversely, to un-assign a schedule, click on the Assigned schedule, and then click the Right Arrow.
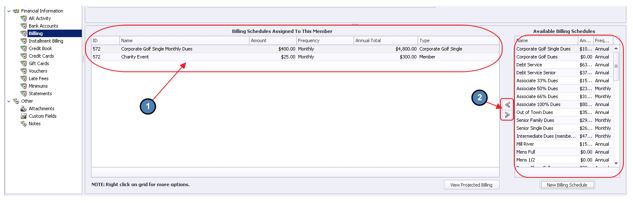
Important: The un-assign function applies only to the Billing Schedules assigned at the Member level, and will not work for those assigned at the Member Group or Member Type level. To determine the level at which the Billing Schedule is applied, refer to the Type column. If the Billing Schedule is applied at the Member Group or Member Type level, the name of the Group or Type will be listed. If the schedule is applied on an individual member basis, Member will be listed in the Type column.

Additionally, a new Billing Schedule can be created within the member’s profile. To do so, click the New Billing Schedule button.

Note: Within the Billing Schedules Assigned To This Member grid, there are shortcuts to edit/customize a displayed billing. For example a Club wants to temporarily adjust fees being charged to one Member for the next (3) months. To access options, right-click on a listed item. Then, choose Customize Billing Schedule option.

Screen will launch (on top of existing window) for editing. Note: [CUSTOM] is added to the name of the billing schedule and changes made in this window will apply to this Member only. Once the settings are changed, save and close, or simply close screen to cancel and exit without making changes.

Caution! If changes are made in this custom screen, this billing schedule for this Member will no longer be seen by the system as a Member Group or Member Type billing schedule. Instead, it will now be seen by the system as an individual Member billing item, and therefore will need to be treated as such until the billing schedule is reverted back to its default state.

Note: Other Members attached to the original billing schedule will not be impacted by this change.
To revert the billing schedule back to its original state (for instance, after the 3 month period has passed), right-click on the custom schedule, and choose Revert to Default.

Confirm reversion by clicking Yes.

Note, all original settings (including Name, Amount, Frequency and Type), return to the attached billing schedule.

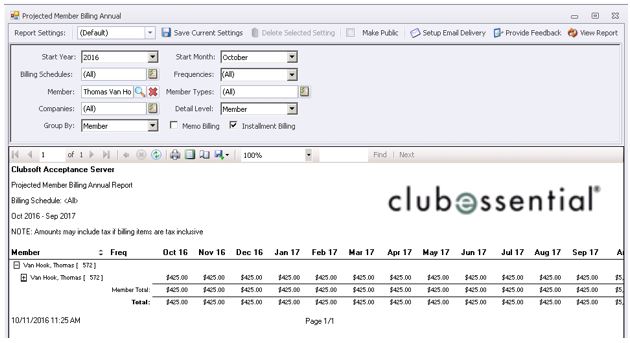
To view projected billing based on future schedules specific to the Member, click View Projected Billing.

The Projected Billing Report will launch.
Best Practices
Utilize Member Groups and/or Member Types to more efficiently and effectively assign Billing Schedules to Members.
FAQs
Q. Why did a Member (who is no longer part of a Group with an attached billing schedule), still get billed for the associated fee?
A. Members who have had Custom adjustments to their billing schedules will not automatically stop applying when the Member leaves the associated group because the system has deemed this as a Member specific billing schedule when the schedule becomes Custom. To ensure the Member is no longer charged for the fee, go into the Member’s profile, Billing Tab, right-click on the billing item (it will say CUSTOM), and click Revert to Default. The billing will then automatically drop off the Member’s account as they are no longer a Member of the Group, and the default billing schedule was based on membership to the Group.
Downloadable Guide
Billing Schedules - Guide