...
- Select the Mobile POS Application to launch the Mobile POS.
.png?version=1&modificationDate=1566243420927&cacheVersion=1&api=v2&width=250)
2. Enter your POS Pin Code (Consult a Club Admin if you do not know your code) and select Continue
Opening a Ticket
In this section, we will discuss the necessary procedures to follow when Opening a Ticket.
- If you have any Open Tickets they will be displayed on the Open Tickets Tab: you can touch or mouse click to open the Ticket.
- To open a New Ticket, choose Select Table.

Note: The Open Tickets tab should be blank before running the End of Shift Report
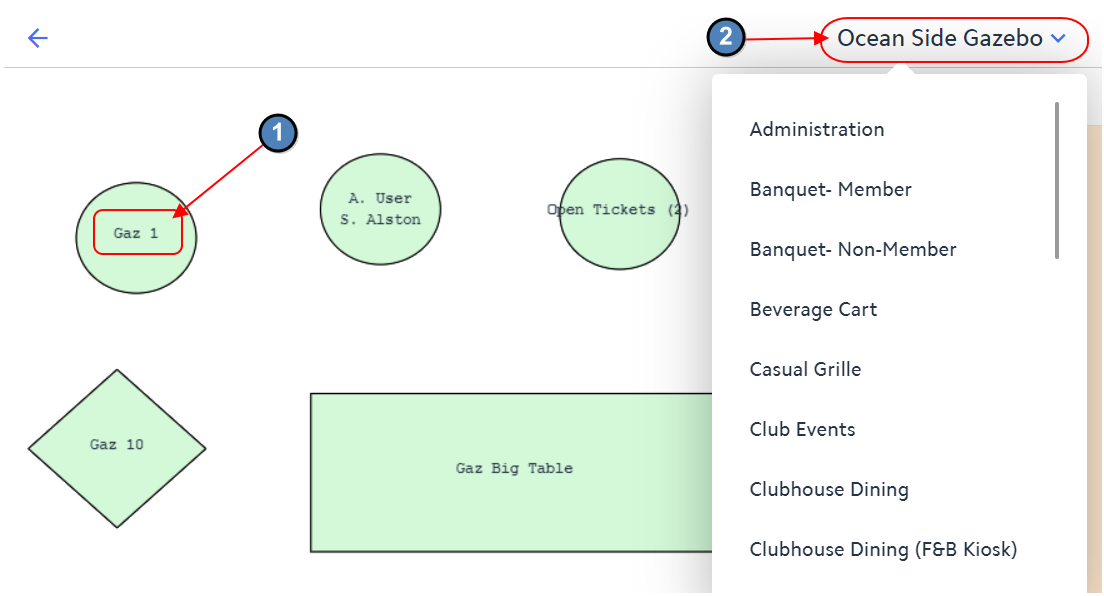
3. Select the Table.
.png?version=1&modificationDate=1566243420284&cacheVersion=1&api=v2&width=325)
Notes: If you need to navigate to a different Area, select the Area dropdown and choose the applicable Area.
.png?version=1&modificationDate=1566243420449&cacheVersion=1&api=v2&width=486)
- If the table has an Open Ticket it will display the server and member name. If there is more than 1 Ticket on the Table it will display how many Tickets are open on the table.
.png?version=1&modificationDate=1566244321077&cacheVersion=1&api=v2&width=646)
- The Areas displayed in the Area dropdown can vary depending on individual security rights; if you only work the Beverage Cart you may only see the Beverage Cart Area and may not see any others. If you do not see an Area listed that should be, please have your manager check your Employee setup.
4. Member Lookup - Enter the Member Number or Member Name. If this is not a Member, select Guest Member on the top right.
As you are typing the number or name, the screen will display the results. Click, or touch the member name.

Navigating the POS Screen
Note: There are important areas to point out on the POS screen.

Adding an Item to a Ticket
- The Screen Group (POS Menu) is user defined: buttons can be setup to access a single Item, Item Category, Combo, single Modifier, Modifier Group, or another Screen Group.
- Navigate to the applicable button within the Screen Group, and either touch or click to add the Item to the Ticket. In this example, we are navigating to the Sandwiches Item Category Button, and selecting the Hamburger Item to add to the ticket.
.png?version=1&modificationDate=1566244323733&cacheVersion=1&api=v2&width=927)
.png?version=1&modificationDate=1566244324327&cacheVersion=1&api=v2&width=726)
3. If there are Forced Item Modifiers associated with the Item, users will be brought directly to the corresponding Item Modifier Group screens. If there are no Forced Item Modifiers associated with the Item, the Item will be added directly to the Ticket. In this example, the Hamburger Item is asking us to select a Meat Temperature, Additional Toppings, Cheese Preference, and a Side. Forced Modifiers will vary by Item.
.png?version=1&modificationDate=1566244324957&cacheVersion=1&api=v2&width=944)
.png?version=1&modificationDate=1566244325666&cacheVersion=1&api=v2&width=909)
Note: If the Item Modifier Group allows users to choose Multiple options within a Modifier Group, simply select the Check Mark once all applicable Modifiers have been selected. This will move the user to the next Item Modifier Group screen.
.png?version=1&modificationDate=1566244326244&cacheVersion=1&api=v2&width=400)
.png?version=1&modificationDate=1566244327660&cacheVersion=1&api=v2&width=600)
.png?version=1&modificationDate=1566244326915&cacheVersion=1&api=v2&width=600)
4. Select the Seat in which the Item should be placed.
.png?version=1&modificationDate=1566244328256&cacheVersion=1&api=v2&width=330)
Notes: If you know the Seat Number prior to entering the first Item, simply select the Seat Number, and the Items you enter will be automatically placed on the selected Seat.
.png?version=1&modificationDate=1566244328817&cacheVersion=1&api=v2&width=400)
5. The Item will then be added to the Ticket with Pricing, Coursing, Seating, Modifiers, and Modifier Upcharges included.
.png?version=1&modificationDate=1566244329472&cacheVersion=1&api=v2&width=300)
6. To navigate back to the main Screen Group, select the Home button or the Back Arrow to get to the previous screen.
...
.png?version=1&modificationDate=1566244330181&cacheVersion=1&api=v2&width=400)
7. As mentioned, if you know the Seat Number prior to entering the next Item, simply select the Seat Number, and the Items you select next will be automatically placed on that selected Seat.
Note: Please note the Selected Items Screen will update to reflect the Items entered on the Seat you have currently selected. In this instance, we entered the Hamburger on Seat 1, if we then select Seat 2, the screen will not have any items entered because there are no Items entered on Seat 2.
.png?version=1&modificationDate=1566244331189&cacheVersion=1&api=v2&width=266)
Note: To view ALL Items entered on the Ticket, select the ALL option.
.png?version=1&modificationDate=1566244332171&cacheVersion=1&api=v2&width=200)
8. Proceed to
...
add any additional Items to the Ticket as needed. In this example, we have entered a Hamburger and Bud Light on Seat 1, and Buffalo Wings and Corona on Seat 2.
.png?version=1&modificationDate=1566244333207&cacheVersion=1&api=v2&width=250)
Sending to the Kitchen
After the appropriate Items are added to the Ticket, touch or click Send to send the Items to the Kitchen. Once Items have been sent their font color will change to Red.
.png?version=1&modificationDate=1566244334191&cacheVersion=1&api=v2&width=250)
Editing Items
- To access the functions associated with Editing an Item (Eg. Delete, Discount, Upcharge, etc), touch or click the applicable Item from the Selected Items Screen.
Note: Available options will vary depending upon if the Item has been Sent to the Kitchen.
Has Not Been Sent Has Been SentSent Has Been Sent
.png?version=1&modificationDate=1566244335510&cacheVersion=1&api=v2&width=628)
2. Below we will discuss each option associated with Editing an Item. Please select the option applicable to your scenario for more details.
Upcharge - Will prompt for an amount to override and increase the price of an Item.
Discount - Gives users the ability to discount an Item. Requires security rights.
Comp - Gives users the ability to comp an Item. Requires security rights.
Remove Discount- Gives users the ability to remove any discounts currently added to an Item.
Reorder - Used to reorder Items already Sent to the Kitchen (Eg. Another Round of Drinks).
Change Quantity - Users can change the Quantity on an Item (including making quantity negative for a credit). Please note you cannot change the quantity of an Item after it has been sent to the Kitchen.
Add Message - Users can add an additional message or prep instructions for an Item. This message will be included on the prep Ticket to the Kitchen.
Change Modifiers - Users can add, change, and delete Item Modifiers. This function can only be performed if the Item has NOT been sent to the Kitchen.
Delete - Used to Delete an Item from a Ticket. If the Item has already been Sent, the user will be prompted to enter a reason for voiding the Item. A Void Ticket will then be sent to the Kitchen.
Change Seat Number - If using seat positions, this allows you to assign or change the seat.
Change Course - If using coursing, user can use this feature to change the default course for an item. For example, if an Item was set up as an appetizer but the member wants it as an entrée, you can change the course to properly group on the prep ticket using this feature. Please note you cannot change the course after an Item has been sent to the Kitchen.
...
Enter the amount to override the price, or use the canned percentages.
.png?version=1&modificationDate=1566244336229&cacheVersion=1&api=v2&width=339)
Notes:
- The amount entered must be greater than the Item Price. If you want to decrease the price, use the Discount option.
- You can upcharge before or after Send.
...
Discount
Touch or click Discount. This gives users the ability to discount an Item. Requires security rights.
A message box will pop up if you do not have security rights to Discount. You will need to get a manager to continue. Have the Manager Enter their PIN Code and click OK.
.png?version=1&modificationDate=1566244337341&cacheVersion=1&api=v2&width=250)
Users will be prompted to Enter a Reason for the Discount. Select from the list of Pre-Created Discount Reasons or key in a Reason. Click OK once the reason has been entered.
.png?version=1&modificationDate=1566244338310&cacheVersion=1&api=v2&width=450)
Enter the Discount (on the right side are pre-set percentages, if none of these are what you want select the Other option to manually enter the desired percentage). If it is a flat dollar discount amount, then use the numbers on the left of the screen. Click OK when finished.
.png?version=1&modificationDate=1566244339345&cacheVersion=1&api=v2&width=341)
Comp
Touch or click Comp. Gives users the ability to comp an item. Requires security rights.
A message box will pop up if you do not have security rights to Discount. You will need to get a manager to continue. Have the Manager Enter their PIN Code and click OK.
Users will be prompted to Enter a Reason for the Comp. Select from the list of Pre-Created Comp Reasons or key in a Reason. Click OK once the reason has been entered.
Once OK has been selected the Comp will apply.Back to Edit Items Options
Remove Discount
Touch or click Remove Discount. This gives users the ability to remove any discounts currently added to an Item.
.png?version=1&modificationDate=1566244342267&cacheVersion=1&api=v2&width=250)
Reorder
Touch or click Reorder. This is used to reorder Items already Sent to the Kitchen (Eg. Another Round of Drinks).
Enter the Quantity to reorder and click OK.
.png?version=1&modificationDate=1566244343220&cacheVersion=1&api=v2&width=232)
At the next prompt, select Yes if you want the order to be sent to the prep printer, No if you want the Item added to the Ticket but not sent to the prep printer.
...
.png?version=1&modificationDate=1566244344227&cacheVersion=1&api=v2&width=250)
Change Quantity
Touch or click Change Quantity. This will allow users to change the Quantity on an Item (including making quantity negative for a credit). Please note you cannot change the quantity of an Item after it has been sent to the Kitchen.
Enter the desired Quantity. When entering a negative Quantity, select the minus (-) sign first and then select the amount of the negative Quantity. Click OK when finished.
.png?version=1&modificationDate=1566244345267&cacheVersion=1&api=v2&width=231)
Add Message
Touch or Click Add Message. This will allow users to add an additional message or prep instructions for an Item. This message will be included on the prep ticket to the Kitchen.
Select from the list of Pre-Created Messages, or key in a Message. Click OK when finished.
.png?version=1&modificationDate=1566244346277&cacheVersion=1&api=v2&width=450)
Change Modifiers
...
- Delete if the modifier highlighted should be removed.
- Add New To Base if another modifier is to be added to the list.
Click Save when finished.
.png?version=1&modificationDate=1566244347408&cacheVersion=1&api=v2&width=350)
Delete
Touch or click Delete. This is used to Delete an Item from a Ticket.
...
Select OK on the confirmation prompt.
.png?version=1&modificationDate=1566244348217&cacheVersion=1&api=v2&width=250)
If the Item has been Sent to the Kitchen Enter a Reason for Voiding the Item. Select from the list of Pre-Created Void Reasons or key in a Reason. Click OK when finished. A Void Ticket is then sent to the Kitchen.
.png?version=1&modificationDate=1566244349247&cacheVersion=1&api=v2&width=450)
Change Seat Number
...
Select the correct seat number. Click OK when finished.
.png?version=1&modificationDate=1566244350269&cacheVersion=1&api=v2&width=231)
Notes:
- Seat numbers can be modified before and after Items are sent.
- Seat numbers can be used for splitting tickets.
...
Change Course
Click or touch Change Course. If using coursing, user can use this feature to change the default course for an item. For example, if an Item was set up as an appetizer but the member wants it as an entrée, you can change the course to properly group on the prep ticket using this feature. Please note you cannot change the course after an Item has been sent to the Kitchen.
Select the applicable Course Number and the new option will be applied.
.png?version=1&modificationDate=1566244351299&cacheVersion=1&api=v2&width=390)
Notes:
- Item Categories and individual Items can be set up with a default course number and changed at any time before using this function.
- The system will automatically draw a line divider between courses on the Send Ticket.
...
Multi-Edit
Please follow the instructions below in the event a user needs to edit multiple Items at once (Eg. Discount multiple Items by 20%).
- Select Edit Items.
.png?version=1&modificationDate=1566244352199&cacheVersion=1&api=v2&width=250)
2. Select the applicable Items.
.png?version=1&modificationDate=1566244353235&cacheVersion=1&api=v2&width=226)
Note: Users can use the Arrows to Reposition Items on the Selected Items Screen.
.png?version=1&modificationDate=1566244354192&cacheVersion=1&api=v2&width=250)
3. Once the applicable Items are selected, choose Edit X Items.
.png?version=1&modificationDate=1566244355212&cacheVersion=1&api=v2&width=250)
4. Choose the applicable option, and proceed to
...
edit the Items.
.png?version=1&modificationDate=1566244356307&cacheVersion=1&api=v2&width=350)
Ticket Level Options
In this section, we will discuss the Ticket Level Options of the Mobile POS (Eg. Delete Ticket, Add Ticket, Print Pay Ticket, etc). Please see available options below.
...
- Select the plus sign (+) to the right of the Member’s name.
.png?version=1&modificationDate=1566244357252&cacheVersion=1&api=v2&width=250)
2. The user will be prompted to change the cover count.
.png?version=1&modificationDate=1566244358290&cacheVersion=1&api=v2&width=324)
3. The Member Grid will populate. Select the applicable Member or choose Guest Member if this is a Guest.
.png?version=1&modificationDate=1566244359315&cacheVersion=1&api=v2&width=900)
4. An additional ticket will populate on the Table.
.png?version=1&modificationDate=1566244360312&cacheVersion=1&api=v2&width=269)
5. To navigate between multiple Tickets on a single Table, select the Member Dropdown and choose the applicable Member.
.png?version=1&modificationDate=1566244361234&cacheVersion=1&api=v2&width=250)
More
The More option will populate additional options for the user to choose. Each option is discussed below.
.png?version=1&modificationDate=1566244362263&cacheVersion=1&api=v2&width=250)
.png?version=1&modificationDate=1566244363235&cacheVersion=1&api=v2&width=306)
Change Member- Used if the member to be billed needs to be changed for any reason.
Change Table- Used if a member wants to move to a different Table or Area, or to join tickets.
Change Cover- Used to change the cover count at any time.
Split Ticket- Used to Split a Ticket. Please see our Mobile POS Split-Ticket Manual for more information on splitting tickets.
Print Pay- Prints the pay receipt ticket prior to closing the ticket.
Delete Ticket- Will delete current ticket.
...
The Member Grid will populate. Select the applicable Member or choose Guest Member if this is a Guest.
Change Table
Touch or click Change Table. This is used if a member wants to move to a different Table or Area, or to join tickets.
The Area Layout will populate. Select the applicable Table or choose the Area Dropdown to navigate to a different Area.
Change Cover
Touch or click Change Cover. This is used to change the cover count at any time.
Split Ticket
Touch or click Split Ticket. This is used to Split a Ticket. Please see our Mobile POS Split Ticket Manual for more information on splitting tickets.
...
Select OK on the Confirm Prompt.
.png?version=1&modificationDate=1566244366496&cacheVersion=1&api=v2&width=250)
If the Ticket has already been sent to the Kitchen, the user will be prompted to Enter a Reason for Voiding the Ticket. Select from the list of Pre-Created Void Reasons or key in a Reason. Click OK when finished. A Void Ticket is then sent to the Kitchen.
.png?version=1&modificationDate=1566244367068&cacheVersion=1&api=v2&width=450)
Additional Information About the Member
...
- Touch or click the Member’s photo, or if the member does not have a photo, touch or click the Grey placeholder image.
.png?version=1&modificationDate=1566244367767&cacheVersion=1&api=v2&width=250)
2. Additional information displayed includes Member Name, Member Number, Member Type, Birthdate, Minimum Activity (View Minimum), and Member Groups.
.png?version=1&modificationDate=1566244368503&cacheVersion=1&api=v2&width=350)
3. Select the toggle on the top right to navigate to additional information about any of the Member’s Dependents.
.png?version=1&modificationDate=1566244369163&cacheVersion=1&api=v2&width=314)
Settling the Ticket
In this section we will discuss options for Settling a Ticket. Please follow instructions below for Settling a Ticket using a Single Settlement Type, Multiple Settlement Types, or a Quick Settlement.
...
- Select Pay on the bottom left of the POS Screen to navigate to additional Settlement Options.
.png?version=1&modificationDate=1566244369722&cacheVersion=1&api=v2&width=250)
2. If the user wants to settle the full amount of the Ticket to one Settlement Type, select the applicable Settlement Type.
.png?version=1&modificationDate=1566244370461&cacheVersion=1&api=v2&width=250)
3. Then choose the full amount of the ticket on the bottom of the Amount Prompt in Blue.
.png?version=1&modificationDate=1566244371201&cacheVersion=1&api=v2&width=202)
Note: If the Cash Settlement Type is used, the Amount prompt will have a few pre-populated Cash options. Utilize these options if applicable, otherwise, enter the amount of Cash provided and select Save.
.png?version=1&modificationDate=1566244371774&cacheVersion=1&api=v2&width=250)
4. The Ticket Display will then show Ordered Items,
...
SubTotal, Tax, Service Charge (SC), Grand Total, Settlement Type, and any Change Due.
Select the (X) to the left of the Settlement to delete the Settlement, or select Done to close the Ticket.

5. A Settle Ticket will then print and the user will be sent back to the Open Tickets Tab.
Note: If this is a Cash Transaction, the user will be brought to a screen displaying the amount of Change to provide, and then the option to Print the Settle Receipt.
.png?version=1&modificationDate=1566244372489&cacheVersion=1&api=v2&width=250)
Multiple Settlement Types
...
- Select the first Settlement Type to be used.
.png?version=1&modificationDate=1566244373128&cacheVersion=1&api=v2&width=250)
2. Enter the amount to be charged to the Settlement Type and select Save.
.png?version=1&modificationDate=1566244373710&cacheVersion=1&api=v2&width=250)
3. Select the next Settlement Type.
.png?version=1&modificationDate=1566244374317&cacheVersion=1&api=v2&width=250)
4. If the next Settlement Type can be closed to the remaining amount of the Ticket, select the remaining amount on the bottom of the Amount Prompt in Blue.
.png?version=1&modificationDate=1566244374957&cacheVersion=1&api=v2&width=193)
5. There will now be Multiple Settlement Types shown on the Ticket Display. Select Done to close the Ticket.
.png?version=1&modificationDate=1566244375669&cacheVersion=1&api=v2&width=450)
Quick Settlement
There are two Settlement Types available for closing the ticket with one step, Cash and Member Charge. These options do not give you the ability to add additional tip, or split tender. Each option is explained below.
...
- Navigate to the bottom left of the POS Screen and select the $ icon.
.png?version=1&modificationDate=1566244376227&cacheVersion=1&api=v2&width=250)
2. An amount prompt will populate. Enter the applicable amount of cash received from the Member/ Guest, or select the Full Amount of the Ticket in Blue if the exact amount of the Ticket is received. Select Save when finished.
.png?version=1&modificationDate=1566244376801&cacheVersion=1&api=v2&width=250)
3. The user will be brought to a screen displaying the amount of Change to provide, and then the option to Print the Settle Receipt.
.png?version=1&modificationDate=1566244377498&cacheVersion=1&api=v2&width=250)
Quick Charge
Quick Charge will automatically settle the Ticket to Member Charge in the full amount of the Ticket. Navigate to the bottom left of the POS Screen and select the Member icon. A Settle Receipt (With Settlement Details) will then be printed.
...
If a Ticket is locked a lockbox icon will display to the right of the Ticket.
.png?version=1&modificationDate=1566244381150&cacheVersion=1&api=v2&width=900)
A Ticket becomes locked when another user is in the Ticket, but could also become locked when there is a disruption of service or other connectivity errors. Please follow instructions below to Unlock a Ticket.
- Select the check box checkbox to the left of the Ticket that needs Unlocked.
.png?version=1&modificationDate=1566244381744&cacheVersion=1&api=v2&width=900)
2. Additional options will populate. Select Unlock.
.png?version=1&modificationDate=1566244382656&cacheVersion=1&api=v2&width=900)
3. A prompt will then populate telling the user if they were successful or unsuccessful in Unlocking the Ticket. Select the X on the right of the prompt to close it.
.png?version=1&modificationDate=1566244383238&cacheVersion=1&api=v2&width=900)
Transfer
The Transfer option allows the user to transfer tickets between servers. This function is useful when servers have a shift change. Please follow instructions below to Transfer a Ticket.
- Select the check box checkbox to the left of the Ticket that needs Transferred.
.png?version=1&modificationDate=1566244383820&cacheVersion=1&api=v2&width=900)
2. Additional options will populate. Select Transfer.
.png?version=1&modificationDate=1566244384498&cacheVersion=1&api=v2&width=900)
3. Search for the applicable Employee and select their Name.
.png?version=1&modificationDate=1566244385056&cacheVersion=1&api=v2&width=900)
4. A prompt will then populate telling the user if they were successful or unsuccessful in Transferring the Ticket. Select the X on the right of the prompt to close it. If successful, the Ticket will then show on the Open Tickets Tab of the Employee selected in the previous step.
.png?version=1&modificationDate=1566244385676&cacheVersion=1&api=v2&width=900)
Member Charge
The Member Charge option gives users the ability to Member Charge a Ticket directly from the Open Tickets Tab. Please follow instructions below to Member Charge a Ticket from this Tab.
- Select the check box checkbox to the left of the Ticket that needs Member Charged.
.png?version=1&modificationDate=1566244386281&cacheVersion=1&api=v2&width=900)
2. Additional options will populate. Select Member Charge.
.png?version=1&modificationDate=1566244386950&cacheVersion=1&api=v2&width=900) \
\
3. A prompt will then populate telling the user if they were successful or unsuccessful in Transferring the Ticket. Select the X on the right of the prompt to close it. If successful, a Settle Receipt will then print for the Ticket selected in the previous step.
.png?version=1&modificationDate=1566244387530&cacheVersion=1&api=v2&width=900)
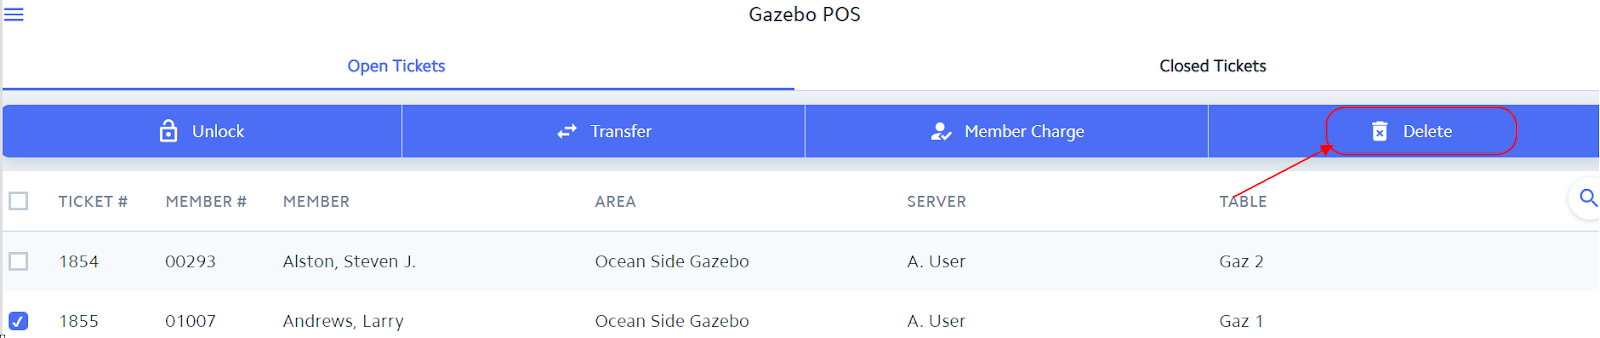
Delete
The Delete option gives users the ability to Delete a Ticket directly from the Open Tickets Tab. Please follow instructions below to Delete a Ticket from this Tab.
- Select the check box checkbox to the left of the Ticket that needs Deleted.
.png?version=1&modificationDate=1566244388103&cacheVersion=1&api=v2&width=900)
2. Additional options will populate. Select Delete.
3. If the Ticket has already been sent to the Kitchen, the user will be prompted to Enter a Reason for Voiding the Ticket. A Void Ticket will then be sent to the Kitchen. Click OK when finished.
.png?version=1&modificationDate=1566244389393&cacheVersion=1&api=v2&width=300)
4. A prompt will then populate telling the user if they were successful or unsuccessful in Deleting the Ticket. Select the X on the right of the prompt to close it.
.png?version=1&modificationDate=1566244390013&cacheVersion=1&api=v2&width=900)
Multi-Edit
Please follow instructions below in the event a user needs to edit multiple Tickets at once (Eg. Transfer multiple Tickets to a new server).
- Select the check box checkbox to the left of the tickets that need to be edited.
.png?version=1&modificationDate=1566244390797&cacheVersion=1&api=v2&width=900)
Note: To select ALL Tickets at once, select the check box to the left of Ticket #
.png?version=1&modificationDate=1566244391575&cacheVersion=1&api=v2&width=900)
2. Additional options will populate. Select the applicable option and follow additional prompts.
.png?version=1&modificationDate=1566244392122&cacheVersion=1&api=v2&width=900)
3. A prompt will then populate telling the user if they were successful or unsuccessful in editing the Tickets. Select the X on the right of the prompt to close it.
.png?version=1&modificationDate=1566244392675&cacheVersion=1&api=v2&width=900)
Quick Ticket
Quick Ticket allows the user to by-pass the Select a Table phase and move straight to selecting the Member. This is typically used in situations at the Bar or Snack Bar when a Member simply wants to order a quick drink or snack. Please follow instructions below.
- Select Quick Ticket.

2. A Member Grid will then populate. Select the applicable Member or if this is not a Member, select Guest Member on the top right. Then proceed to enter the transaction as normal.
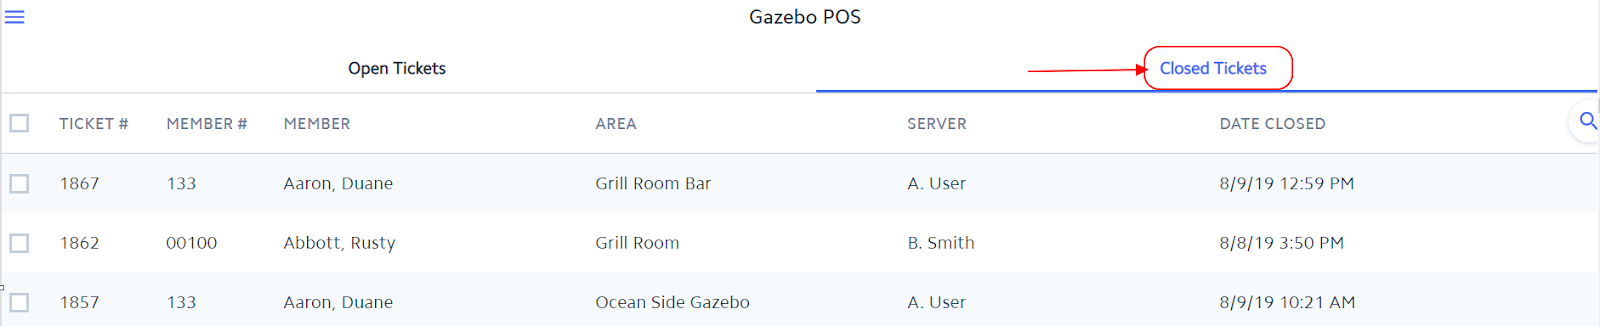
Closed Tickets
The Closed Tickets Tab allows the user to Re-Open, Re-Print, and Delete previously closed Tickets. Please be aware that users must have the proper security rights to Re-Open or Delete Tickets on this tab. Each option is explained below.
Important: Only tickets that have NOT been Posted will show in the Closed Tickets Tab.
Re-Open
Please follow instructions below in the event a Closed Ticket needs to be Re-Opened.
- Select the check box checkbox to left of the Ticket that needs Re-Opened.
2. Additional options will populate. Select Re-Open.

3. A prompt will then populate telling the user if they were successful or unsuccessful in Re-Opening the Ticket. Select the X on the right of the prompt to close it.

4. The Ticket will then show once again on the Open Tickets Tab. Touch or click on the Ticket to continue editing.

Re-Print
Please follow instructions below in the event a Closed Ticket needs to be Re-Printed.
- Select the check box checkbox to left of the Ticket that needs Re-Printed.

2. Additional options will populate. To Re-Print the Pay Ticket, select Print Pay. To Re-Print the Settle Ticket, select Print Settle.

3. A prompt will then populate telling the user if they were successful or unsuccessful in Re-Printing the Ticket. Select the X on the right of the prompt to close it.

Delete
Please follow instructions below in the event a Closed Ticket needs to be Deleted.
- Select the check box checkbox to left of the Ticket that needs Deleted.
2. Additional options will populate. Select Delete.

3. A prompt will then populate telling the user if they were successful or unsuccessful in Deleting the Ticket. Select the X on the right of the prompt to close it.
Fly Out Menu
The Fly Out Menu provides users the ability to access additional functionality of the Mobile POS. This includes a Member Lookup (To Access additional information about the Member), End Of Shift Report, Gift Card Balance, and an Item Lookup. Each option is explained below.
...