...
Once enabled, go to the Mobile Ordering tab, and configure the settings.

...
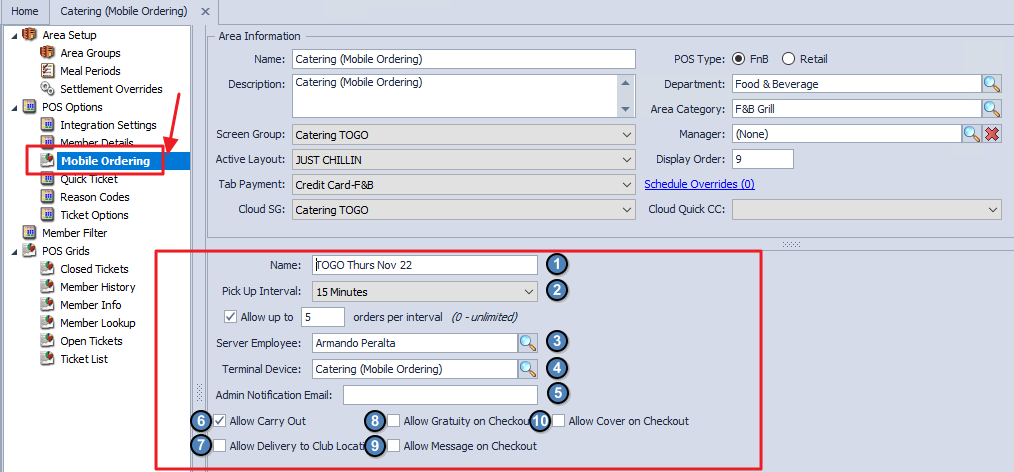
Name - Provide the Mobile Menu Ordering Location with a Name. This may be the same or different name as the Area, and is the name Members will see for the Area on the Mobile Ordering application.Minutes after start time before first pickup - Enter the minutes after a location opens that the first pick-up time would be available. For instance, if an area opened at 9:00am, and the first pick-up time you wanted to be available was 9:30, enter 30 minutes here.
Pick Up Interval - This field determines how many times show in the available Pickup time for the order. If set at 5 minutes, available times will be 9:30, 9:35, 9:40, etc. If set at 15 minutes, available times will be 9:30, 9:45, 10:00, etc.
Orders per Interval - Checking this box will allow for the number of orders per interval to be limited to allow for an even flow of tickets to the kitchen, ensuring all orders taken can be completed. Marking zero (0) orders per interval will leave the amount unlimited.
Server Employee - This will be the Employee responsible for the Mobile Orders. Choose an available employee from the list.Please Note: Best practice is to create an account solely for this purpose.
...
- Terminal Device - Set to the appropriate device that employees will sign in to view the Mobile Ordering tickets.
...
- Admin Notification Email - Define an admin email address to receive an automatic email each time a new Mobile Order is placed.
- Allow Carry Out - Check this box to allow pickup from this location. If this box is not checked, the option to select Pickup will not be provided to Members when placing their order.
...
- Allow Delivery
...
- to Club Location -
...
- Allows for delivery to predefined locations as set in CMA. Please see Member Access - Mobile Ordering on the App for more detail.
Add a Menu
...
- Allow Gratuity on Checkout - Allows members to add gratuity when checking out in Mobile Ordering.
- Allow Message on Checkout - Allows members to add a general message to a Mobile Order on the checkout screen.
- Allow Cover on Checkout - Allows members to add a cover count to their Mobile Order and enter how many individuals their order will serve.
Add a Menu
Once basic settings have been established, create Menu(s) for this Area by clicking the New button.
...
A Menu configuration screen will appear.
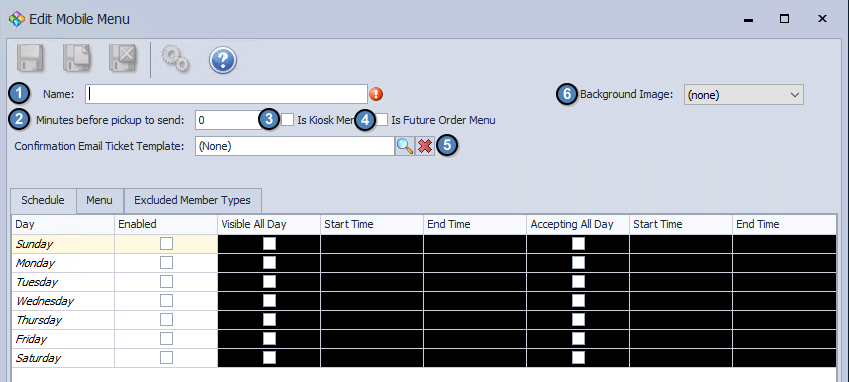

Complete the screen as follows:
Name - Enter the name of the Menu (ie - Pool Shack) as you would like it to appear on the Mobile Ordering screen.
Start Time and End Time - Enter the appropriate start time and end times this menu will be available. Menu will not be available outside of the window specified here.
Days Available - Check the days of the week this menu will be available for ordering. If not checked, menu will not appear on that day.
Minutes before Pickup Time - This setting determines how soon before an order is to be picked up, that it will fire to the kitchen. For instance, if an order is placed at 11:20amMinutes before pickup to send - This setting determines how soon before an order is to be picked up, that it will fire to the kitchen. For instance, if an order is placed at 11:20am, to be picked up at Noon, and this setting is set to 15 minutes, the order will auto-fire to the kitchen at 11:45am, 15 minutes before the time it is to be picked up.
Confirmation Is Kiosk Menu - Enables this menu to be visible in Kiosk Mode.
- Is Future Order Menu - Allows members to select a future date when placing their order via Mobile Ordering.
Confirmation Email Ticket Template - If set to none, will default to the settings of the Settle Ticket associated with the Area. Option to choose a different template if desired. Template will feed the confirmation email sent to the Member, if Member chooses email notifications when ordering.
Background Image - Select an image from a list of available options to display on the homepage of Mobile Ordering.
...
an image from a list of available options to display on the homepage of Mobile Ordering.
On the Schedule tab you will enable the day and time settings for each day of the week.
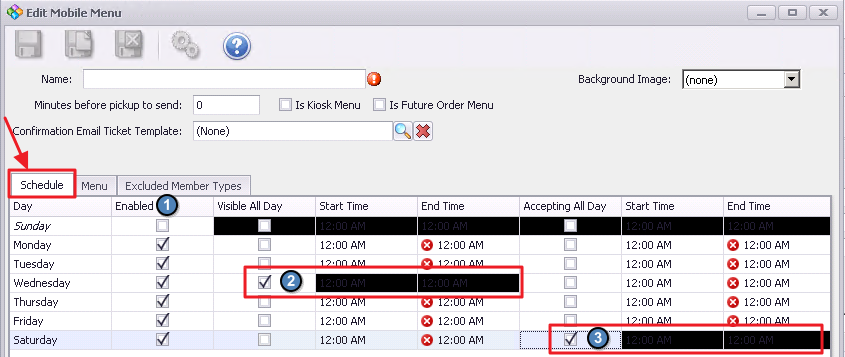
Complete the screen as follows:
Enabled - Checking this box opens the menu for that specific day.
Visible All Day - Checking this box allows members to see this menu all day. This will disable the Start and End Time for that specific day.Visibility Start and End Times - If this menu is not visible all day, enter the appropriate start time and end times this menu will be available. Menu will not be available outside of the window specified here.
Accepting All Day - Checking this box allows members to place a Mobile Order under this menu all day for that specific day.Accepting Start and End Times - If this menu is not accepting orders all day, enter the appropriate start time and end times this menu will accept orders. Menu will not be available outside of the window specified here.
Next on the Menu tab, establish the categories that will house the Menu Items. To establish a Category/Grouping, type a name for the Category here, and press Enter.
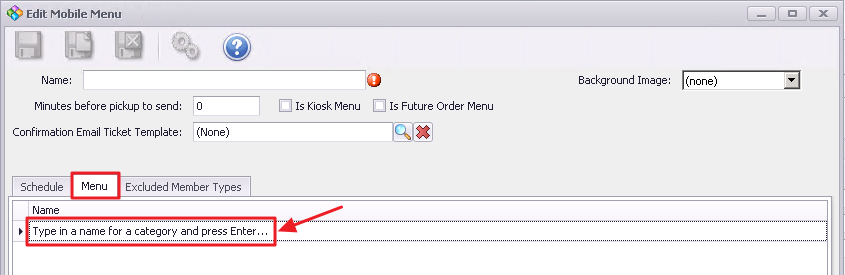

Then, search for an Item (from the list of existing Items), to add to the category. Click on the Search icon to launch the Item selector.
...
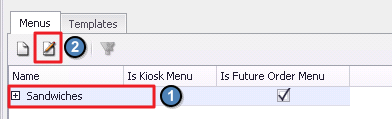
To edit an existing Menu, select the Menu to edit, and click the Edit icon.

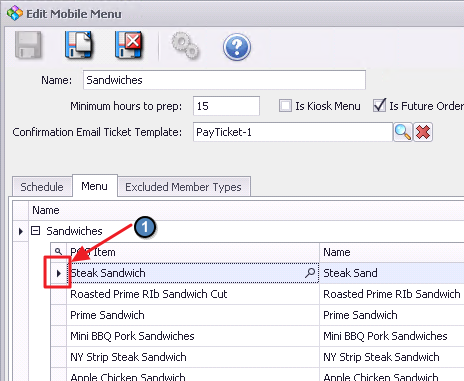
Edit as required. If an Item on a menu needs deleted. Click on the Arrow next to the Item, and then click the Delete key on your keyboard.


Similarly, to delete an entire Category on the Menu, click on the arrow next to the Category, and then click Delete on your keyboard.
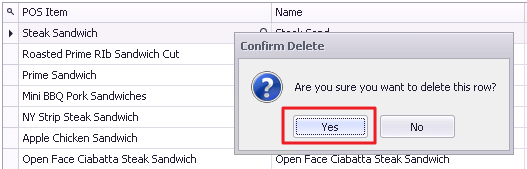

Confirm deletion.
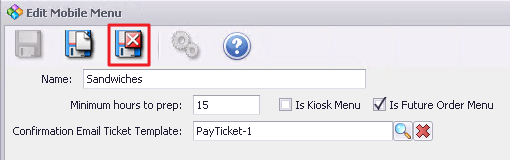
When complete, click Save and Close.

Delete an Existing Menu
To delete an existing Menu, select the Menu to edit, and click the Delete icon.
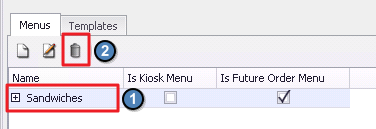

Menu will no longer be available for selection on Mobile Ordering.
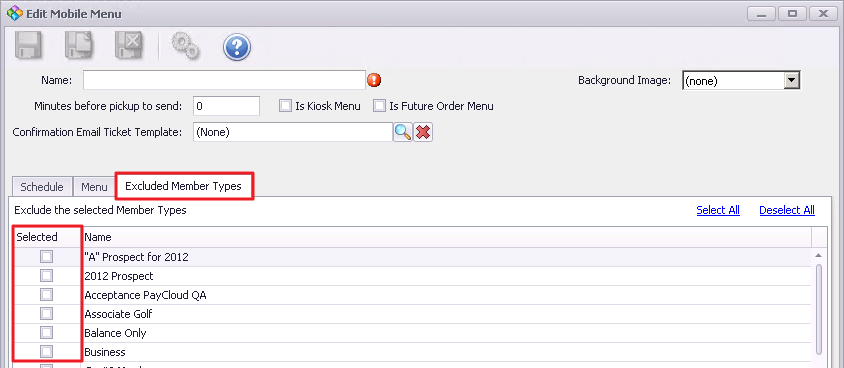
On the Excluded Member Types tab you will select any member type that should not have the ability to see this menu.
Finalize Configuration
When all settings have been configured for the area, click Save and Close to finalize configuration.
...