| Table of Contents | ||||||||
|---|---|---|---|---|---|---|---|---|
|
Overview
The Financial Report Writer enables Users to create Custom Financial Statement Reports within the Office Product. The tool functions similarly to Excel, yet is embedded within the Office Product, allowing Live (Posted) Data to directly feed the reports. Users who have needs in excess of the Stock Financial Reports, are encouraged to learn more about the Financial Report Writer. |
Video
This video provides Users with an Overview of the Financial Report Writer tool.
...
| Widget Connector | ||||||
|---|---|---|---|---|---|---|
|
Content
|
|---|
Accessing the Tool
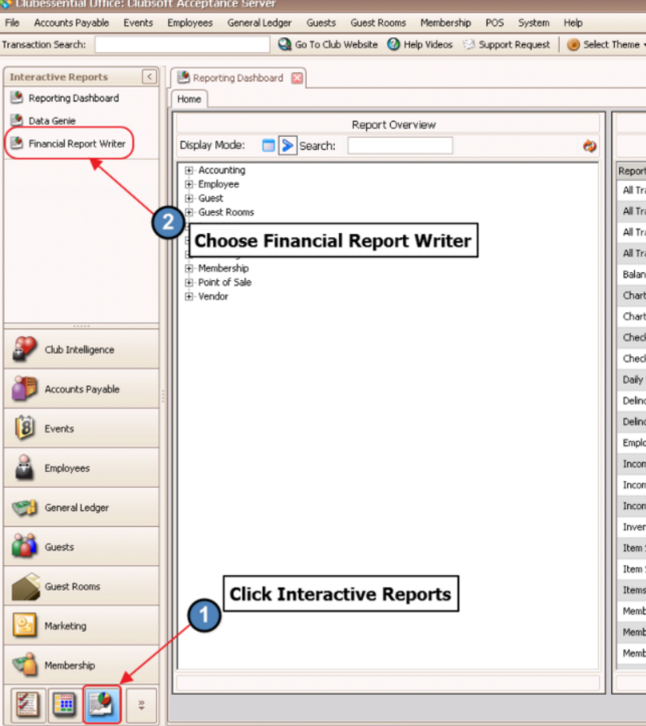
Within the Clubessential Office Product:
Choose Interactive Reports
Financial Report Writer
Functionality - The Basics
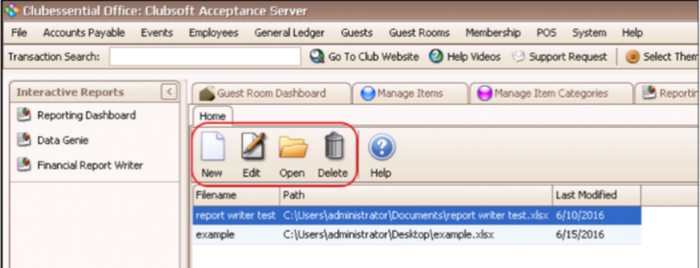
After launching the application, Users may choose to create a New report, Edit an existing Report Writer report, Open an existing Excel Spreadsheet, or Delete reports on the page.
Create a New Report
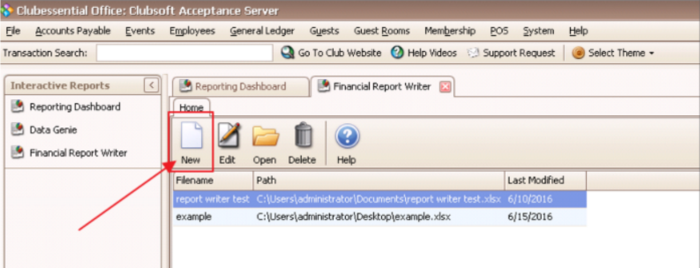
Click “New” to create a new report.
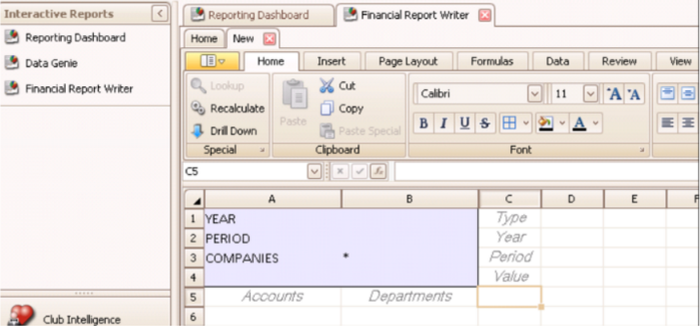
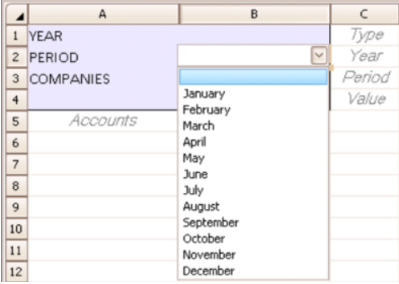
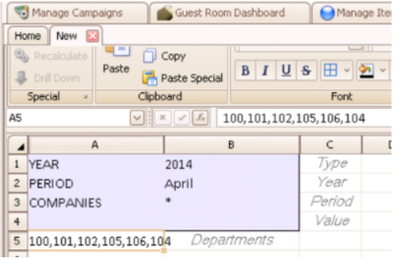
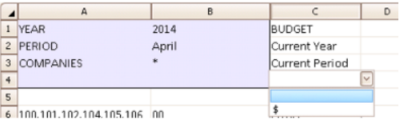
Define Sheet Settings
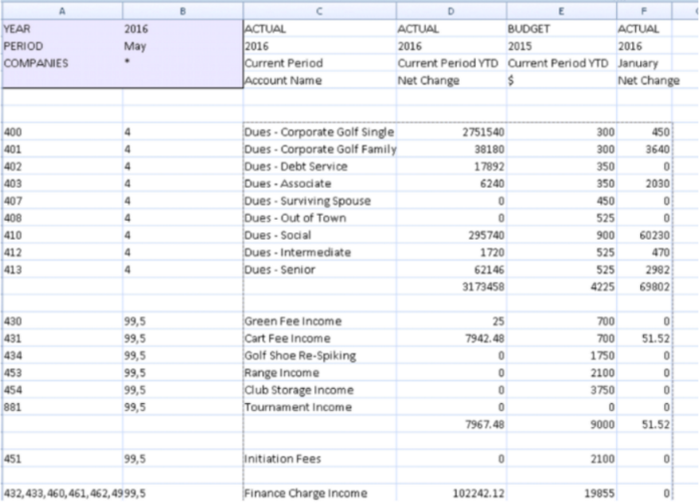
The area in purple shown above (Columns A and B, Rows 1-4) displays the built-in sheet setting components of the Report Writer, and serves as the reference point (base data) for the values displayed in the Report. The drop-down menus within the cells allow for easy customizable population.
The following parameters must be set in order for the Report Writer to populate data:
Year: This parameter allows users to specify the base year. Fifteen years of historical data, the current year, and 1 future year (to assist with the Budgeting process) are available for selection.
Period: This parameter allows users to specify the Base Month. All months (January - December) are available for selection.
Companies: This parameter allows Clubs with multiple Companies (within one Office environment), the ability to report by Company or in aggregate . A single company is indicated by a *.
By selecting desired data to populate the sheet settings in cells B1-B4, users define how the report will generate data based on the next stage of columnar and row definitions.
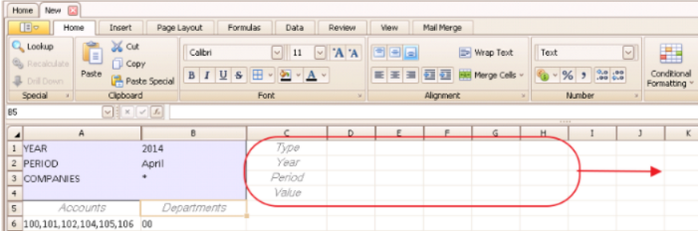
Define Row Settings
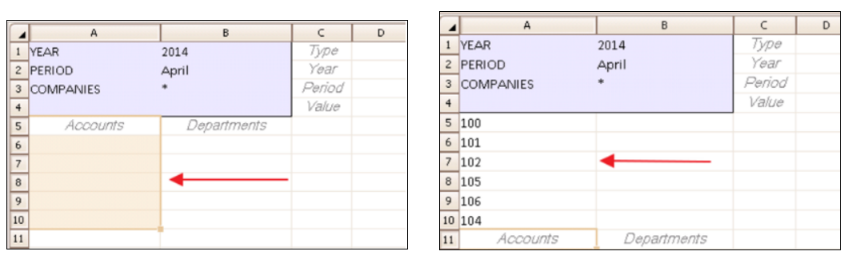
The Row Settings are in Columns A and B (beginning with row 5). The Row Settings include Accounts and Departments and must be set in order for the Report Writer to populate data.
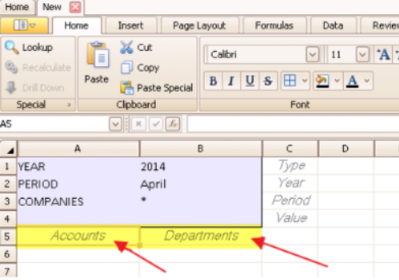
Account Settings
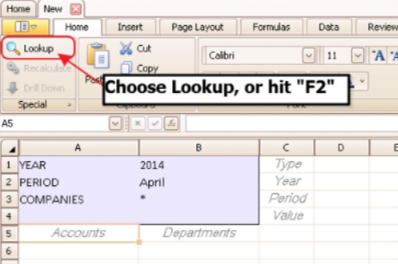
The Account Settings allow users to specify the Account, Range of Accounts, or Selected Group of Accounts for which data is requested. Users familiar with the Chart of Accounts may type in Account numbers directly. In addition to direct entry, Users may request assistance (using the Lookup button, or F2), to make their account selection.
Use Lookup screen to search for, filter, and specify accounts. Note that drop-down lists are available to help with selection.
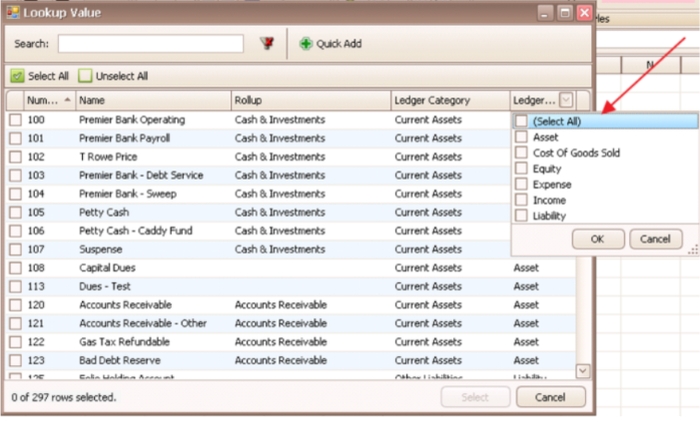
Check the box next to the account(s) desired, or choose “Select All” to have all returned accounts selected.
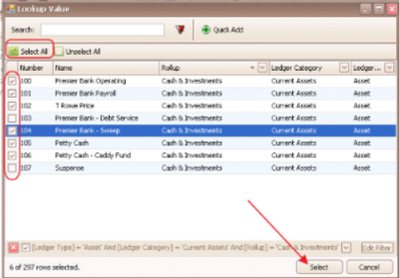
Selected accounts will then populate cell(s) highlighted prior to Account selection. In this case, one cell had been highlighted, so all accounts returned to one cell.
To give each Account its own row, highlight appropriate number of rows in Column A, prior to making Account selection. Then, select accounts. Accounts will populate individual rows as selected.
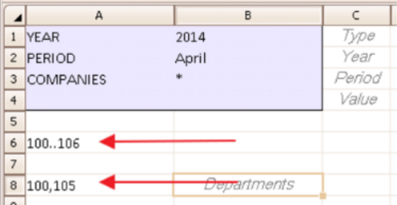
Range of Accounts may be specified by typing “..” between the beginning account number and the ending account number of the range. To manually specify multiple accounts that are not adjacent to each other in the chart of accounts, separate account numbers by utilizing a comma.
When a range or multiple accounts are selected, the Account Description display (if selected) will populate based on the first account in the selection.
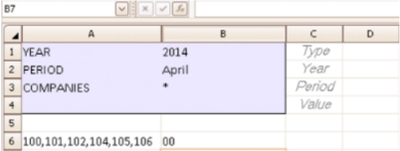
Department Settings
The Department Settings allow users to specify the Department, Range of Departments, or Selected Group of Departments for which data is requested. Users familiar with the Department structure may type in Department numbers directly. In addition to direct entry, Users may request assistance (using the Lookup button, or F2), to make their Department selection, and launch the Lookup screen. This may be used to search for, filter, and specify Departments. Note that drop-down lists are available to help with selection.
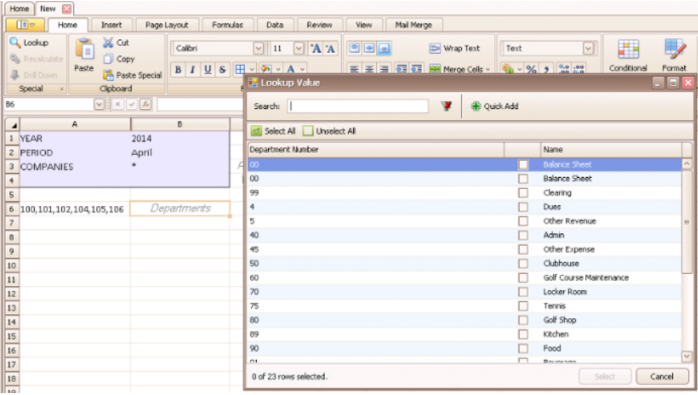
Check the box next to the Department(s) desired, or choose “Select All” to have all returned Departments selected.
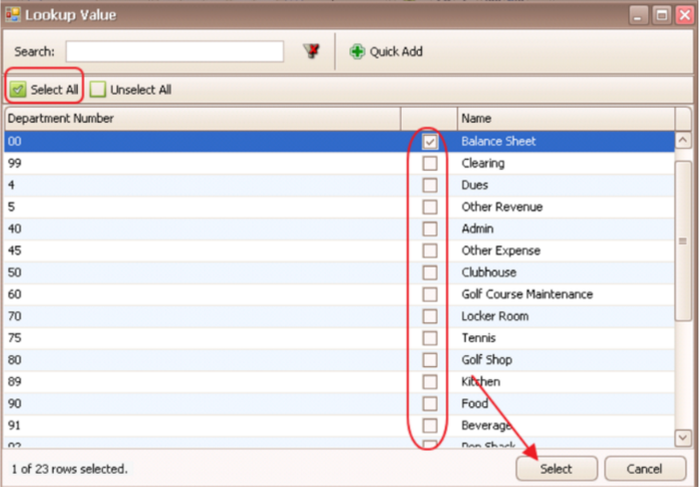
Selected Department(s) will then populate cell(s) highlighted prior to Department selection.
Define Column Settings
The Column Settings are in rows 1-4, beginning in Column C. The Column Settings include Type, Year, Period, and Value, and must be set in order for the Report Writer to populate data.
Type Settings
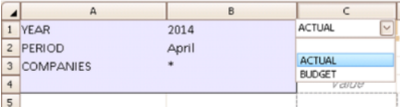
The Type Settings include Actual or Budget, and may be selected from the drop-down arrow located on the right side of the “Type” cell. The Type Setting must be specified before Year Setting can be designated.
Year Settings
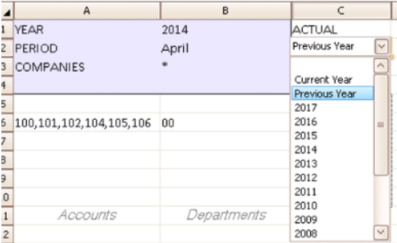
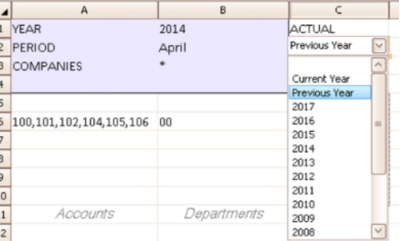
The Year Settings displayed depend on the Type Settings selected. For Actuals, Years will display up 15 historical, previous, and current. For Budget, Years will also display one future year.
Period Settings
Period Settings include Months, Quarters, Days, or Year to Date. To see all options, scroll down on the options scroll bar.
Value Settings
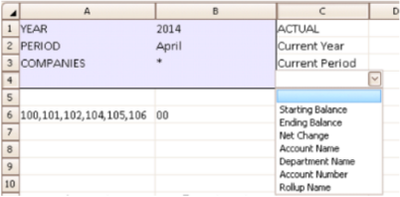
Value Settings are dependent on Type Settings. If Actual, options are: Starting Balance, Ending Balance, Net change, Account Name, Department Name, Account number, or Rollup Name. If Budget, option is $; the dollar value budgeted.
Once the above settings are specified, and data exists for the desired parameters, results will populate the grid. The data returned can be formatted, however, cannot be replaced with other values.
Save the Report
To save a report, click on the small arrow shown below, Click “Save As” to save a new report.
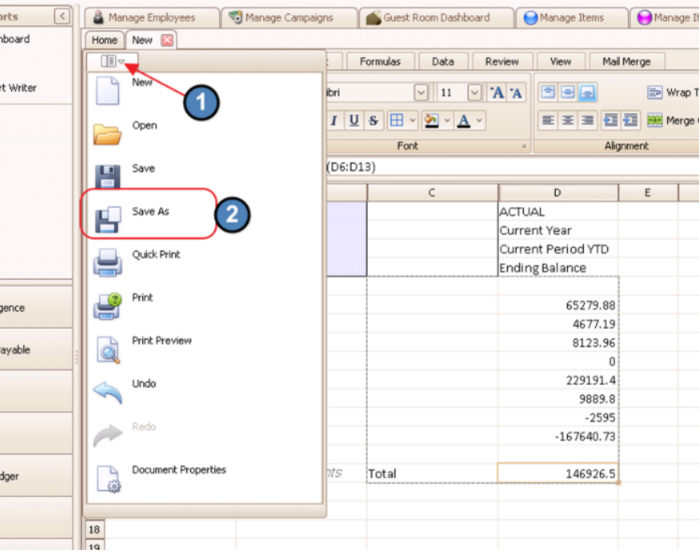
Once report has been saved initially, clicking “Save” thereafter will update existing report with changes made subsequent to initial save.
Other Functionality
Adding Formulas/Headings/Text
In addition to specifying the Sheet, Column and Row Settings, users may utilize cells not populated by the system to add Headings, Subtotals, Formulas, or other Formatting.
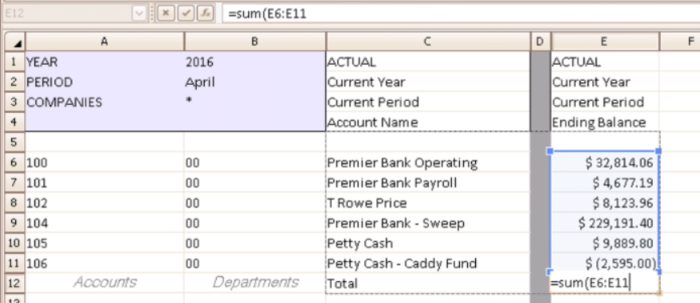
For instance, in the above example, column D was added to insert additional formatting/shading, and row 12 was utilized to Total the Amounts pulled from the system in rows 6-11). Note a formula (similar to Excel) has been added in cell E12.
Tip: Variance Columns are often utilized to compare one month’s results with another. Report Headings, and Subtotals/Totals are added frequently to further highlight results returned.
To insert customized text/formulas:
Into a Row, Columns A and B of that row must be blank.
(ie - Row 12, Columns A and B had no Accounts or Departments specified.)
...
Into a Column, Rows 1-4 of that column must be blank.
(ie - Column D, Rows 1-4 had not had Type, Year, Period, or Value specified.)
In addition to having formulas reference cells on the current sheet, formulas may also include cells on other tabs within the Workbook. To link to a cell on another tab within the workbook, the current cell must contain “=”, the name of the other tab, “!”, the cell desired (Column and Row).
The following example shows a formula in cell D6 of the current, “Income by type” tab summing together two cells (D7 & D8) from a different tab, named, “Income.” When referencing other cells, the data must be physically typed into the cell (rather than referenced by clicking on the cell in the other tab).
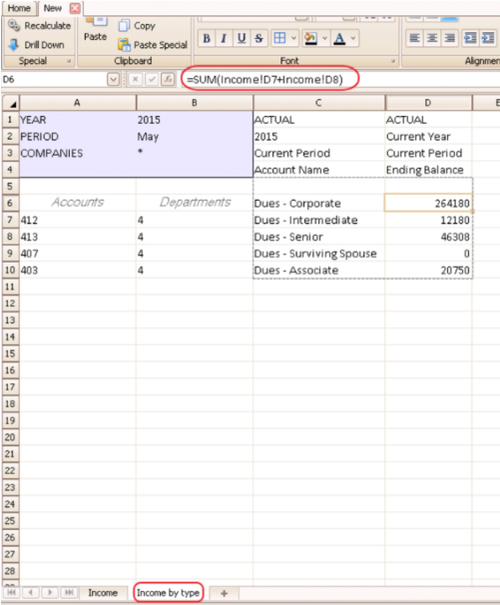
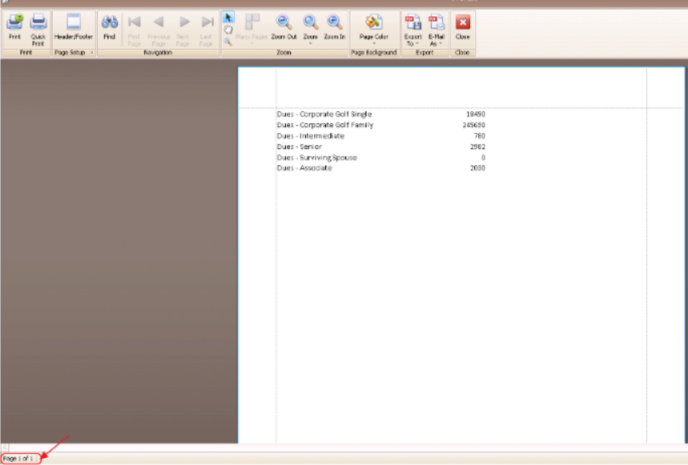
As expected, the formula in cell D6 above returns the total of the two types of Corporate Dues from the “Income” tab. (18490 + 245690 = 264180 as displayed on the “Income by type” tab.)
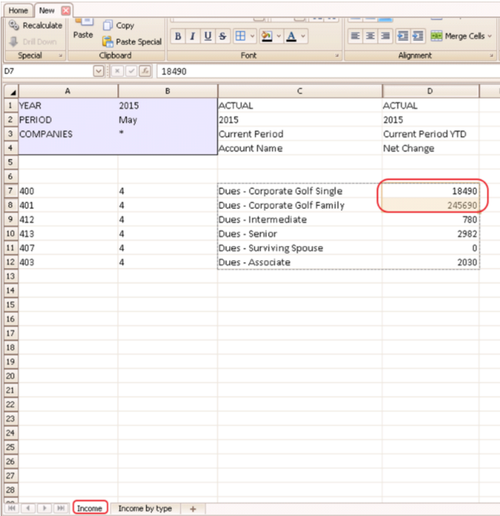
The "Income" Tab below shows the source data.
The tabs along the top (above the ribbon bar) display functionality (similar to Excel) built into the Financial Report Writer. Clicking on a Tab will return a ribbon bar with features pertaining to that tab.

Home Tab: Some common features available on the Home tab include Font Formatting options, Alignment options, and more.
In this example, cells containing the Title of the Club have been selected, merged, and bolded for emphasis to improve the appearance of the report.
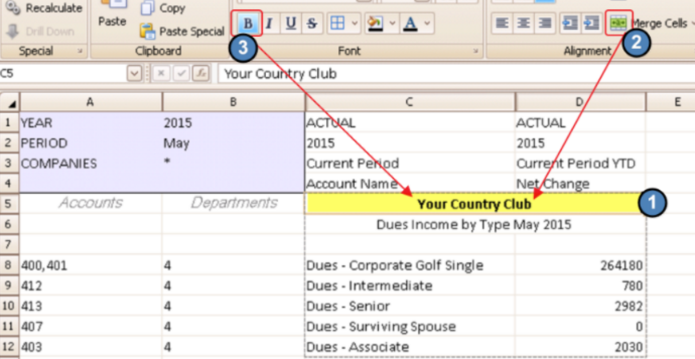
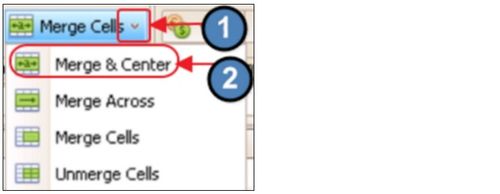
When merging, note that options for how the cells will display after merging are available for selection by clicking on the arrow next to the Merge Cells button. Merge & Center is a popular option for displaying titles.
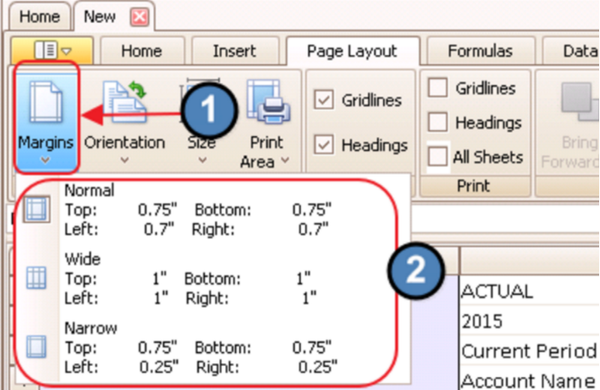
Page Layout Tab: Another popular tab is the Page layout tab which contains the ability to set Margins, Orientation and other key page features.
To set a Margin, from the Page Layout tab, click on the “Margins” button and then select appropriate margin from the list, “Normal, Wide, or Narrow”.
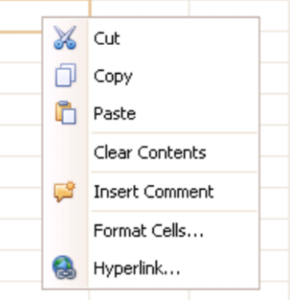
In addition to the top tabs, right-clicking on a cell in the customizable portion of the grid, launches familiar functions.
Drilling Down
The Drill Down function allows users to identify the information supporting the numbers pulled into the Financial Report Writer. To drill down into a report, click on an amount, and then select Drill Down button, or hit the “F3” key.

General Ledger Transaction Screen will open, and allow for further investigation. Details will be listed below headings, and further drill-down/research (into batches, for instance) may be performed.

Statistical Functions
In addition to general statistical functions, the product also has unique Clubessential functions built in to report on additional data such as cover counts, rounds, etc. Click on the “Function” key, and look for the “CE” prefix to help identify these functions.

Print the Report
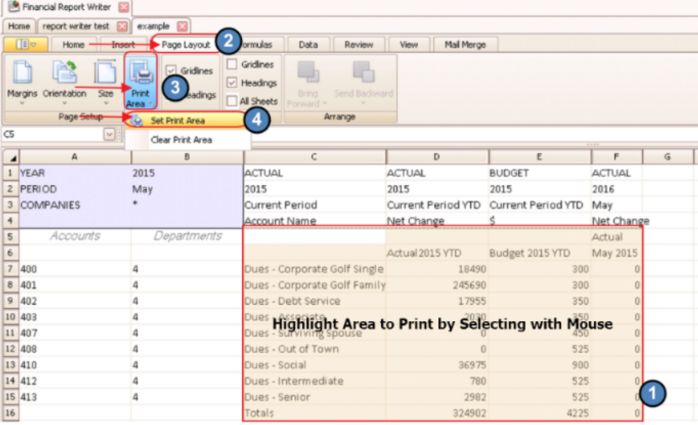
Set Print Area
To designate a portion of the report for printing, highlight the desired area to print. Then, go to the “Page Layout” tab, choose the “Print Area” button, and click the “Set Print Area” option.
Fit to Page
To specify the report print to designated number of pages, check the "Fit to Page" box. Then populate the "Fit Height" and/or "Fit Width" fields as required. In the example below, the report contents will print on two pages; however, all columns of the report will be visible on both pages.

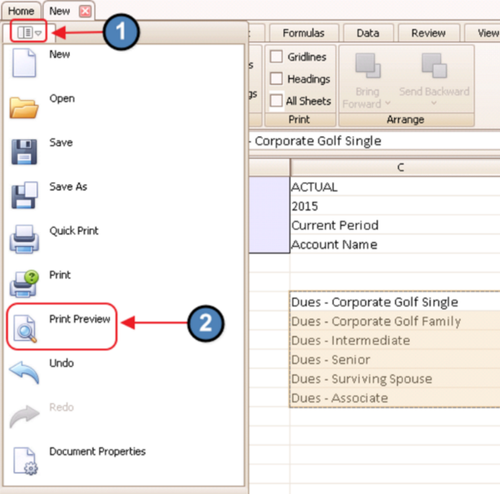
Print Preview
To preview how the report will print, click the icon as shown, and select “Print Preview.”
Report will then display.
Note: Page numbers will be displayed in the bottom left hand corner of the screen.
Add Headers/Footers
Within the Print Preview screen, click on the “Header/Footer” button to launch the “Header and Footer” screen.
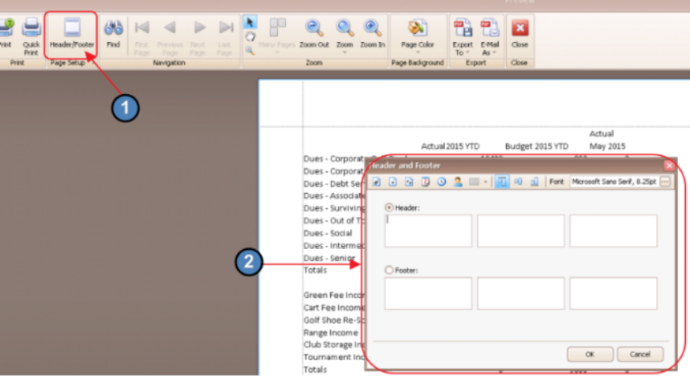
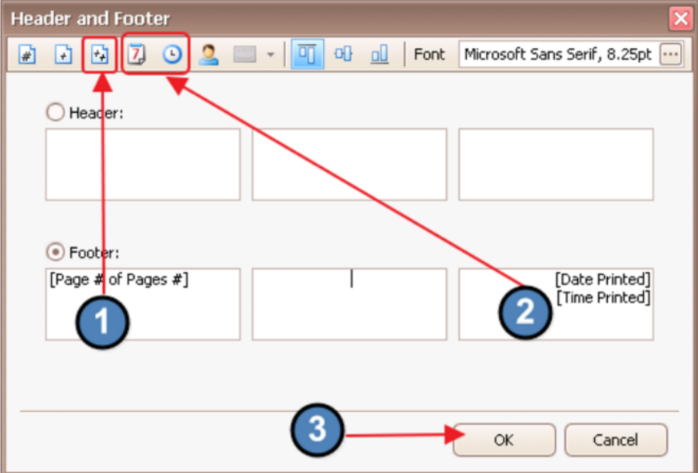
The six boxes represent the Left, Middle and Right Headers, and the Left, Middle and Right Footers. Click the box to denote Header location, and then select (or type) the information to populate. The information inserted (or typed) will then display on that area of the page.
In the below example, the following icons were utilized to populate the information within the various boxes. Hovering over an icon displays its description. Available options are: Page #, # of Pages, Page # of # pages, Date Printed, Time Printed, UserName, Image, Align Top, Align Middle, Align Bottom, Font. Click “OK” when finished.
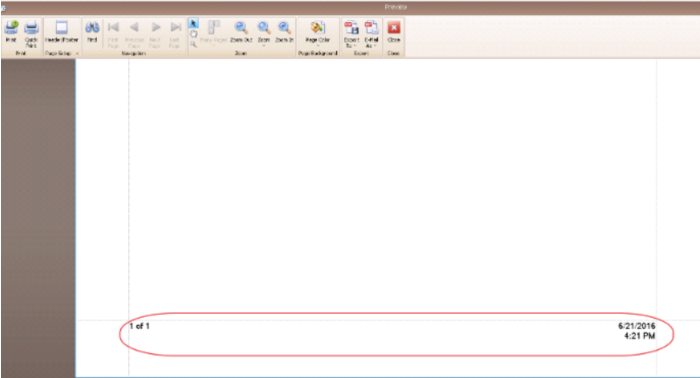
The defined Header(s) and/or Footer(s) display in the Print Preview window.
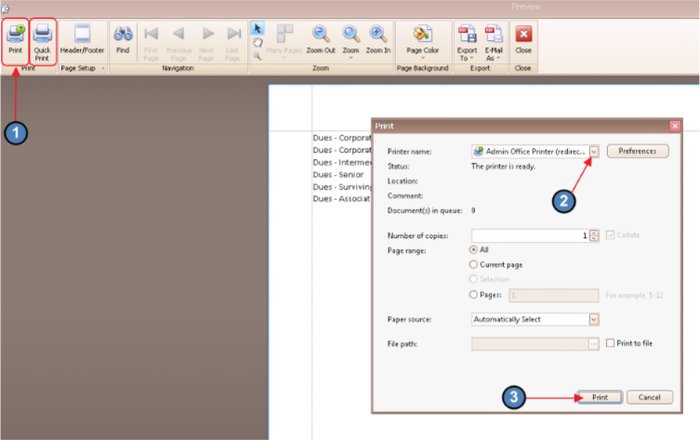
Print/Quick Print
Once Print Preview appears proper, click “Print” (or click “Quick Print” to automatically send report to default printer).
Once “Print” is selected, choose or confirm desired Printer, adjust any other settings as needed, then select “Print” to send job to specified Printer.
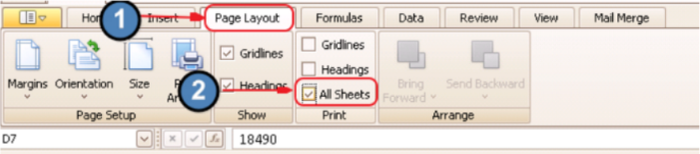
Print Entire Workbook at Once
To print the entire Workbook at one time, go to “Page Setup” tab, and ensure the “All Sheets” button is selected.
Create a Report from Existing Excel Report
To utilize an existing Excel report to get started, click, “Open”, and select Excel report file. Once file opens, Accounts, Departments, and other Parameters may be specified to populate the data within the already formatted report.
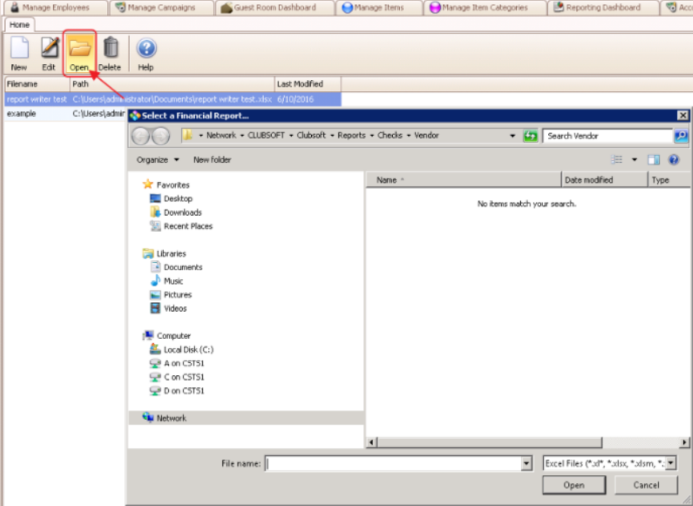
Open an Existing Financial Report Writer Report
To Open/Edit an existing Financial Report Writer report, highlight desired file, and click, “Edit.”

FAQs
Q: What data displays in the Financial Report Writer Reports - posted and unposted batches?
A: While other Reports contain data from un-posted batches, the Financial Report Writer displays only data reflected in posted batches.
Downloadable Guide
Financial Report Writer - User Guide.pdf
...