| Table of Contents | ||||||||
|---|---|---|---|---|---|---|---|---|
|
Overview
...
Mobile Ordering empowers your members to quickly and conveniently order food from your Club’s Mobile App, for pick-up or delivery (optional) at Club locations.
Because mobile ordering directly integrates with your Clubessential Office system, orders entered into the Mobile Ordering application appear in the Mobile POS system, and fire the related tickets to the kitchen/bar printer(s) seamlessly. Setup and configuring Mobile Ordering is done in the Clubessential Office Management System. Additionally, because the app fully integrates with the Office system, Member Profile information auto-populates notification contact info for Member’s ease of use.
Use Case(s)
| Widget Connector | ||||||
|---|---|---|---|---|---|---|
|
Content
...
| Table of Contents | ||||||
|---|---|---|---|---|---|---|
|
Mobile Ordering Configuration - Office
Enable Area for Mobile Ordering
Club Admins have full access to configure the mobile ordering experience for their members within the Clubessential Office software (CMA) via the Areas setup.
To configure Mobile Ordering for an area, go to Settings, Areas.
...
During Implementation, your trainer will have created a new Area for you, specifically used to configure the menus shown in the Mobile Ordering tool. Depending on the locations at the Club that will be accepting mobile orders, an example new Area might be Pool Snack Bar (Mobile Ordering) if the Club is accepting orders in their Pool Snack Bar. The purpose of creating a new Area for each location accepting Mobile Orders is to enable the Club to obtain sales demographics, based on all orders coming from the Mobile Ordering tool.
Select the Area created during your Implementation process to configure your menus.
...
Please Note: The Mobile Ordering setting must be enabled in POS Options. This step will have been checked during Implementation. To verify this setting is configured, go to POS options, and enable (check) the Mobile Ordering setting.
...
Configure Mobile Ordering Area Settings
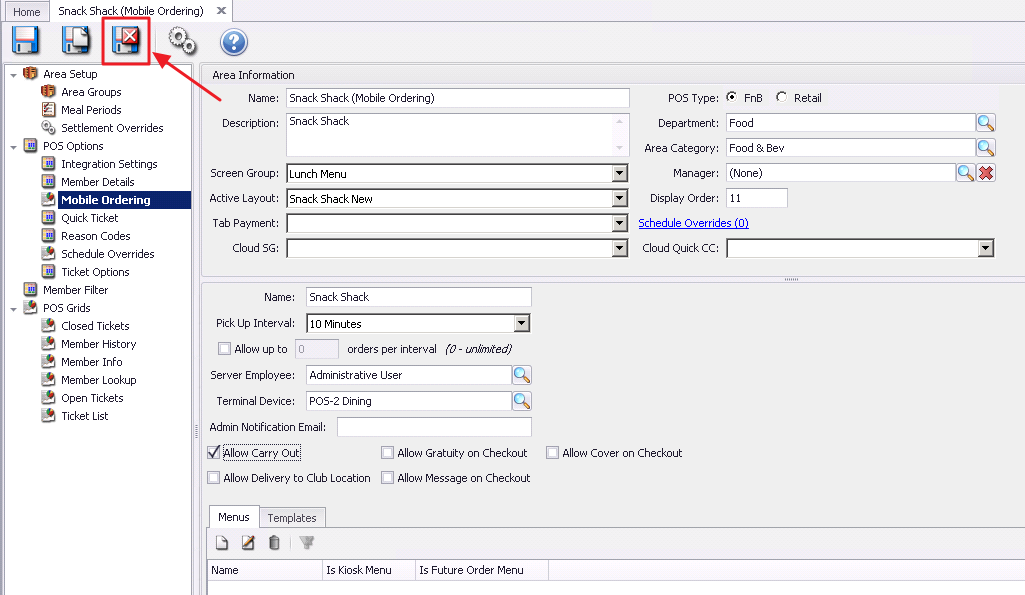
Once enabled, go to the Mobile Ordering tab, and configure the settings.
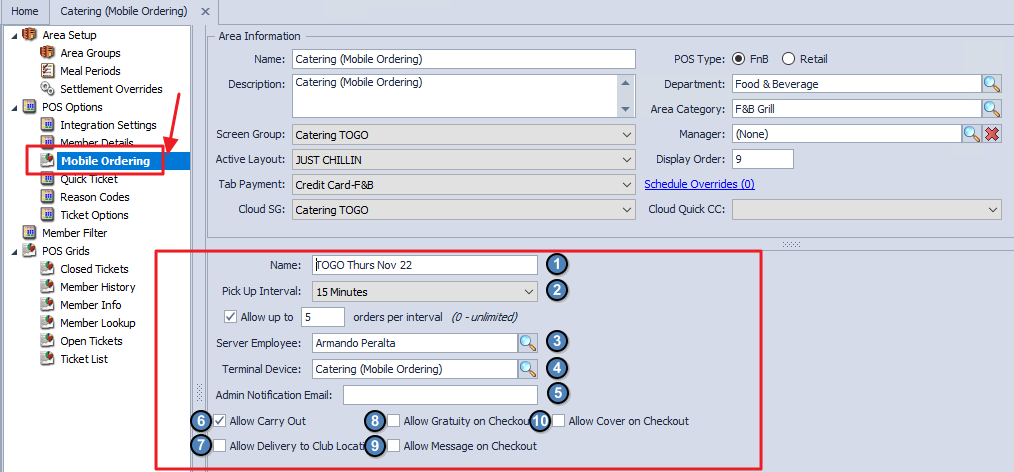
Name - Provide the Mobile Menu Ordering Location with a Name. This may be the same or different name as the Area, and is the name Members will see for the Area on the Mobile Ordering application.
Pick Up Interval - This field determines how many times show in the available Pickup time for the order. If set at 5 minutes, available times will be 9:30, 9:35, 9:40, etc. If set at 15 minutes, available times will be 9:30, 9:45, 10:00, etc.
Orders per Interval - Checking this box will allow for the number of orders per interval to be limited to allow for an even flow of tickets to the kitchen, ensuring all orders taken can be completed. Marking zero (0) orders per interval will leave the amount unlimited.
Server Employee - This will be the Employee responsible for the Mobile Orders. Choose an available employee from the list.
Please Note: Best practice is to create an account solely for this purpose.- Terminal Device - Set to the appropriate device that employees will sign in to view the Mobile Ordering tickets.
- Admin Notification Email - Define an admin email address to receive an automatic email each time a new Mobile Order is placed.
- Allow Carry Out - Check this box to allow pickup from this location. If this box is not checked, the option to select Pickup will not be provided to Members when placing their order.
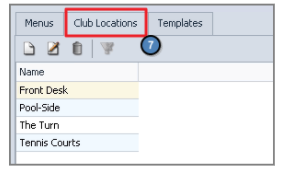
- Allow Delivery to Club Location - Allows for delivery to predefined locations as set in CMA. When this feature is enabled, you will get an additional window (Club Locations) that pops up that allows you to input and designate specific locations where members are able to select delivery to. These options would then appear on the mobile ordering menu at checkout if the member selects that they want it delivered. The member would then have to select wherever they want that delivered. Please see Member Access - Mobile Ordering on the App for more detail.
- Allow Gratuity on Checkout - Allows members to add gratuity when checking out in Mobile Ordering.
- Allow Message on Checkout - Allows members to add a general message to a Mobile Order on the checkout screen.
- Allow Cover on Checkout - Allows members to add a cover count to their Mobile Order and enter how many individuals their order will serve.
Add a Menu
Once basic settings have been established, create Menu(s) for this Area by clicking the New button.

A Menu configuration screen will appear.
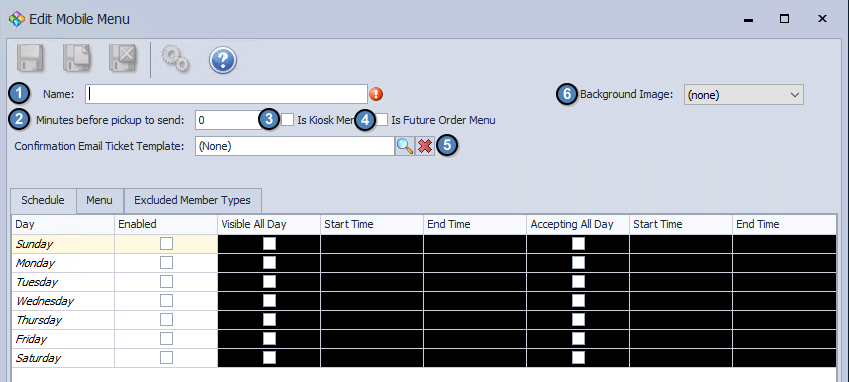
Complete the screen as follows:
Name - Enter the name of the Menu (ie - Pool Shack) as you would like it to appear on the Mobile Ordering screen.
Minutes before pickup to send - This setting determines how soon before an order is to be picked up, that it will fire to the kitchen. For instance, if an order is placed at 11:20am, to be picked up at Noon, and this setting is set to 15 minutes, the order will auto-fire to the kitchen at 11:45am, 15 minutes before the time it is to be picked up.
Is Kiosk Menu - Enables this menu to be visible in Kiosk Mode.
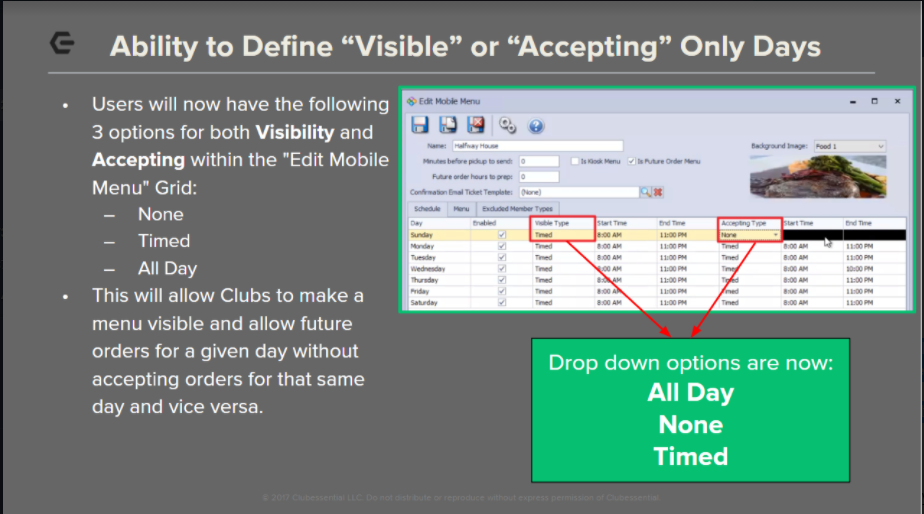
Please Note: Checking this setting will remove this menu visibility from the mobile app and this menu will only be available on Mobile Ordering kiosk devices.- Is Future Order Menu - Allows members to select a future date when placing their order via Mobile Ordering (often used for catering). When this box is checked, both Minutes before pickup to send must be indicated as well as Future order hours to prep which indicates the number of hours in advance an order must be placed prior to pickup. This allows Clubs to prevent members from placing a large catering order without giving the Club enough preparation time. Future Ordering Menu's now allow users to limit the number of days in advance that an order can be placed for any given menu.
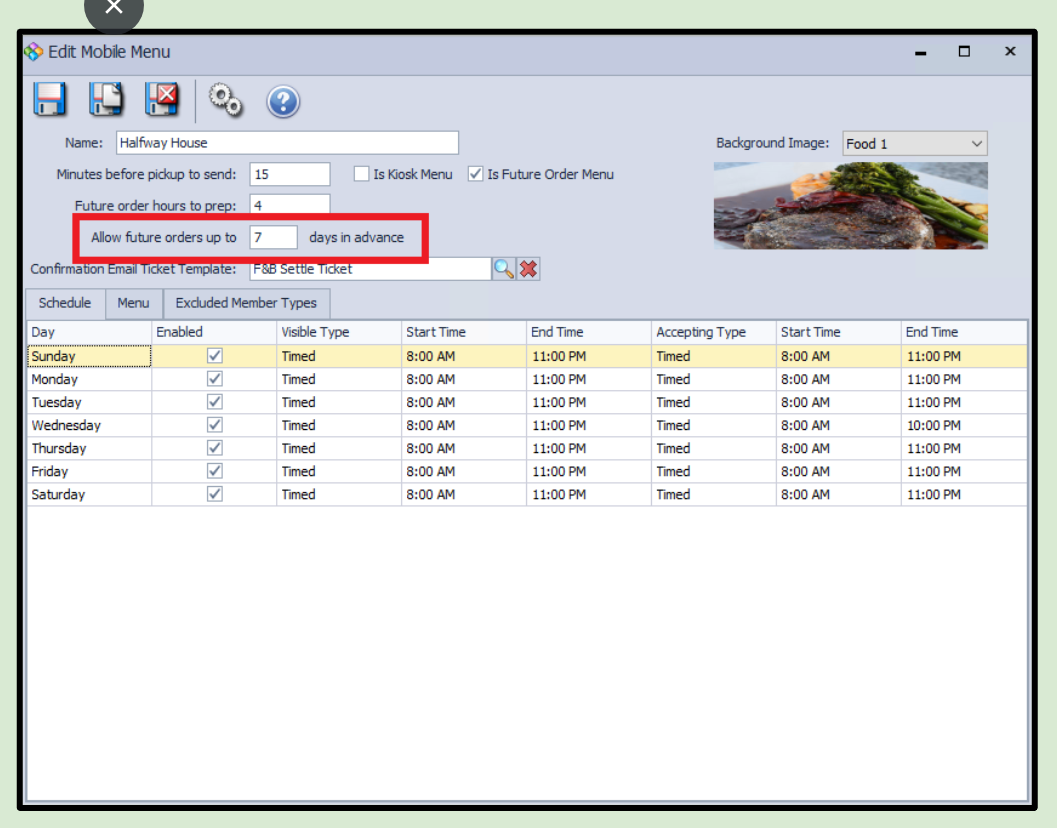
Confirmation Email Ticket Template - If set to none, will default to the settings of the Settle Ticket associated with the Area. Option to choose a different template if desired. Template will feed the confirmation email sent to the Member, if Member chooses email notifications when ordering.
Background Image - Select an image from a list of available options to display on the homepage of Mobile Ordering.
On the Schedule tab you will enable the day and time settings for each day of the week.
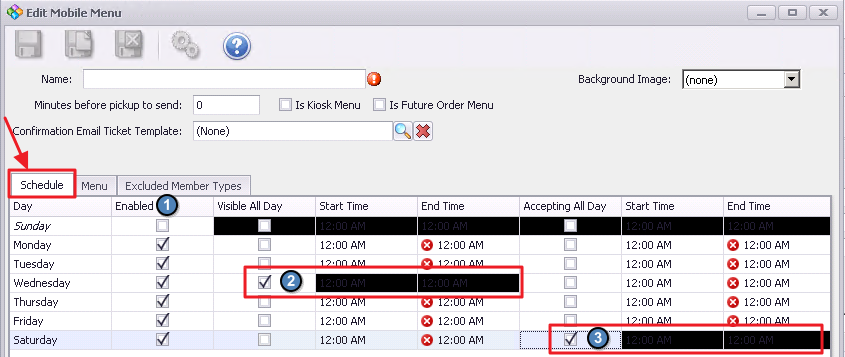
Complete the screen as follows:
...
Enabled - Checking this box opens the menu for that specific day.
...
Visible All Day - Checking this box allows members to see this menu all day. This will disable the Start and End Time for that specific day. Visibility Start and End Times - If this menu is not visible all day, enter the appropriate start time and end times this menu will be available. Menu will not be available outside of the window specified here.
...
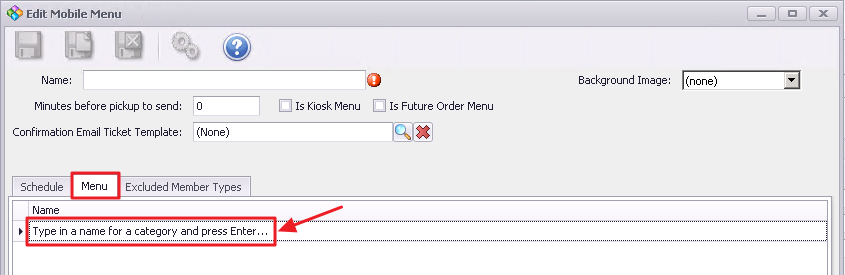
Next on the Menu tab, establish the categories, such as Appetizers, Salads, Entrees, that will house the Menu Items . To establish a Category/Grouping, type a name for the Category here, and press Enter.
Then, search for an Item (from the list of existing Items), to add to the category. Click on the Search icon to launch the Item selector.

Start typing the name of the Item in the Search box to find the item. To simplify the search, limit the results to F&B items by clicking the F&B filter. Additionally, remove columns that may not be useful to you by right-clicking on the column, and choose Remove this Column.

Or, to add useful columns, right-click in the grid, and then select Choose Columns to launch the column selection box. Double-click or drag and drop any additional field to display in the columns (Item Category, Active, etc).

...
Double-click on the Item desired to add to the Menu under this category.

...

Please Note: Best practice for adding Items would be to select existing Item categories, filter based on Active Items, and then click Select All to add all Items at once if appropriate.
...

...

Edit Modifiers
If an Item exists on the Mobile Menu, and you wish to override (perhaps to limit) the modifiers that appear on the Mobile Menu, go to Manage Items, select the Item with the Modifiers to edit, select Modifiers, and click the Override Mobile Ordering Modifier Groups option.

Construct a new Modifier Group to show in the Mobile Ordering tool, by clicking the Lookup button, and selecting desired Modifier Groups to show. Once complete, the Modifier Groups showing on the right will be for Mobile Ordering only. If desired, overrides can be defined with NO modifiers as well. All other dining options will display the Modifier Groups on the left (default).

Another way to edit the Modifier Groups attached to an Item is to go to Manage Item Modifier Groups. Select the Modifier Group to edit. Highlight the Modifier to hide, and uncheck Show in Mobile Ordering option. Option will no longer display for selection in the Mobile Ordering application.

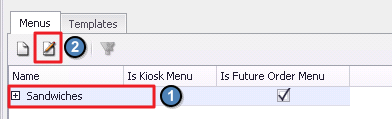
Edit an Existing Menu
To edit an existing Menu, select the Menu to edit, and click the Edit icon.
Edit as required. If an Item on a menu needs deleted. Click on the Arrow next to the Item, and then click the Delete key on your keyboard.
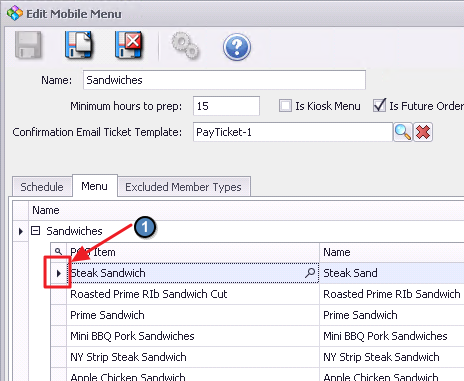

Similarly, to delete an entire Category on the Menu, click on the arrow next to the Category, and then click Delete on your keyboard.
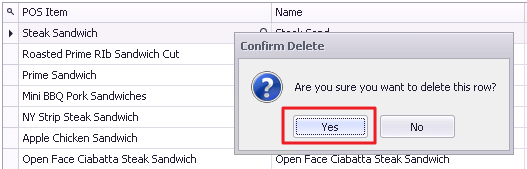
Confirm deletion.
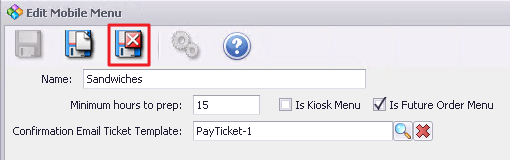
When complete, click Save and Close.
Delete an Existing Menu
To delete an existing Menu, select the Menu to edit, and click the Delete icon.
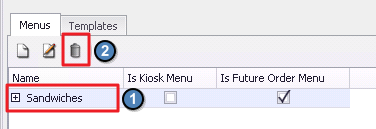
Menu will no longer be available for selection on Mobile Ordering.
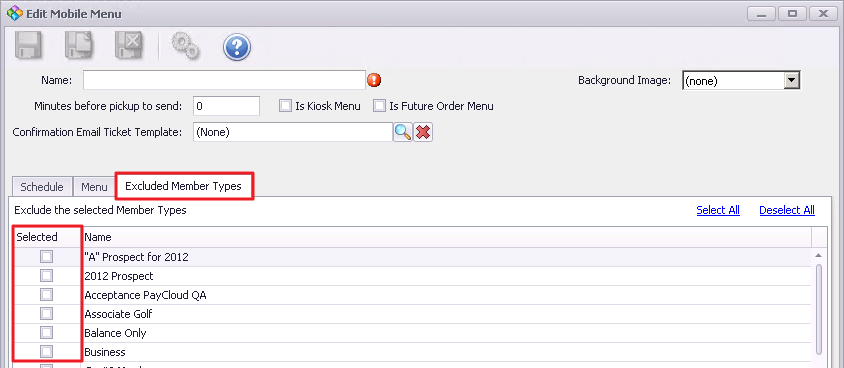
On the Excluded Member Types tab you will select any member type that should not have the ability to see this menu.
Finalize Configuration
When all settings have been configured for the area, click Save and Close to finalize configuration.
Device Settings - Ticket Printing (Mobile Ordering)
Users have the ability to change Printer settings for Mobile Ordering in CMA, POS Menu, then Devices (as seen below), to allow tickets to print twice. This setting allows Users a clean copy of the Member’s Mobile Order ticket to help ensure accuracy.
.png?version=1&modificationDate=1531325797843&cacheVersion=1&api=v2&width=700)
Member Access - Mobile Ordering on the App
From the Clubessential App, Members can click Order Food from the main navigation window, or click Menu, and choose Order Food.
...
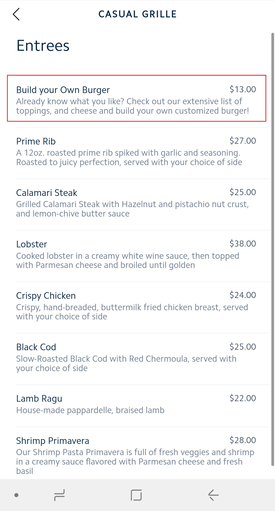
Members will be taken to a personalized landing page, where they can choose from various menus/locations to order from, defined by your Mobile Ordering configuration settings. See examples below.
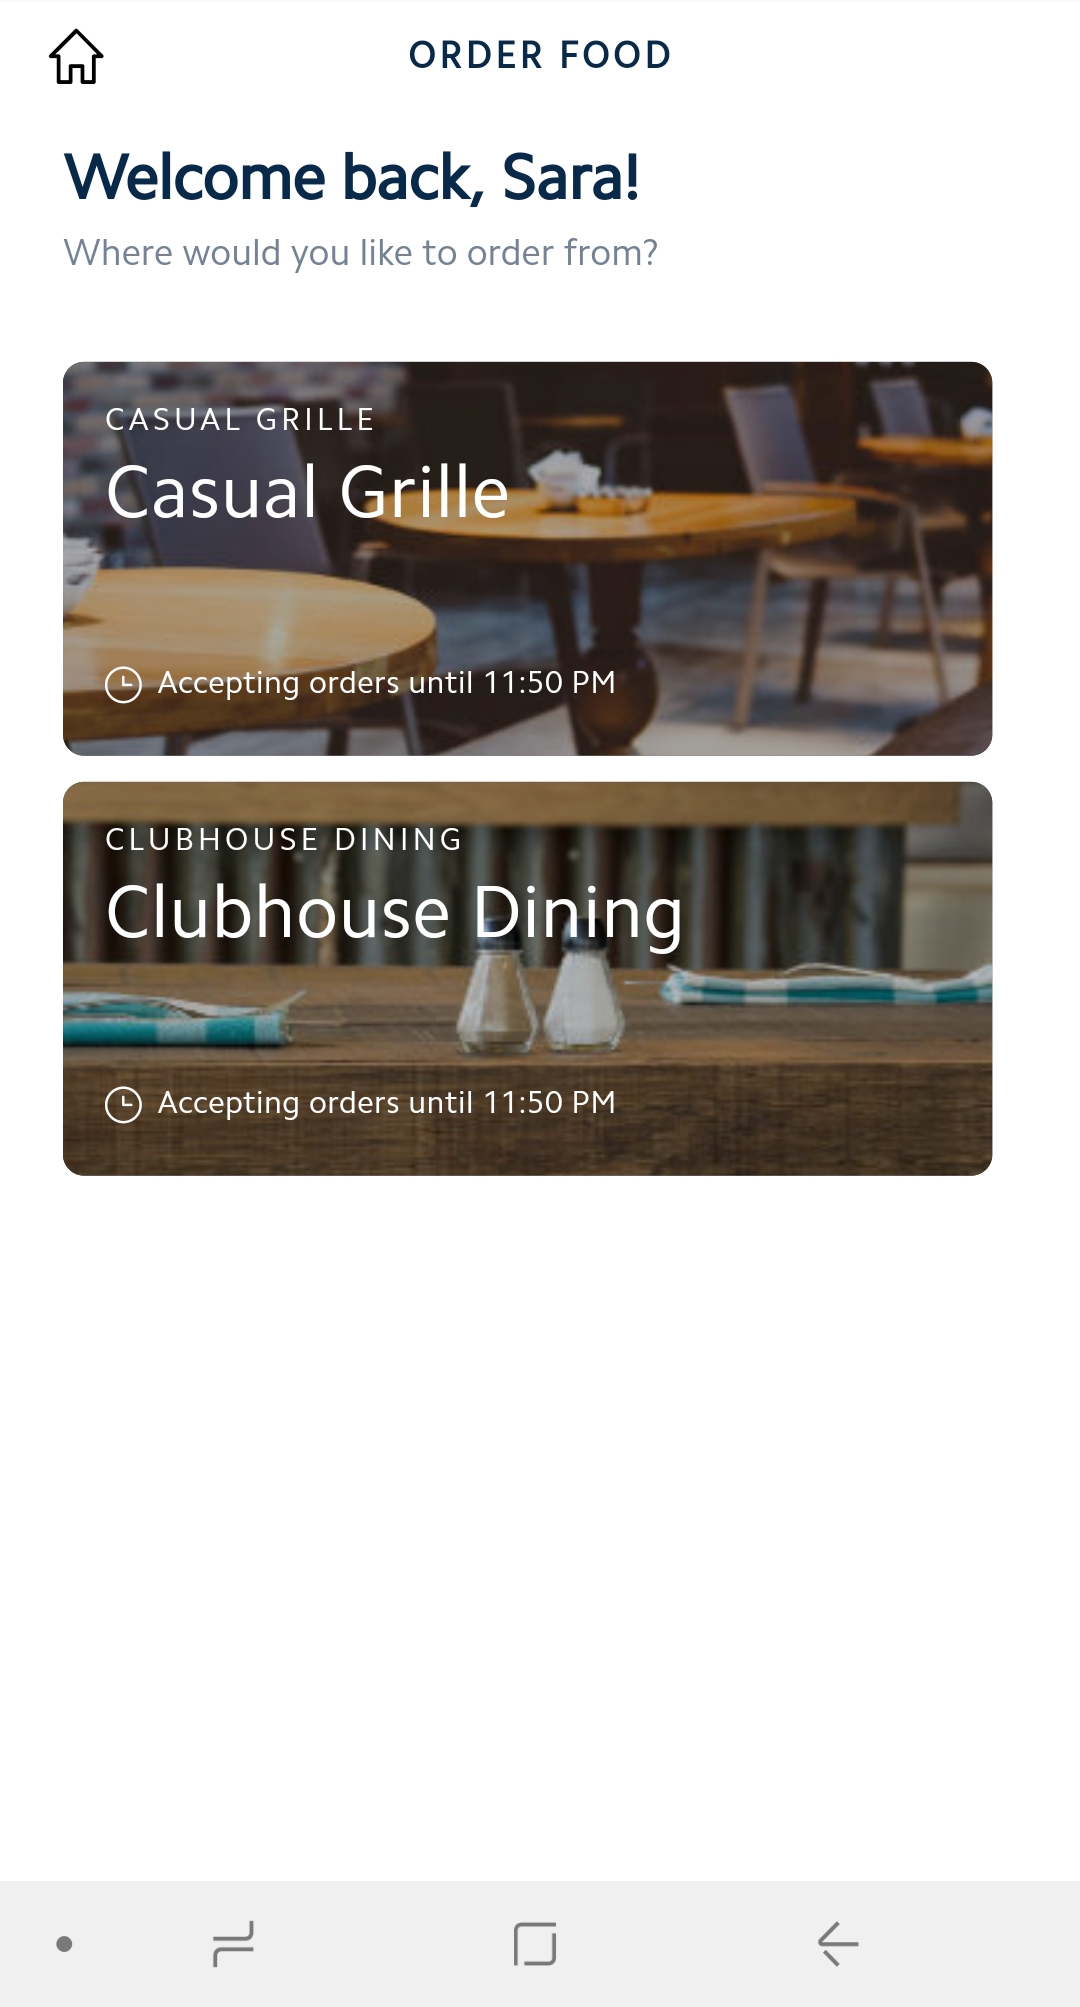
Please Note: Background Images shown behind each menu location on the landing page can be selected from the back Office Software from a list of stock images. Please see the Club Admin Access via Back Office Software section for more detail.
Placing an Order
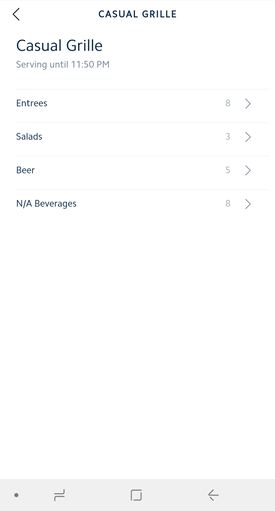
From the Main Screen, Members will select the menu/location they wish to order from, and will be taken to the Menu selected. Top level Menu Categories will appear for selection. Member will tap the top level menu category to see a list of Items contained within the category.
Please Note: Number of Items in each Category are listed next to the Menu Categories.
Once an Item is selected, modifier options associated with the Item will prompt for user selection (i.e. - cooking temperature, sides, etc). Once selections are made, and additional special instructions are added (if required), Member will click Add to Cart. Note: Special instructions will print on the prep ticket that goes to the kitchen.
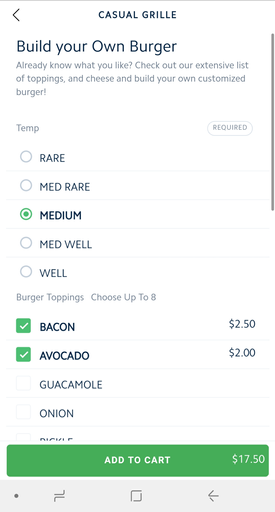
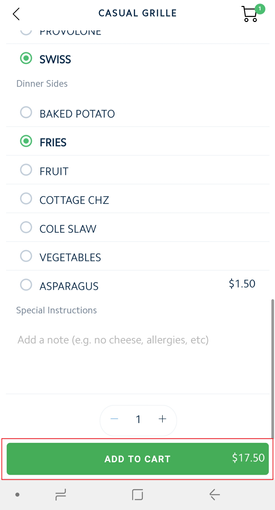
Once clicked, Member will receive confirmation that Item was added to cart, and screen will then return to main menu for additional selections. Note that number of items currently in cart will will display in upper-right hand corner. When all Items have been selected, Member may tap either the Cart icon, or the View Cart button at the bottom to review the order details and finalize the order.

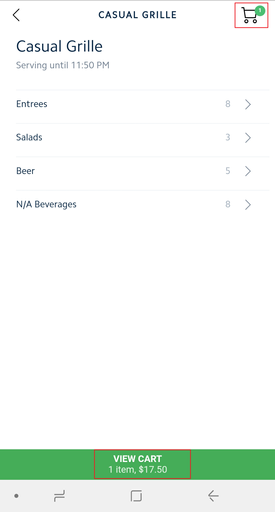
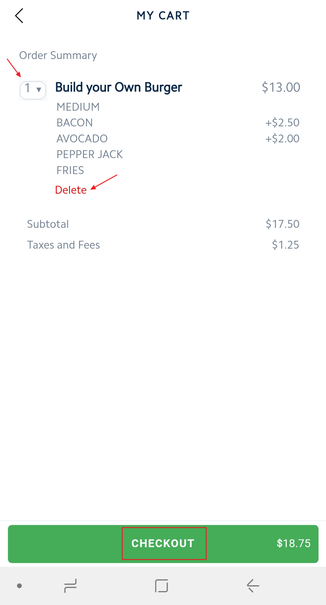
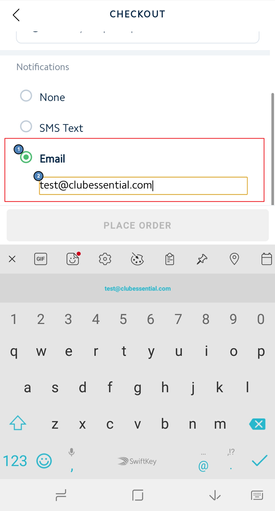
Checking Out
Once the Cart Icon, or View Cart button has been selected, the Member’s Cart will load for review and finalization. Tap on the Quantity box to edit quantity of items ordered. Tap delete to eliminate an item from the order. When order is proper, tap Checkout to continue finalizing order.
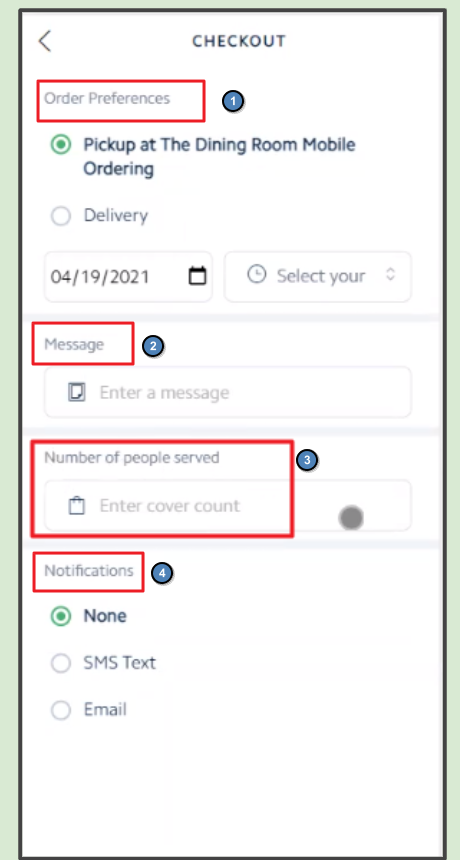
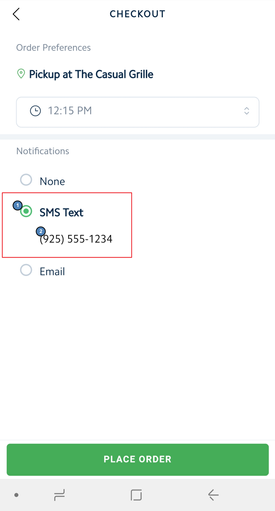
The Checkout screen will load with the options below (depending on the menu settings within CMA).
...
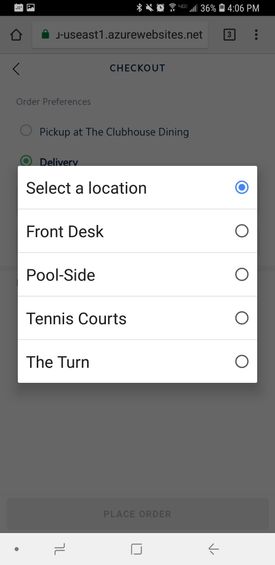
Please Note: Club Locations can be added, edited, and removed from Area Information then Mobile Ordering menu.
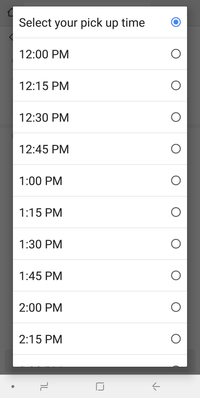
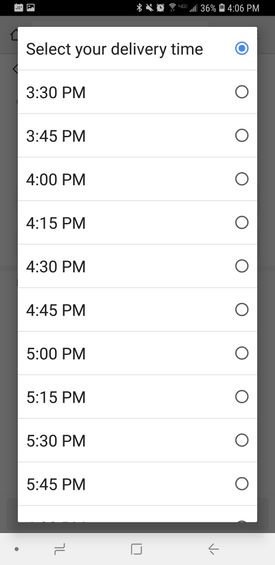
Members can select a time by clicking next to the Clock Icon, and selecting from available times (as allowable based on configuration). To select a location for delivery, Members will tap next to the Location icon, and enter location (ie - Pool), and then will click Done when finished.
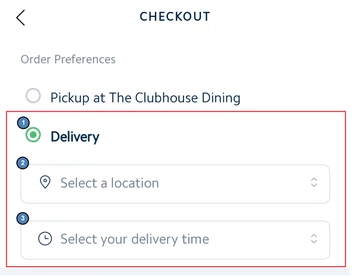
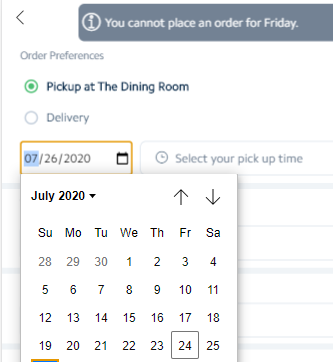
If the menu is configured as a Future Order menu, the member will also see an option to select a date.
...
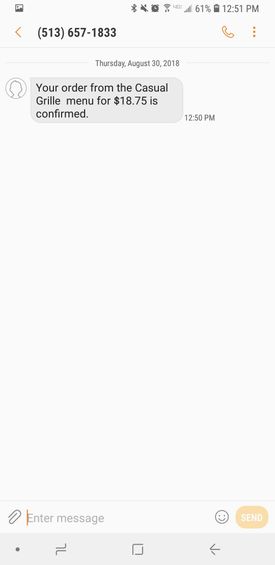
Please Note: The Member will receive the SMS notification from a number with the same area code as the Club. These confirmation texts will always come from the same phone number, allowing members to save the number if they prefer.
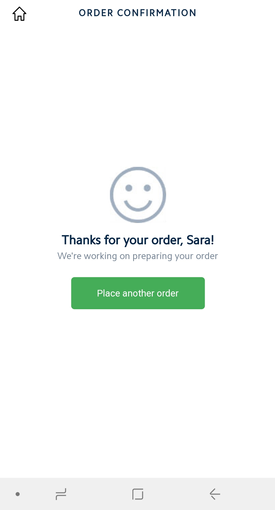
Confirmation on the ordering screen will appear. Additionally, Member will receive a notification that the order has been received. Click Place Another order if desired.
Club Access via Mobile POS
Club staff with proper permissions can access the Mobile POS terminal dedicated to mobile ordering, and view all Mobile Ordering orders from the Mobile Ordering tab.
Activating Mobile POS on a Device
First, user will need to activate the device that will be used for the Mobile Orders by opening the activation email on the device that is to be activated. Example of activation email below.
...

...

Once activated, user can log-in to Mobile POS.
Mobile Ordering Tab
Within the Mobile POS, users can view, print, edit orders, notify Members, and/or settle the ticket from the Mobile Ordering tab. When viewing Mobile Order Tickets, users will see the screen below.

Please Note: Navigating back to the Mobile Orders tab you will see a pick-up time. This pick-up time will determine when orders are sent to the kitchen. The send frequency configured on the menu in the back Office system will automatically send orders to the kitchen, dependent upon the send frequency entered (in Minutes). For example, if the send frequency is set to 15 minutes and the order is scheduled to be picked up at 12:35 p.m. the order will automatically send to the kitchen at 12:20 p.m. Please refer to the Add a Menu section for more information on setting up your send frequency.
...
Notifying a Member Their Order is Ready
...

...

More Info Button
Users have the option to view More Info on a Mobile Order, as seen below. The More Info button will populate information regarding the Mobile Order including ticket number, Member, ticket creation time, mobile ordering menu, mobile ordering pickup location, mobile ordering pickup time, mobile ordering contact info.
.png?version=1&modificationDate=1531326328807&cacheVersion=1&api=v2&width=490)
.png?version=1&modificationDate=1531326329057&cacheVersion=1&api=v2&width=311)
...

Modifying an Order
...

Additional items may be added to the order (if required) by using the Main order screen.

If edits are made after initial ticket has fired to the kitchen, click Send to resend order to kitchen.
Settle Order to the Member Account by selecting Charge, or Cash as applicable. If interested in Credit Card Payment option, please contact your Clubessential trainer for more information. If desired, receipt may also be printed. Staff may click Exit to return to main screen.


FAQs
Q: We are not equipped to provide delivery services at our Club. How can I prevent Members from choosing the delivery option?
A: Ensure the setting marked Allow Delivery to Member location is not checked in the Area’s mobile ordering setup screen.
Q: How can I ensure Members are not able to select a time for pickup for the first 30 minutes after an area opens?
A: Ensure the Minutes after start time before first pickup field is set to 30 in the Area’s mobile ordering Setup screen. If Area opens at 11:00am, and this setting is 30, first available pickup time would be 11:30am.
Q: How can I ensure tickets fire to the kitchen appropriately (based on pickup time)?
A: Ensure the Minutes before pickup to send field is set to the appropriate time period desired in the Menu setup screen. If order is set for pick-up at 11:30am, and menu takes 15 minutes to prepare, set Minutes before pickup to send field to 15 to ensure ticket prints to kitchen at 11:15am for appropriate prep time.
Q: Can my mobile ordering menu differ from my regular menus for the area?
A: Yes, mobile ordering menus may be customized to include different items and/or fewer items than the Area’s normal menu. Additionally, Items on the Menu may have custom names (overriding the default Item Name).
Q: How long does it take for changes I make to setup/configuration (menus, etc) to show up in Mobile Ordering?
A: The time it takes for changes in Office to show up in the cloud (whether in mobile POS or mobile ordering) depends upon the Sync Frequency setting in Office. If you run CMA and click System -> System Settings -> Web Site -> Office Cloud, above the endpoint listing you'll see a text box that says Sync Frequency. This is how often, in minutes, changes in Office are pushed to the cloud. Additional delay due to caching expiration could add an additional minute to the sync time designated in the previous setting. Therefore, if in Office Sync Frequency is set to 5, changes in Office to mobile menu configuration will show up in the cloud in, at most, six minutes.
Q: What if I am in a different time zone than my Club, but want to place an order for later that day?
A: The menu start/end times and the pickup times you are allowed to choose are all based upon the timezone of the club, not your current local timezone. If you go to order food from your phone and you're standing in an Eastern time zone, but the club's CMA instance is set to the Pacific time zone, then the times you are allowed to pick from will be using a Pacific time zone.
Q: If my Club's iPad itself times out would orders stop sending to the kitchen?
A: Orders are sent to the server whenever the member orders food on their phone. No iPads/devices need to be signed in to mobile POS for those orders to be sent.
Best Practices
When creating Menus, add items that typically take approximately the same amount of time to prepare for smoother operation.
Ensure Member information is up to date within the back Office software to allow for a smooth and accurate order process for the member.
Clearly define all item descriptions, menu areas/locations, hours of operation, and settings.
Host an mobile ordering kick-off event to encourage Members to place their first order.
Track usage to validate your ROI.
Assign a ‘dummy’ or placeholder Employee Account to the mobile ordering system, that way no one employee is responsible for all orders.
Downloadable Guide
...
Table of Contents
| Table of Contents | ||||||
|---|---|---|---|---|---|---|
|
| Widget Connector | ||||||
|---|---|---|---|---|---|---|
|
