| Table of Contents | ||||||||||
|---|---|---|---|---|---|---|---|---|---|---|
|
Overview
The Manage Vendor Invoice tool allows users to access, manage, create, edit, and delete vendor invoices. The grid can be customized to include the check number, and can then be used to see all outstanding invoices, or to see what invoices were paid with a particular check. It is also the tool used to enter new invoices. Use Case(s)
|
Content
|
|---|
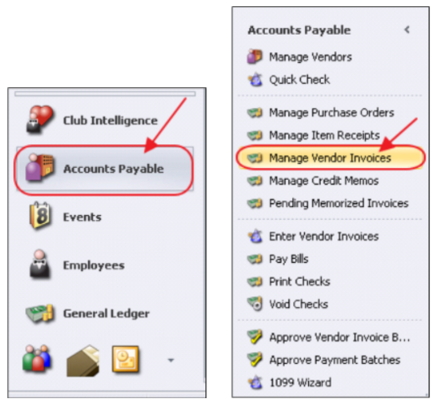
Navigation
To access the Manage Vendor Invoices Screen:
Click on Accounts Payable
Then, click Manage Vendor Invoices
Standard Invoice Entry
To enter an invoice into the system:
Click Click the New icon on the Manage Vendor Screen. 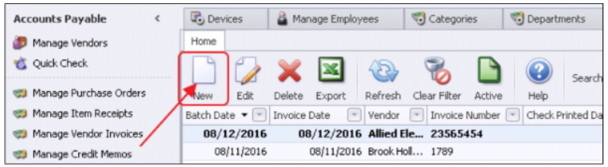
...
Or, select Enter Vendor Invoices directly from the user menu. 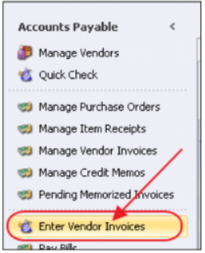
...
The Lookup Value screen will appear to assist with locating a specific batch, amount, or other filter as specified, or to begin a new batch.
To begin a new batch, click the Quick Add button, or to add an invoice to an existing batch, select the batch from the list by double-clicking on it. 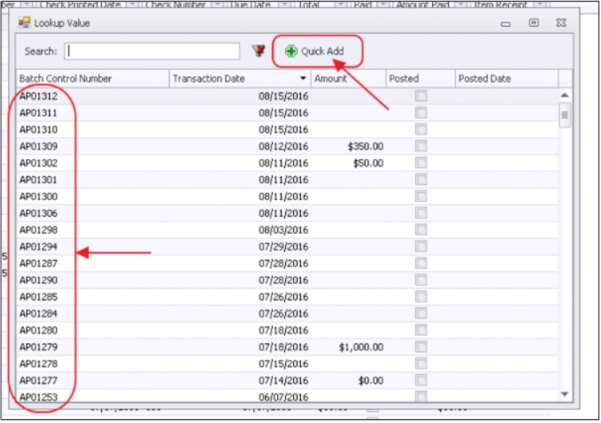
...
The Vendor Invoice Wizard screen will load.
The Vendor Invoice Batch number will load (based on either the batch selected, or based on the auto-generated number for the new batch. The Batch Date will default to today’s date for new batches, and will have already been assigned to previous batches. This is the date the batch will post to the General Ledger. Click Next to proceed. 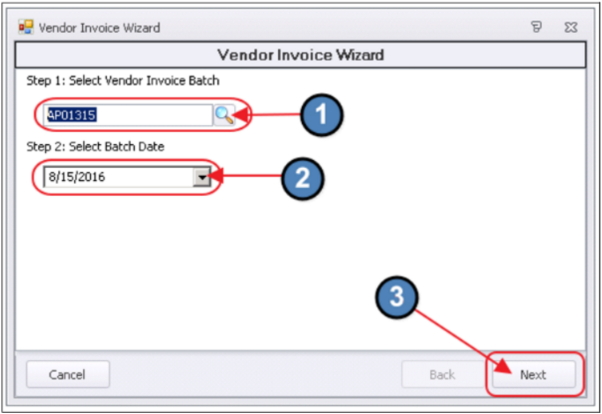
...
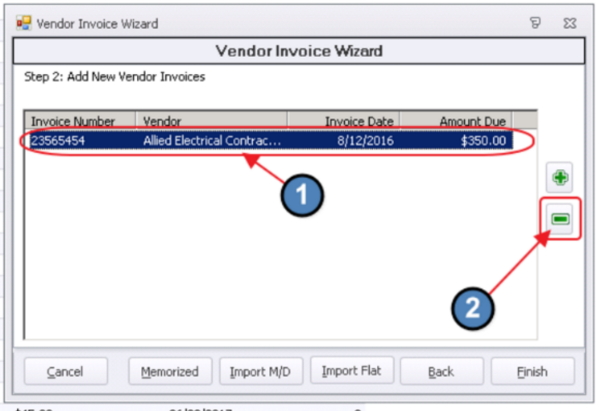
For existing batches with already existing invoices, invoices will be displayed in the grid.
To add a new Invoice to the batch, click the green plus button. 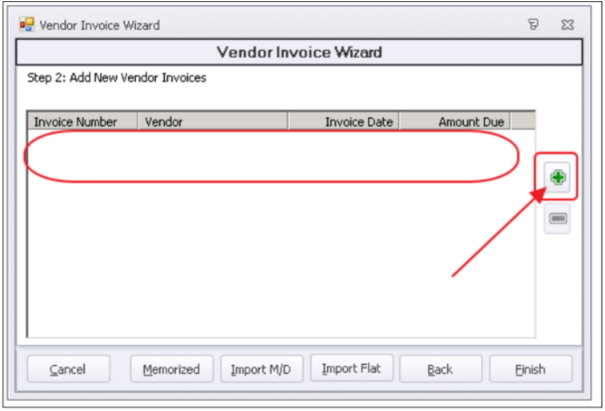
...
Invoice Receipt (Unpaid) screen will display. 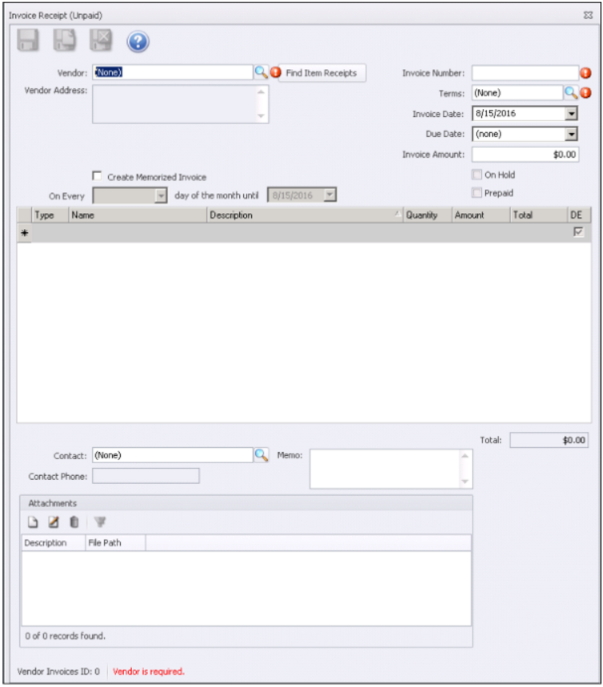
...
Select the Vendor. Start typing the name of the vendor or click on the Lookup icon to launch the Lookup screen.
Once Vendor appears in the list, select the Vendor to populate the Vendor field by double-clicking on it. 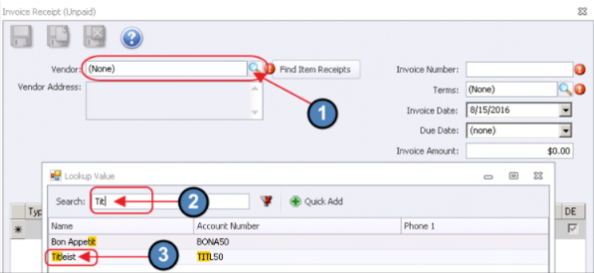
...
Using an Item Receipt Receipt
Once Vendor is selected, the Open Receipts screen for the selected Vendor will appear.
To create an invoice using Open Item Receipts, click to select the Item receipts(s) that apply. Then, click, Select.
...
Complete Invoice Receipt screen by populating the Invoice Number, Amount, and any additional items as needed.
Click, Save and Close when complete to return to the Vendor Invoice Wizard screen. 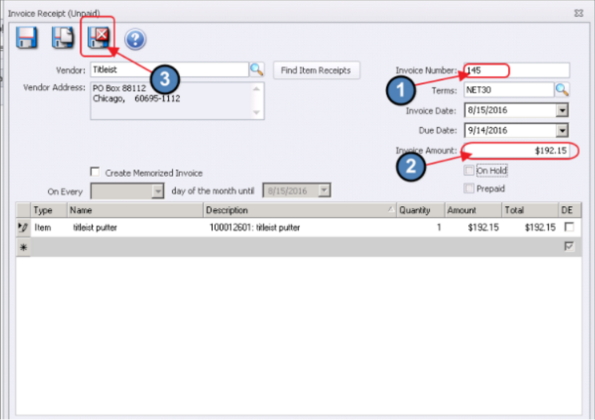
...
The batch can be left open to add to later or it can be posted. To leave the batch open, click, Cancel. 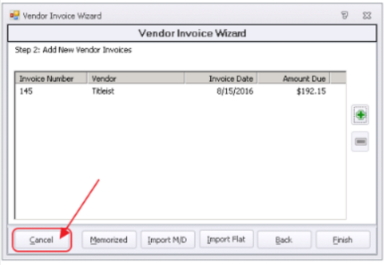
...
To Post the batch, click Finish.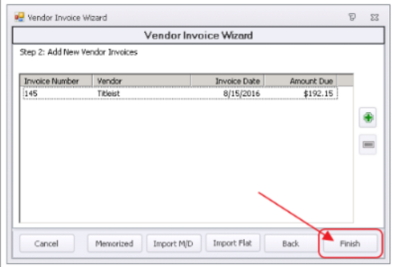
...
The Post Batch Preview screen will appear. Review the batch, and when ready, click, Post Batch. 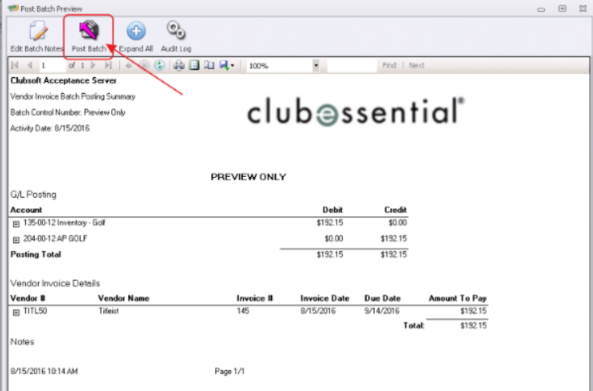
...
Without Using an Item Receipt Receipt
To create an invoice without using an Item Receipt, leave all item receipts unchecked. Then, click Cancel.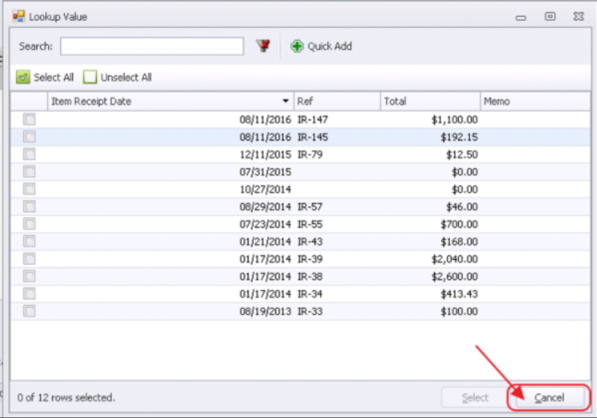
...
Next, complete the Invoice Receipt screen beginning with the Invoice Header info including the Invoice Number and Invoice Amount. Then, create a line on the invoice to apply the invoice amount to the appropriate General Ledger account(s). To create a line, click on the drop-down in the Type column, and then select Account. 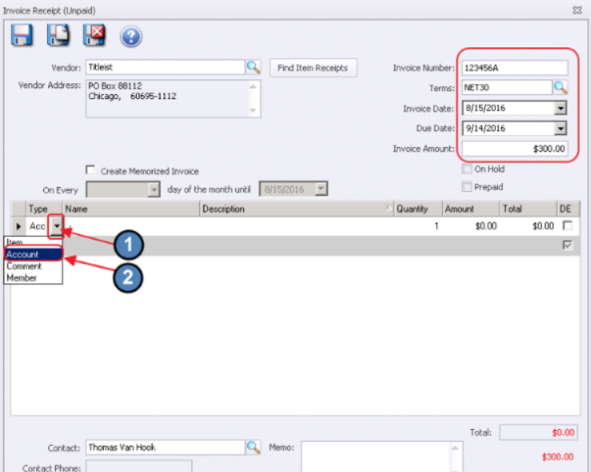
...
Populate the Number or Name of the G/L account to apply the invoice amount.
More than one account line may be added if necessary, and amount on each line may be adjusted accordingly. 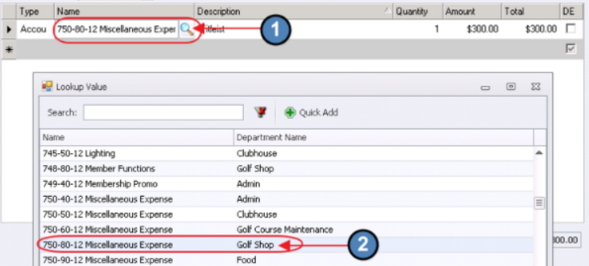
...
To enter an additional Comment that will show in the G/L, add an additional line(s) to the invoice by selecting the appropriate Comment designation. 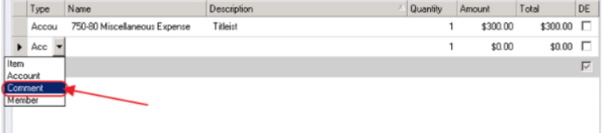
...
When complete, click Save and Close.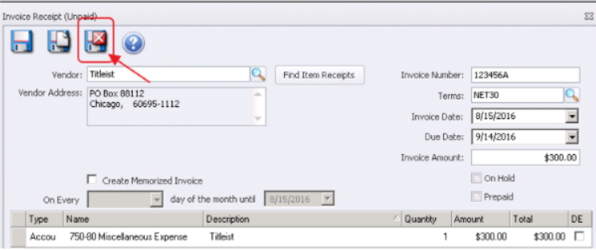
...
Entering a Reciprocal Charge Charge
The reciprocal charge feature enables a user to enter an invoice for a reciprocal club and create the charge for the member at the same time. Once the invoice batch is posted, the system will create a charge batch under Approve Charge Batches in Membership, which can be posted to charge the member’s account.
Note: Once the Vendor Invoice Batch is posted and the membership batch is created, there is no longer a connection between the two batches. Changes to the membership batch will not affect Accounts Payable. Any service fees charged to the members for processing reciprocal charges would be done through the Membership module as a separate Member Charge.
To Create a Reciprocal Charge:
...
Under Type option, select, Member. 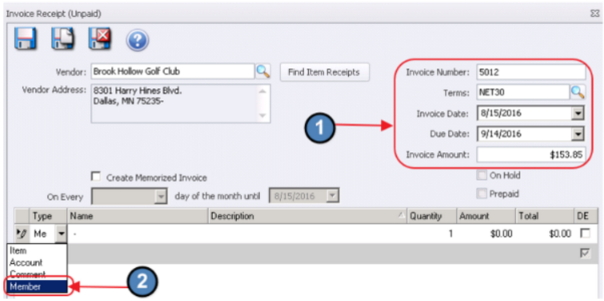
...
Then, in the name section, select the member to be charged. Use the lookup feature for assistance.
Once Member is located, double-click to select and populate the Name field. 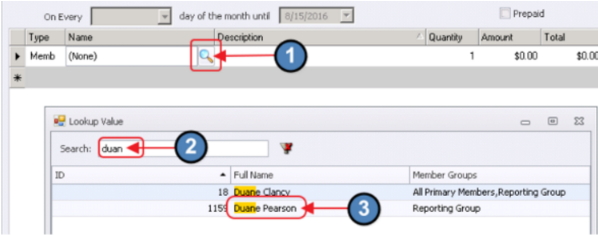
...
The Description will default to Vendor Name. This will display on the member statement, and can be adjusted if necessary. Leave Quantity at the Default. Enter the Amount of the Charge, and click, Save and Close. 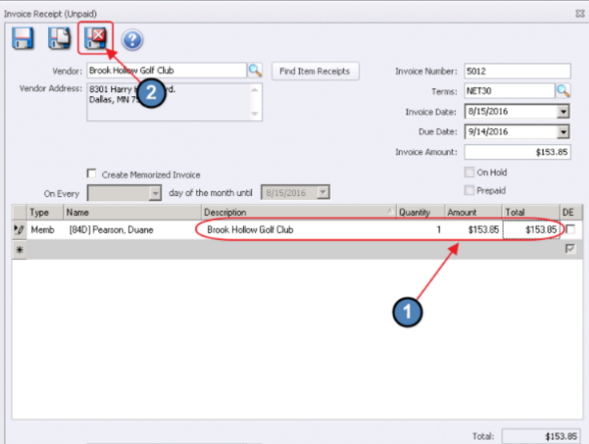
...
Memorized Invoices Invoices
Memorized invoices are created to minimize invoice entry for repeat monthly expenses. The invoice is created, and configured to be memorized.
Then, monthly, a copy of that invoice is pulled into a Vendor Batch to be process.
Creating Memorized Invoices Invoices
Access the Invoice Receipt screen (the invoice entry screen) – follow instructions for Standard Invoice Entry.
In the header section, select Create memorized Invoice. Once selected, the two date fields will open for population.
The On Every Date should be set to the day of the month the Memorized Invoices should be set to auto-create the bill.
The Until date should be set to the end date of the Memorized Invoice. 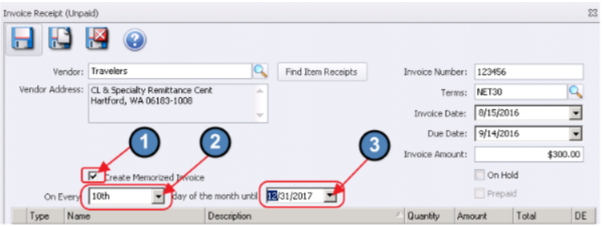
...
After the Memorized Invoice settings are complete, finalize the invoice entry process, and save and close when finished.
...
PLEASE NOTE: Memorized Invoices can only be deleted from this screen. They cannot be created or edited.
Deleting Memorized Invoices Invoices
To delete memorized Invoices, click on Accounts Payable, and then click, Pending Memorized Invoices.
...
Select the Invoice to delete from the Invoice Grid by clicking on it (highlighting it), and then click, the Delete button. 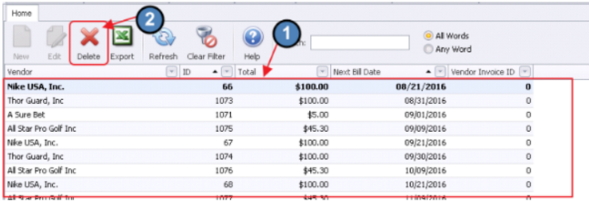
...
Retrieving Memorized Invoices for Processing Processing
Memorized Invoices are created with a Next Bill Date, which is set based on the On Every day of the month entry during the creation of the initial invoice.
...
To retrieve Memorized Invoices, click on Accounts Payable, and then, click, Enter Vendor Invoices.
...
When the open batch screen appears, click Quick Add.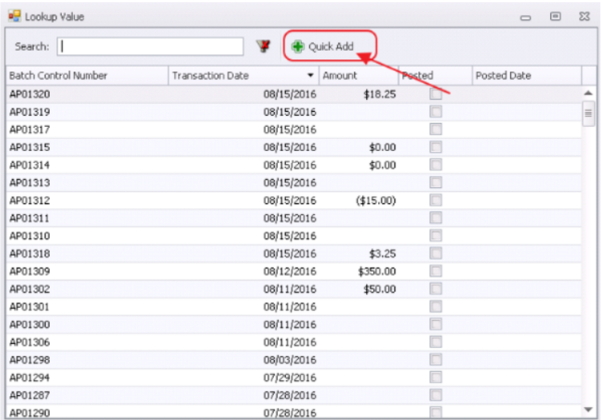
...
Then, select the Batch Date equal to or after the Next Bill date of the memorized Invoice.
Click Next.
A prompt will display stating how many memorized invoices are available for that batch date, and would you like to add them to your batch.
...
Clicking, No will not add the memorized invoices to the batch. When selecting No, the user will continue to receive the prompt each time a new vendor invoice batch is created or until the memorized invoice is deleted. 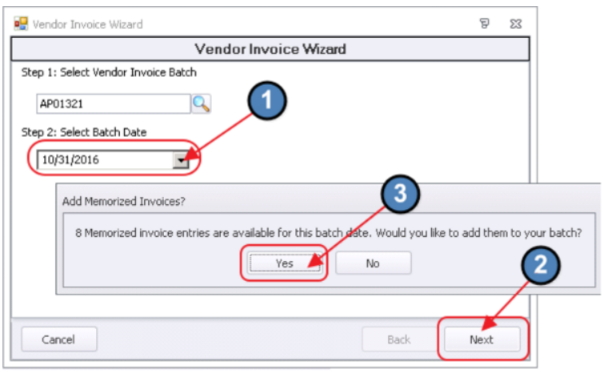
...
NOTE: Memorized invoices added to a batch by accident can be deleted out of the batch, and the system will prompt the user again to add them when the next vendor invoice batch is created that matched the next bill date.
Editing an Invoice Invoice
The Vendor Invoice can be edited until the Vendor Invoice Batch has been posted. Once the Vendor Invoice Batch has been posted all corrections related to the general ledger posting would need to be corrected using either negative invoices, or journal entries.
To Edit an Invoice, click Accounts Payable, and select Enter Vendor Invoices.
...
From the batch lookup window, double-click on the batch the invoice is in to open it. 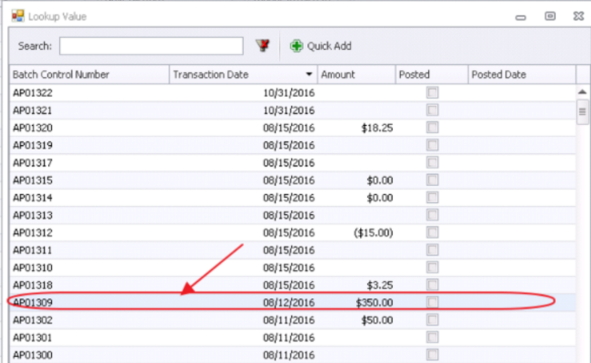
...
Batch number and date will auto-populate. Click, Next to continue. 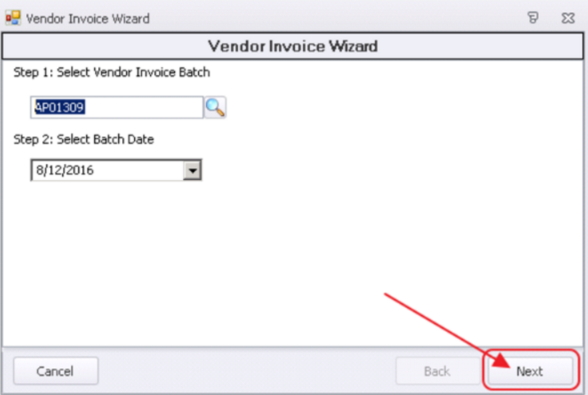
...
The The Vendor Invoice Wizard screen will appear, and will display all invoices in the batch. Double click on the invoice to open it. 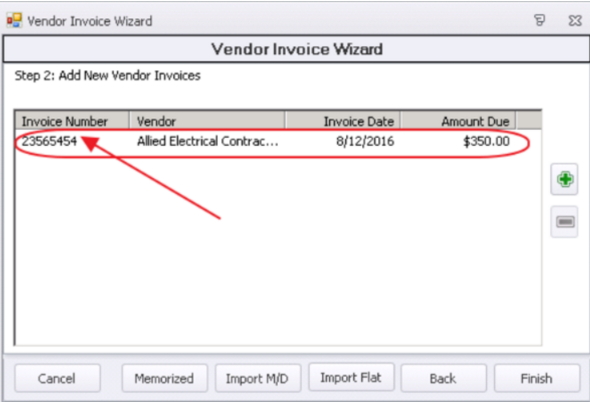
...
Vendor Invoice screen will appear. Edit invoice, and when complete, click Save and Close. 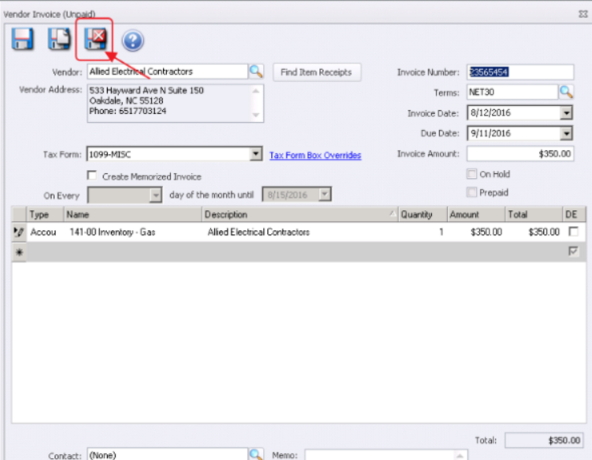
...
Proceed as previously demonstrated.
Deleting an Invoice Invoice
Once the Vendor Invoice Batch has been posted, all corrections related to the general ledger posting would need to be made using either negative invoices, or journal entries.
To Delete an Invoice, click Accounts Payable, and select Enter Vendor Invoices.
...
The Open Vendor Invoice Batch screen will load.
Click the batch the invoice is in to select. 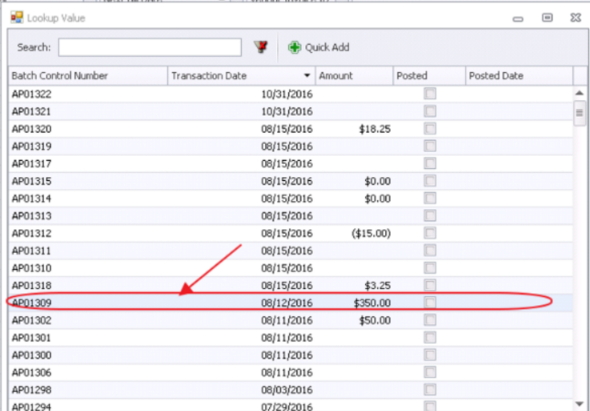
...
Batch number and date will auto-populate. Click Next to continue. 
...
The Vendor Invoice Wizard screen will load listing all invoices in the batch. Click on the invoice to select, and then, click the Green Minus sign to delete the invoice.
...
Voiding Vendor Invoices
Resolving the Issue
Client attempts to un-post an Approved Vendor Invoice Batch and is unable to do so because there is an inventoried item attached to it. Going through the process of Un-posting a Batch (shown below) the User will see the following error, Unable to unpost batch. This batch contains at least one inventoried item and cannot be unposted (5).
...
The way to remove this invoice and attached item receipt is done by following through the process to printing the check and voiding the check.
Click on the Accounts Payable Module
Click on the Pay Bills Screen
Select Invoice in question.
Save invoice to make payment batch.
Post Batch.
Click on Print checks.
Select Invoice check in question.
Change Check number to fake check number.
Change check paper to normal printer paper.
This keeps them from wasting check paper as this check is just going to be voided anyway.
Click Print & select Yes, check(s) printed properly.
The Check Register screen will open.
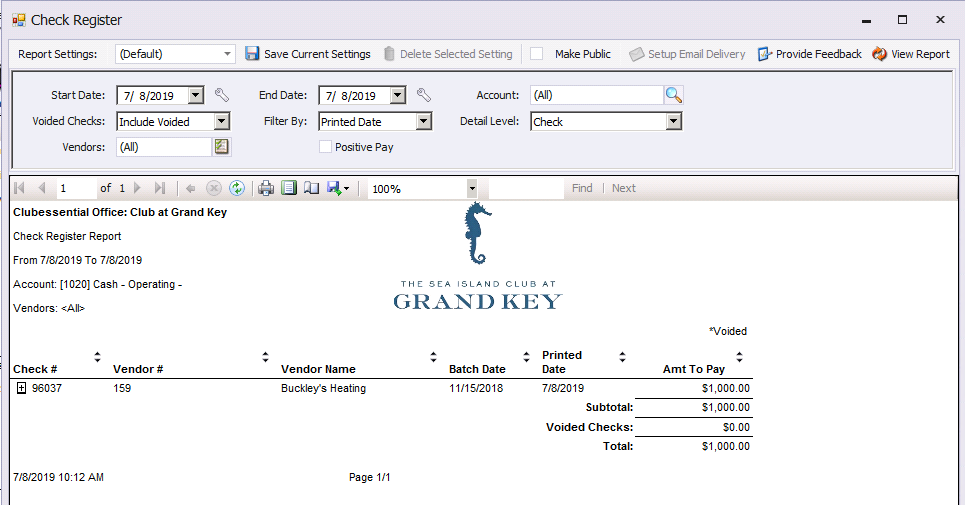
Click on the Void Checks option.
Type in the day the check was printed.
In this case, it was printed on 6/24/2019
Change “Do the invoices paid by these checks need to be paid again at a later time?” to yes.
Change “Do Credit Memos applied to these checks need to be used again?” to No.
Click Next
Confirm check number(s) listed is/are to be voided and click Finish to process the void.
Create a new invoice that has the same amount as the existing invoice only in a negative amount.
...
then complete steps 1-9 only be sure to select the original invoice and the negative in Pay Bills as the two will need to be on the same $0 Check.
Q: How will this look for auditing purposes?
A: This process makes sure there is a record of what happened with the invoice while also voiding it out for the Client.
Q: What happens to the inventoried item(s) attached to the invoice?
A: An inventory adjustment will have to be made to remove the inventoried item(s) brought in by the Item receipt voided in the above process back out of the system.
Best Practices
Use Memorized Invoices to assist with repeat monthly expenses.
FAQs
Q. Can the Manage Vendor Invoices screen be used to reconcile A/P to the General Ledger?
A. The Manage Vendor Invoices screen does not include Credit Memos and therefore, cannot be used to reconcile A/P to the General Ledger.
Downloadable Guide
Managing and Entering Vendor Invoices Guide