...
| Table of Contents | ||||||||||
|---|---|---|---|---|---|---|---|---|---|---|
|
Overview
Kiosk Mode is designed as a self-service/check-in option for Club Members. In this guide, we will discuss how to utilize Kiosk Mode integrated with the Tee Times reservation system to allow Members (and their Guests) to check in and pay for their tee times. In addition, we will discuss how the Kiosk Mode can be utilized to offer a self-serve honor system snack bar, where Members can take a beverage or snack on their own and charge the items to their account. Please Note: The self-serve features described above can only be utilized when Clubs have the Clubessential Office POS & Accounting, Clubessential Website (Axis), and Clubessential Tee Times Reservation Products. Use Case(s)
|
...
|
|---|
Rain Check Setup
...
1) To access the Rain Check Settings, navigate to System across the top toolbar and select System Settings.
2) Select Point of Sale on the left pane and apply the Issue and Redeem Item under Rain Check Settings. Also enter a default expiration value in days in the Expiration Day Count field.
3) Most clients place buttons on their POS home screen for the two rain check items. This is optional as you can use the Look up Item Feature to look them up when necessary.
Issuing a Rain Check
To issue a Rain Check,
1) Open a ticket for the customer as you would normally, select the Issue Rain Check button (or look up the Issue Rain Check item using the Look up Item feature). The Issue Rain Check Window will display as shown in the image below.
2) Fill out the details of the Rain Check Form.
a) The Golfer Count will default to 4 but you will use the Up and Down arrows to select the number of Golfers.
b) Enter the Party Name.
c) Enter the Expiration date – The expiration date will default to the date as you determined in System Settings as the default number of days to expire. The expiration date may be overridden by simply using the Up and Down buttons to change the date.
3) Select whether the Rain Check is for 9 or 18 Holes and if a Cart was used or not.
4) Select the number of Golfers the rain check is being issued for. (Notice that the system only allows a maximum selection of 4 because the Golfer Count in Step 2 is 4).
5) Select to apply the Rain Check as a Group or as Individual Rain Checks.
a) If Group is selected - The display window will appear as shown below. The user will have one, 9 Hole Rain Check for 4 players.
b) If Individual is selected – the display window will appear as shown below. The user will have four, 9 Hole Rain Checks for 1 player.
6) Once the rain check details form is filled out then click OK.
7) A $0 rain check item will display on the ticket and the user will close the ticket as normal.
Redeeming a Rain Check
To redeem a Rain Check,
1) The user will open a ticket for the customer as usual, click the Redeem Rain Check button (or look up the Redeem Rain Check Item using the Lookup Item feature). The Redeem Rain Check window will open and any rain checks that have been issued will display as shown below. Select the Rain Check being redeemed and then click OK.
2) A $0 redeemed Rain Check Item will display on the ticket and the user will close the ticket as normal.
Best Practices
Set up buttons for both Rain Check Items (Issue, and Redemption) on the POS main screen for easy access.
FAQs
Q: Can I give a rain check a fixed expiration date, like 12/31/2017, rather than having it expire in 365 days?
A: Rain check settings established in the CMA will provide a default expiration date to populate upon issuance, however, the date may be overridden to a fixed date like 12/31/2017 upon issuance in the POS.
Downloadable Guide
...
Accessing the Tool
Depending on your Club’s preference, settings can be adjusted to provide a simple approach to Members logging in, or can provide more security (requiring a Billing Member’s Number, and Member unique PIN) to log in to the kiosk. Settings and instructions are as follows.
Accessing Kiosk Mode (with PIN disabled)
To enable a simple login experience for your Members, ensure the Disable PIN in Kiosk Mode setting is checked. With this System Setting enabled, Members can easily swipe their card, or enter their Member number to quickly log in.
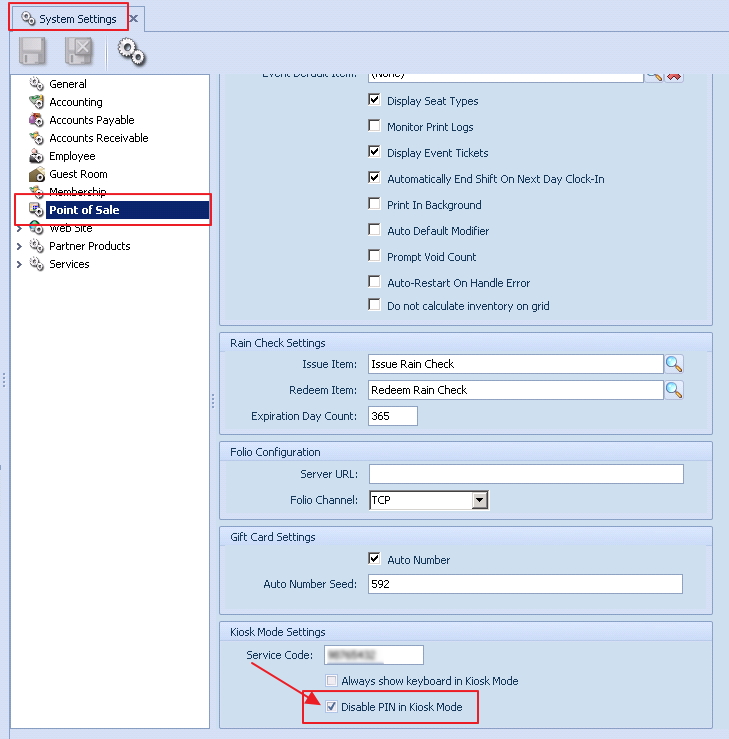
To disable the PIN, access System, System Settings, then Point of Sale, and check the Disable PIN in Kiosk Mode check box at the very bottom of the menu. Once Disable PIN in Kiosk Mode has been checked, perform the following to log in:
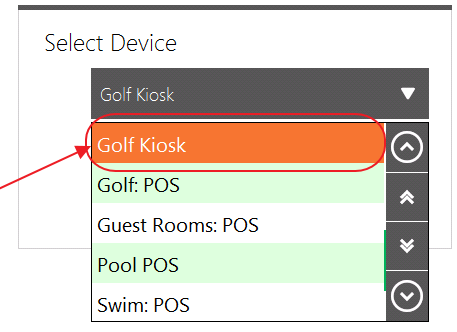
Choose the Club designated kiosk device (Golf Kiosk in this example).
Please Note: For initial Kiosk setup only.
2. Touch the POS screen to begin.

.png?version=1&modificationDate=1504260496270&cacheVersion=1&api=v2&width=600)
Accessing Kiosk Mode (with PIN enabled)
To enable a more secure login experience for your Members, ensure the Disable PIN in Kiosk Mode setting is not checked. This will require a Billing Member’s Number to be input along with a corresponding Member PIN to log in to the kiosk.
.png?version=1&modificationDate=1504260702690&cacheVersion=1&api=v2&width=600)
Once Disable PIN in Kiosk Mode is not checked, perform the following to log in:
1. Choose the Club designated kiosk device (Golf Kiosk in this example).
Please Note: This step is for initial Kiosk setup only.

.png?version=1&modificationDate=1504261547247&cacheVersion=1&api=v2&width=600)
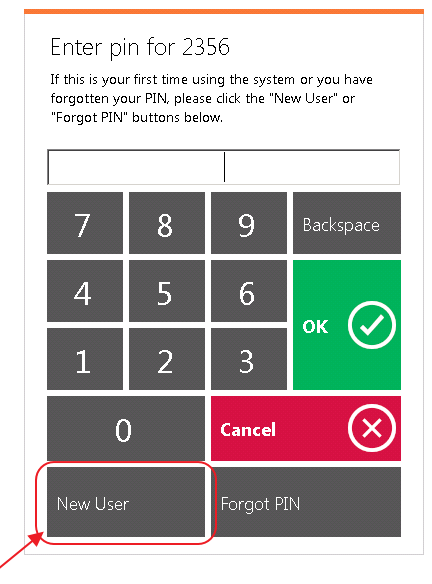
4. Next, the member will need to enter a PIN number. Most members will need to create a PIN for the first time. To start the process, select New User.
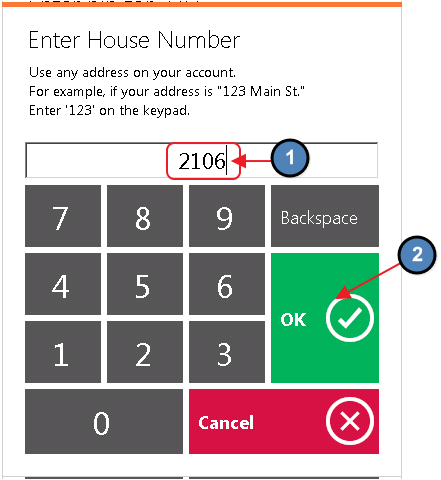
5. Members will then enter the street number of any address on their account.
a. For example, if the member’s address is 123 Main St., they will enter 123
b. Select OK.
6. If the member has dependents on their account, the system will prompt the user to select the member for whom the PIN is being created.
7. Members can then set their PIN. Select OK and the user will receive a prompt confirming the successful creation of their PIN.
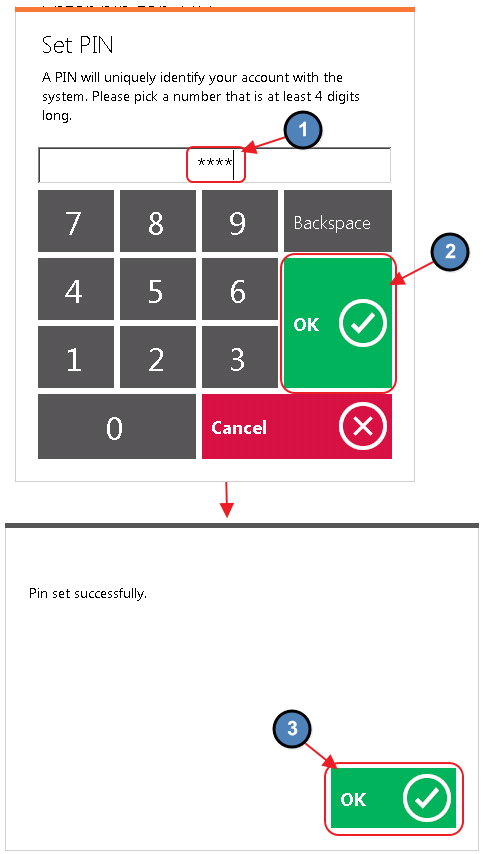
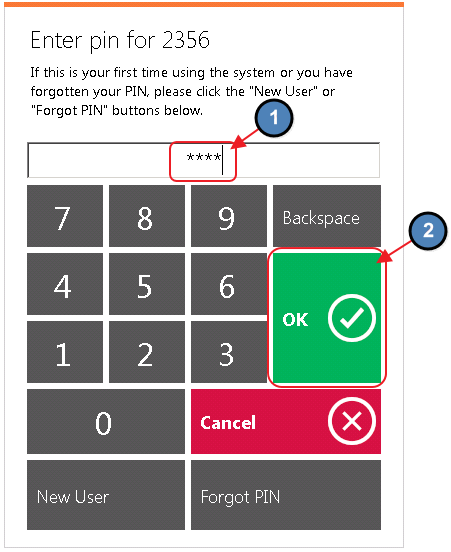
8. The member will then be prompted to enter their newly created PIN. Select OK.
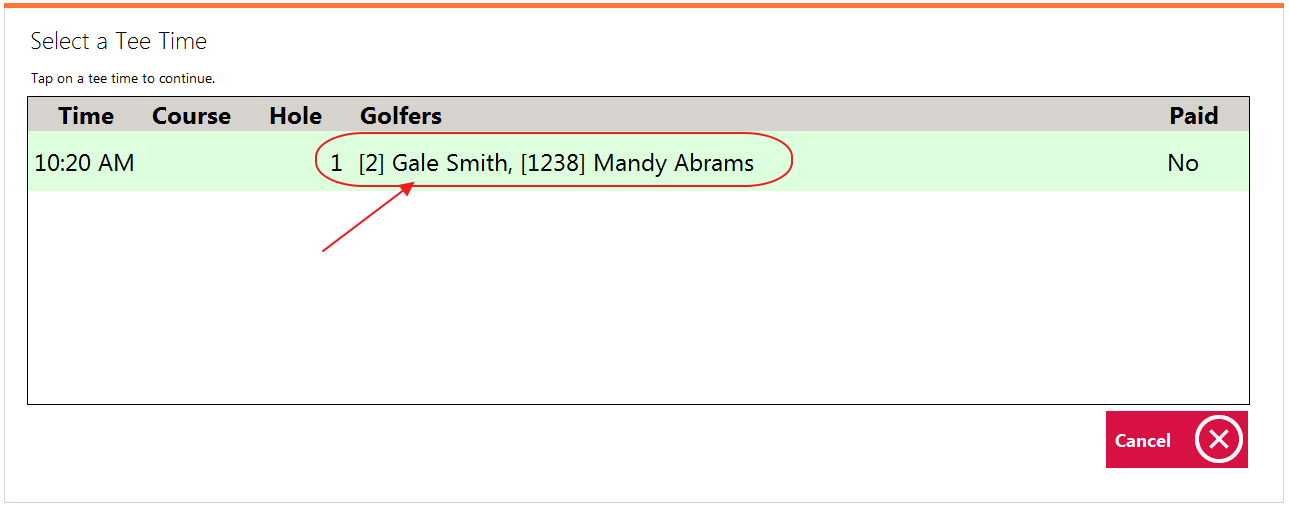
Find my Tee Time
Once the member has logged in, the Find My Tee Time button will populate. Please follow the below instructions:
1. Select Find My Tee Time.

2. Tee Time reservations specific to the member who is signed in will populate. Select the appropriate reservation.
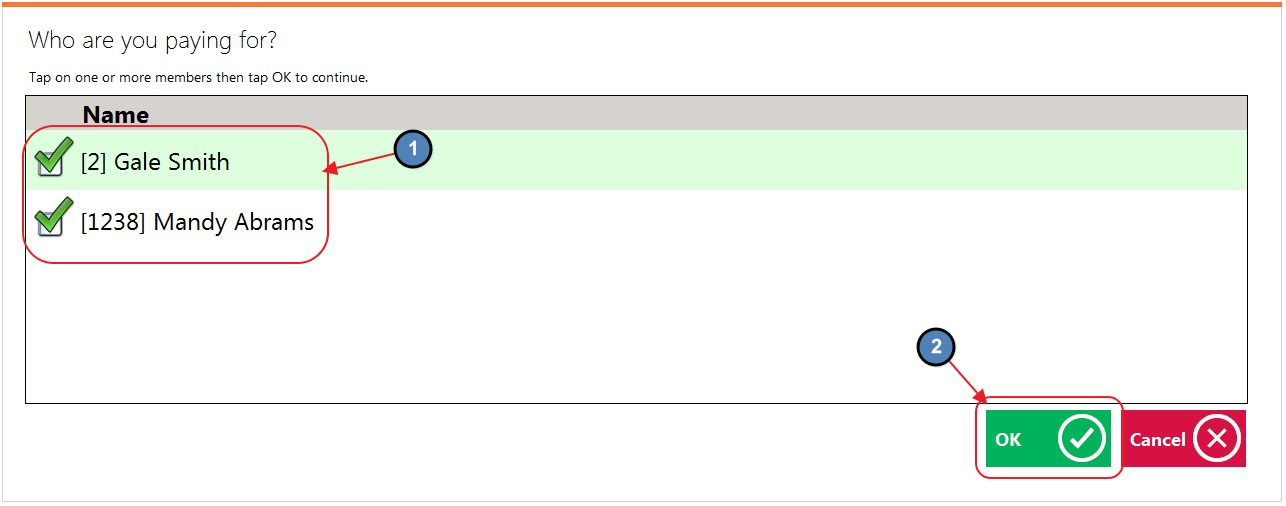
3. The system will prompt Who are you paying for? The member will then select the member(s) they are paying for and select OK.
Paying for the Tee Time/Self-Serve Snack Bar
To pay for the Tee Time and/or purchase additional items:
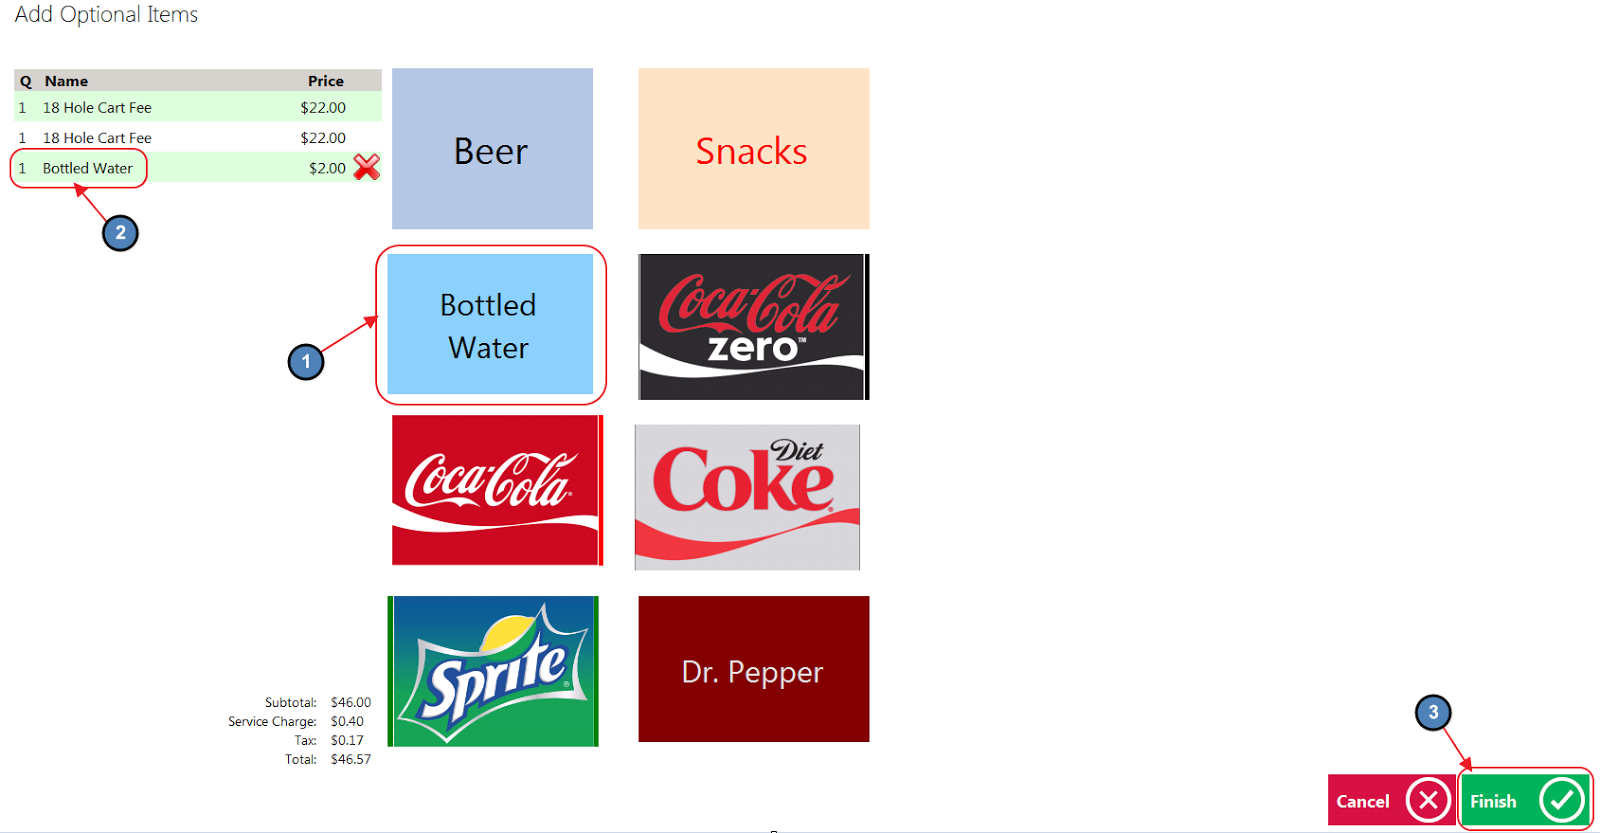
1. Once the member confirms who they are paying for, a ticket will populate reflecting any default fees associated with the Tee Times.
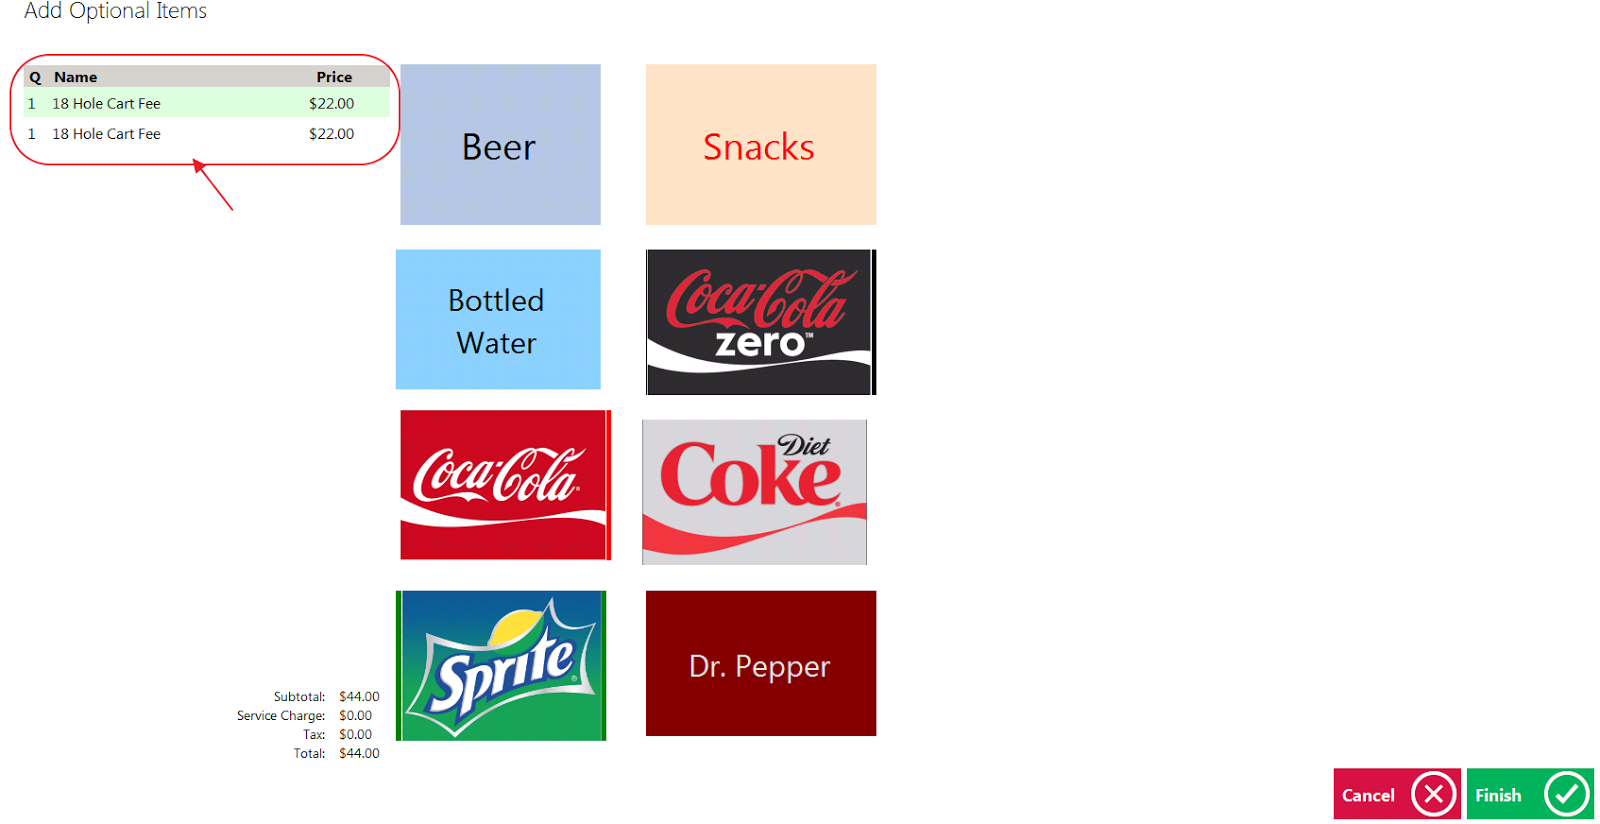
2. An additional Screen Group can be assigned to the Kiosk if the club would like to offer a self-serve honor system snack bar. The member can select any additional items they are purchasing and select Finish.
Please Note: The above screens will not populate for Clubs without the Honor System Snack Option. Instead, the member will be taken directly to the Payment Prompt/Step 3. Default fees associated with Tee Times will still apply.
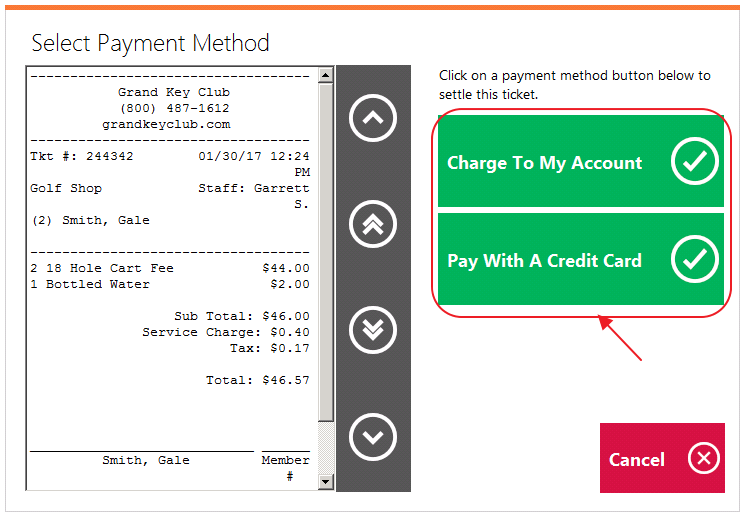
Please Note: If the club is allowing the option to use Credit Cards, the club must provide the solution of a Card Reader.
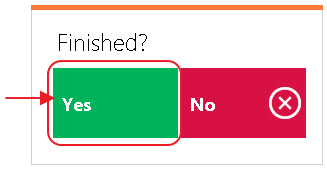
4. Select Yes when finished.
Best Practices
Please review the process on each POS kiosk terminal before going live, to ensure success in New Member PIN setup, as well as Tee Times, and payments.
The self-serve feature can only be utilized when Clubs have the Clubessential Office POS & Accounting, Clubessential Website (Axis), and Clubessential Tee Times Reservation Products. Please reach out to your Account Manager to confirm your eligibility to use the Self-Serve feature, if you have any questions.
Please remember that the Club must provide the solution of a Card Reader if choosing to allow the use of Credit Cards.
FAQs
Q: What if I do not currently have a POS system or if I do have a POS system, the ability to integrate?
A: Please contact your Clubessential Account Manager for details on Initial Setup, Implementation, and Price.
Downloadable Guide
Kiosk Mode - Tee Times Integration Guide