...
| Table of Contents | ||||||||||
|---|---|---|---|---|---|---|---|---|---|---|
|
Overview
Kiosk Mode is designed as a self-service/check-in option for Club Members. In In this guide, we will discuss how to utilize the Kiosk Mode to check in from a Member’s perspectiveconfigure Kiosk Mode within the CMA application. Please note that Kiosk Mode can be used as a simple check in station or as a unified component with the Clubessential Reservations system. Be sure to view the appropriate configuration section depending on your club’s setup. Use Case(s)
|
Content
|
|---|
Accessing the Tool
Depending on your Club’s preference, settings can be adjusted to provide a simple approach to Members logging in, or can provide more security (requiring a Billing Member’s Number, and Member unique PIN) to log in to the kiosk. Settings and instructions are as follows.
Accessing Kiosk Mode (with PIN disabled)
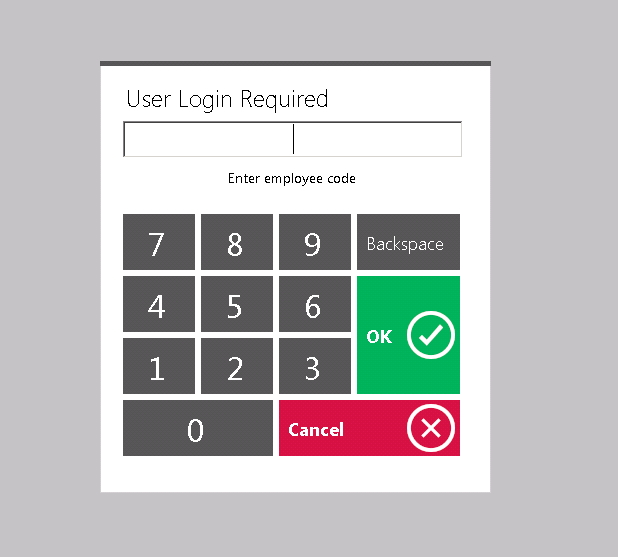
To enable a simple login experience for your Members, ensure the Disable PIN in Kiosk Mode setting is checked. With this System Setting enabled, Members can easily swipe their card, or enter their Member number to quickly log in, and check in.

To disable the PIN, access System, System Settings, then Point of Sale, and check the Disable PIN in Kiosk Mode check box at the very bottom of the menu. Once Disable PIN in Kiosk Mode has been checked, perform the following to log in:
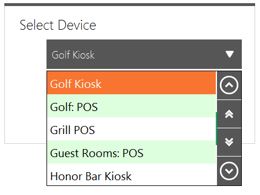
Choose the Club designated kiosk device (Check In in this example).
Please Note: For initial Kiosk setup only.
2. Touch the POS screen to begin.
Accessing Kiosk Mode (with PIN enabled)
To enable a more secure login experience for your Members, ensure the Disable PIN in Kiosk Mode setting is not checked. This will require a Billing Member’s Number to be input along with a corresponding Member PIN to log in to the kiosk.
...
Once Disable PIN in Kiosk Mode is not checked, perform the following to log in:
1. Choose the Club designated kiosk device (Check In in this example).
Please Note: This step is for initial Kiosk setup only.
4. Next, member will need to enter a PIN number. Most members will need to create a PIN for the first time. To start the process, select New User.
5. Members will then enter the street number of any address on their account.
a. For example, if the member’s address is 2106 Main St., they will enter 2106
b. Select OK.
6. If the member has dependents on their account, the system will prompt the user to select the member for whom the PIN is being created.
7. Members can then set their PIN. Select OK and the user will receive a prompt confirming the successful creation of their PIN.
8. The member will then be prompted to enter their newly created PIN. Select OK.
...
Once the member’s PIN is entered, the Check-In button will populate. Please follow the below instructions to check in.
1. Select the Check-In Button.
2. The member will then select who is checking in and specify the number of guests with them.
3. If the club charges Guest Fees, the system will ask the user to select how they would like to settle the ticket. If the club is allowing the option to use Credit Cards, the club must provide the solution of a card reader.
Please Note: If there are no Guest Fees the user will not receive the payment prompt. Please proceed to step 4.
Best Practices
1. Please review the process on each POS system before going live, to ensure the success of New Member PIN setup, as well as payments.
2. Members can reset their PIN, if needed, from the POS after entering their Member Number at the Forgot PIN button.
FAQs
Q: What if I do not currently have a POS system or if I do have a POS system, the ability to integrate?
A: Please contact your Clubessential Account Manager for details on Initial Setup, Implementation, and Price.
Downloadable Guide
Kiosk Mode - Member Check-In Guide
...
Member Check-In Configuration (No Reservations Integration)
In this section, we will discuss how to configure Kiosk Mode as simple check in station for the club’s members.
Area Setup
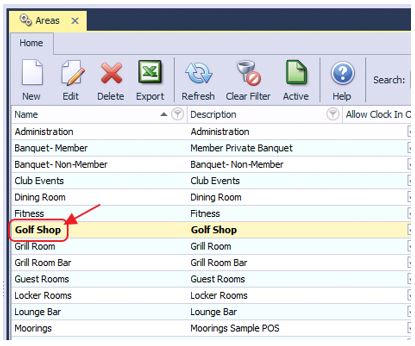
The first step in configuring Kiosk Mode is to configure the appropriate Area.
1) To access Areas, select System across the top toolbar and choose Areas.
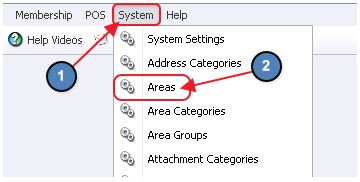
2)The Areas grid will launch. Select the Area to be configured for Kiosk Mode.

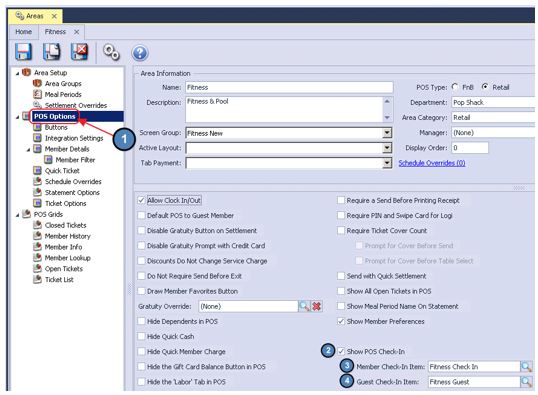
3) On the left pane, select POS Options. Then, check Show POS Check In and enter the items to be charged for both members and guests.
Note: If Guest Fees are charged, please be sure the item selected in the Guest Check In Item section is set up with the appropriate price. If the price needs to be modified, navigate to item in Manage Items and adjust the price accordingly.
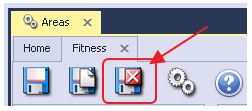
4) Select Save & Close.
Terminal Setup
The next step in configuring Kiosk Mode is to set up the Terminal.
1) Navigate to System across the top toolbar and select Terminals.
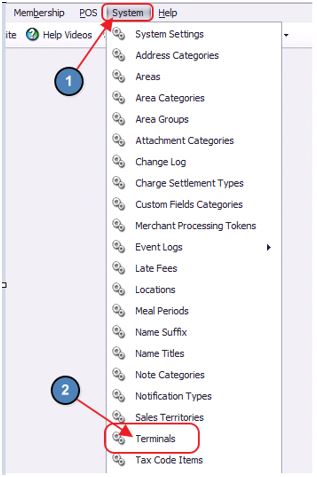
2) Then, perform either of the following to launch the Terminal setup screen:
a) Click the New icon on the toolbar.
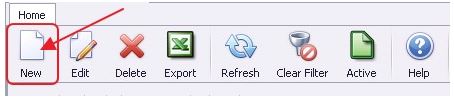
b) Right-click anywhere on the Terminals Grid and select New.
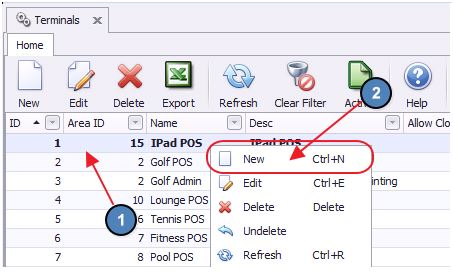
3) The Terminal Setup screen will launch.
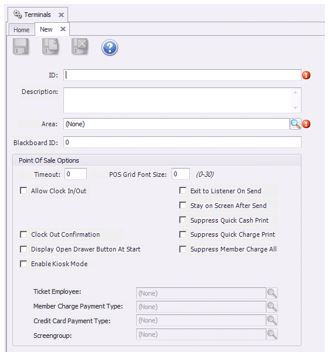
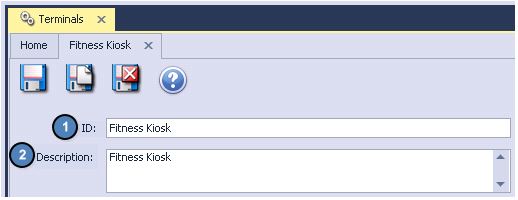
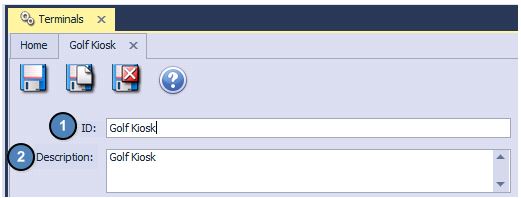
4) Enter an ID (the name of the Terminal) and Description of the new Terminal.
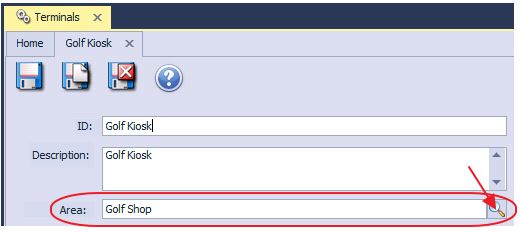
5) Select the Area for which Kiosk Mode should be enabled.
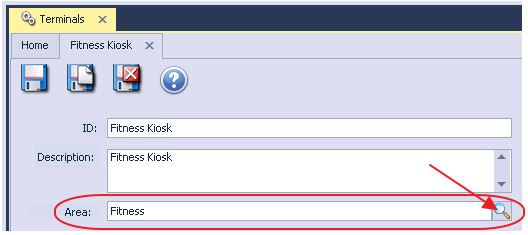
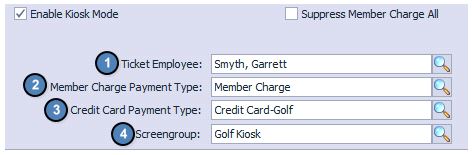
6) Check Enable Kiosk Mode. As this terminal will only be used for Kiosk, all other POS Options will not need to be entered.
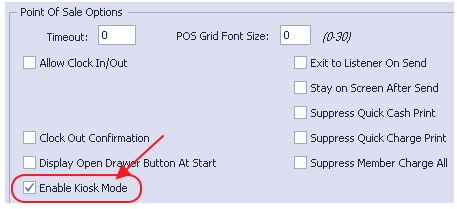
7) After Enabling Kiosk Mode, some additional settings will need to be specified. These settings include:
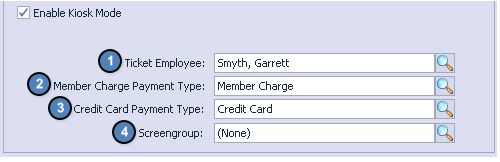
(1) Select the Employee to be attached to the tickets entered through Kiosk.
(2) Select the Payment Type to use when closing tickets with Member Charge.
(3) Select the Payment Type to use when closing tickets with Credit Card.
(4) Leave the Screengroup field blank because there is no Reservations Integration. This Terminal will work solely as a Check In Station.
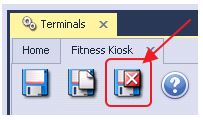
8) Select Save & Close.
Workstation Device Setup
The final step to configuring Kiosk Mode is to set up the Workstation Device. Workstation Devices are what the user selects when logging into the POS.

To create a new Workstation Device,
1) Navigate to POS across the top toolbar and select Devices.
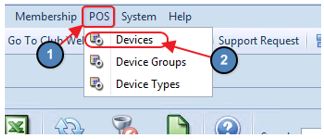
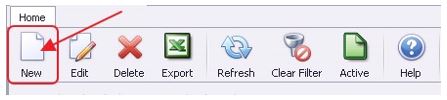
2) Then, perform either of the following to launch the POS Device setup screen:
a) Click the New icon on the toolbar.
b) Right-click anywhere on the POS Devices Grid and select New.
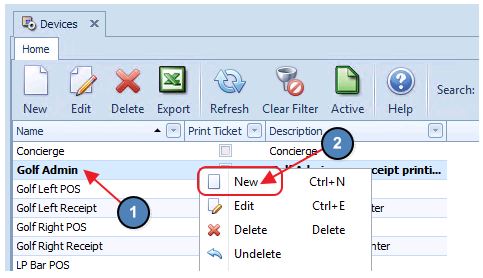
3) The POS Device setup screen will launch.
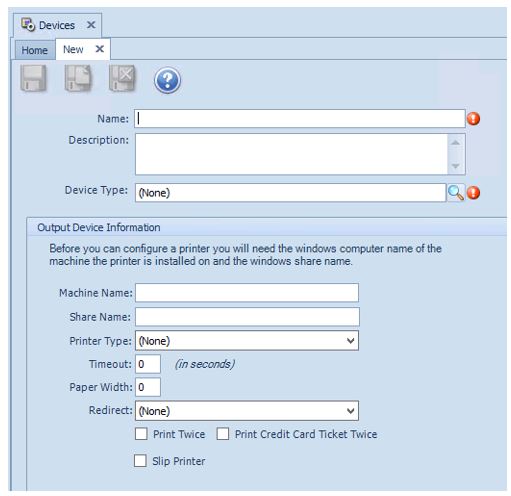
4) Next, please follow instructions below:
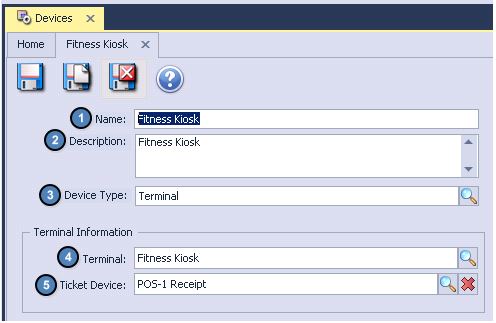
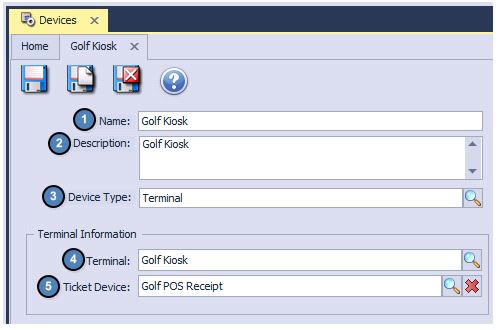
(1) Name - Enter a Name for the new Workstation Device. Again, this will be the name that appears in the Select Device drop down at the POS.

(2) Description - Provide a Description of the new Workstation Device (Optional)
(3) Device Type - Select Terminal from the Device Type Lookup. This will populate additional Terminal options.
(4) Terminal - Select the new Terminal that was previously created.
Note: Remember, the Area that is attached to the Terminal selected here will be the Area the Workstation Device defaults too when selected at the POS.
(5) Ticket Device - Select the Ticket Device (Receipt Printer) that should be used for this Workstation.
5) Select Save & Close.
Member Check-In Configuration (Reservations Integration)
In this section, we will discuss how to configure Kiosk Mode to be integrated with the various Clubessential Reservation systems.
Area Setup
The first step in configuring Kiosk Mode is to configure the appropriate Area.
1) To access Areas, select System across the top toolbar and choose Areas.
2)The Areas grid will launch. Select the Area to be configured for Kiosk Mode.
3) On the left pane, select Integration Settings.
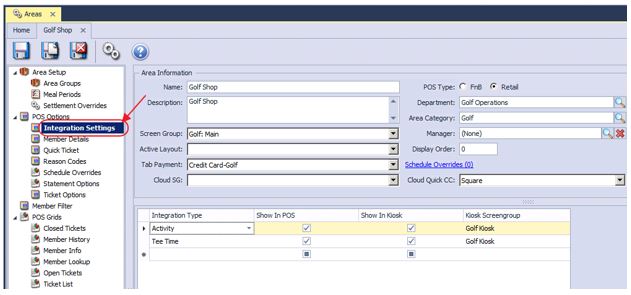
4) Next, please follow the instructions below:

(1) Integration Type - Please select the appropriate Axis Integration Type.
Note: Please note at this time only the Activities, and Tee Time Axis Integrations can be utilized within Kiosk Mode.
(2) Show in POS - Ignore this box as it is unrelated to Kiosk Mode.
(3) Show in Kiosk - Check this box to configure this Integration Type to show in Kiosk Mode.
(4) Kiosk Screen Group - Select the Screen Group that will display within Kiosk Mode. This will be the Screen Group utilized with the self-serve honor system.
5) Select Save & Close.
Terminal Setup
The next step in configuring Kiosk Mode is to set up the Terminal.
1) Navigate to System across the top toolbar and select Terminals.
2) Then, perform either of the following to launch the Terminal setup screen:
a) Click the New icon on the toolbar.
b) Right-click anywhere on the Terminals Grid and select New.
3) The Terminal Setup screen will launch.
4) Enter an ID (the name of the Terminal) and Description of the new Terminal.
5) Select the Area for which Kiosk Mode should be enabled.
6) Check Enable Kiosk Mode. As this terminal will only be used for Kiosk, all other POS Options will not need to be entered.
7) After Enabling Kiosk Mode, some additional settings will need to be specified. These settings include:
(1) Select the Employee to be attached to the tickets entered through Kiosk.
(2) Select the Payment Type to use when closing tickets with Member Charge.
(3) Select the Payment Type to use when closing tickets with Credit Card.
(4) Select the Screen Group that will display within Kiosk Mode. This will be the Screen Group utilized with the self-serve honor system.
8) Select Save & Close.
Workstation Device Setup
The final step to configuring Kiosk Mode is to set up the Workstation Device. Workstation Devices are what the user selects when logging into the POS.

To create a new Workstation Device,
1) Navigate to POS across the top toolbar and select Devices.
2) Then, perform either of the following to launch the POS Device setup screen:
a) Click the New icon on the toolbar.
b) Right-click anywhere on the POS Devices Grid and select New.
3) The POS Device setup screen will launch.
4) Next, please follow instructions below:
(1) Name - Enter a Name for the new Workstation Device. Again, this will be the name that appears in the Select Device drop down at the POS.
(2) Description - Provide a Description of the new Workstation Device (Optional).
(3) Device Type - Select Terminal from the Device Type Lookup. This will populate additional Terminal options.
(4) Terminal - Select the new Terminal that was previously created.
Note: Remember, the Area that is attached to the Terminal selected here will be the Area the Workstation Device defaults too when selected at the POS.
(5) Ticket Device - Select the Ticket Device (Receipt Printer) that should be used for this Workstation.
5) Select Save & Close.
Additional System Settings
In this section, we will discuss additional Kiosk Mode Settings that impact the kiosk functionality. To access these settings, click on System, System Settings, POS, and scroll down to Kiosk Mode Settings.
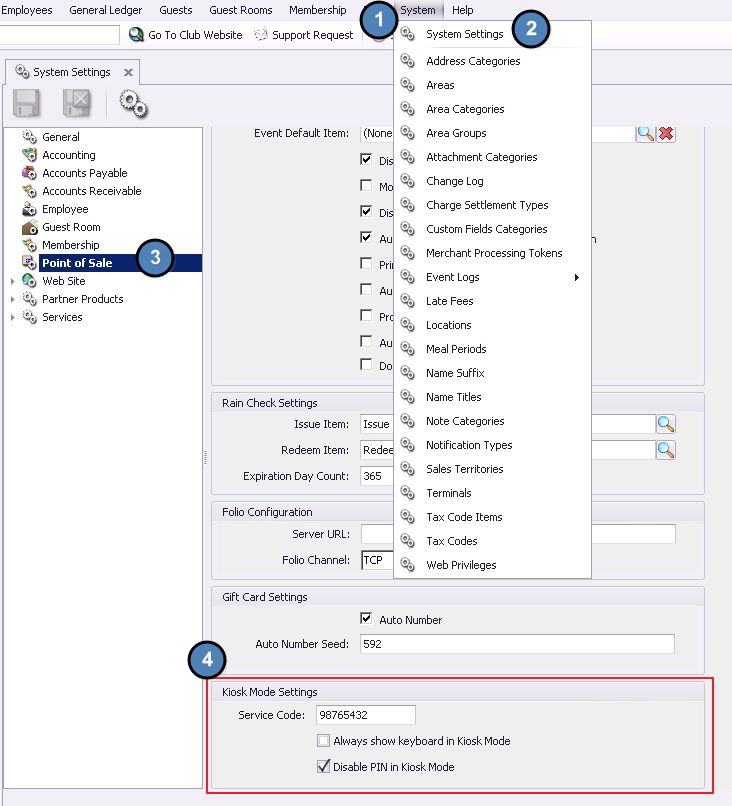
There are (3) Settings found in the Kiosk Mode Settings section.
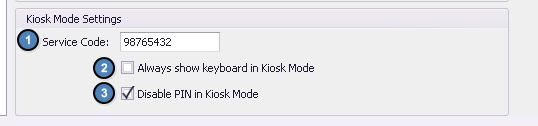
1) Service Code - Set this code (to a code of your choice) to allow Club Staff to exit Kiosk Mode from Kiosk.
Once Kiosk Mode has been set, click on the Gear Icon (intentionally discrete button in the bottom right-hand corner) to access the Service Code screen.

Enter the Service Code when prompted and click OK.
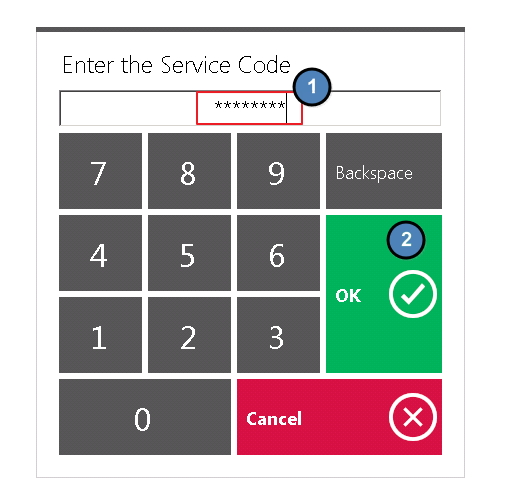
Once accepted, Kiosk will return to regular POS Login screen.
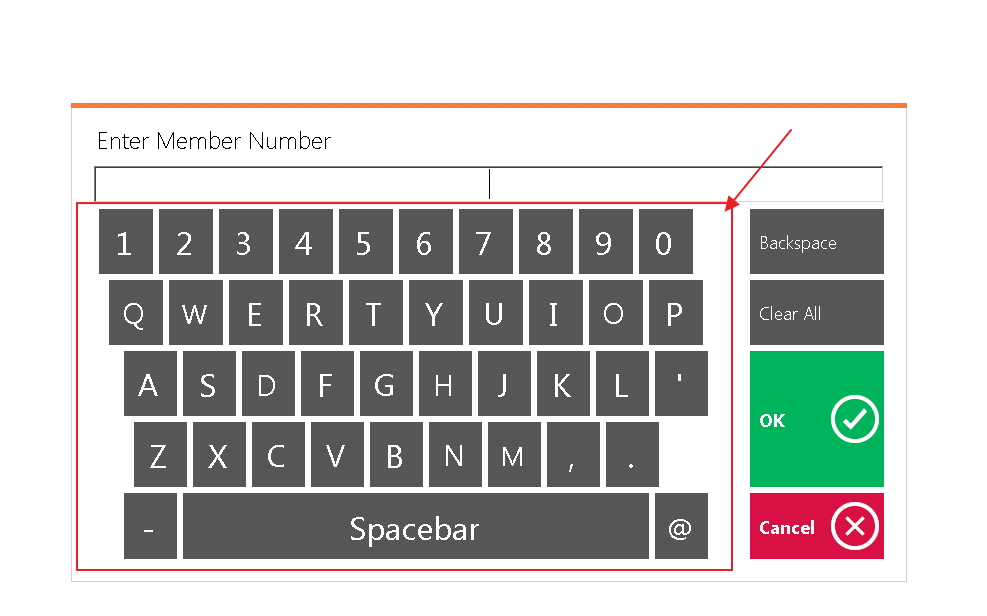
2) Always show keyboard in Kiosk Mode - Check this box to show full keyboard on the kiosk. This is helpful when Member numbers involve Alpha-numeric characters.
3) Disable PIN in Kiosk Mode - Check this setting to bypass the requirement for a unique Member PIN, and allow any Member to log-in with only their Member number. See additional kiosk documents for more information on this setting.
Best Practices
1. When considering use of a kiosk, determine where operating costs could be saved, and Member experience could be enhanced with a self-service check-in option.
FAQs
Q: Does a Kiosk use a POS user license?
A: Yes, setting up a Kiosk will utilize a POS user license. To obtain more licenses, please contact your Account Manager for more information.
Q: Can you use the Kiosk for all systems integrated with the Clubessential Reservations products?
A: Yes, the Kiosk could be integrated with any Clubessential Reservations product in use at the Club - ie, Tee Times, Fitness Center Spa Appointments, Personal Training sessions, etc.
Q: Do you have to have the Reservations product to have “Activities” linked to the Kiosk or can you manually enter Tee Times for instance?
A: The Clubessential Reservations product would be required to link and allow Members to check in for Activities showing on the Kiosk.