Table of Contents
| Table of Contents |
|---|
...
|
...
|
...
Command Prompt
You will need to identify the name of your system or machine and make a note of it.
To do so, you will need to go to your Start menu and search for Command Prompt or select it from the quick menu.
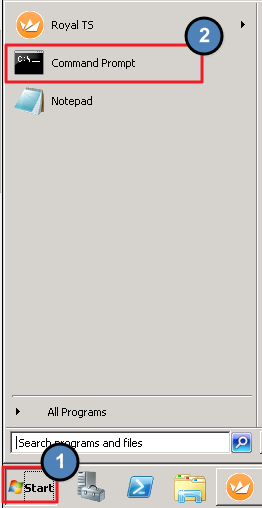
From here you will type in: whoami and hit return or enter. The machine will report back on the next line with the name in the format highlighted below. Again, please make a note of this name.
Uninstall/Change
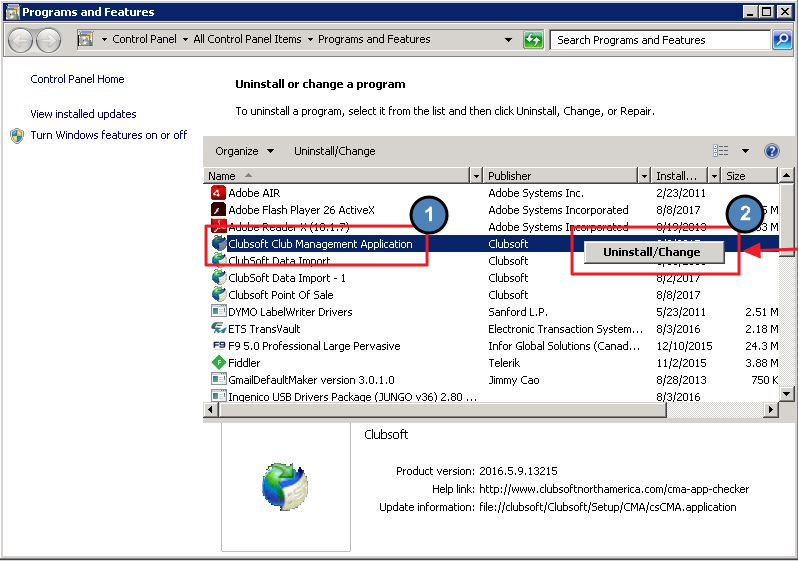
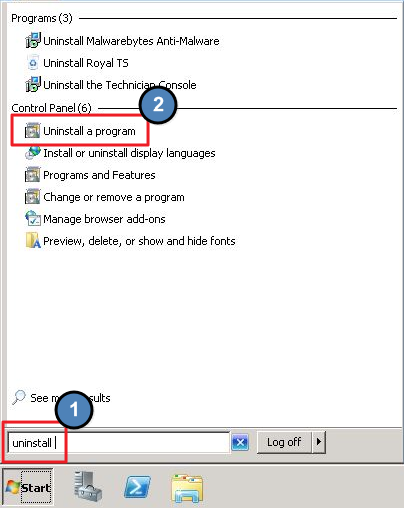
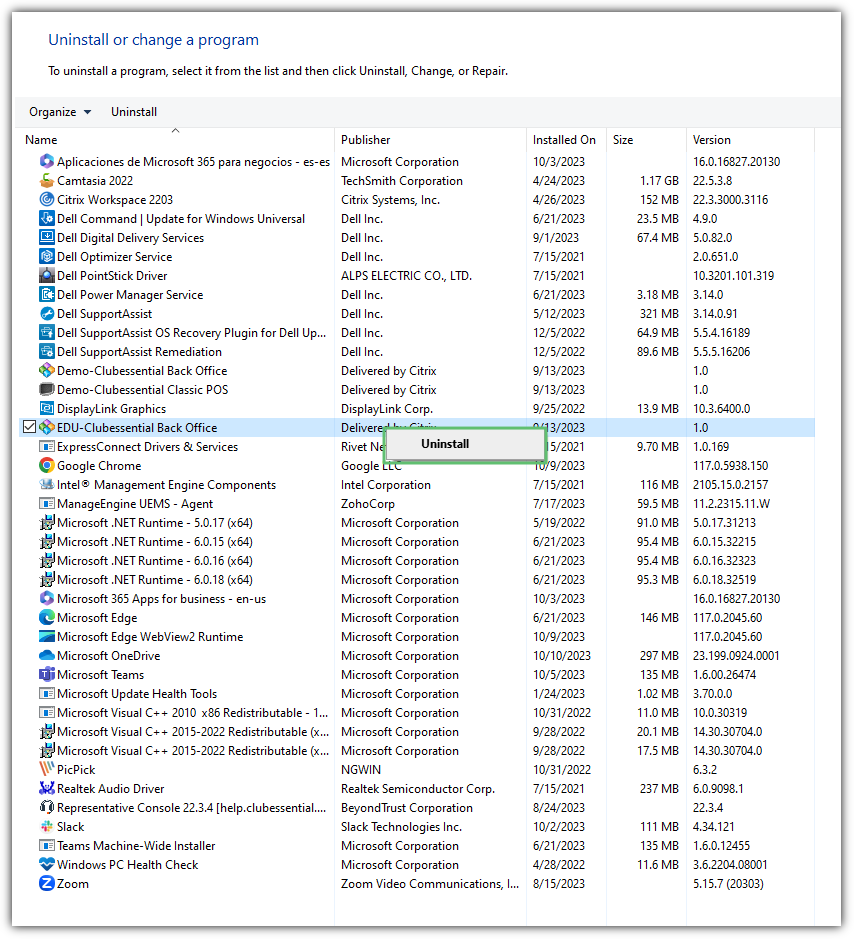
Now you will need to go back to your Start menu and search for Uninstall (1) then select, Uninstall a Program (2).

From here you will need to select Clubsoft Management Application (1), right click and select Uninstall/Change (2).
...
|
...
Overview
If you are experiencing issues with your POS or receive a message that says “Please Contact your Application Vendor” and/or are locked out of your system, we have a few simple troubleshooting steps correcting this issue with your Clubsoft Management Application and Point of Sale systems by uninstalling and reinstalling both applications. Use Case In the instance that you received the error listed above and/or are locked out of your system, you can follow these steps to uninstall and reinstall the CMA and POS to remedy this issue and get you right back to serving your membership! Reinstall documentation available here. |
Content
|
|---|
Uninstalling
...
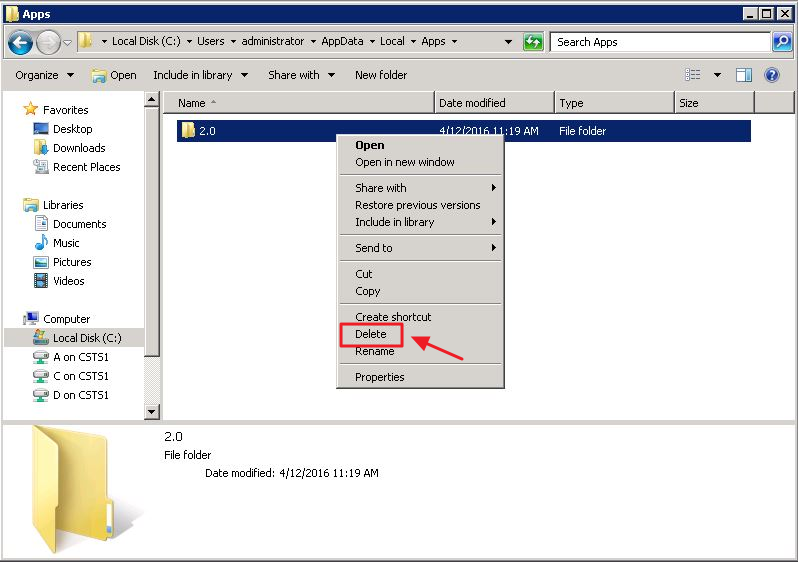
Computer → Local C → Users → ** → App Data → Local → Apps
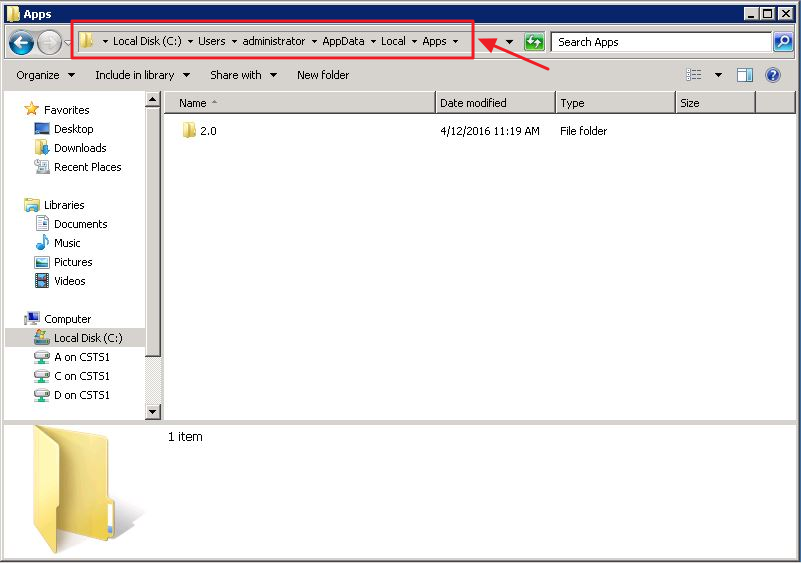
Now you will delete the 2.0 folder from the user name you requested earlier in the Command Prompt step. For the examples here, the user’s name is administrator. Please right click and then delete this folder.
Best Practices
When mapping the shared application folder, use the UNC path to reduce risk of spreading viruses.
While it is not required, installing the Clubessential Office Management Application at the POS stations is oftentimes helpful for the Food and Beverage Managers to be able to make quick edits/updates to the system.
FAQs
Q. What version of Windows can I use?
A. Clubessential software is no longer tested for Windows XP or previous versions of Windows Operating System. In terms of Server environment, Clubessential software is no longer tested for Windows Server 2003 or previous versions of Windows Server Operating System since they are no longer supported by Microsoft.
Q. When launching the application for the first time, I was asked to select the appropriate connection file. What is it?
A. When launching the application for the first time, you may be asked to select the appropriate database connection file. If so, browse to the Clubessential shared folder and select the DefaultConnection.xml file.
Q. When launching the application for the first time, connection to the SQL database failed. Now what?
A. If connection to the database fails when launching the application for the first time, check that the user has rights to the SQL database and has local administrator rights.
If the user has access to both the SQL database and local admin, follow these steps:
Downloadable Guide
Installing Office (CMA/POS) on Local Workstations - Onsite Server - Guide
...
|
Accessing the Tool
Uninstall/Change
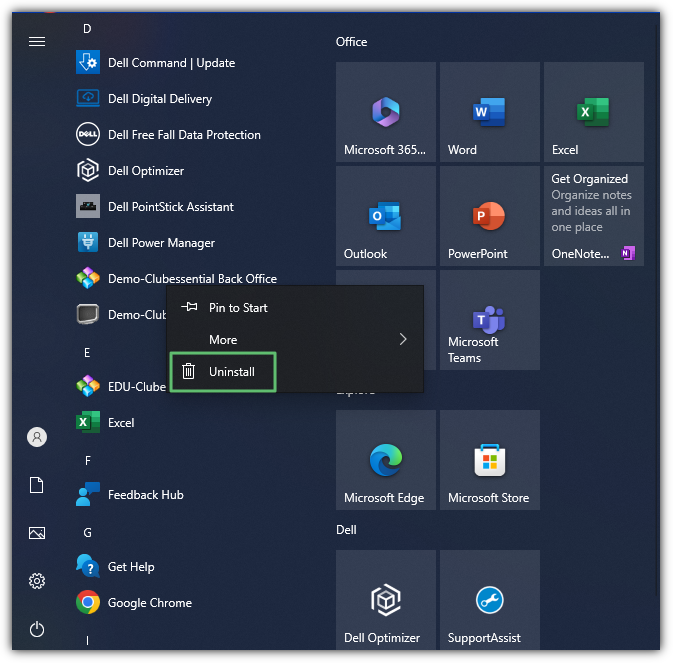
Select the Start menu and search for Uninstall then select, Uninstall a Program.
From here, select Clubsoft Management Application, right click and select Uninstall/Change.
Please Note: You will need to repeat this step to remove the Clubsoft Point of Sale application also.
Deleting the 2.0 Folder
The final step in the uninstall process is to delete the user specific 2.0 Folder. This is when you will need the specific user name of the machine you generated in the Command Prompt step.
...

Uninstall Using Windows 10
Uninstall from the Start menu
Select Start and look for the app or program in the list shown.
Press and hold (or right-click) on the app, then select Uninstall.
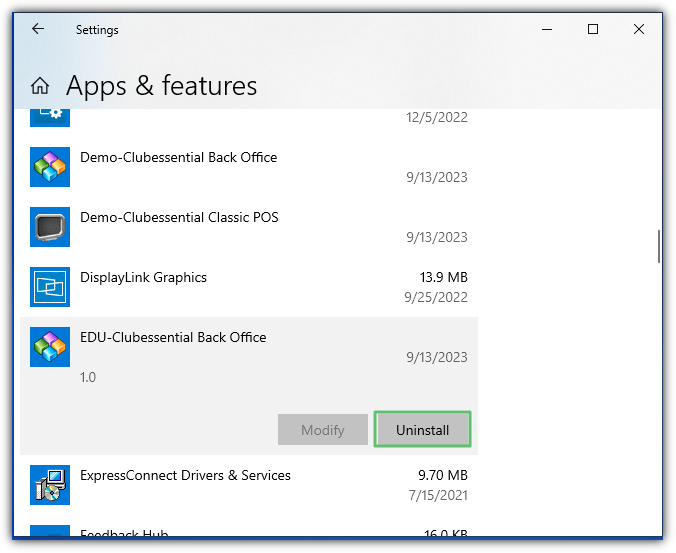
Uninstall from the Settings page
Select Start, then select Settings > Apps > Apps & features.
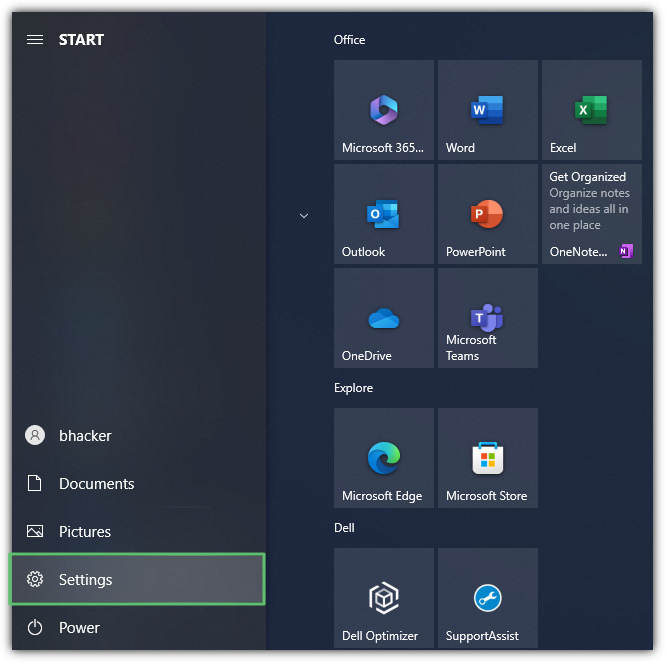
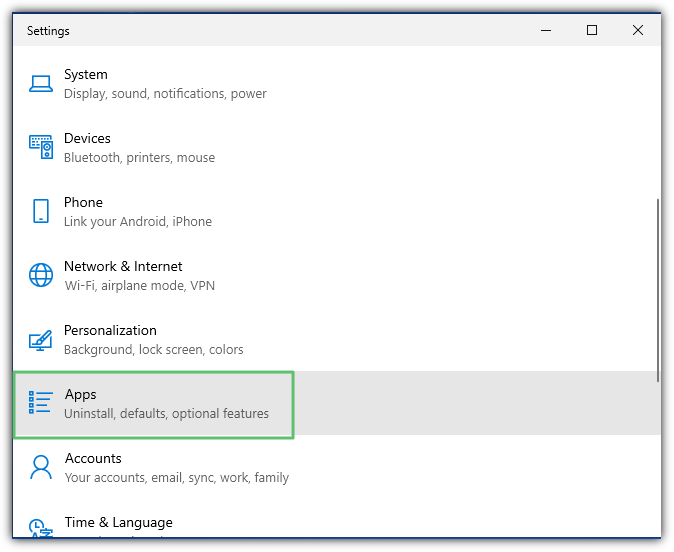

Select the app you want to remove, and then select Uninstall.
Uninstall from the Control Panel (for programs)
In the search box on the taskbar, type Control Panel and select it from the results.
Select Programs and Features.
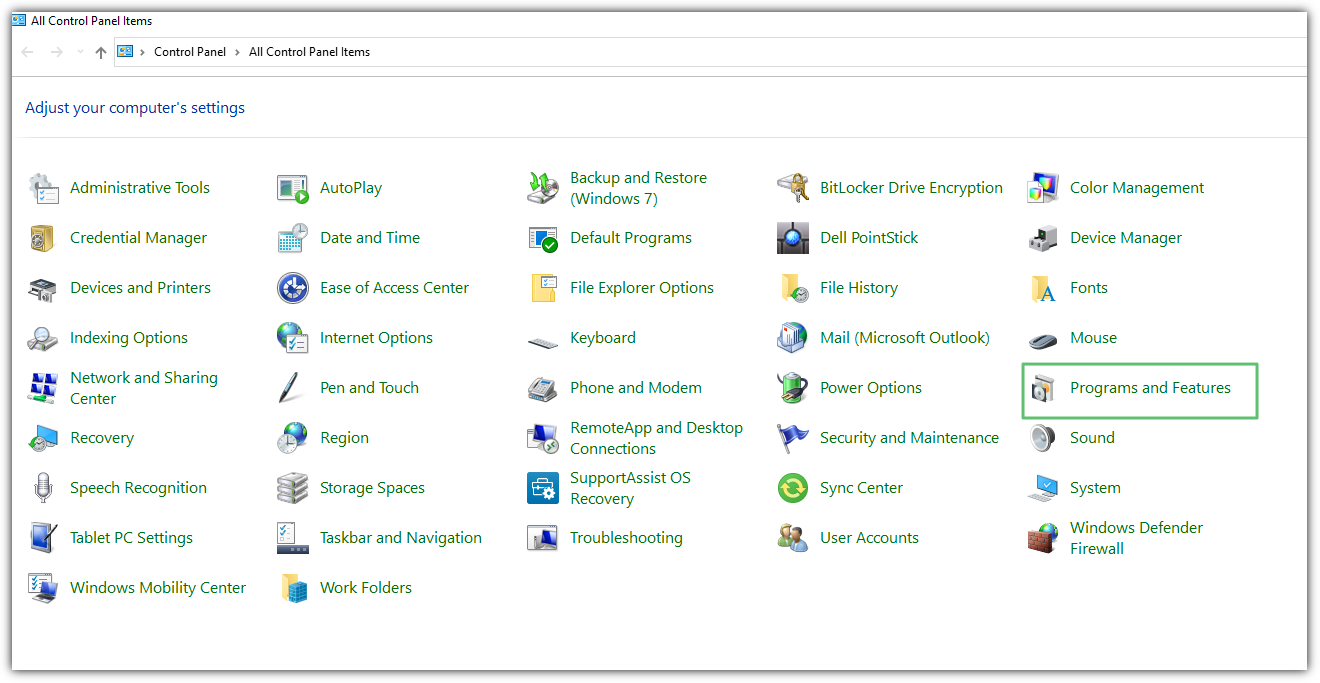
Press and hold (or right-click) on the program you want to remove and select Uninstall or Uninstall/Change. Then follow the directions on the screen.
Uninstall Using Windows 11
Uninstall from the Start menu
Select Start > All apps and search for the app in the list shown.
Press and hold (or right-click) on the app, then select Uninstall.
Uninstall in Settings
Select Start > Settings > Apps > Apps & features .
Find the app you want to remove, select More > Uninstall.
