...
| Table of Contents | ||||||||
|---|---|---|---|---|---|---|---|---|
|
Overview
The Editor tool appears in the Marketing Template portion of CMA. It can be utilized when creating marketing templates. The editor has many functions similar to those found in Microsoft Word in addition to custom features of the CMA. The user can ‘mouse over’ the icons to see its function. This guide will specifically take a look at the most commonly used functions of the editor. Please Note: Only clients still utilizing CSWeb will use this editor. New clients will use the improved, Hosted Editor. Use Case
|
...
1. Select Marketing Module, then Manage Templates, and New.

2. Clicking the New icon or double clicking on the name of an existing template will open the editor. This is what the editor should look like.
Please Note: If your editor does not look like this, please notify Clubessential so we can update your editor to the most recent version.
...
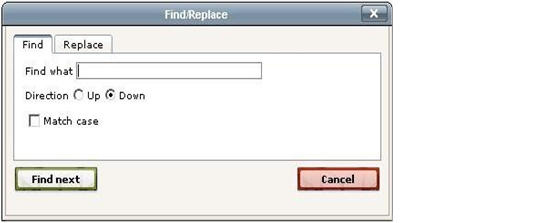
Allows for search and replace for words within the editor.

Select Custom Character
Inserts custom characters into the editor.

Insert/Edit Image
This allows you to browse images in the image library or upload new images to the server to use in the editor.
...
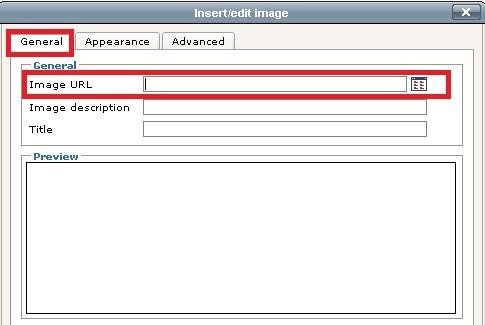
On the General tab, Click the browse button to the right of the Image URL field to open the image manager.
In the Image Manager, you can create new folders, search for existing images, or upload new images by clicking on the appropriate icon(s).
...
Please Note: Valid File Extensions are gif, jpg, png, and the max file size is 10MB. Please keep in mind that 1MB should be fine for web use. 1MB=600x800 pixels.
...
Path
This will show you the location/folder where the image is uploaded.
File to Upload
Click browse and select your file from your computer.
As File Name
This setting allows you to rename the file.
Upload
System will say “upload successful”, then continue to upload more images or close out of the pop up box if you are finished.
Image will display in folder/gallery.
Click the up arrow next to the filename for options such as Insert, Delete, Edit, View, Download, Add to Favorites.
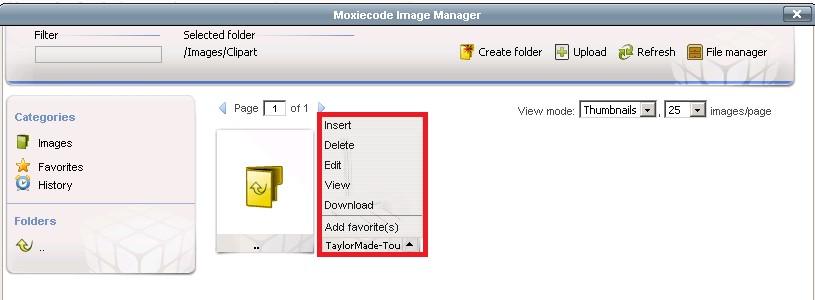

Click Insert to add the image to the editor:
A new window will appear defaulting to the General Tab.
The Image URL field will be automatically populated with the file path to the image.
Image description is optional; however if you do NOT enter a description, a warning will pop up that the image does not have a description when you insert the image. If this happens, click ‘ok’.
The Title is optional as well, if a title is entered, the title will display when the mouse is on top of the image.
Click Insert to add the image to the editor OR click the Appearance tab for further formatting options.

Appearance Tab
Provides formatting options such as alignment, size dimensions, Vertical/horizontal spacing, border and style. Set the image alignment so it appears right, left, top, bottom or center to the text. Resize the image using the dimension boxes.
To set a specific dimension, uncheck constrain proportions box. For Vertical/Horizontal Space enter a 5-10 in this box so that there is spacing between the image and the text. Enter a number such as 1-10 for the border size, color is not an option here.

Advanced Tab
Do not use; this is for advanced developers.
Click Insert to add the image once you have selected the image and set formatting. Image will appear in editor. To edit the image, hold mouse over image and right click a pop up box will appear allowing for adjustments to the image.
HTML
...
- View the HTML code vs. the visual editor view. This is for experienced administrators
...
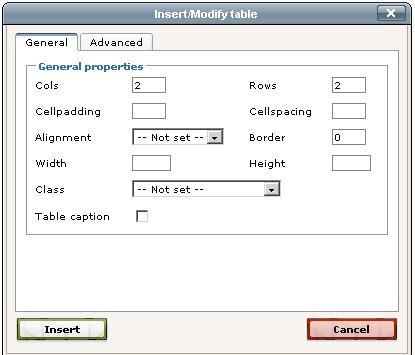
Table-Insert/Modify a table
...
- Tables are useful to organize and format information.
...
...
General tab allows you to set the General table properties as seen below.
...
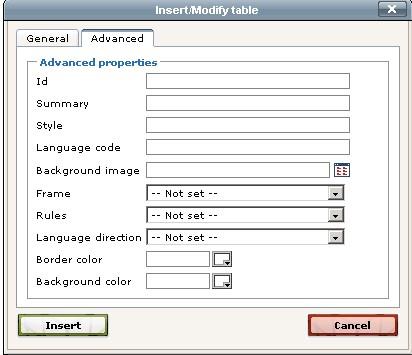
The Advanced Tab allows you to set additional table properties such as background and border color.
...
Click Insert once the table properties are set and the table will appear in the editor
...
Additional table icons allow you to easily add/remove rows and columns or merge cells once a table has been created
...
.
Remove Formatting
Highlight text and click this icon to remove all formatting. This option is good to use when copy/pasting from another source into the editor. Once the formatting is cleared, you can set the new formatting.
Undo/Redo buttons
Second Row of Icons

Cut-remove text or images
Copy
Paste
Paste as Plain Text
Paste text, removing all formatting. Recommended paste option
Paste from Word
Paste text from a Word document
Order List
Format list with numbering or lettering options
Unordered List
Format list with bullets or symbols
Bold Text
Indent Text
Underline Text
Strikethrough
Left, Center, Right, Full Alignment
Hyperlink and Break Hyperlink
The Hyperlink Icon is used to create a link to a document such as a PDF of a newsletter, video files, or other types of documents.
To create a hyperlink:
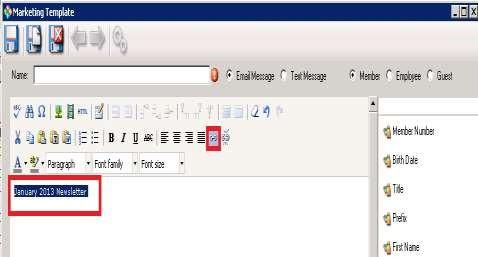
First type the text that will be the link.
Please Note: Until the text is in the editor and highlighted, the hyperlink icon will remain greyed out.Type text such as “January 2013 Newsletter” in the body of the editor and click the hyperlink icon.

3. Click the browse button in the Insert/Edit Link menu.


4. Click the Browse button to locate the file on your computer.
5. As File Name: Option to name the file something other than the original file name.
6. Click Upload.

7. Once complete, click the “x” to close the upload box and return to the file manager.
8. Select file by placing a checkmark by the file name in the preview, and click insert.
...

9. Insert/Edit box will appear. The Link URL will be populated with the file.
10. Then set the Target to either open in a new window or the same window.
11. Enter the Title of the document.
12. Click Insert. The text is now a hyperlink to the document.

Third Row of Icons

Select Text Color
Choose a font color for your text using this option
...
Select Background Color
Select a color to go behind your text
Format
Use preset formatting options for paragraphs, headers, etc..
Font Family
Select text font. Each club’s system has a default font, it is usually best to use the default font when creating emails for consistency
Font Size
Select size of text font. The Font size is in points.
Custom Plug-Ins
Please Note: This option is available ONLY in the Marketing Editor Template.
Use these custom plug-in options to customize/personalize the email template. Options include Attachments, Member, Custom Fields, Member Financial, System, Web Custom Page and Web Module. Click the plug-in option on the right side of the editor for detailed options.
Attachments
This is one option to upload and attach documents into the email template. Using this feature will display the attachment file name exactly as the filename is when uploaded. If you wish to customize the attachment file name, use the hyperlink function instead. Clicking the Attachment button will display all attachments currently uploaded, then click the attachment name to insert into document.

...
To upload a new attachment:
Click the New button the top right corner, then browse your computer for the file you wish to upload.
Select a category by clicking the looking glass.
Enter a Description of the file (optional).
Set Web Visibility Settings. ‘Anonymous’ will allow the member to open the attachment without logging into the website.
Save and Close
Please Note: Download File allows you to download the file onto a disk and the Document Quick View allows you to preview the document.
...
...

Once the new file is uploaded, it will appear in the list of attachments. Click the file name to insert into the editor as seen below.

...
Member
This plugin allows you to customize the member’s personal information such as their name, web login information, member number and birthdate. It works similar to a mail merge feature pulling information from the database into the document. Click the member information you wish to include. Example below.

Custom Fields
This plug-in pulls in data from ‘custom fields’ in the database.

Member Financial
Use this plugin to include data such as food minimums, current balance due, and past due amounts.

System
Use this plugin to include system information such as the club name, phone number and email address.

...
Web Custom Page
If you use the Clubsoft web product, you can use this plugin to link to a custom webpage.
Web Module
If you use the Clubsoft web product, you can link to modules of the website using the various options.

Best Practices
Click the Refresh icon to refresh the images in the Image Manager.
Access the File Manager (where you upload files/documents) by clicking on the File Manager icon.
View Mode allows you to toggle between thumbnail view, which displays a preview of the image, and list view, which shows the file name only.
Under Categories, when the Images icon is selected, it will display all images in the Image Manger, Favorites will display only images tagged as Favorites, History will show recent history and Folders will display all created folders in the image manager.
...
A: Only clients still utilizing CSWeb will use this Classic Editor. New clients will use the improved, Hosted Editor.
Downloadable Guide
...