Versions Compared
Key
- This line was added.
- This line was removed.
- Formatting was changed.
...
Table of Contents
| Table of Contents |
|---|
...
|
...
|
...
|
...
|
Overview
The Split Ticket feature enables users to split an existing ticket in a variety of ways:
Split by Creating New Ticket(s) and then selecting the items to be moved to each new ticket.
Split Item
Split by Quantity
Split by Seat
Split by Course
Split by Member
Split by Amount
After splitting a ticket, adjustments can me made if you decide you want to split the ticket in a different manner or need to make corrections.
The Split Ticket feature also enables users to combine tickets.
Example Use Case(s)
- 3 members decide they want to split a ticket evenly.
- 2 members decide they want to split an appetizer.
- A member decides to pay for another member’s meal.
Content
...
| Table of Contents | ||||||
|---|---|---|---|---|---|---|
|
Required Permissions
POS
Spilt Ticket
Change Table
Split Ticket Feature
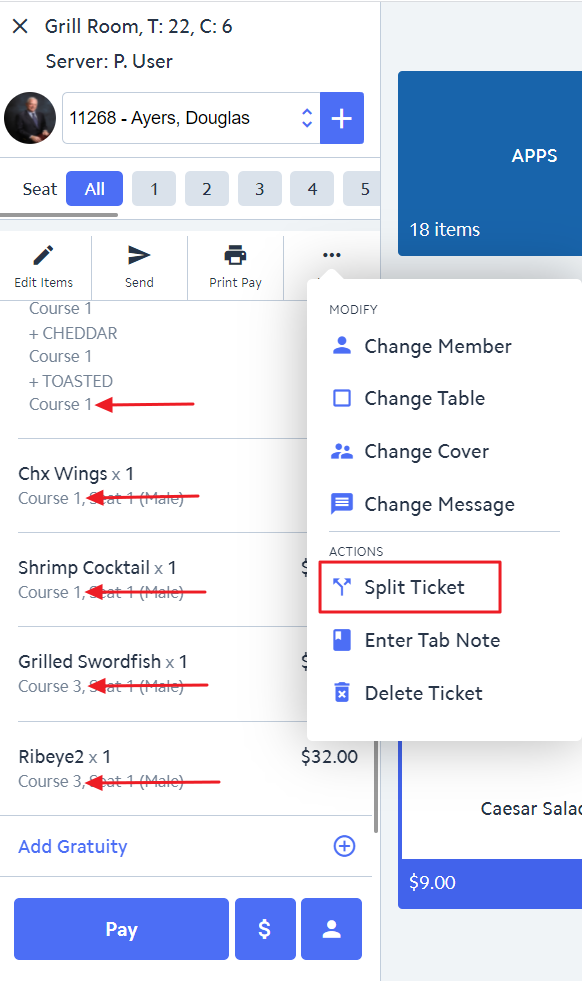
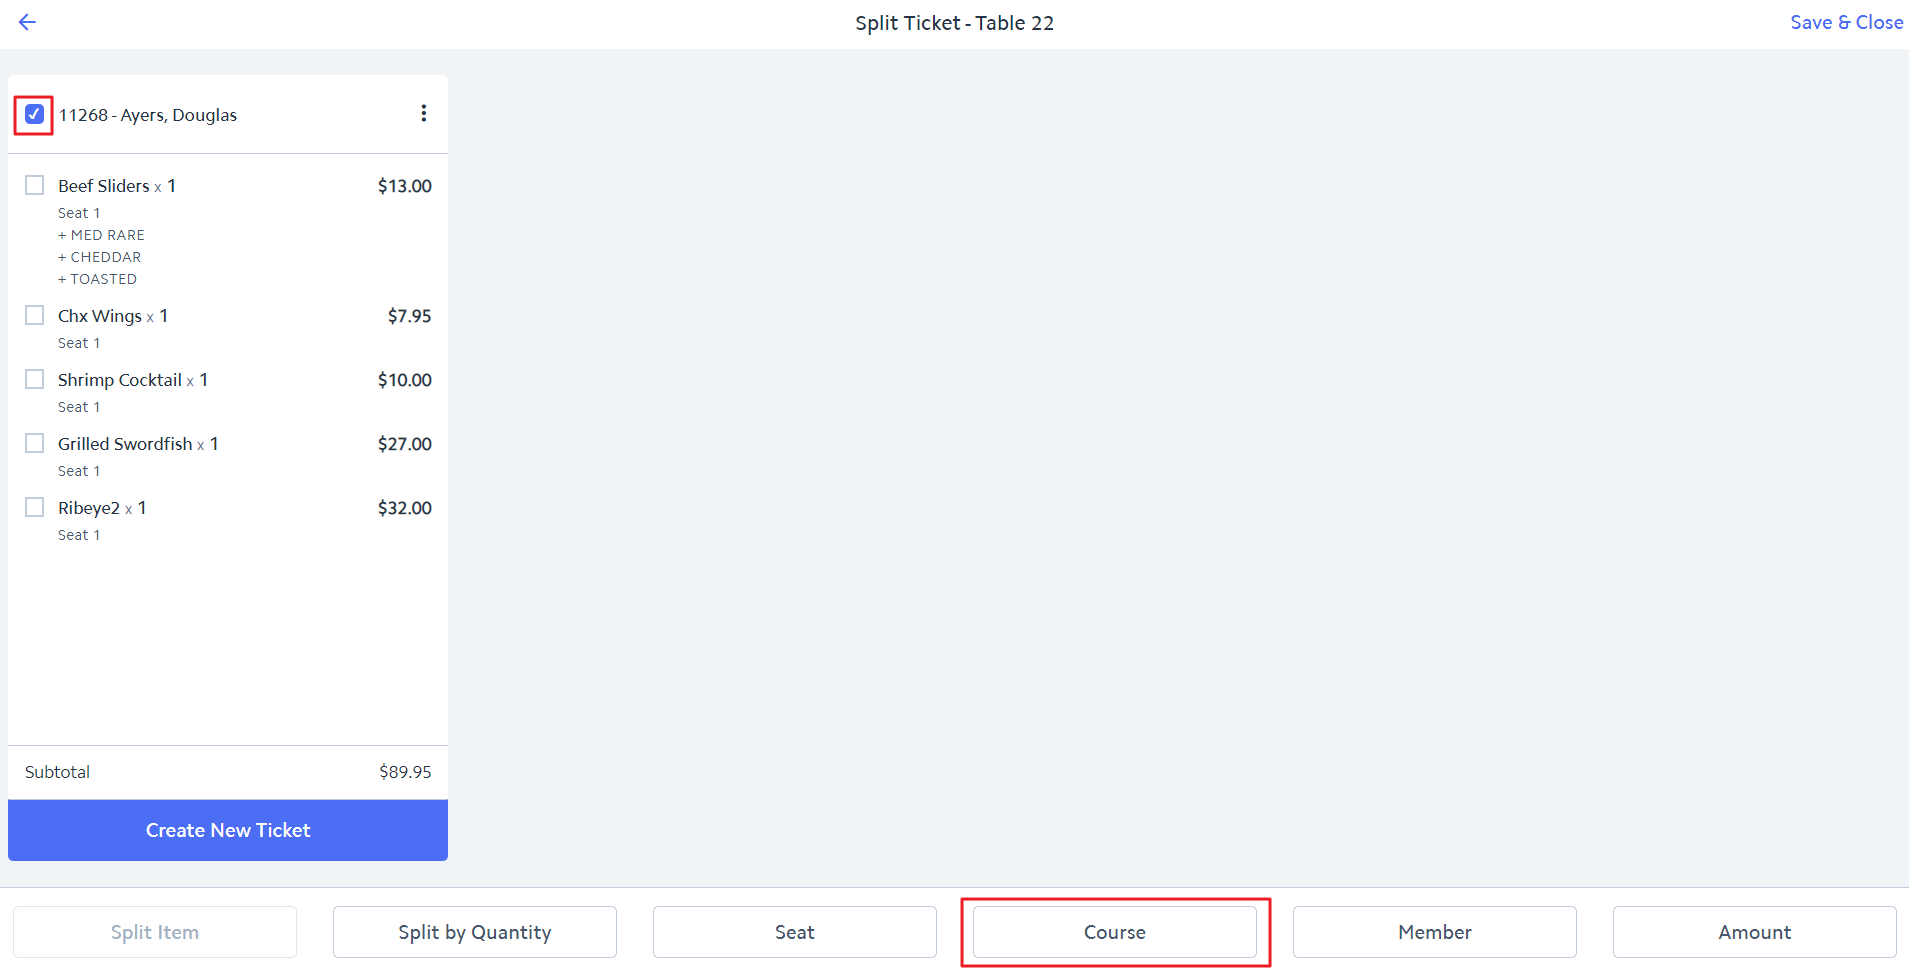
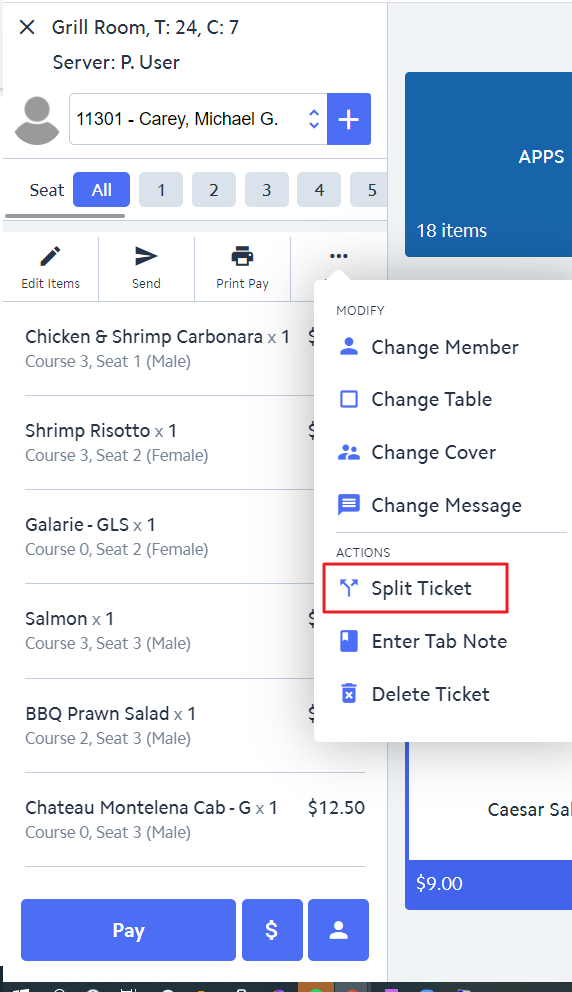
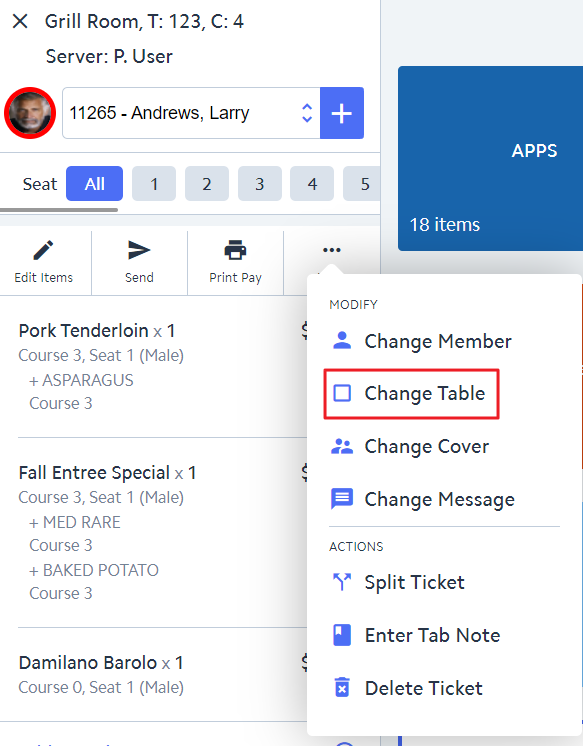
The Split Ticket option is listed under the More actions section of ticket (the 3 continuous dots icon).
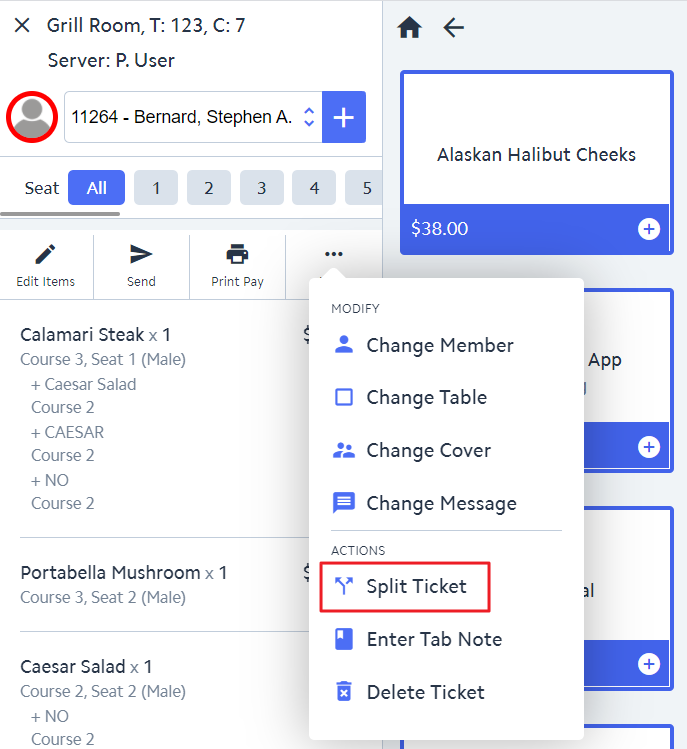
...
...
To perform a ticket split, first add items as usual to the ticket. You can split before or after the items have been sent.
...
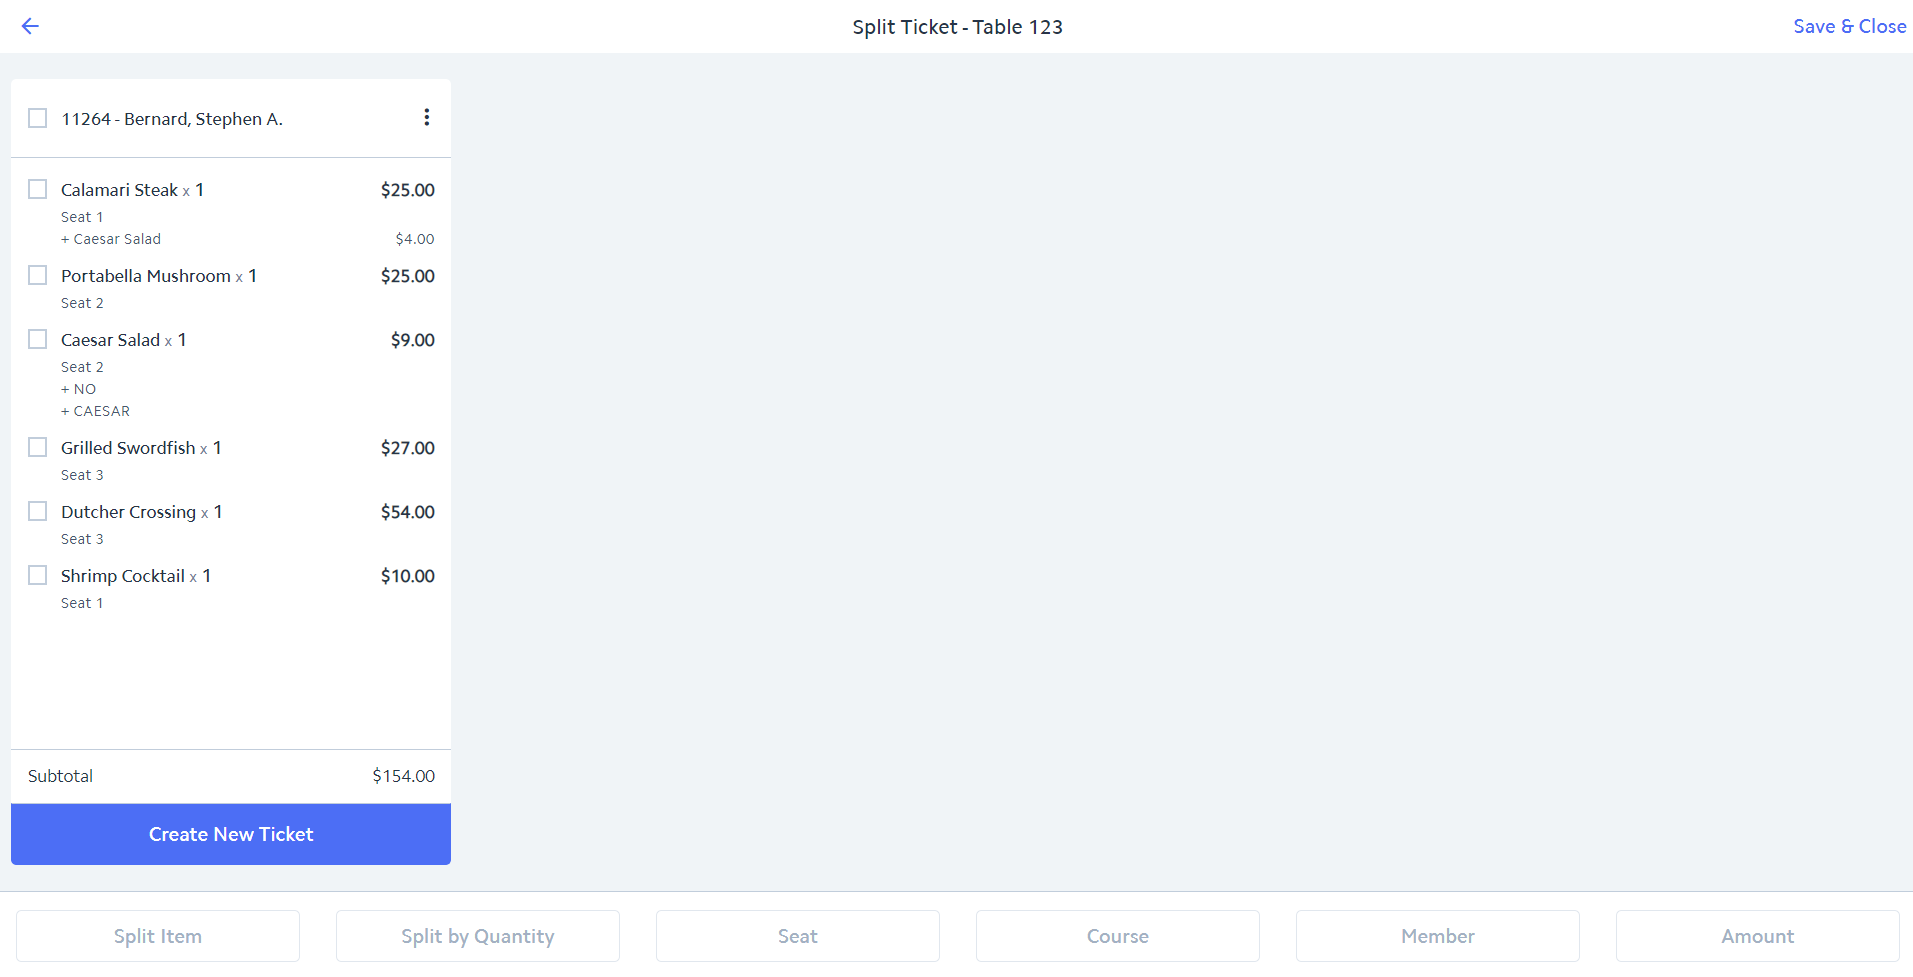
Click Split Ticket to open the Split Ticket Screen.
Note: If you split the ticket before you hit send, all items will still print to the remote printer (kitchen, bar, etc.) on one prep ticket.
...
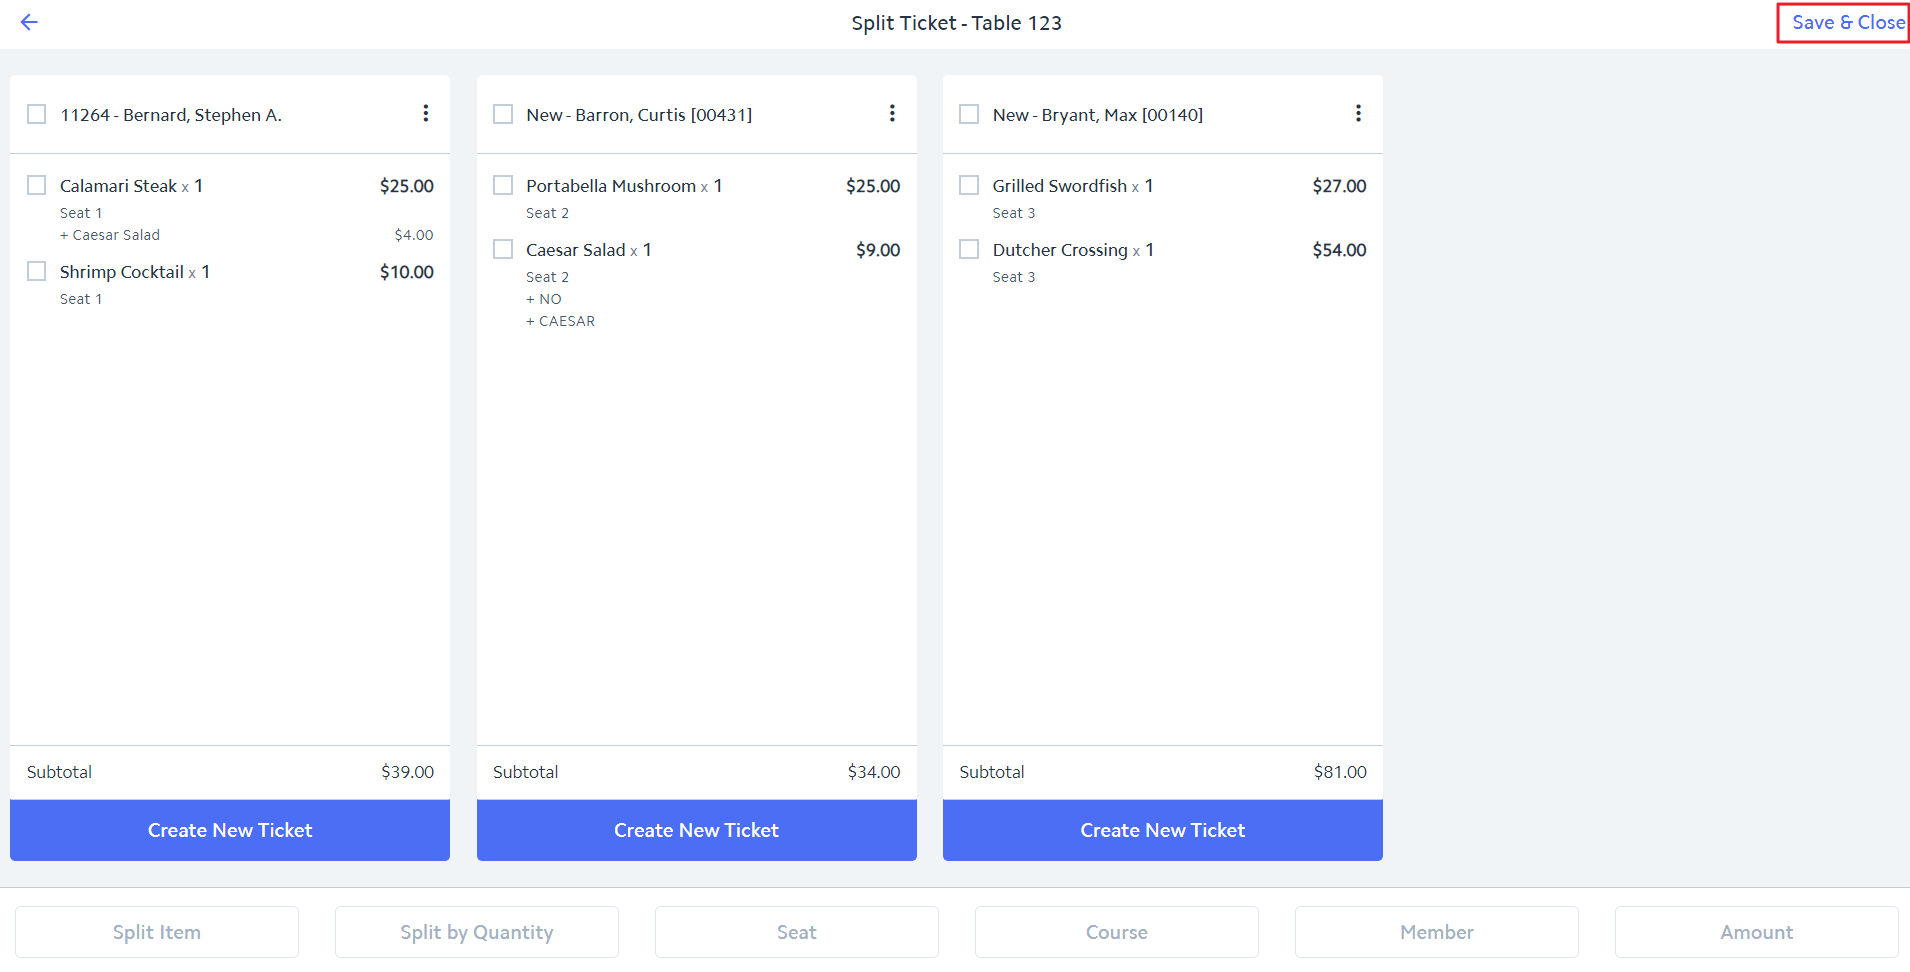
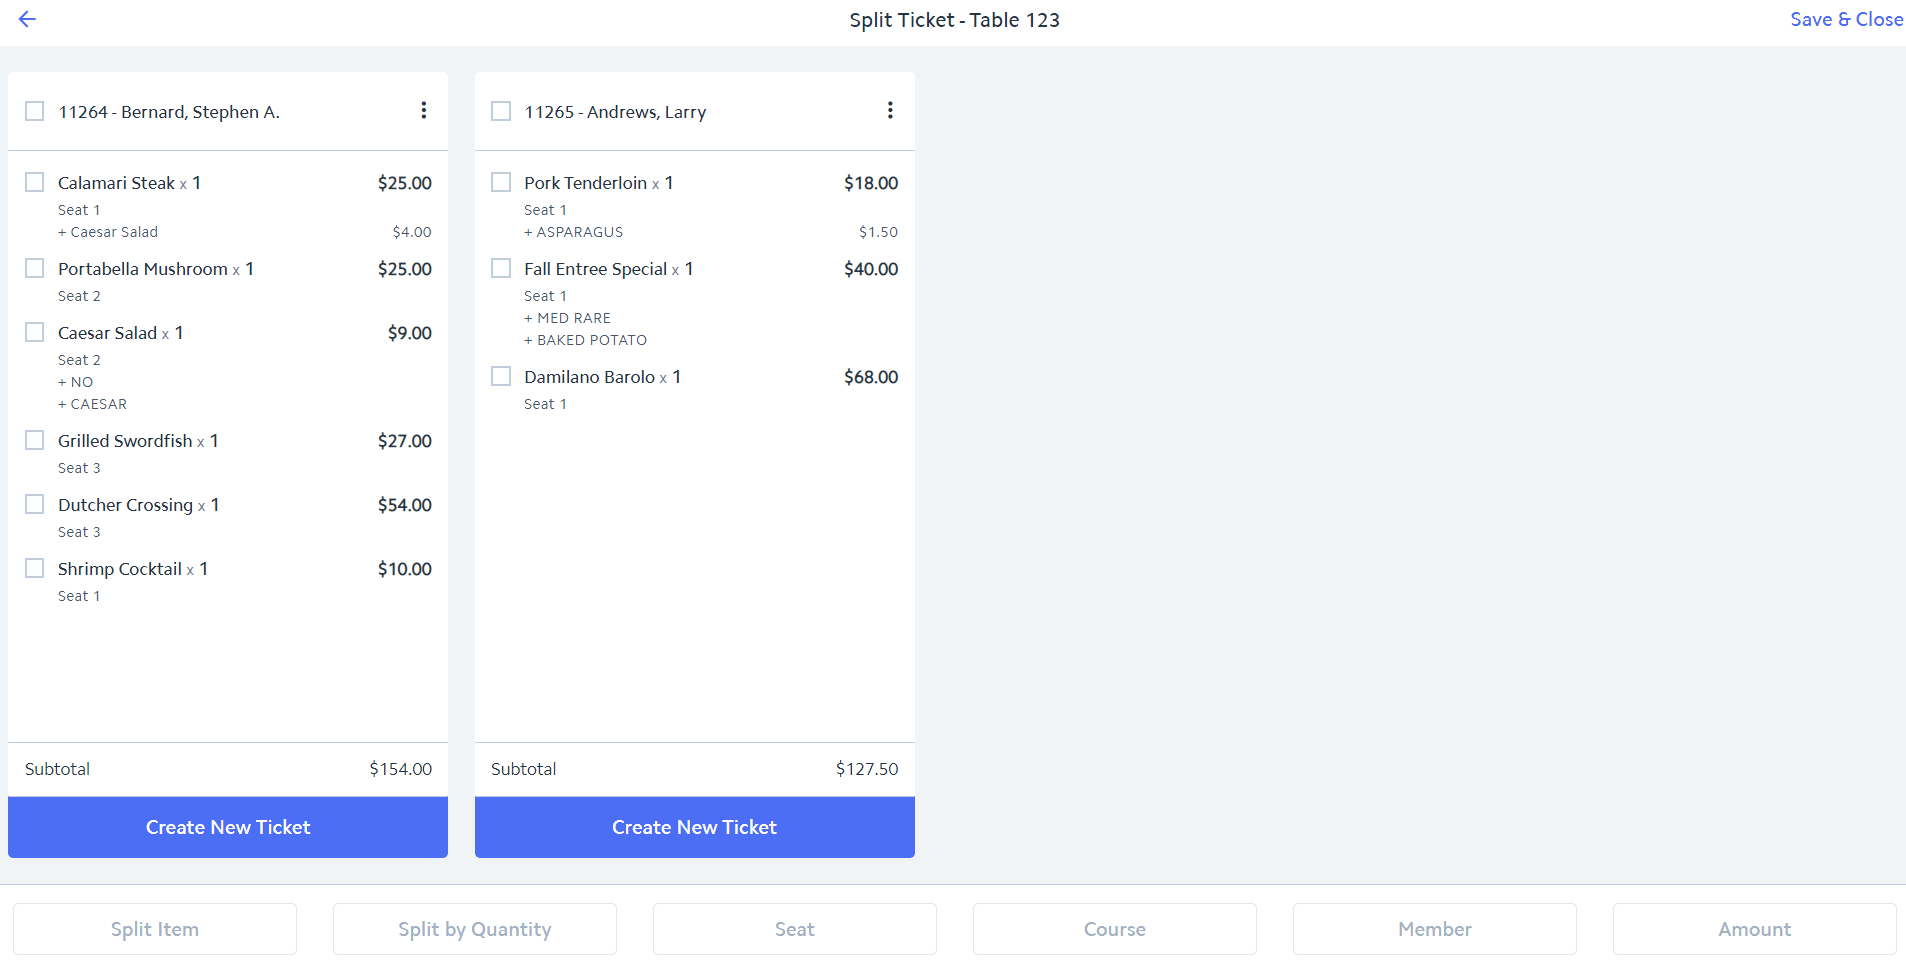
The Split Ticket Screen will appear
...
.
Split Ticket Options
There are various ways to split a ticket:
Split by Creating New Tickets (and select the items items to be moved to each new ticket)
Split Item
Split by Quantity
Split by Seat
Split by Course
Split by Member
Split by Amount
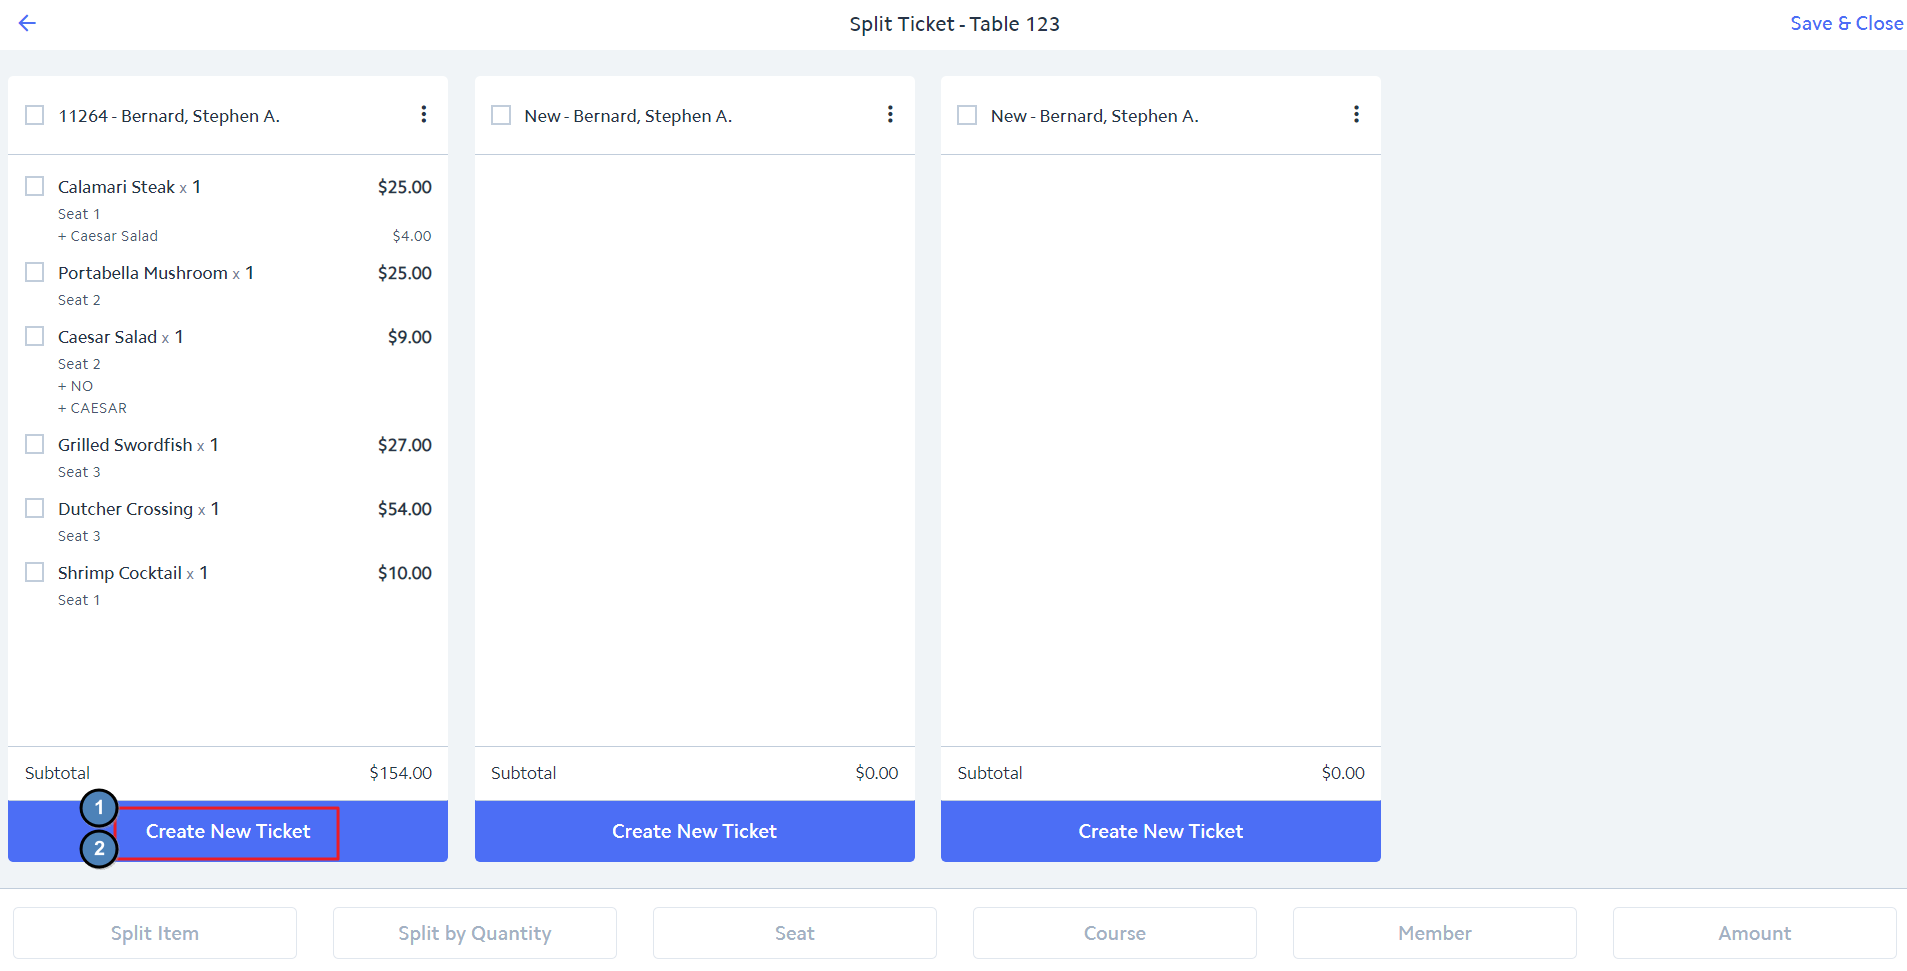
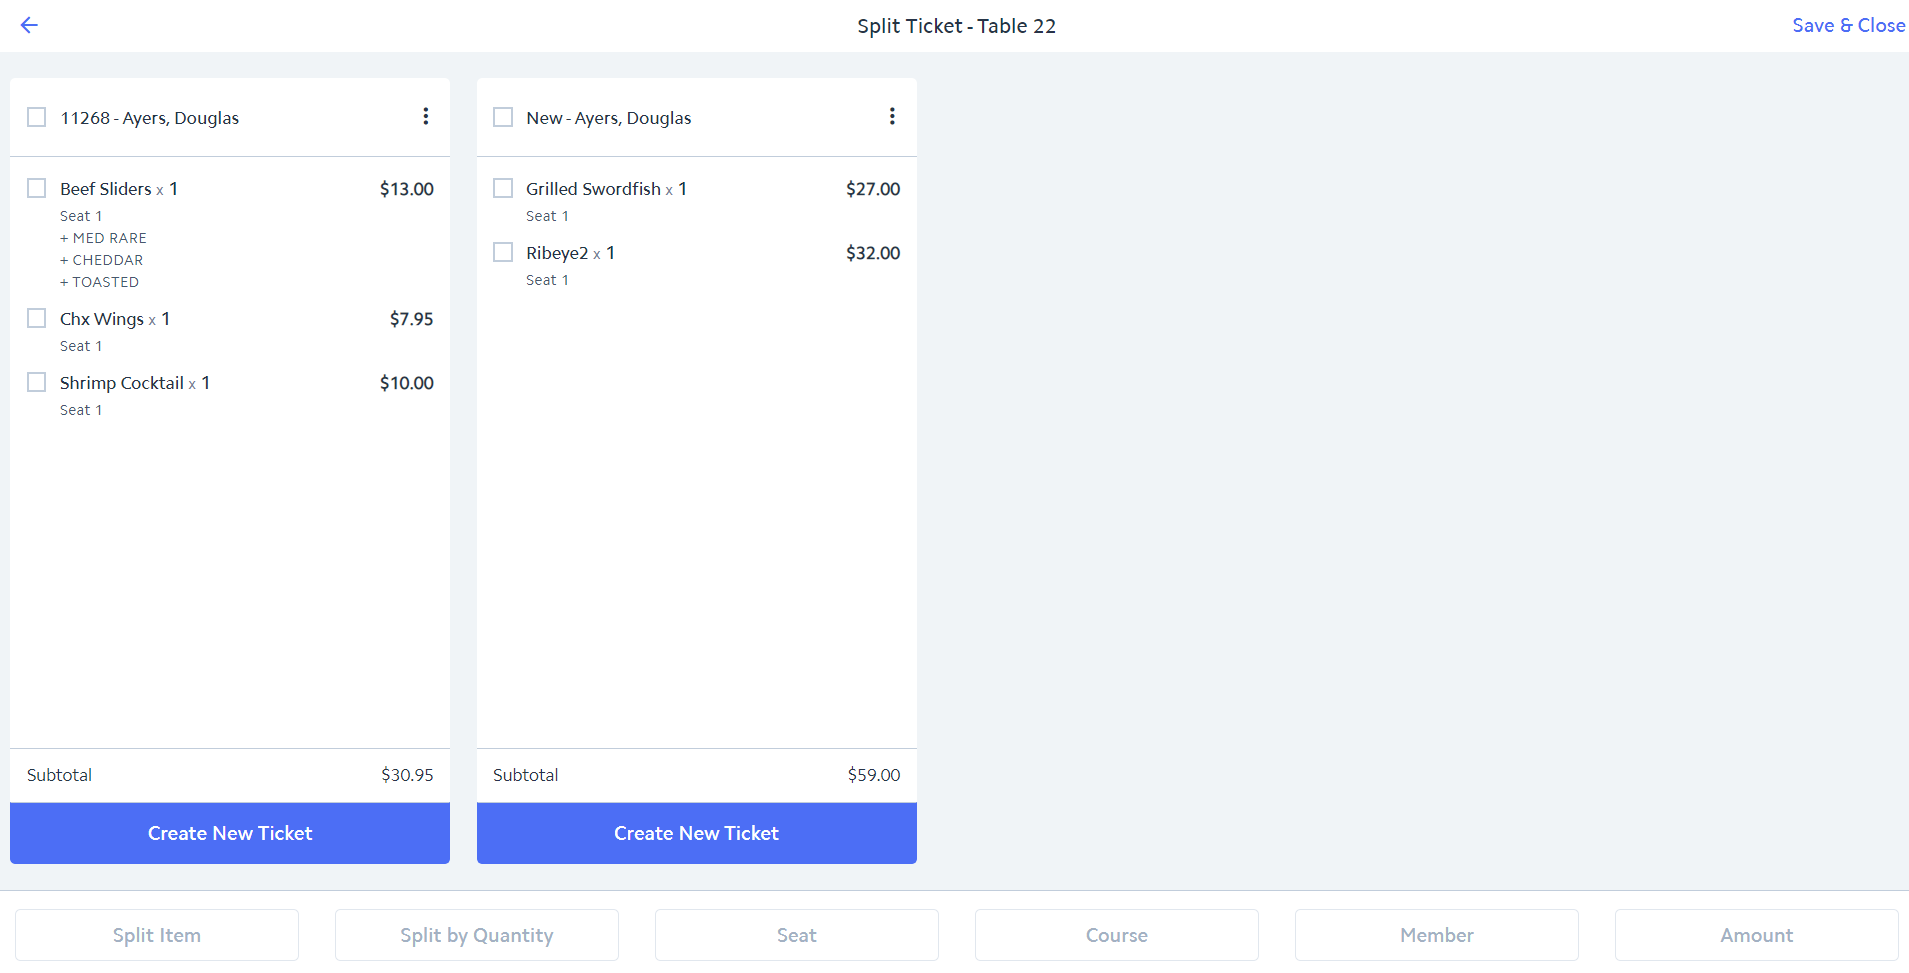
Split By Creating New Tickets
Use Case: There are 3 members at the same table. Only one ticket was created for the table and it is in Member 1's name. All items for the table have been added to the ticket. Upon settling, Member2 and Member3 request their own tickets for the items they ordered.
...
Within the Split Ticket screen, click Create New
...
Ticket to create the additional ticket(s) you want for the table. For this use case, click Create New Ticket 2 times to create 2 additional tickets. The Split Ticket Screen will now
...
display three tickets.
...
...
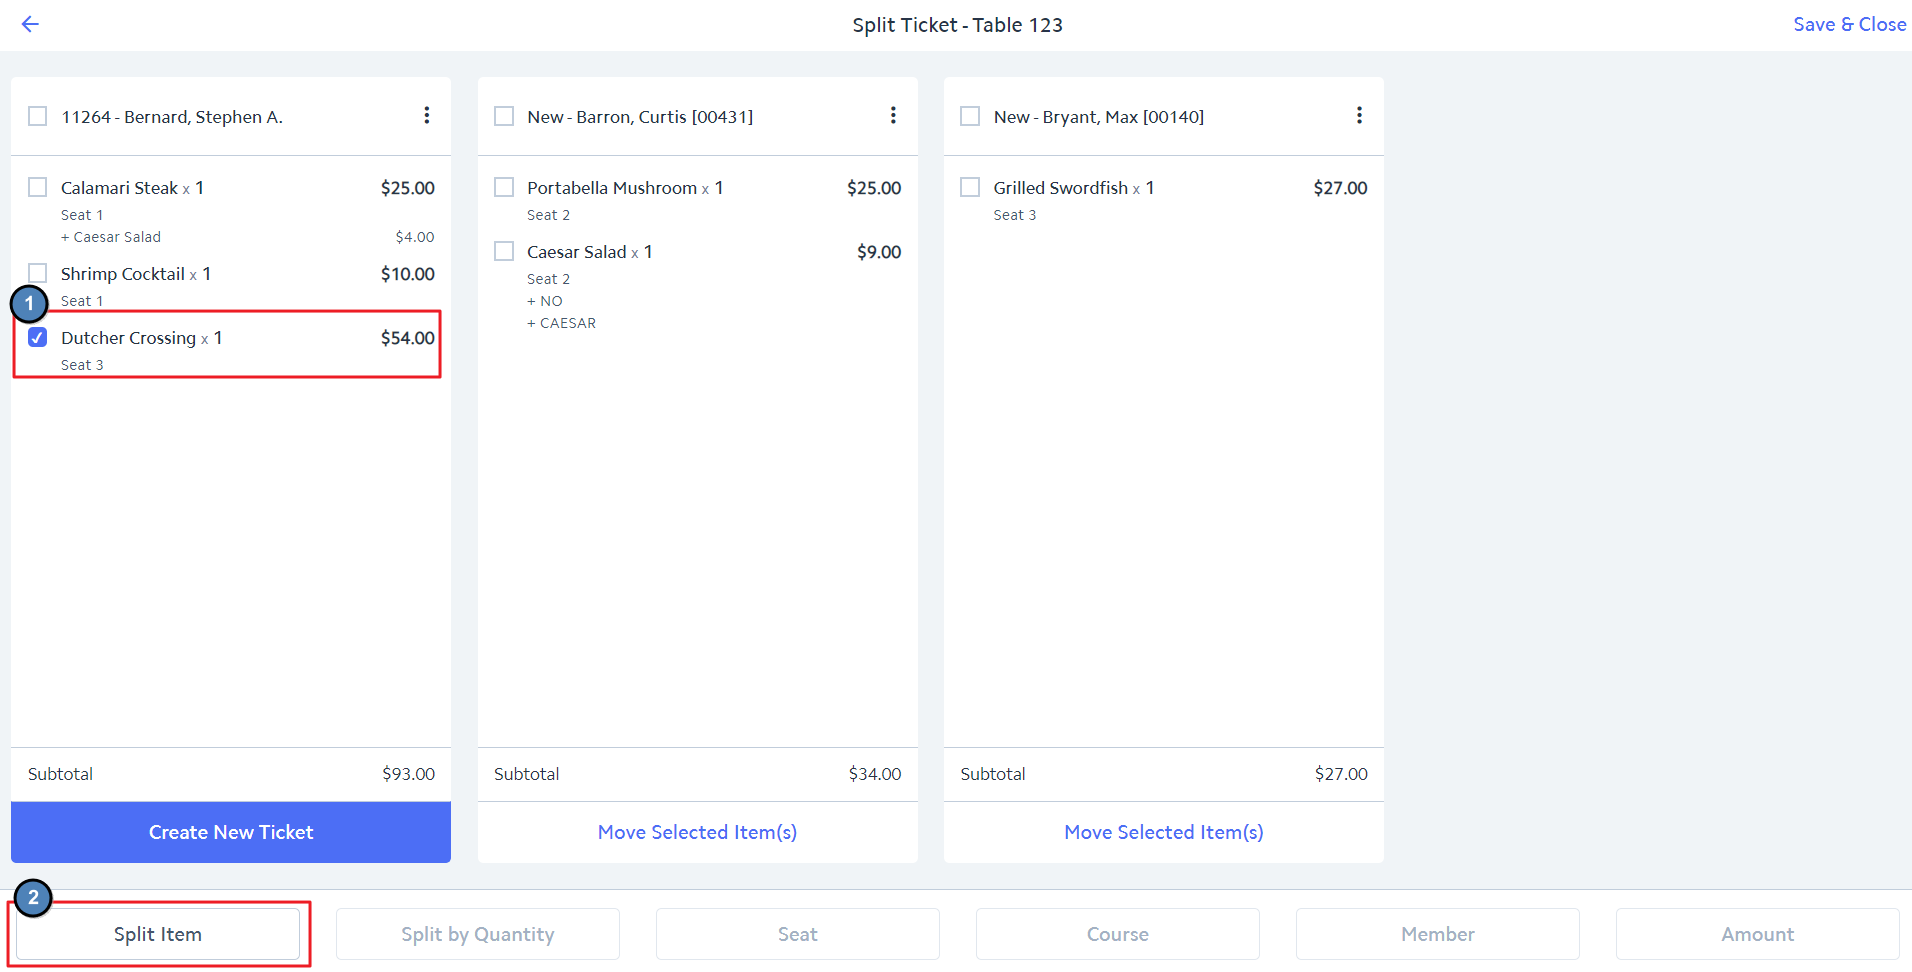
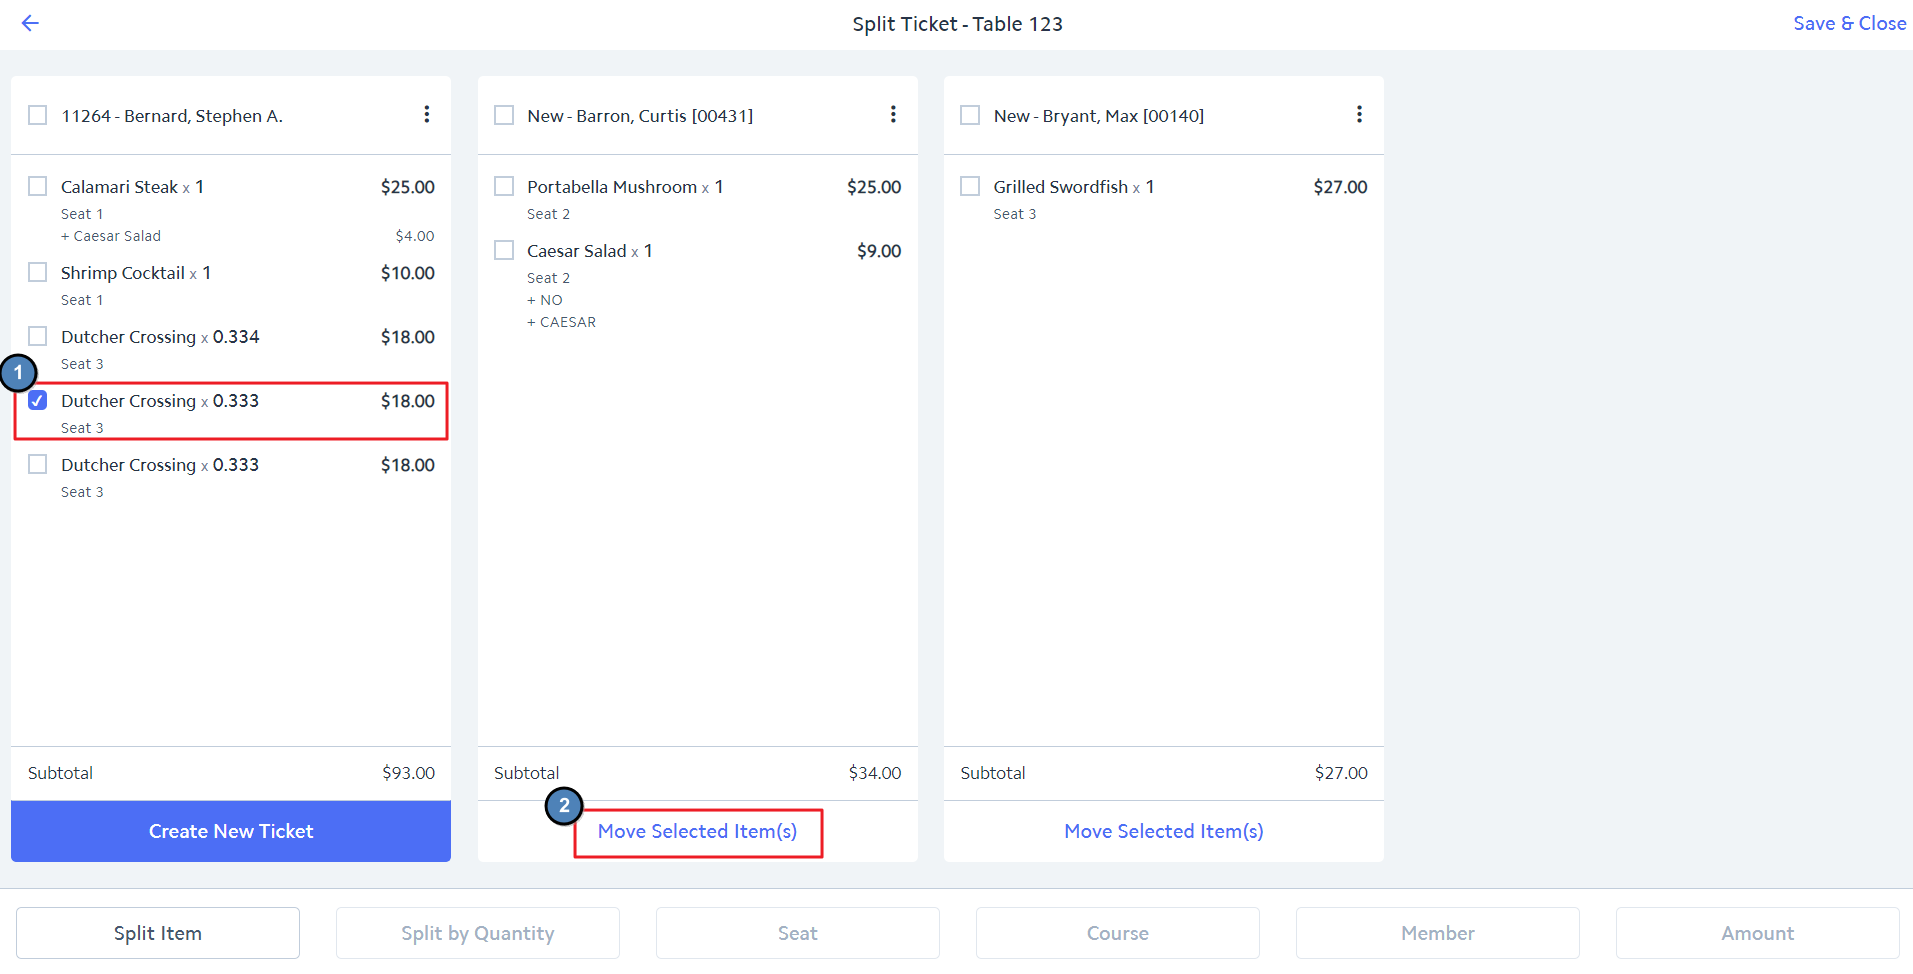
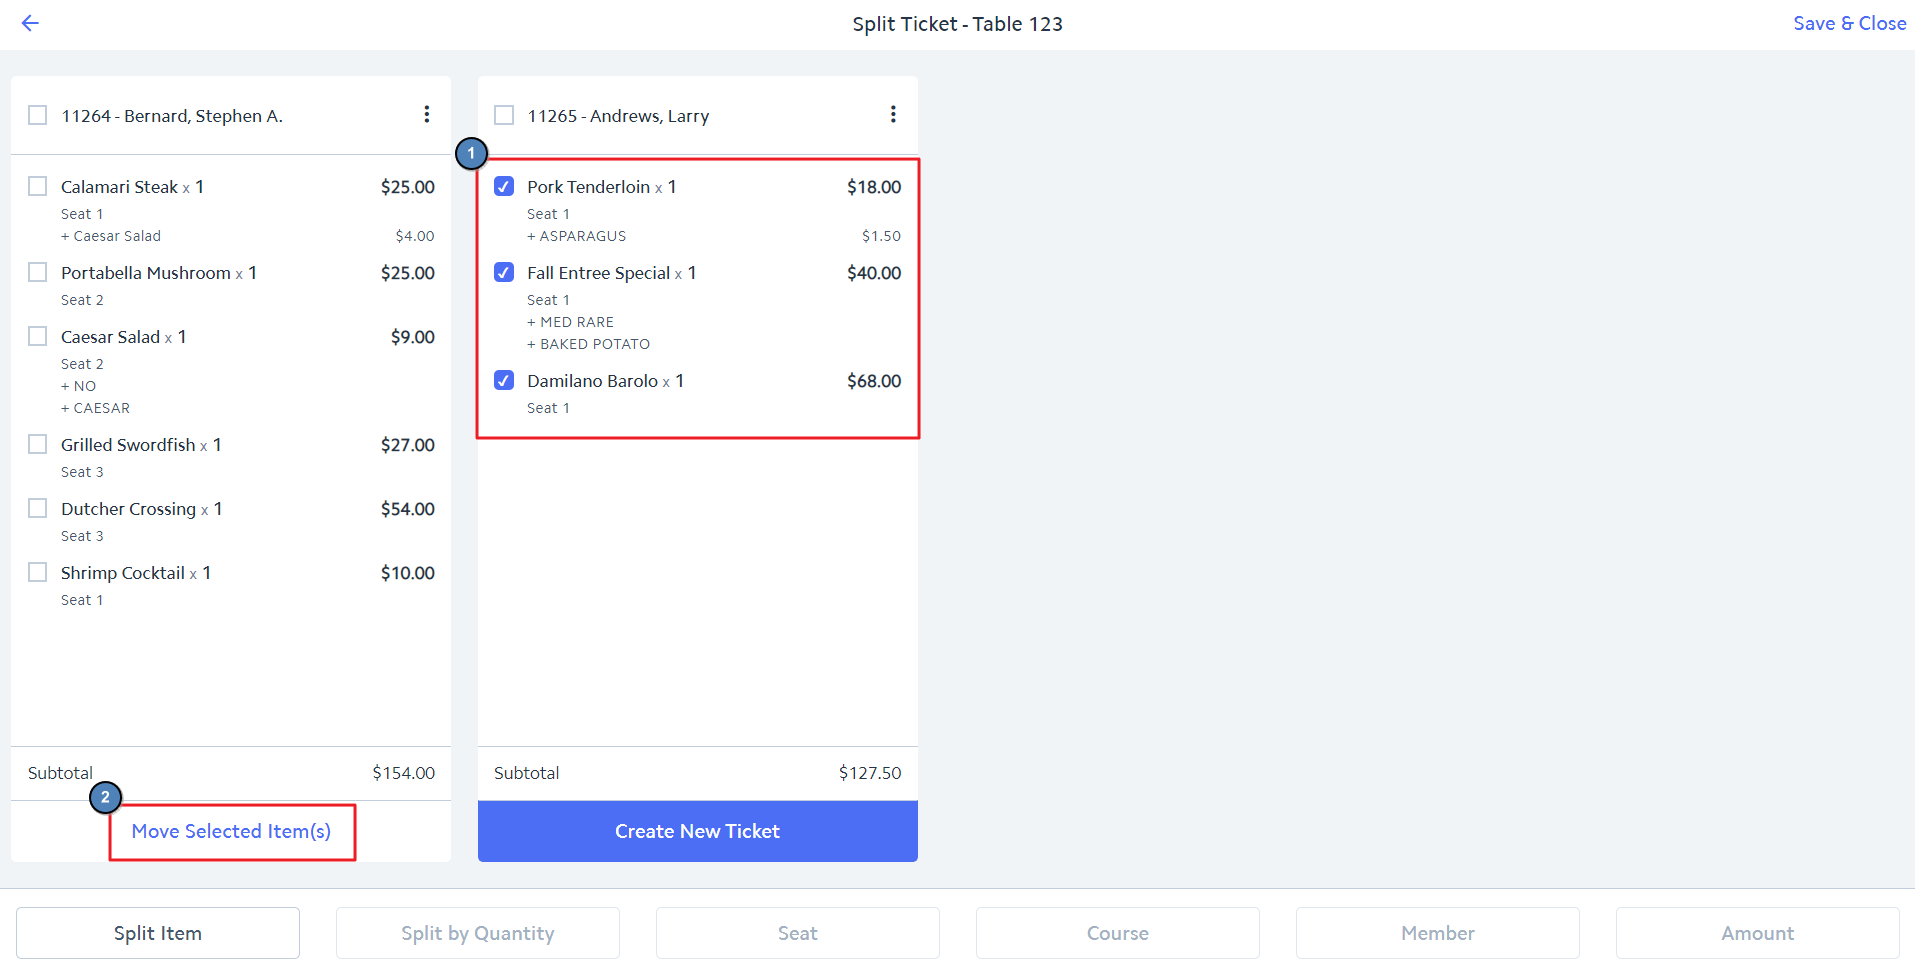
Check the item(s) on the original ticket that should be moved to one of the new tickets. You can checkbox more than one item at a time. Click the Move Selected Item(s) button of the ticket to where the items should be moved.
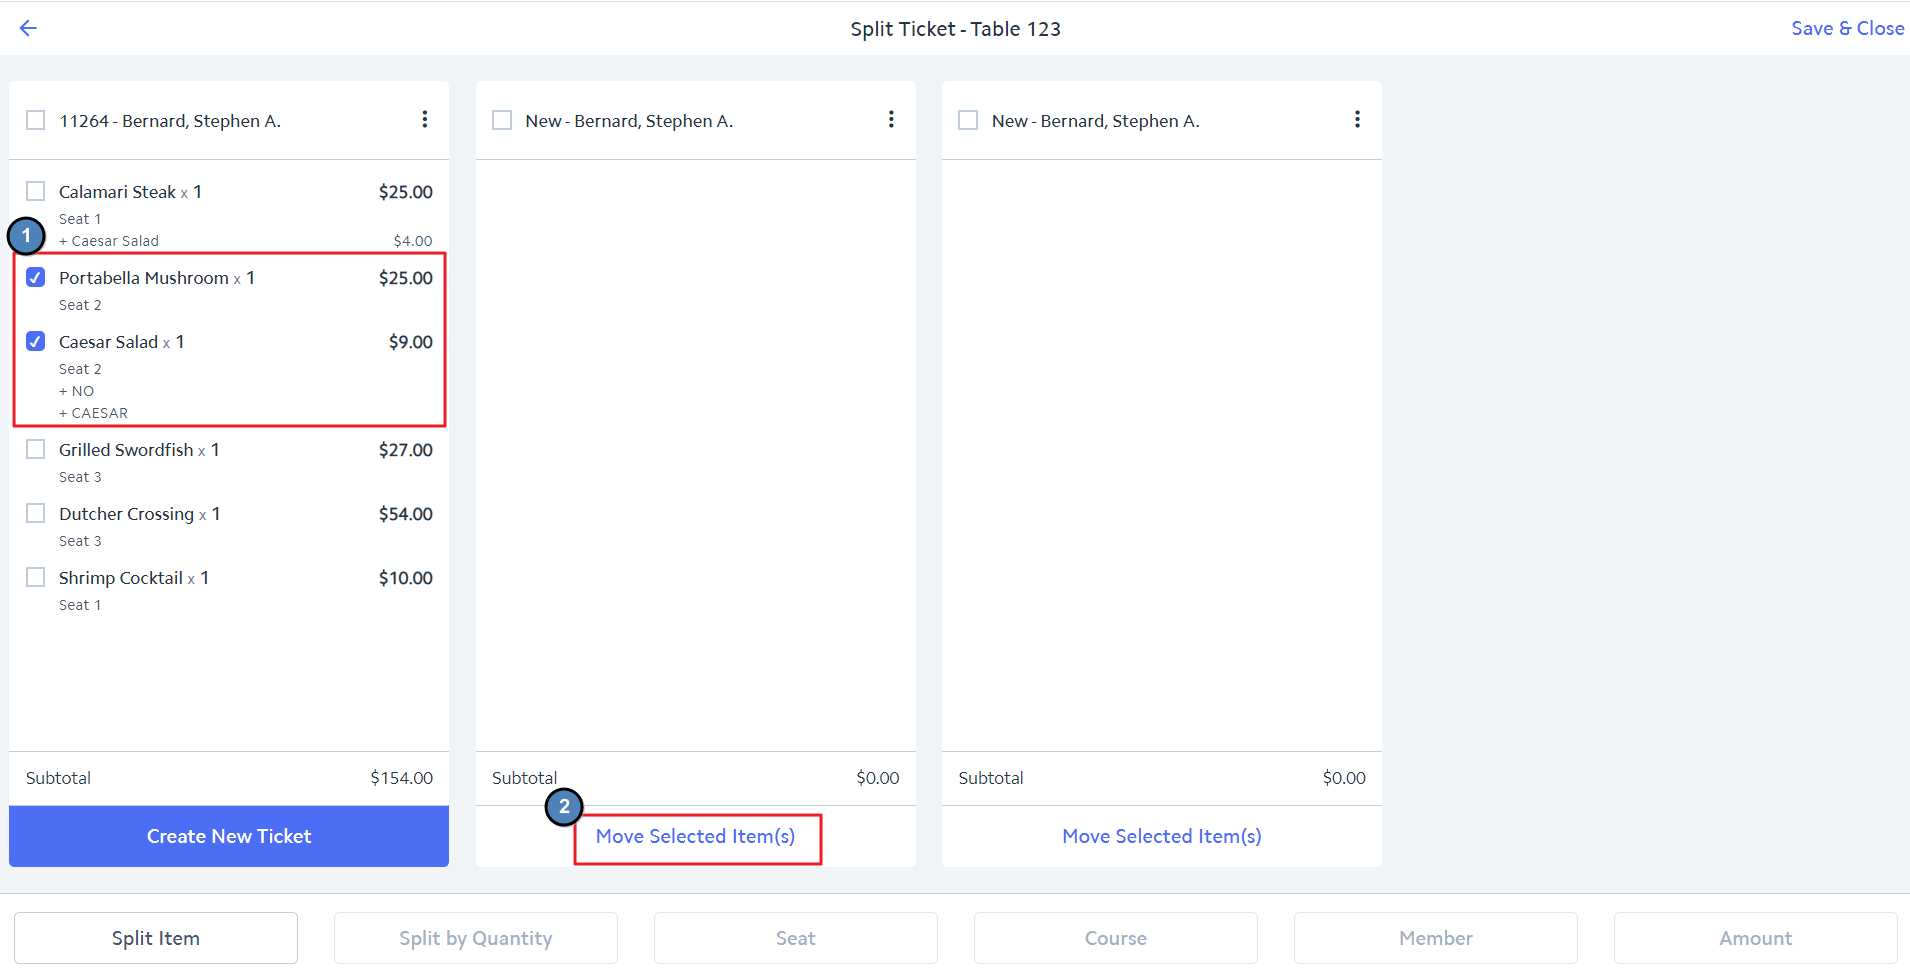 Image Removed
...
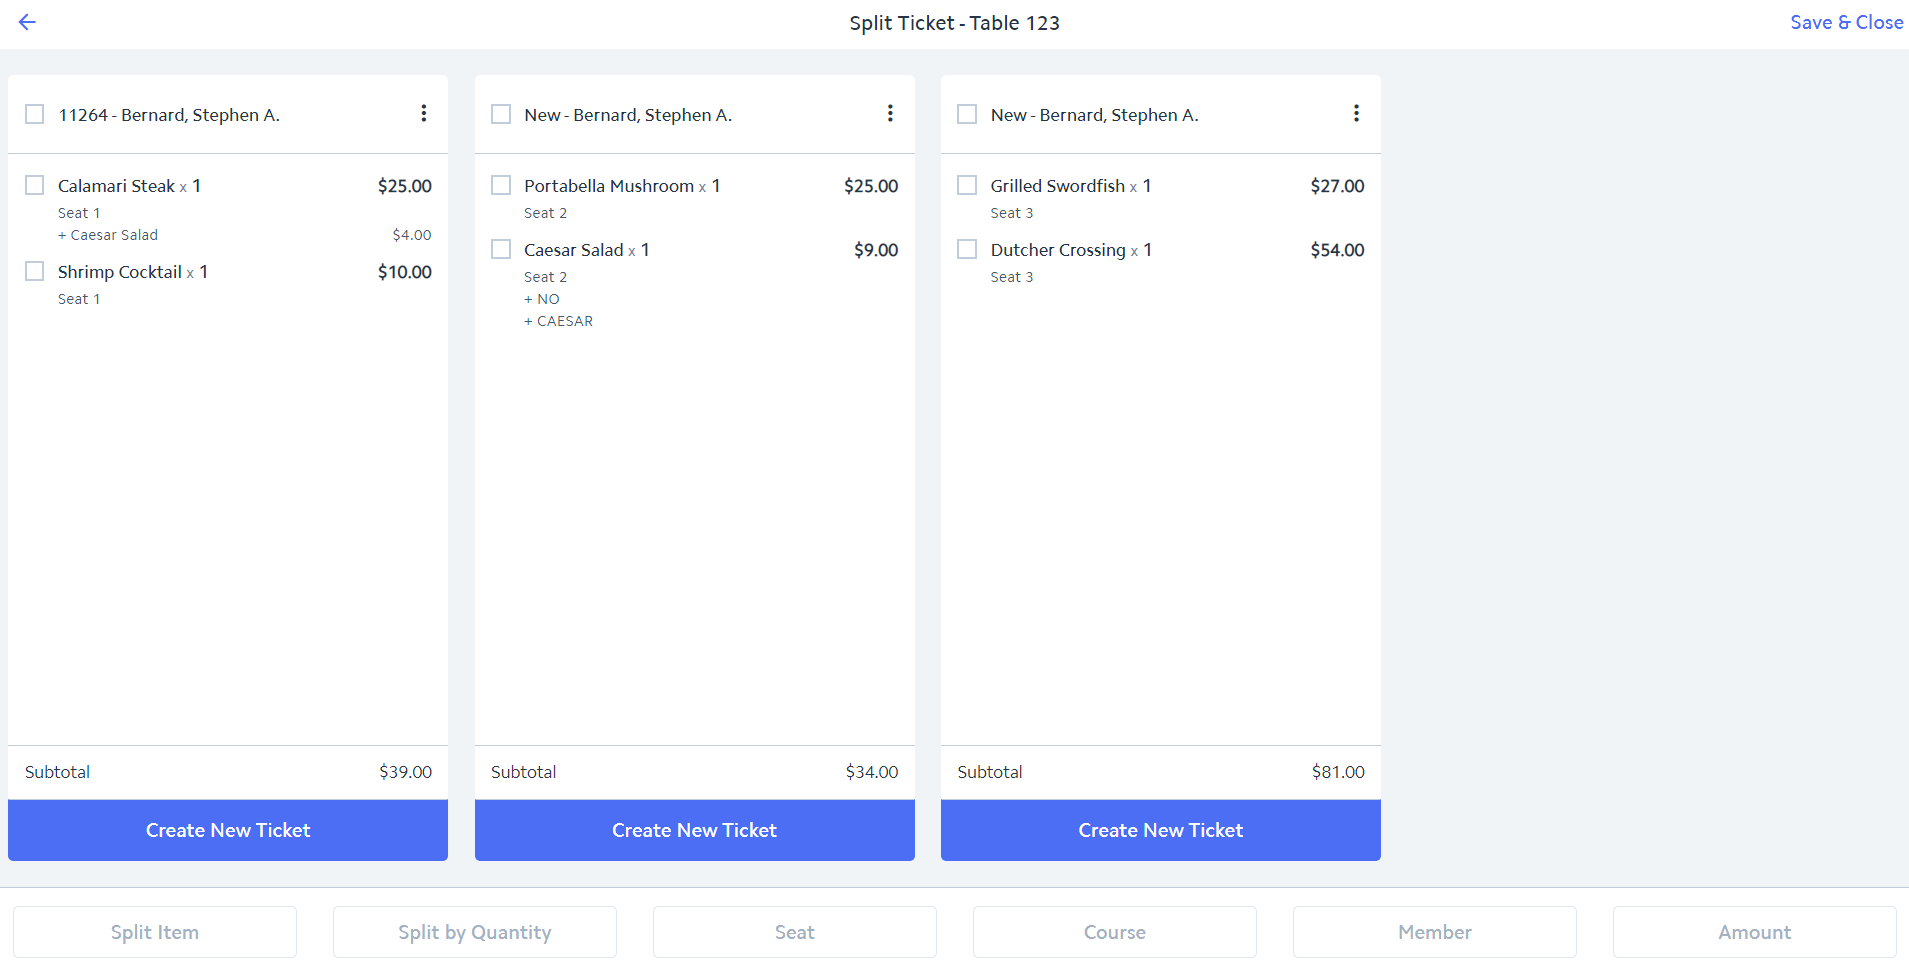
The items will be removed from the original ticket and added to the ticket selected.
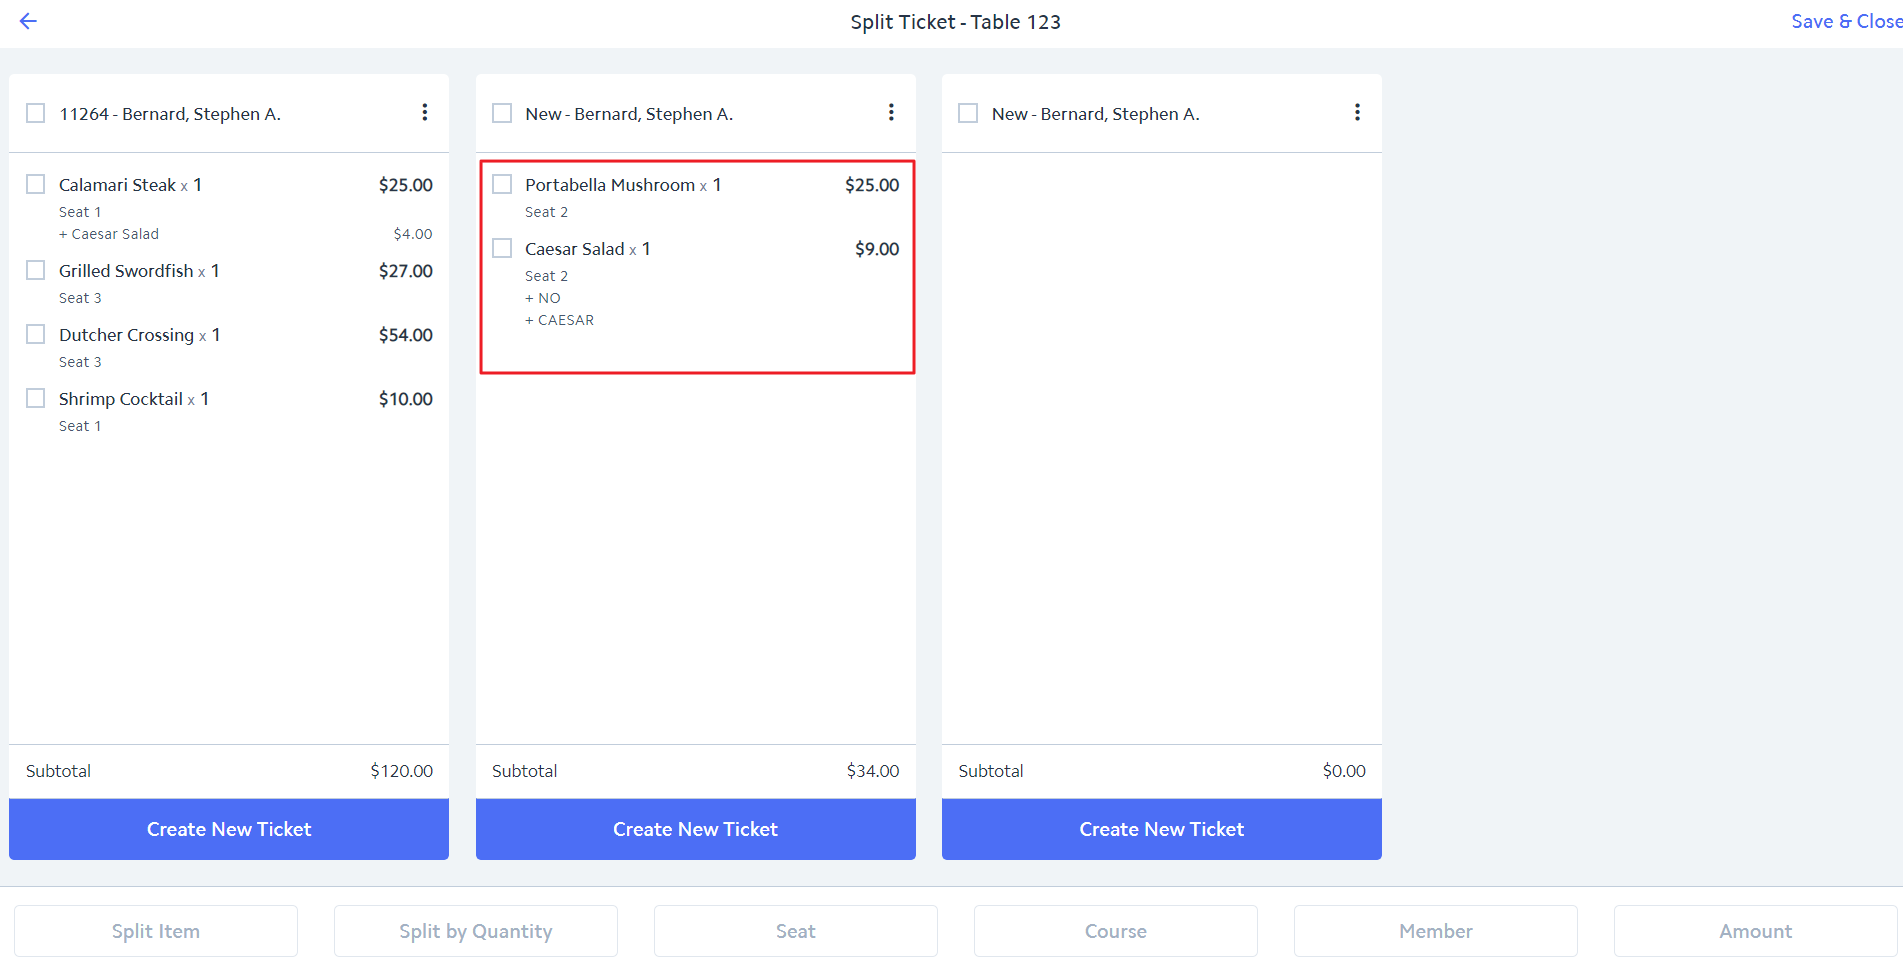 Image Removed
...
Repeat the same process to move item(s) to the third ticket.
 Image Removed
...
Again, the items will be removed from the original ticket and added to the ticket selected.
...
...
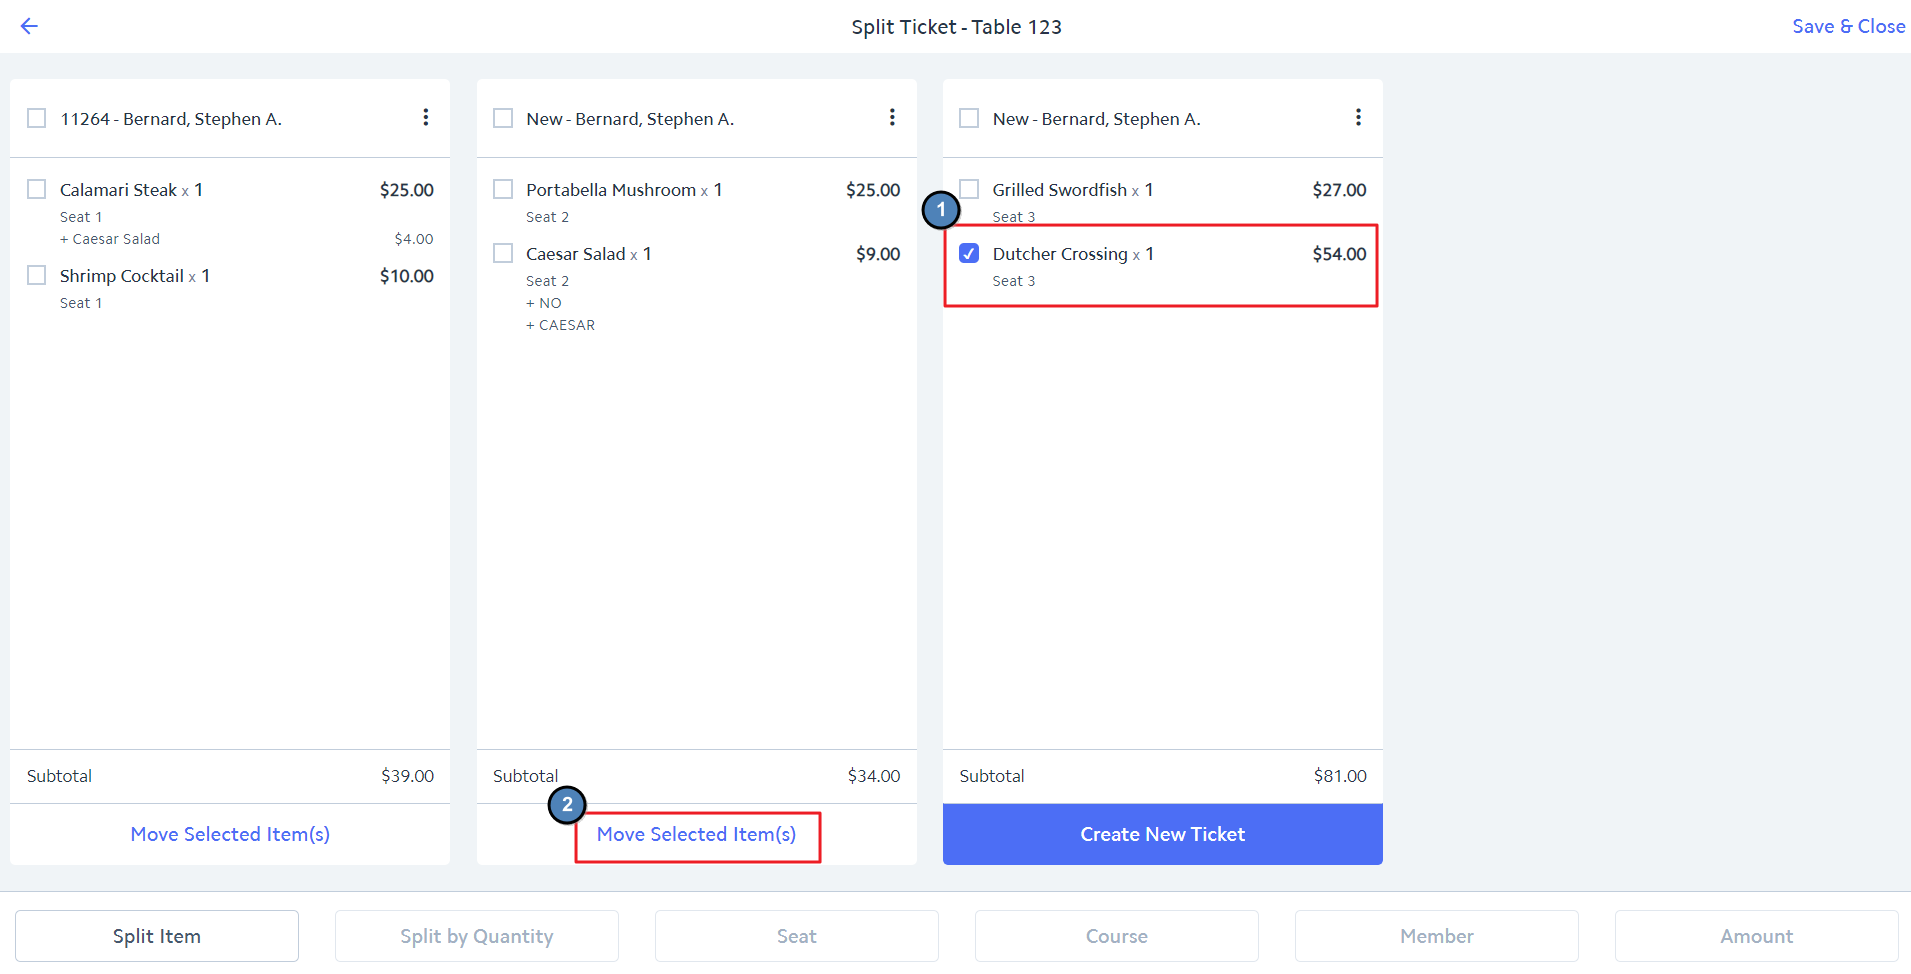
If you make a mistake and need to move an item to a different ticket, follow the same process. Check the item(s) that need to be moved, then click Move Selected Items(s) button of the ticket to where the item(s) should be moved.
...
...
To change the member assigned to a ticket, click the 3 dots at the top right of the ticket,
...
then select Change Member.
...
Follow the prompts to select the member the ticket should be assigned to.
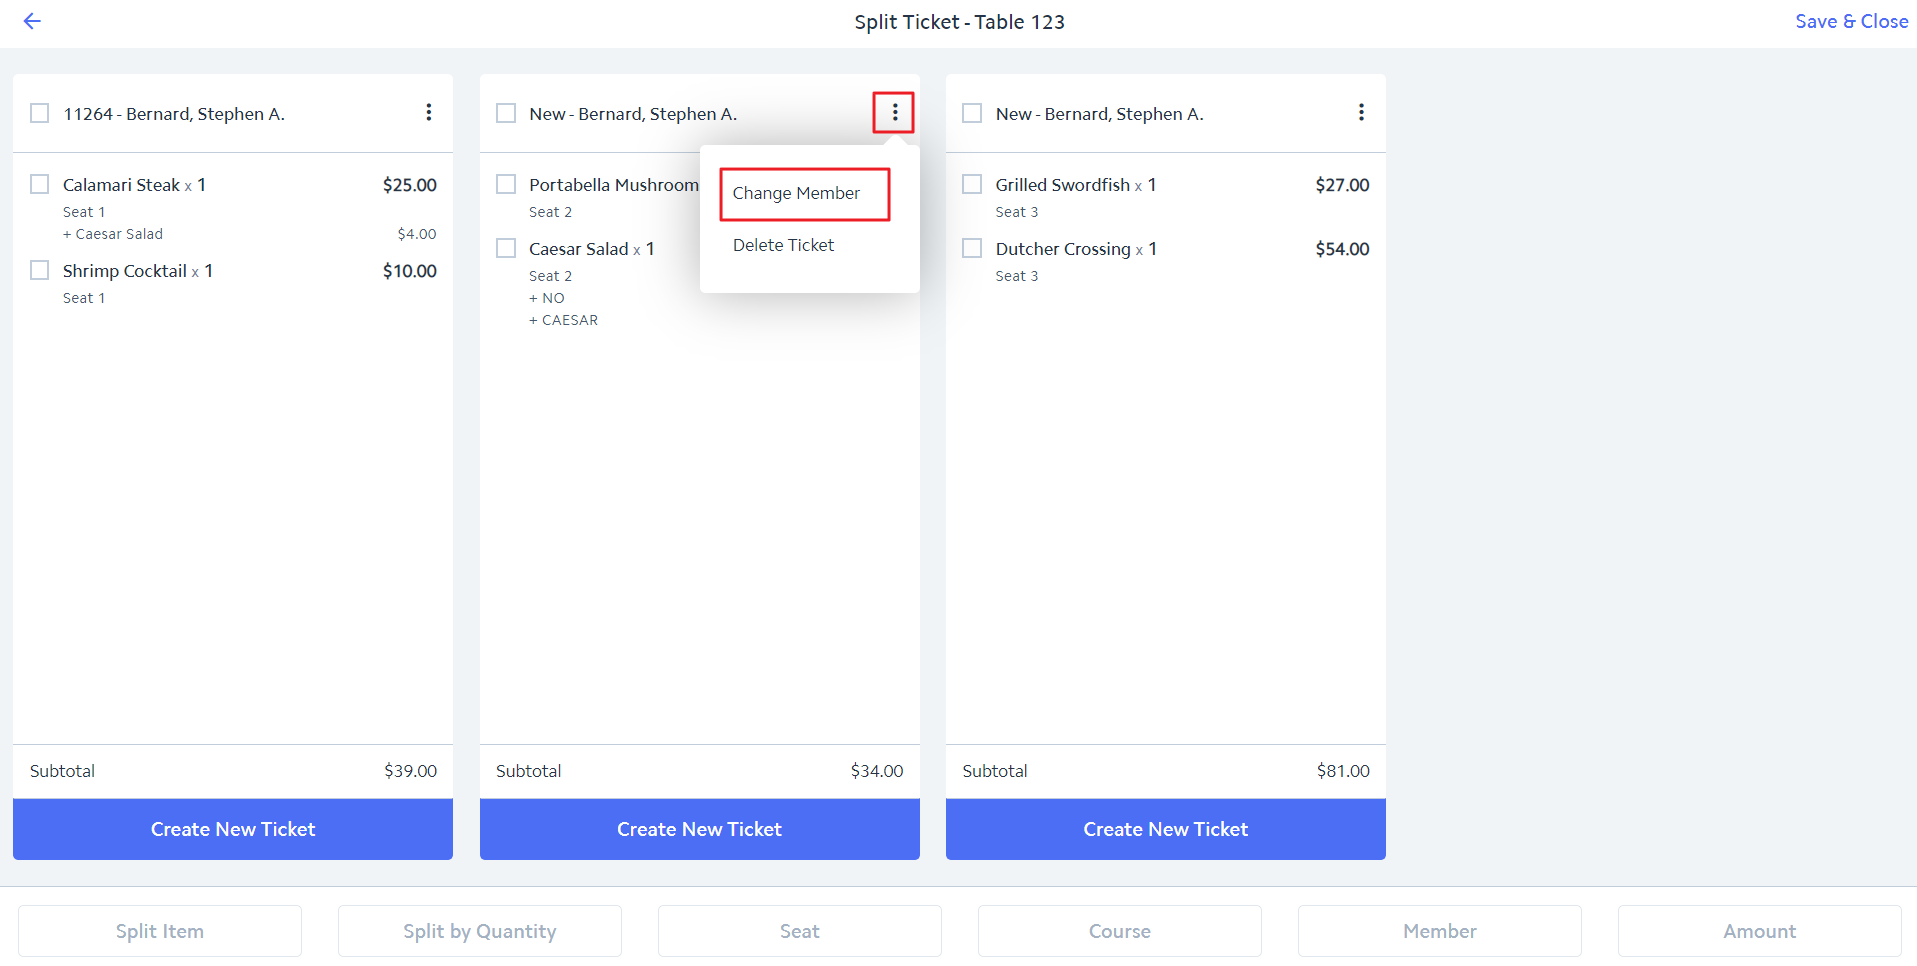 Image Removed
...
Once all items are on the correct tickets and the correct member has been assigned to each ticket, click Save & Closeto save your changes. The newly created tickets will be added to the Open Ticket grid.
...
Split Item
Split Item provides the ability to split an item across multiple tickets.
Use Case: You have 3 tickets on 1 table and all 3 members want to split the bottle of wine.
...
Within the Split Ticket screen, check the item(s) that need to be split across tickets. Then click Split Item.
...
...
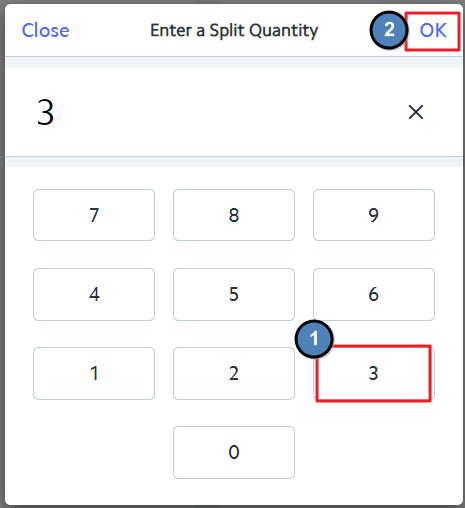
Enter the quantity you want to split the item(s) by. Click OK.
...
...
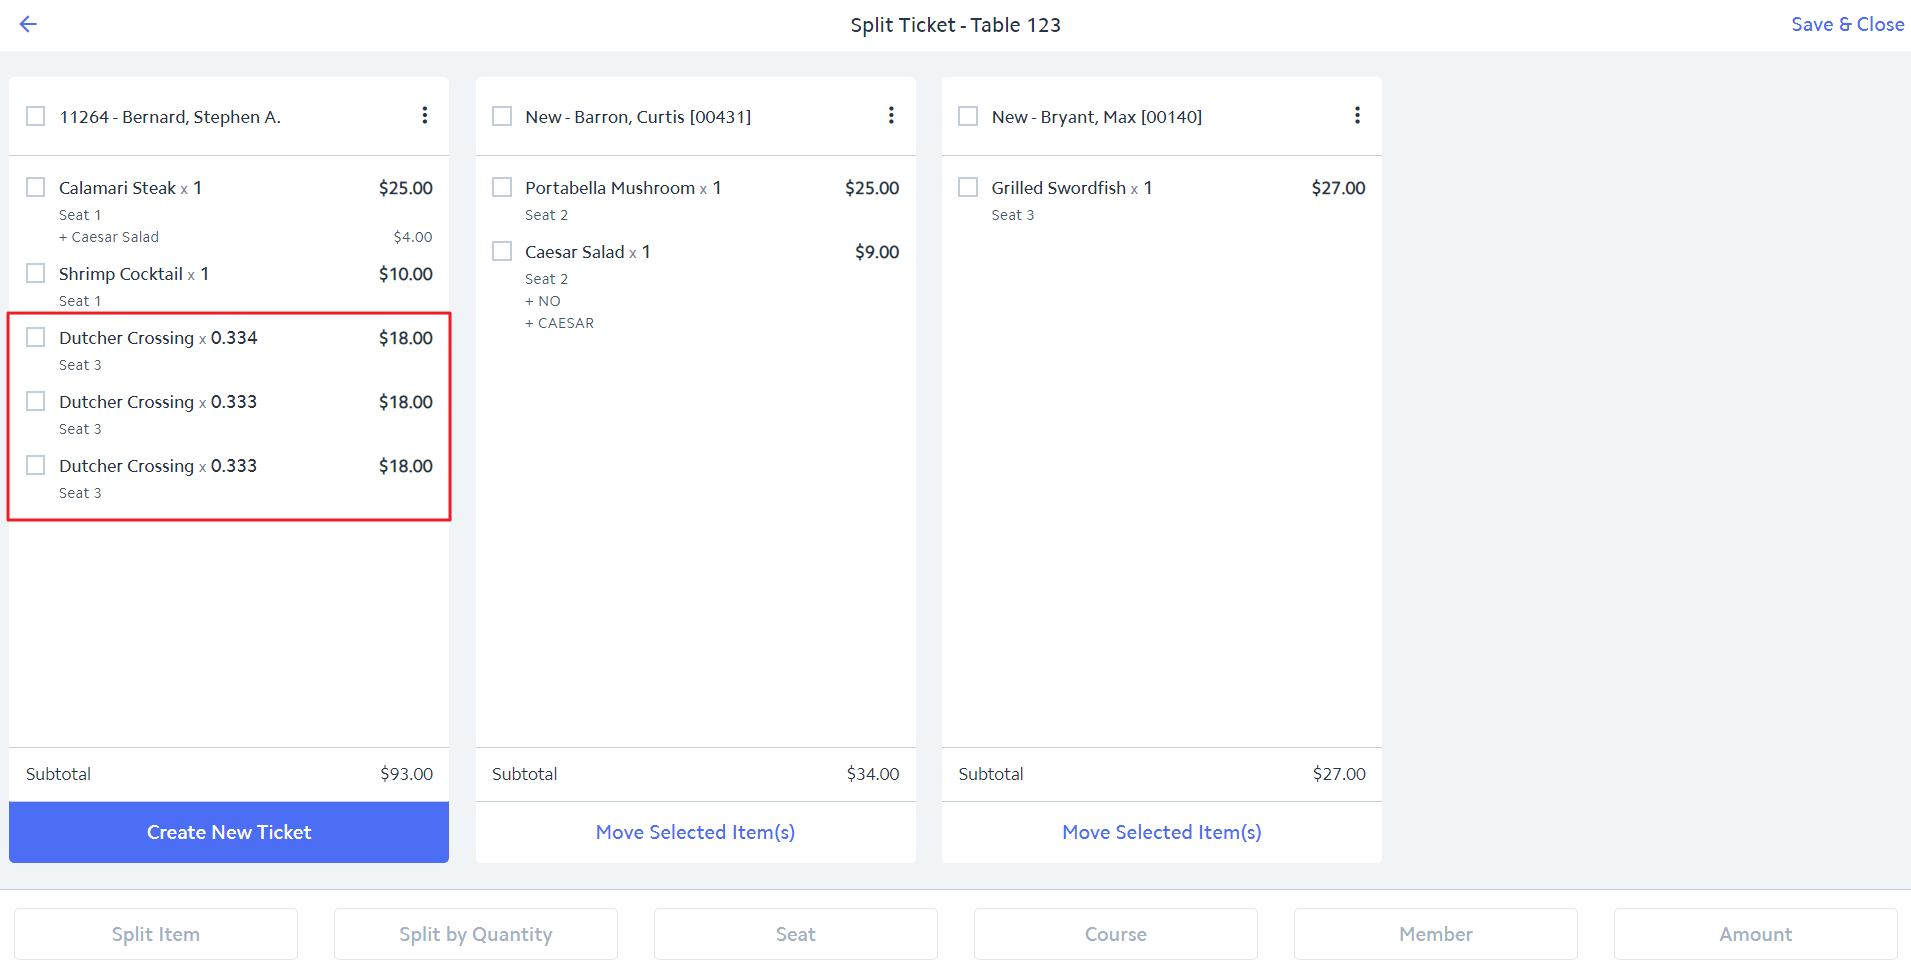
The item(s) will be divided by the quantity entered and appear broken out on the original ticket
...
 Image Removed
...
.
Check the item(s) to be moved to a different ticket. Click Move Selected Item(s) on the ticket to where the item(s) should be moved.
...
...
Repeat the process to move the other instance of the item(s) to the 3rd ticket.
...
...
Once all items are on the correct tickets, click Save & Close to save your changes.
 Image Removed
...
Note:
...
The Split Item changes the item QTY to fractions to calculate the item price to meet specified amount.
Split By
...
Quantity
Split by Quantity provides the ability to split an entire ticket by a specified number
...
.
...
...
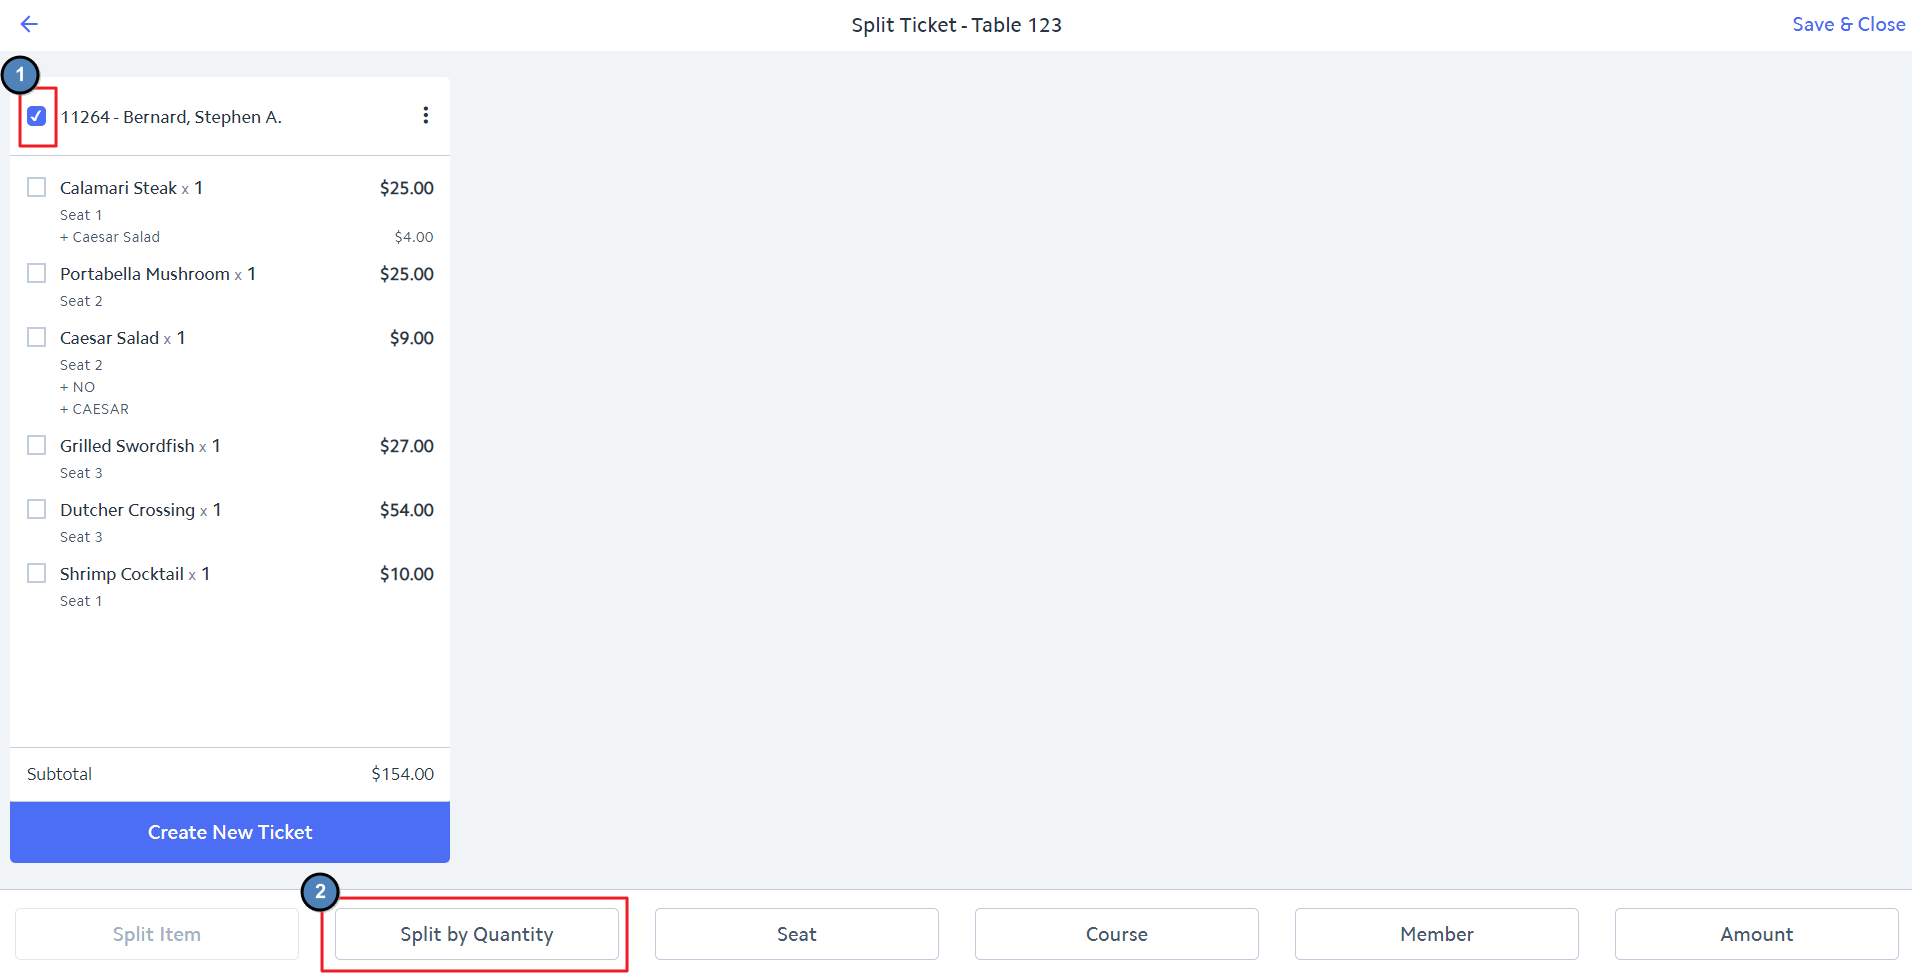
Within the Split Ticket screen, check the ticket itself in the upper left hand corner, then select Split by Quantity.
...
...
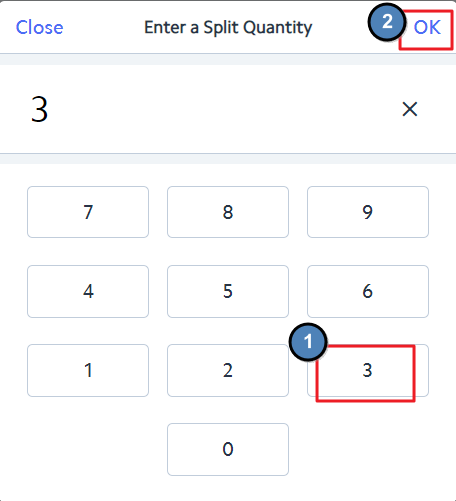
Enter the quantity you want to split the ticket by. Click OK.
...
...
The system will create the number of tickets based on the quantity entered. Each item will be equally divided (as much as possible) by the quantity entered and placed on each ticket.
...
...
Click Save & Close to save your changes.
...
Note:
The Split by Quantity changes the item QTY to fractions to calculate the item price to meet specified amount.
Once clicking Save & Close,
...
the changes are saved. Once the changes are saved, there is no way to merge the amounts and QTY back to original state.
Once clicking Save & Close, all subsequent items entered on a ticket will be added to the ticket as a full amount and QTY.
Split By
...
Seat
Split by Seat allows the user to split a ticket based on seating. Note: This option can only be used when utilizing
...
seat positioning
...
.
...
Assign the seat position to each item when ordering. Select Split Ticket.
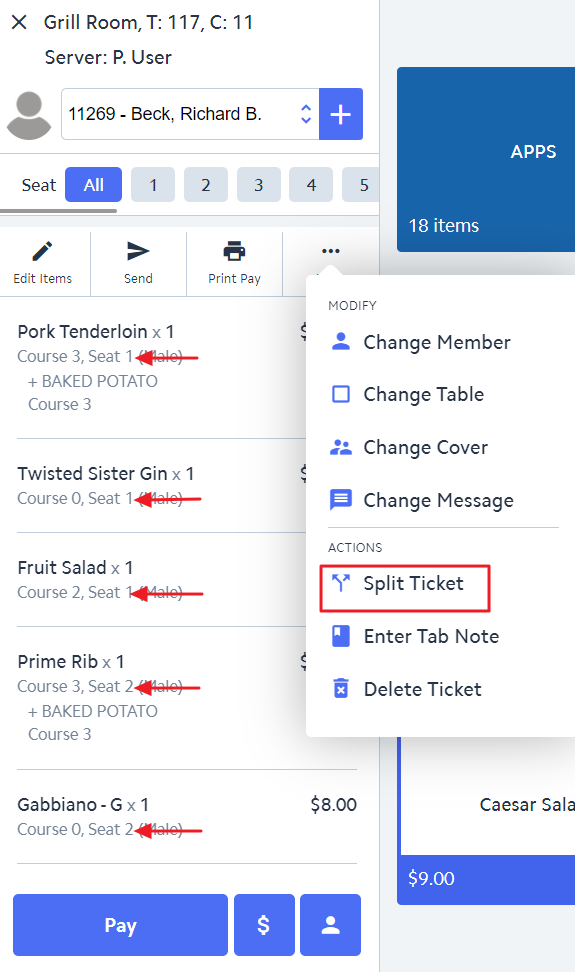 Image Removed
...
Within the Split Ticket screen, check the ticket itself in the upper left hand corner, then select Seat.
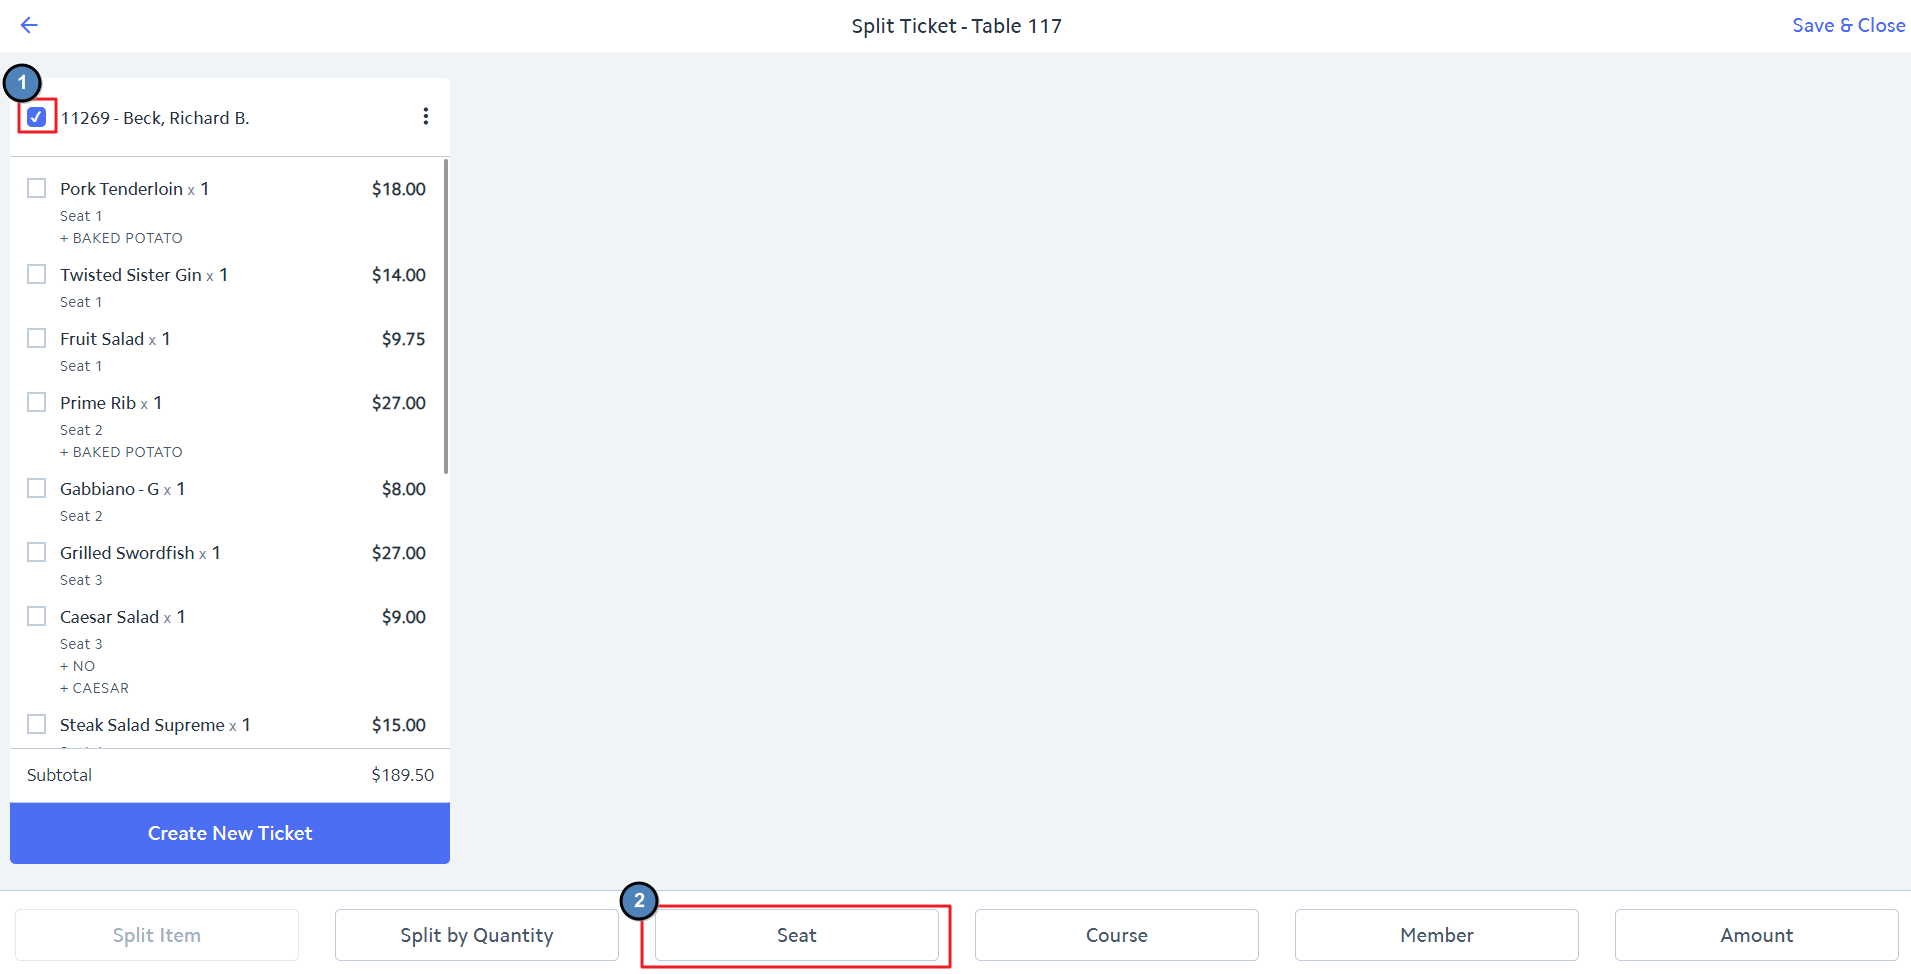
 Image Removed
...
The system will create a ticket for each different seat position.
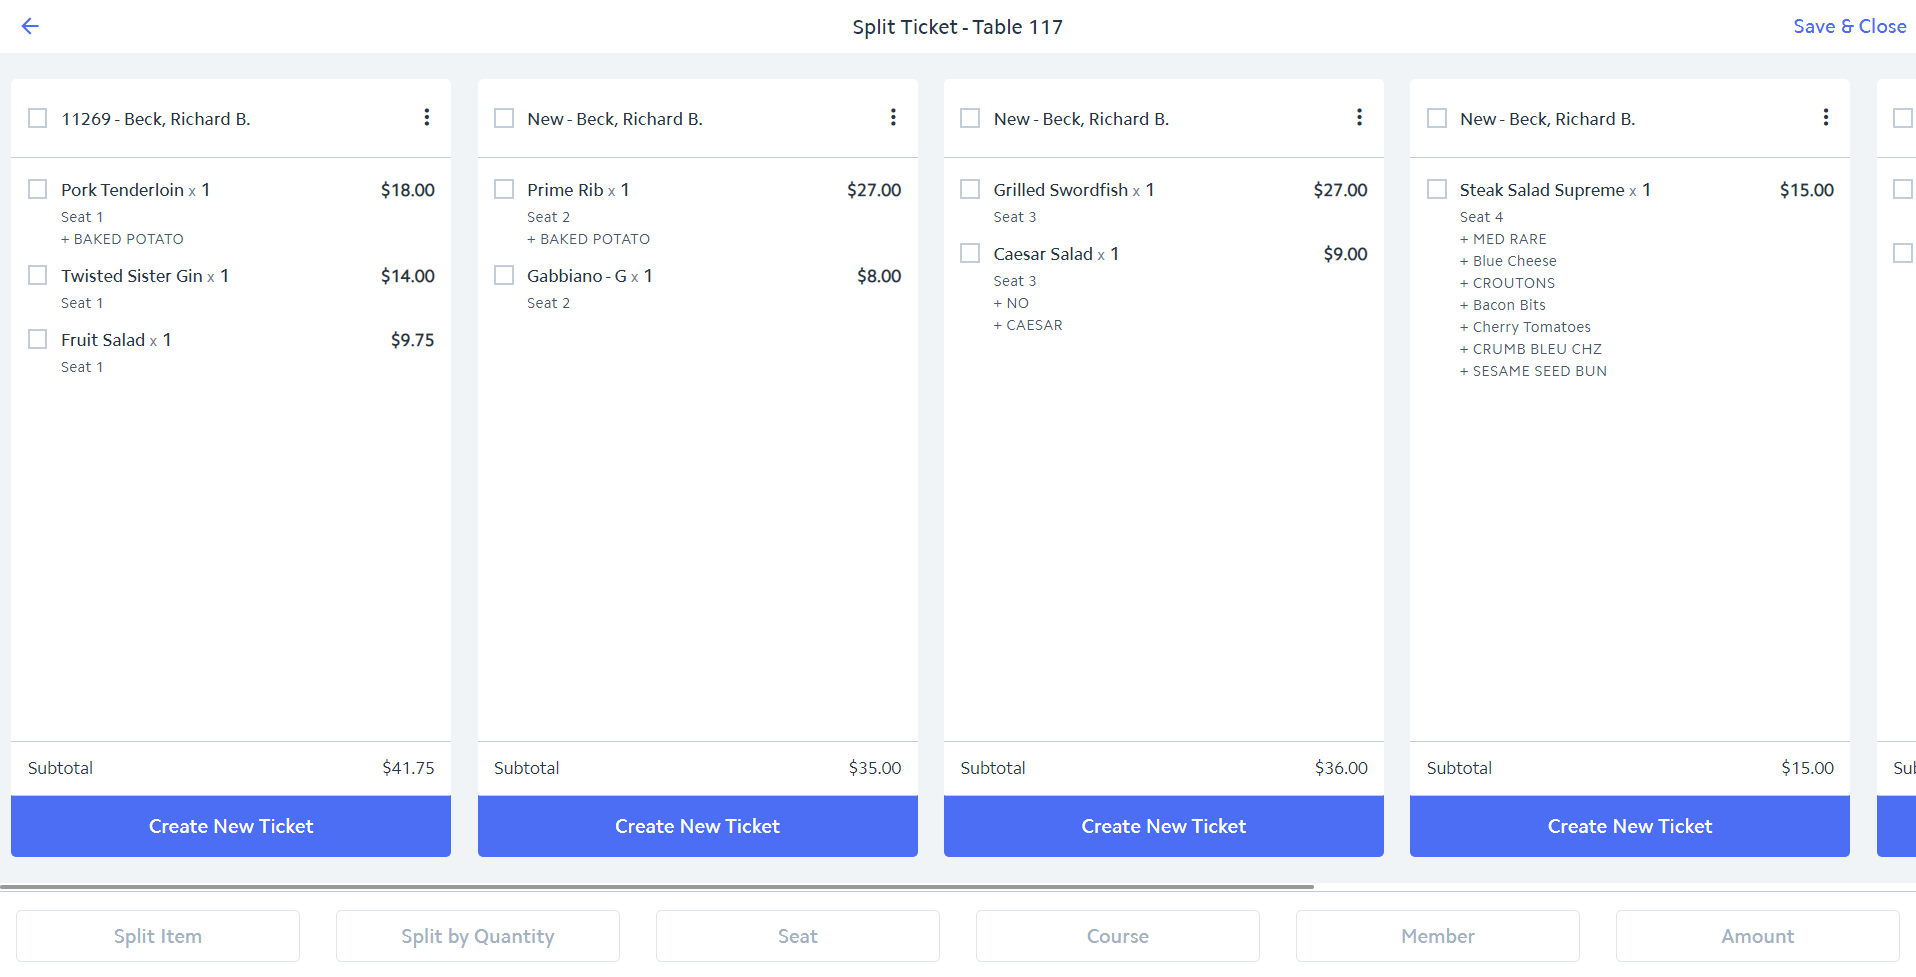 Image Removed
...
Change the member assigned to each ticket as necessary by clicking the 3 dots at the top right of the ticket,
...
then selecting Change Member.
...
Follow the prompts to select the member.
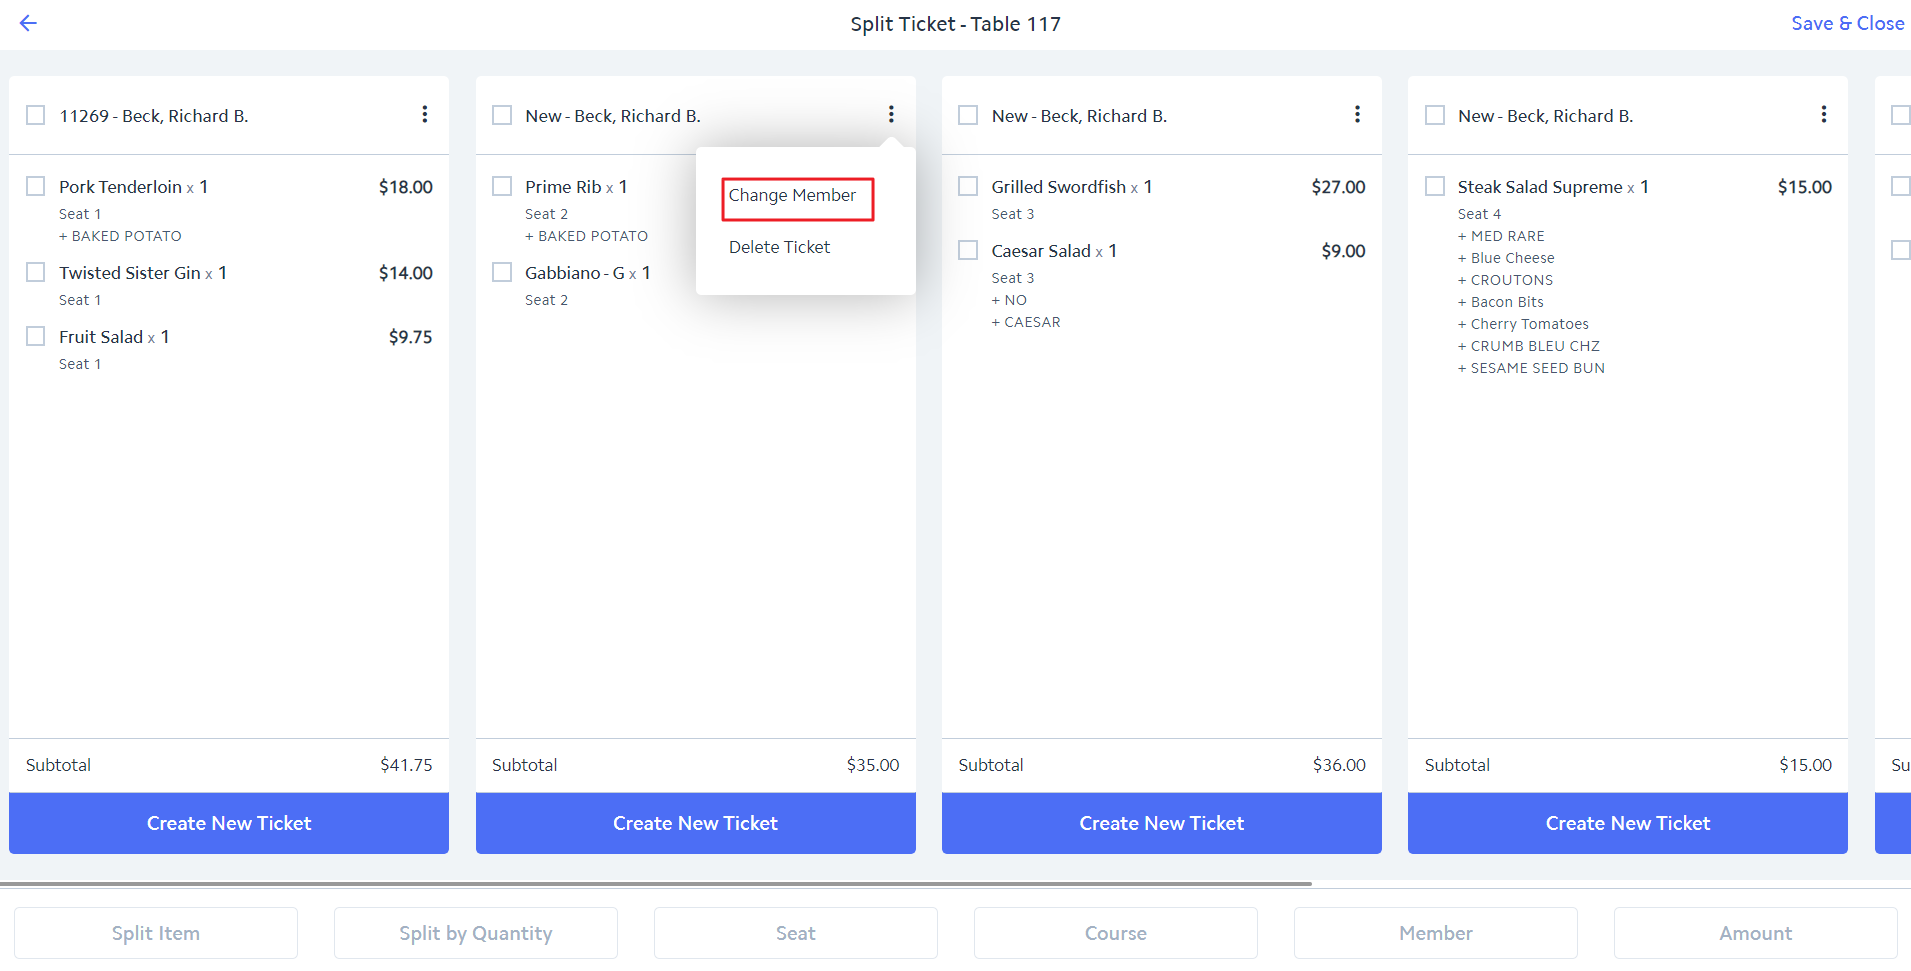 Image Removed
...
Click Save & Close to save your changes.
Split By Course
Split by Course allows the user to split a ticket by course. Note: This option can only be used when utilizing courses.
...
...
Assign the course to each Item on the ordering screen if it is not set by default. Select Split Ticket.
...
...
Within the Split Ticket screen, check the ticket itself in the upper left hand corner, then select Course.
...
...
The system will create a ticket for each different course.
 Image Removed
...
Change the member assigned to each ticket as necessary by clicking the 3 dots at the top right of the ticket,
...
then selecting Change Member.
...
Follow the prompts to select the member.
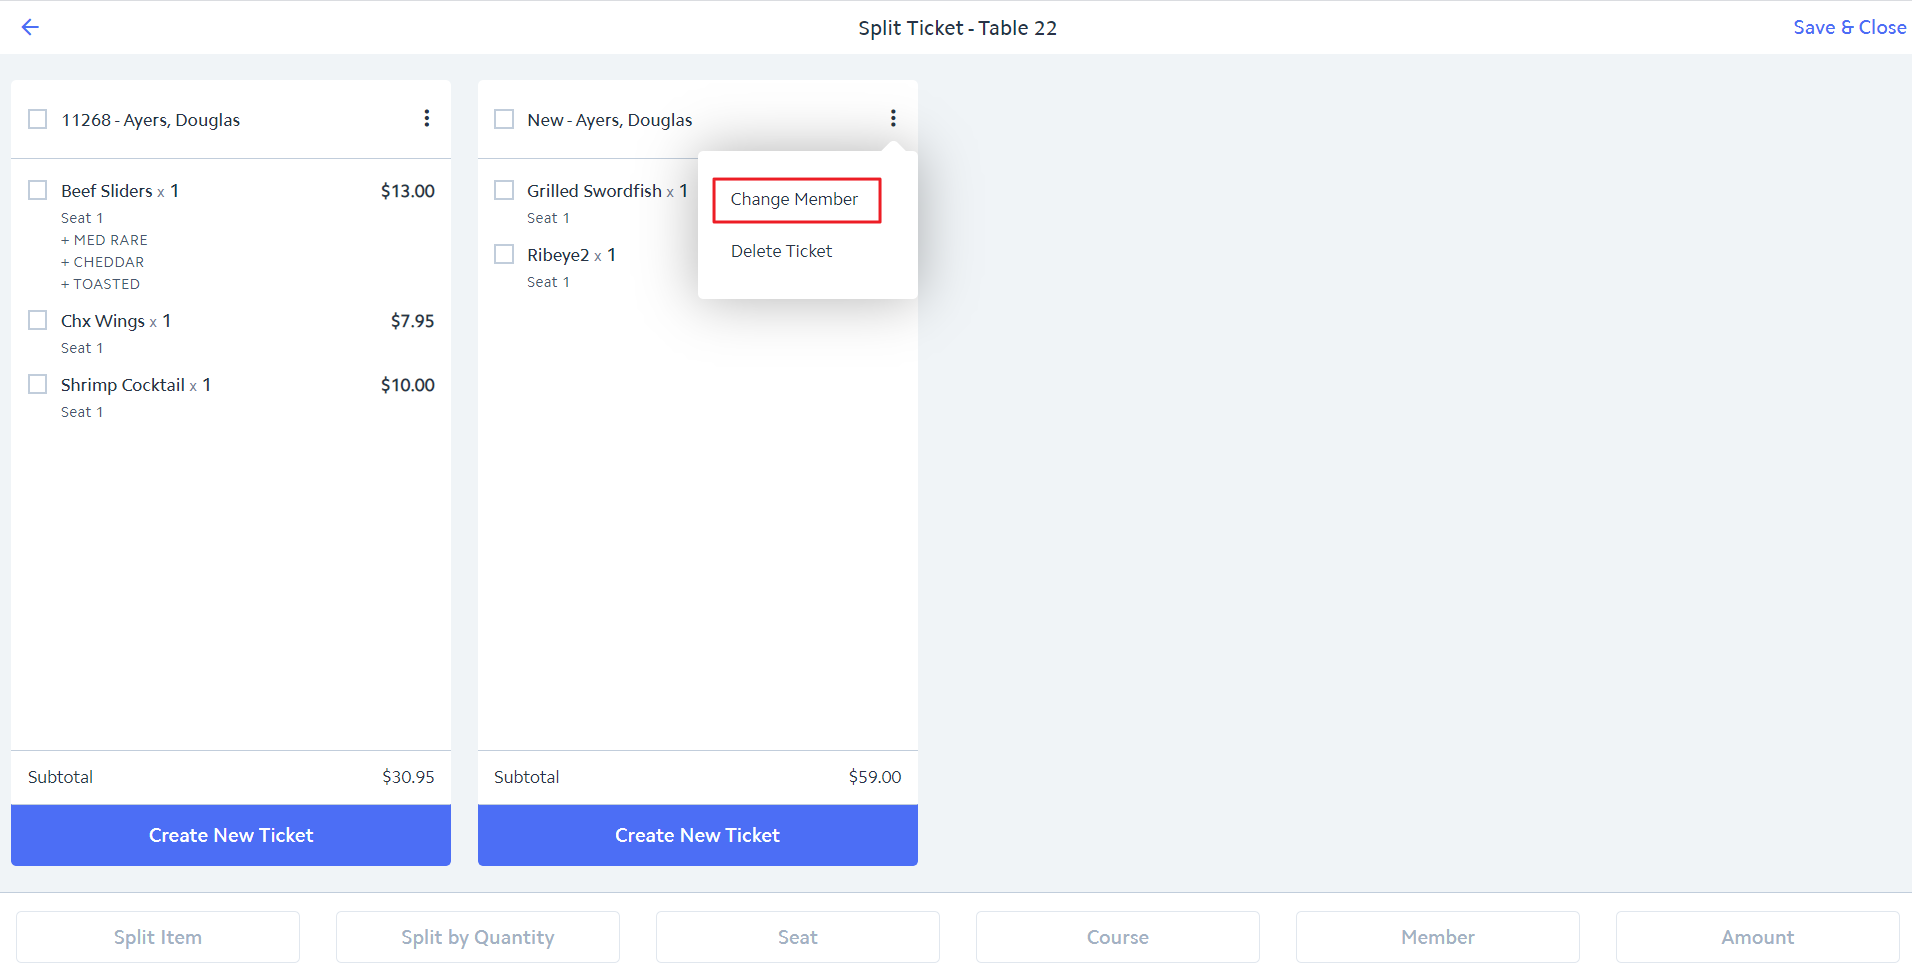 Image Removed
...
Click Save & Close to save your changes.
Split By
...
Member
Split by
...
Member allows the user to split a ticket by member when the "Prompt for Member on Seat in POS" option is turned on for the Area in CMA. Note: This option can only be used when utilizing the Prompt for Member on Seat in POS.
Use Case: Three members are dining at the same table. The "Prompt for Member on Seat in POS" is turned on. The server selects the member assigned to each seat as items are added to the ticket. Upon settling, each member requests their own ticket.
...
Assign a member to each seat on the ordering screen when adding items to the ticket for that seat. Note:
...
The "Prompt for Member on Seat in POS" option must be turned on for the Area in CMA in order to assign a member to a seat. When turned on, the system will automatically prompt you to assign a member to each seat on the ticket. When you are ready to create the ticket for the table, select Split Ticket.
...
...
Within the Split Ticket screen, check the ticket itself in the upper left hand corner, then select Member.
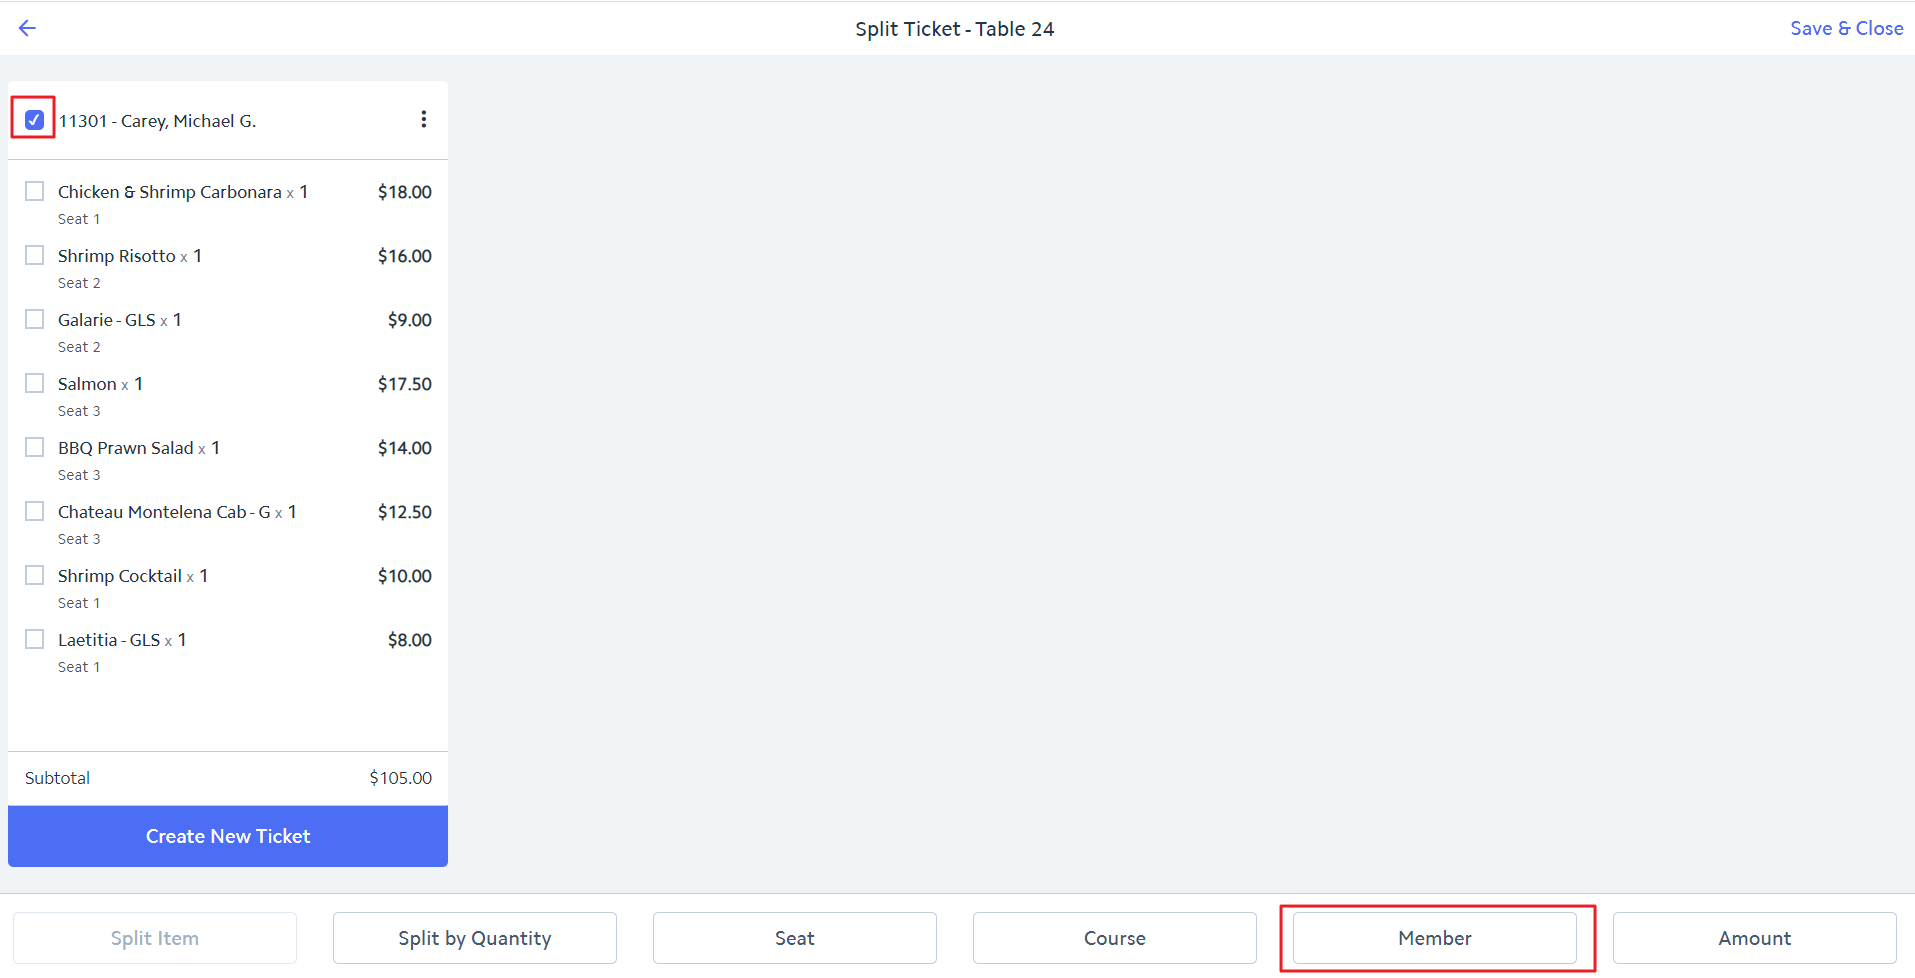
...
...
The system will create a ticket for each different member.
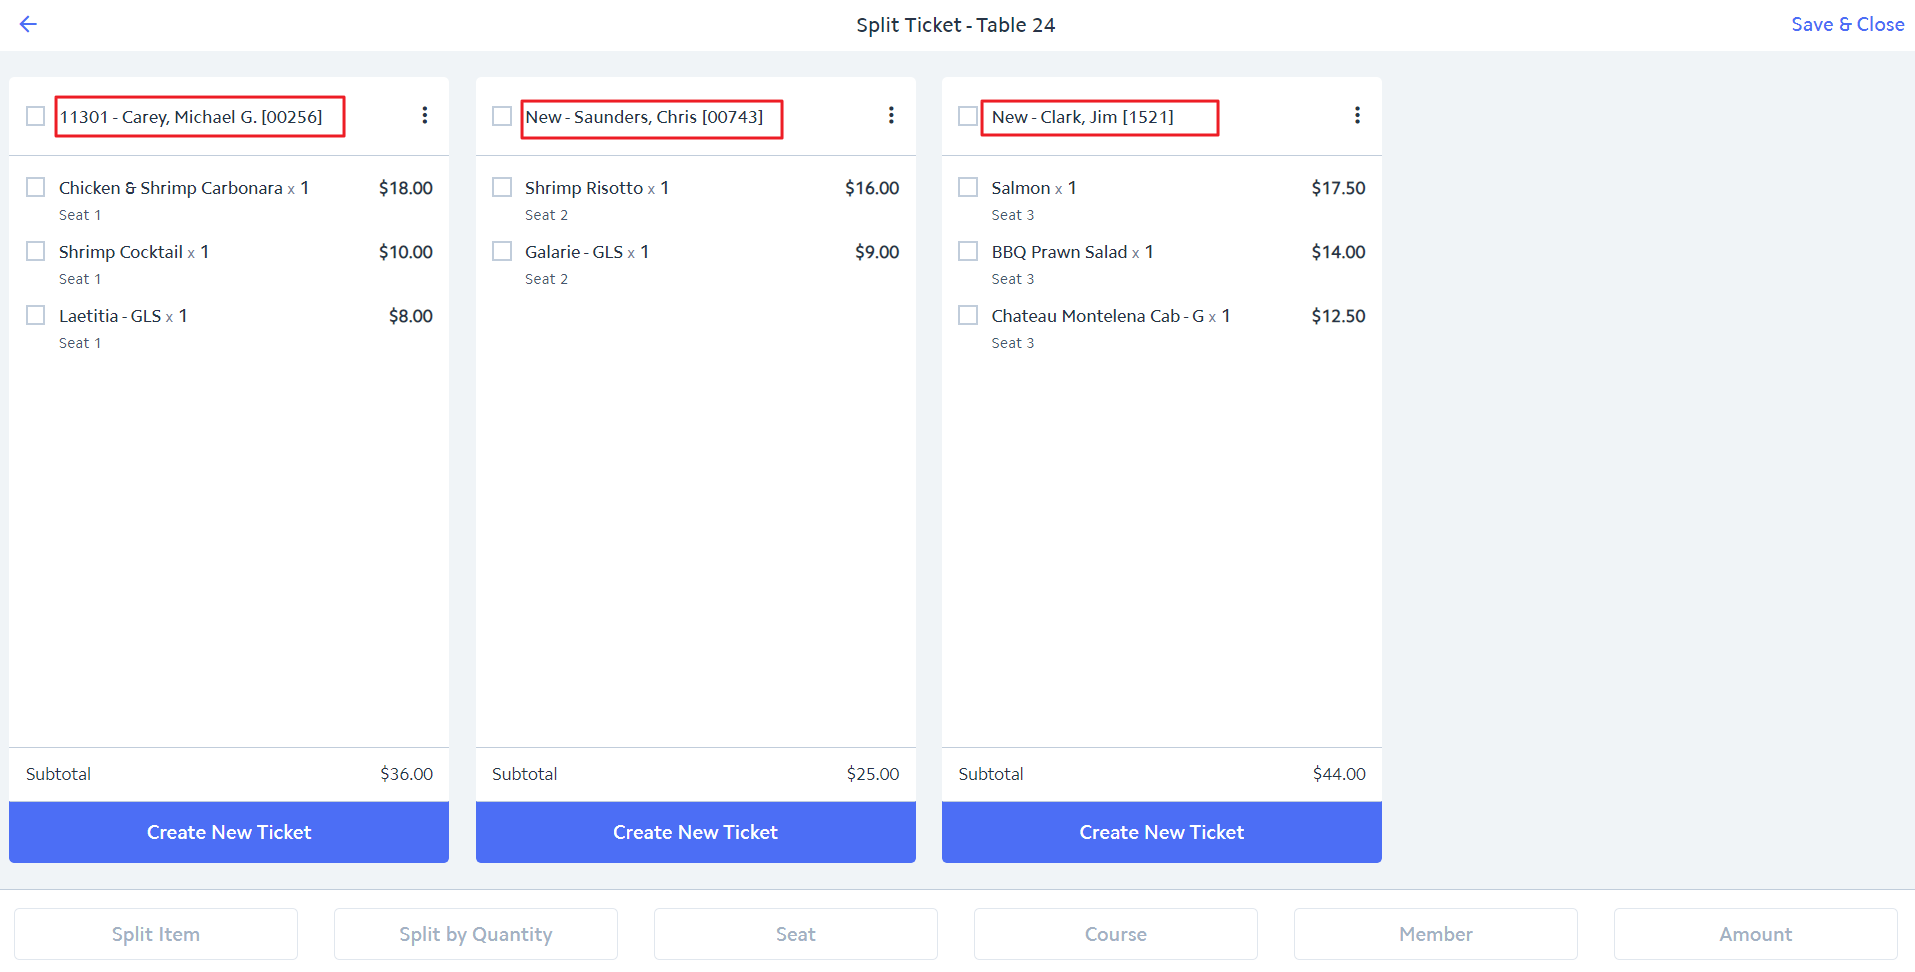 Image Removed
...
Click Save & Close to save your changes.
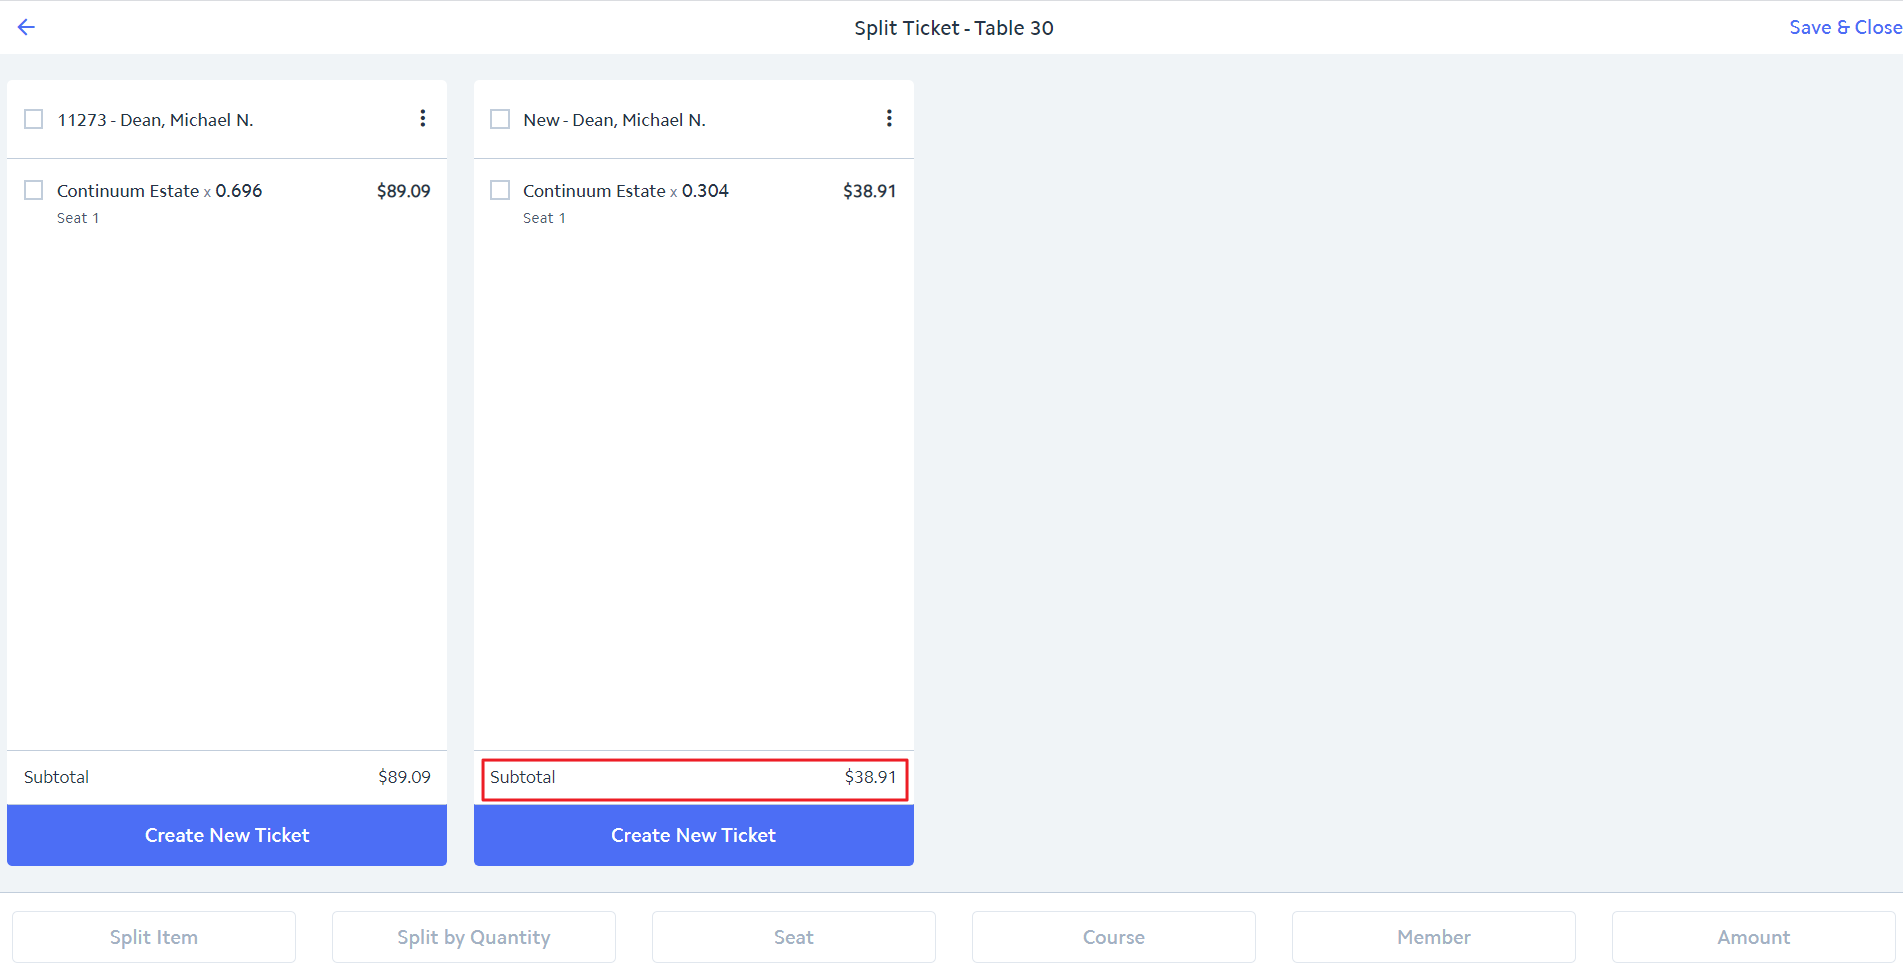
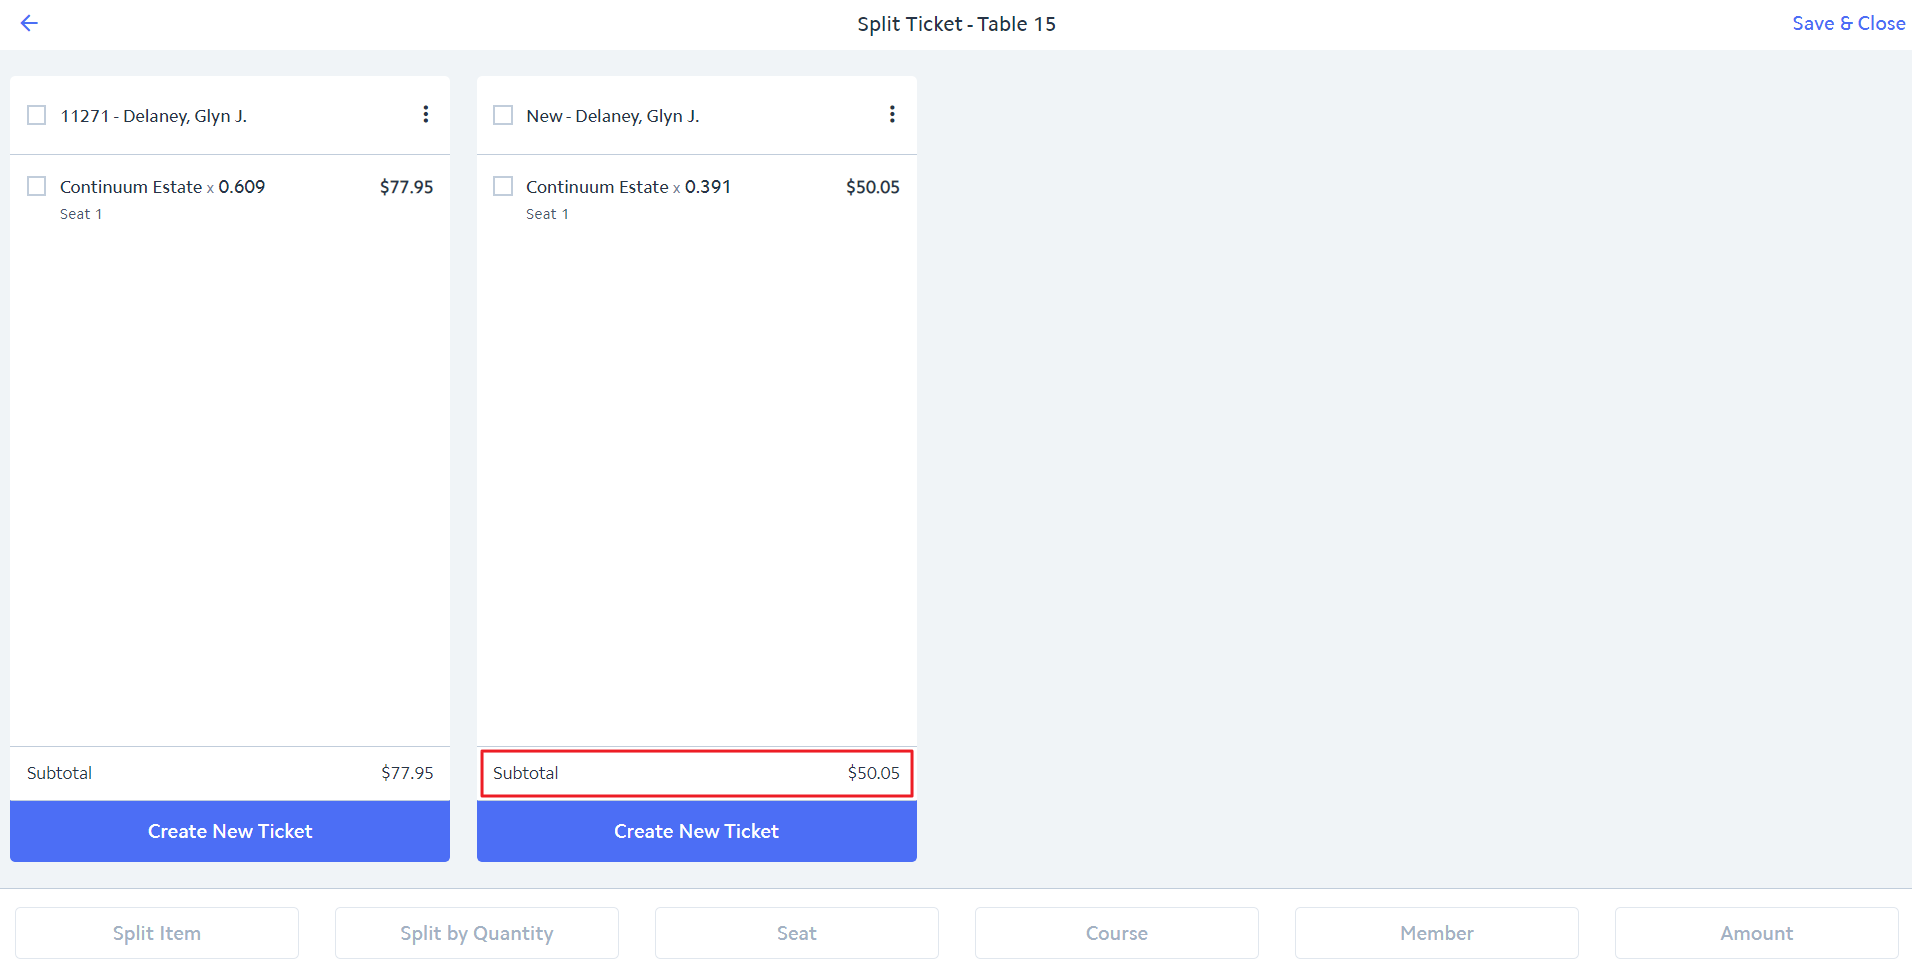
Split By Amount
Split by Amount allows the user to split a ticket by a specified amount a person wants to pay.
Use Case: One person wants to pay exactly $100 of the $189.50 bill. Note: It is advisable to wait until you are ready to close the ticket before performing this option. See the Include Tax notes below for more information on how this option works.
...
Within the Split Ticket screen, check the ticket itself in the upper left hand corner, then select Amount.
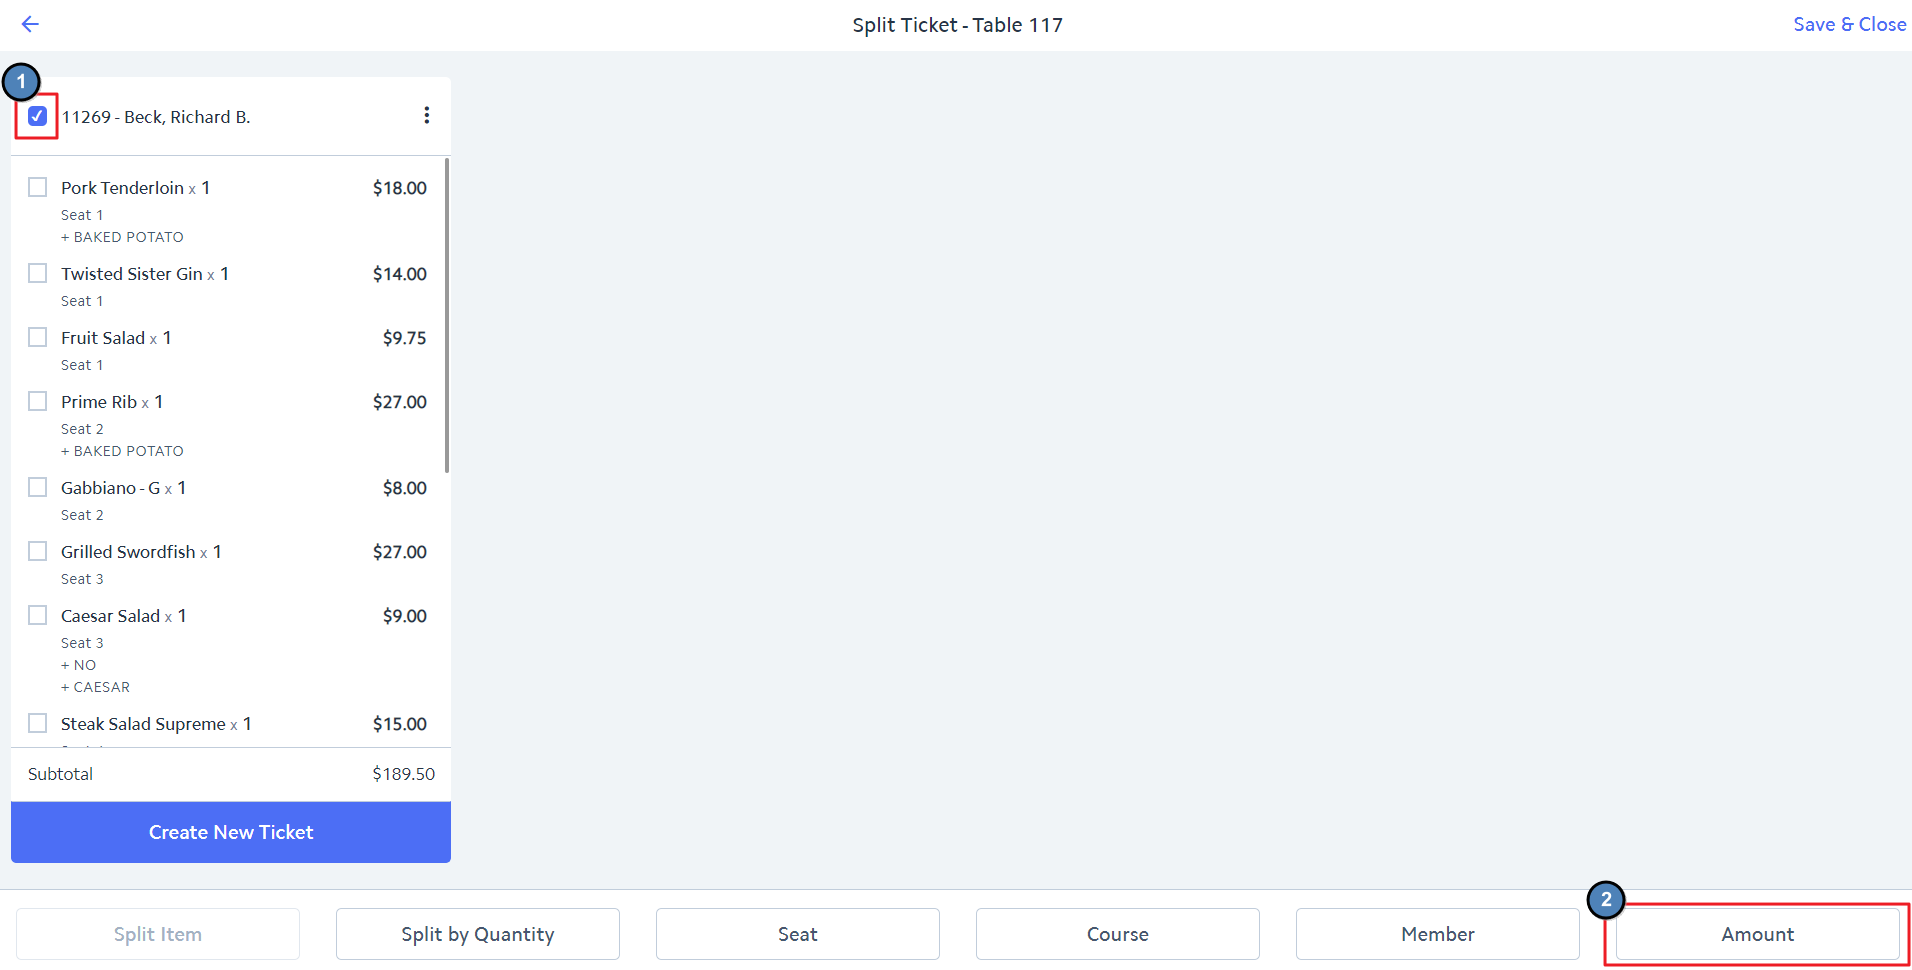
...
...
Enter the dollar amount to split. Click OK when finished.
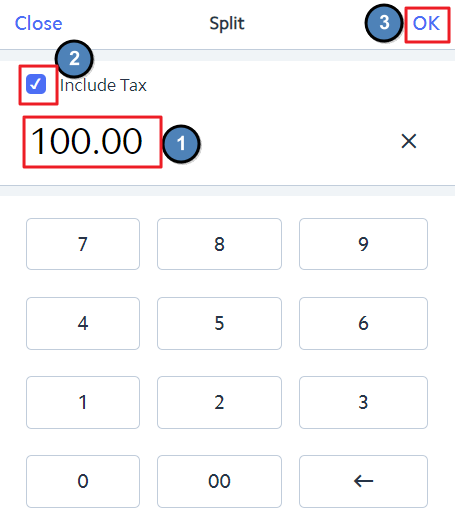
 Image Removed
...
The system will create a ticket for the amount specified (or as close as possible to the amount specified given calculations and rounding).
...
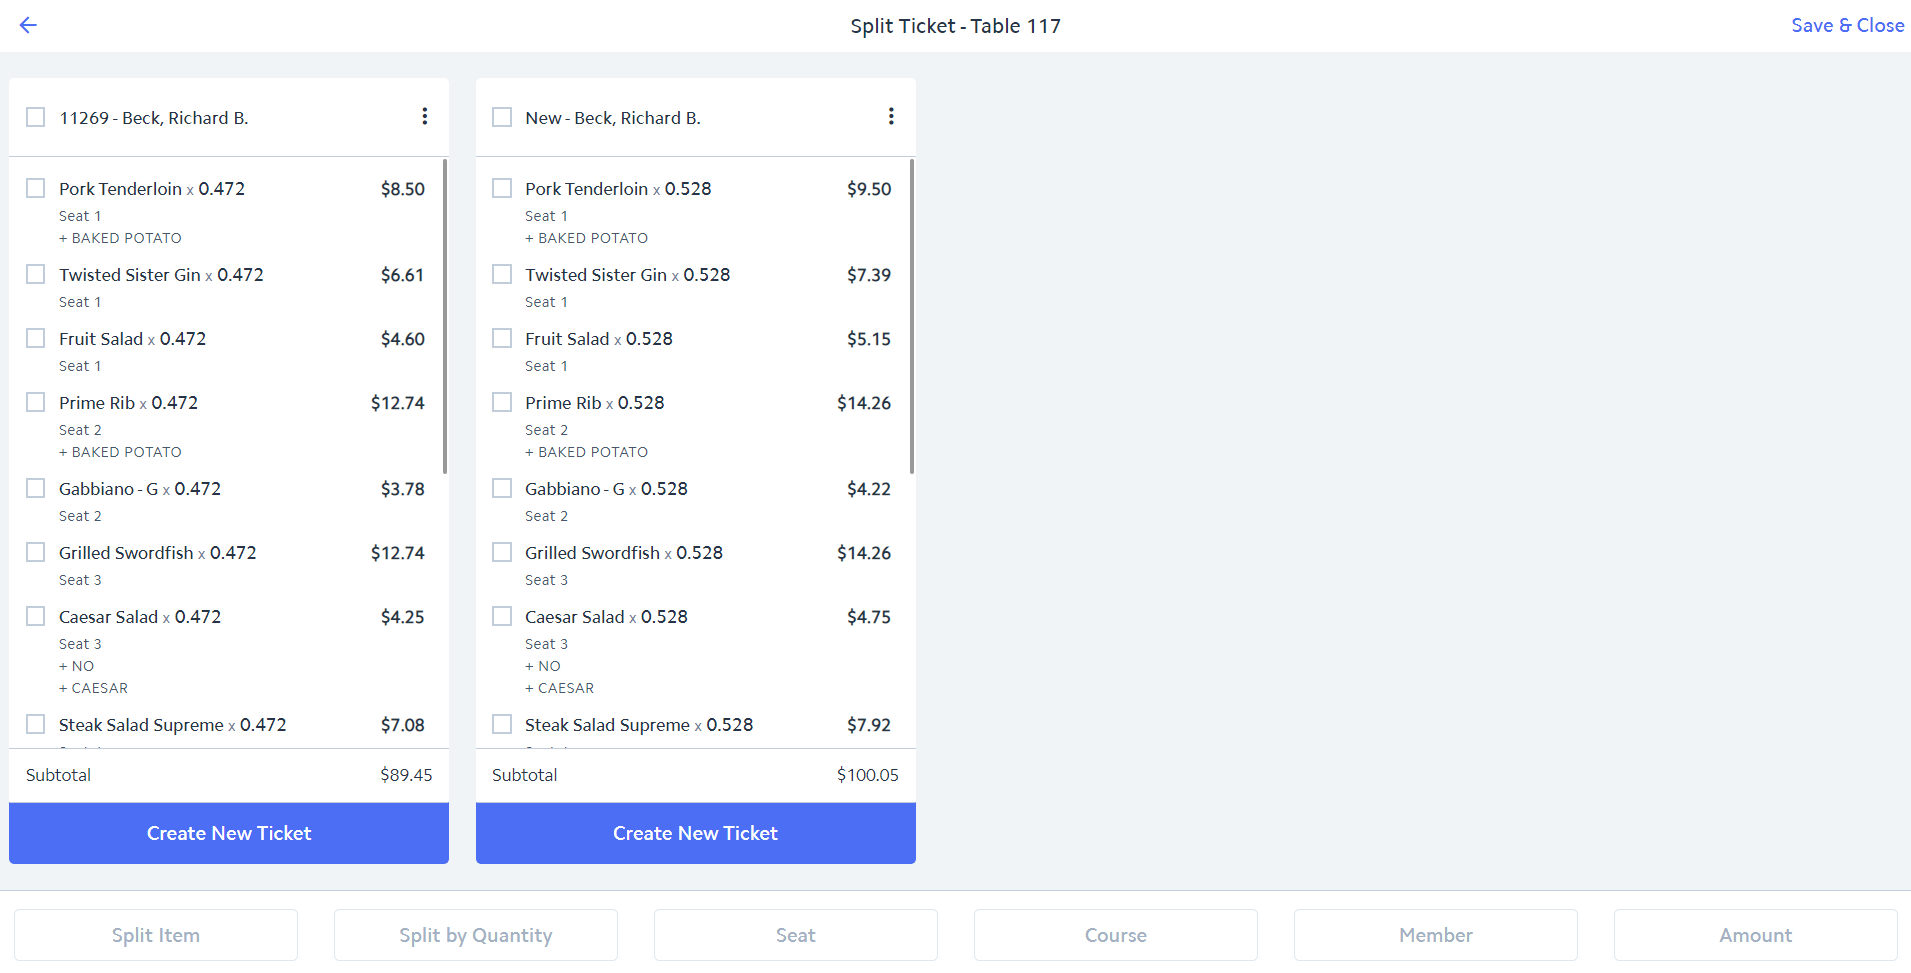 Image Removed
...
Note:
The Split by Amount changes the item QTY to fractions to calculate the item price to meet specified amount.
Once you click OK the changes are saved. Once the changes are saved, there is no way to merge the amounts and QTY back to original state.
All subsequent items entered on a ticket after the ticket has been Split by Amount will be added to the ticket as a full amount and QTY.
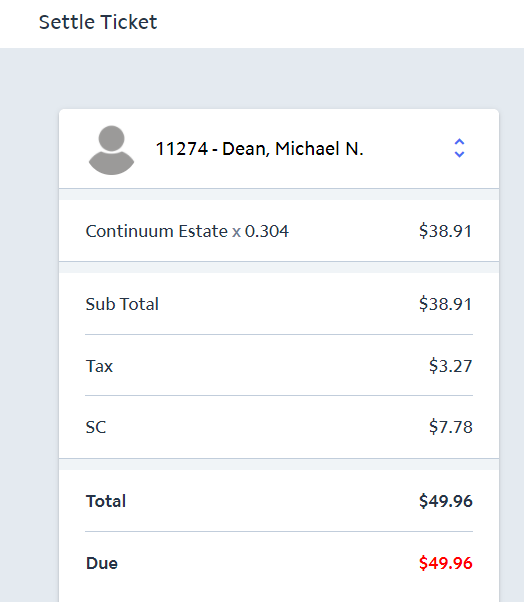
Include Tax
The Include Tax feature is utilized to include the calculated tax and service charge into the the split.
If you choose to include tax, then the Subtotal of the new ticket will be the split amount minus the tax and service charge that will be calculated when settling (Spit Amount - (Tax + Service Charge)) = Subtotal. This is done so that the Total amount paid comes as close as possible to the split amount entered (without exceeding it).
If you choose to not include tax, then the Subtotal of the new ticket will be the split amount itself (or as close as possible to the split amount given calculations and rounding). Upon settling, tax and service change will be added to the Subtotal.
Example 1:
...
We have one item on a ticket with a price of $128.00 (bottle of wine)
...
We split this item by an amount of $50.00 and check the Include Tax checkbox
...
 Image Removed
.
When settling, tax and service charges will be added to the Subtotal bringing the Total to the split amount entered (or as close as possible to the split amount entered).
...
Example 2:
...
We have one item on a ticket with a price of $128.00 (bottle of wine).
...
We split this item by the amount of $50.00 without checking the Include Tax checkbox
...
 Image Removed
.
When settling, tax and service charge will be added to the Subtotal.
...
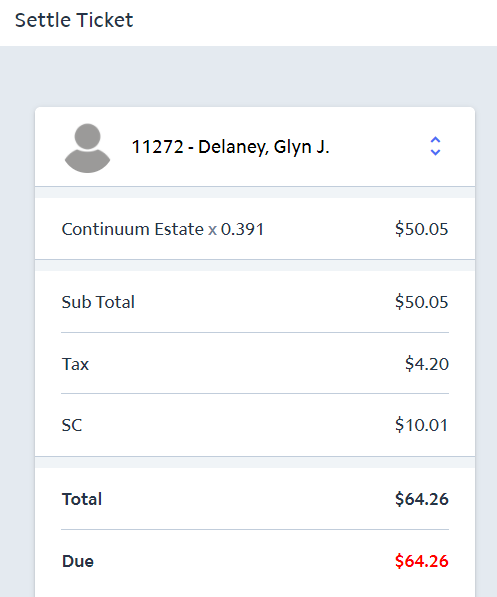 Image Removed
...
Combining Tickets
In the event a member decides to pay for another member sitting at a separate table, the Split Ticket feature can be used to combine the two tickets into one. Please note that in order to combine the tickets, the tickets need to be on the same table. Therefore, the non-paying member's ticket needs to be moved to the paying member's table.
...
Use the Change Table feature to move the non-paying member's ticket to the paying member's table.
...
...
Once the two tickets are on the same table, select Split Ticket.
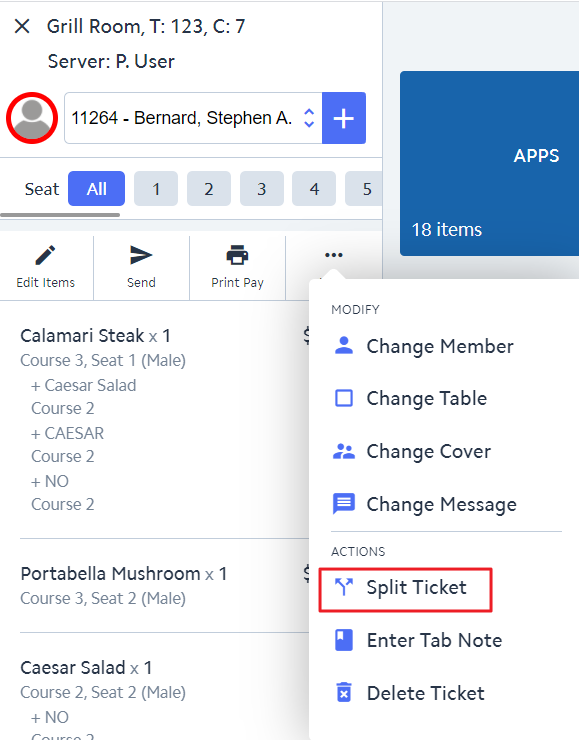 Image Removed
The Split Ticket Screen will appear
...
 Image Removed
...
.
Check the item(s) that should be moved from non-paying member's ticket to the paying member's ticket. Then click Move Selected Item(s).
...
...
All items will be moved to the paying member’s ticket. The ticket the items were transferred from will automatically be deleted.
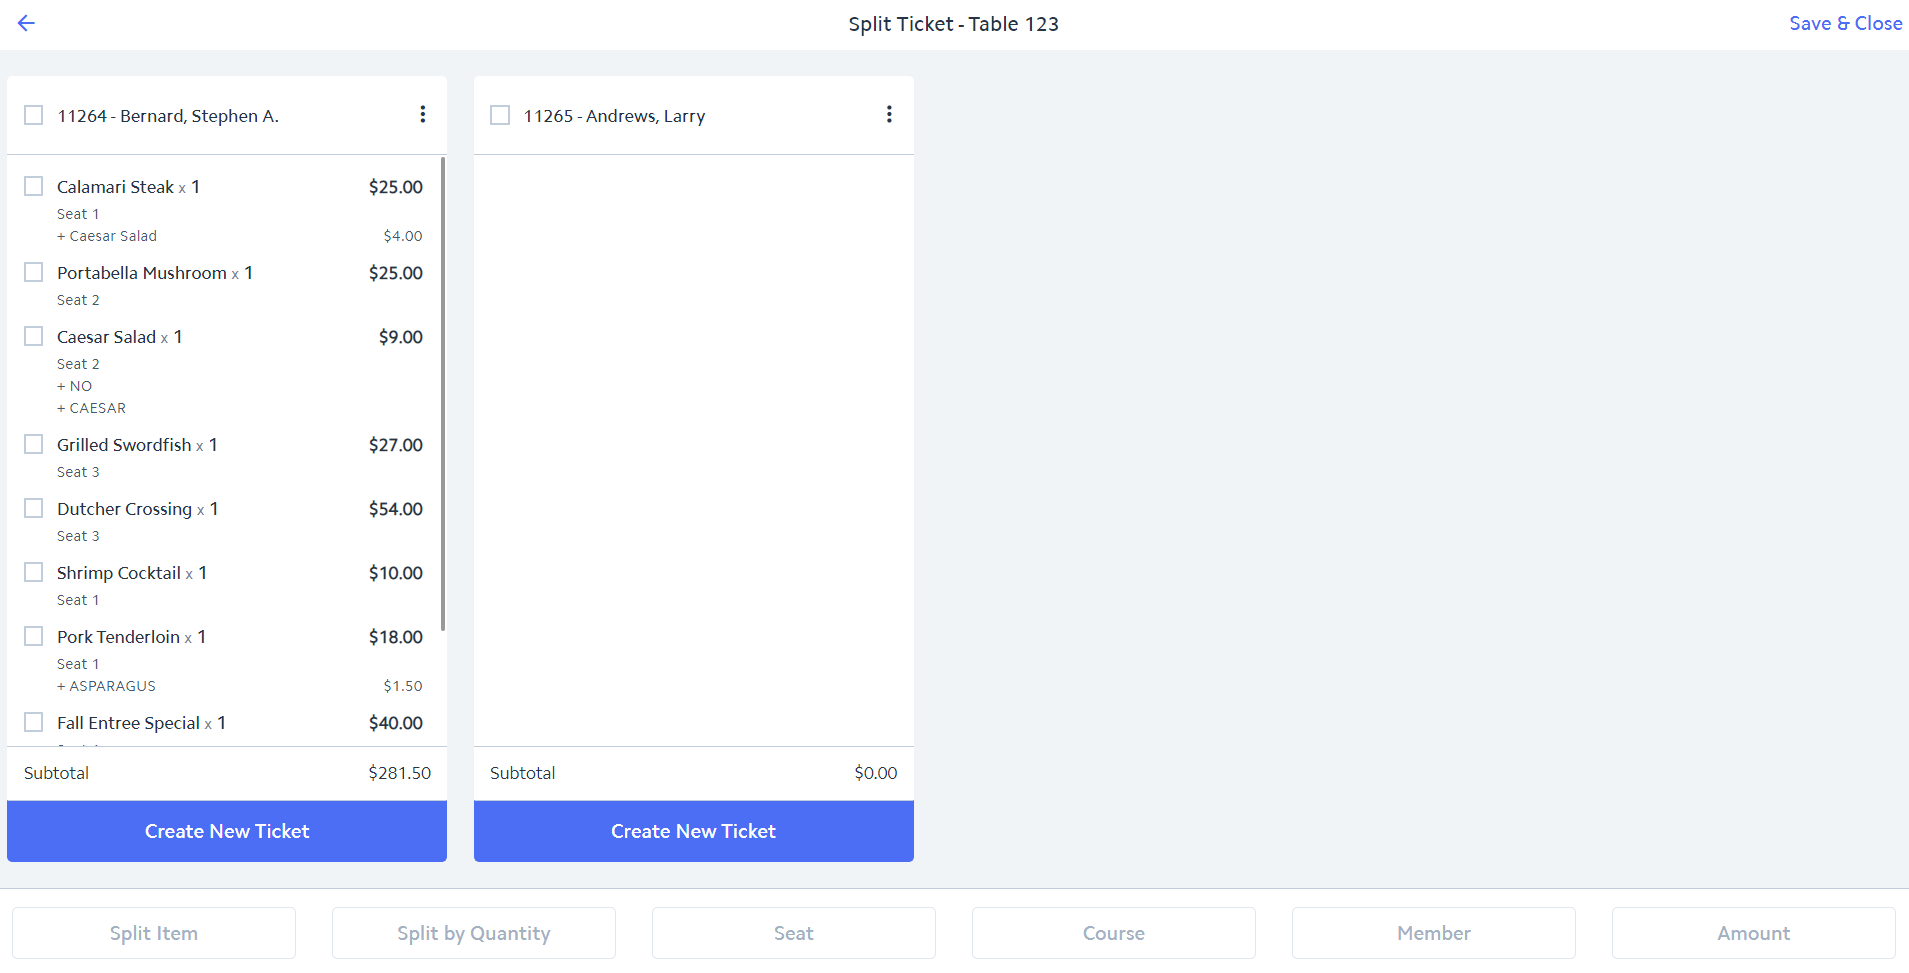 Image Removed
Best Practices
When ticket splitting is required, ensure to add the items as normal and then after all items are added, select Split Ticket.
When combining tickets, ensure all tickets are at the same table prior to merging them by using the Split Ticket option.
FAQs
Q: I split my ticket the wrong way but have not yet clicked 'Save & Close', can I start over?
A: Yes, by clicking the back arrow (top left-hand corner of the Split Ticket screen), your Split Ticket actions will be cancelled and you will be returned to the original ticket. Start fresh by reselecting the Split Ticket option.
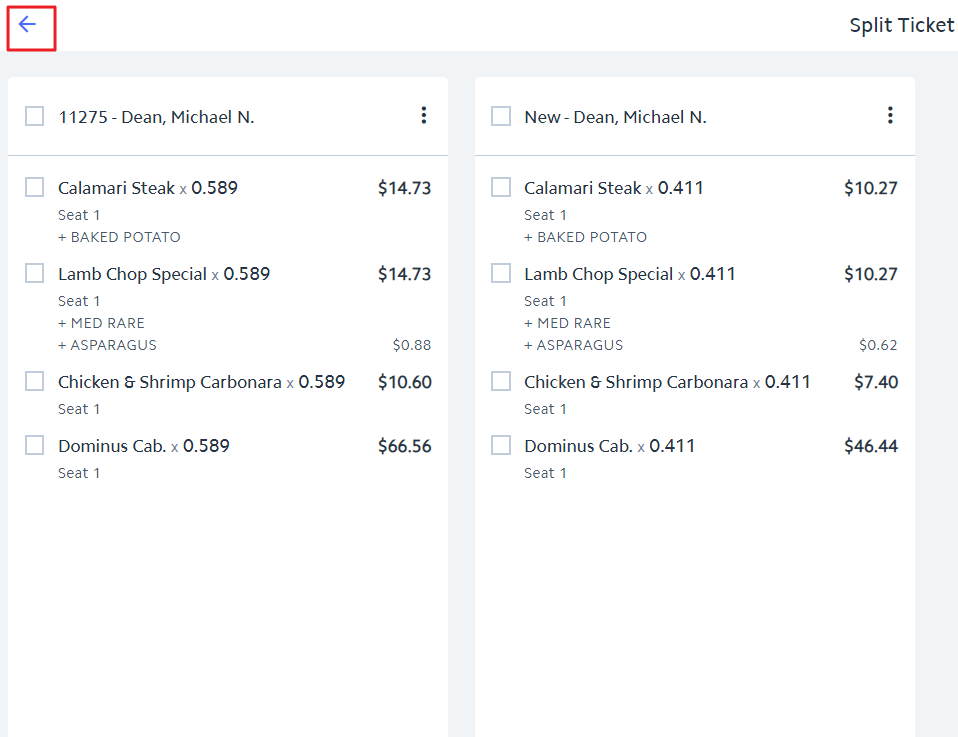 Image Removed
Downloadable Guide
...
 Image Added