Versions Compared
Key
- This line was added.
- This line was removed.
- Formatting was changed.
Table of Contents
| Table of Contents | ||||||
|---|---|---|---|---|---|---|
|
Overview
Communicating with your entire membership at once is sometimes the best method, especially when sending out important communication that is relevant to all members. When communication only applies to a group of members, it is best to use target marketing in emails to effectively deliver the message. In order to use target marketing, Dynamic Groups should be employed. Dynamic Groups automatically add members based on defined rules from the Directory and accounting system.
Required Permissions
Admin
Editor
Dynamic Groups
Dynamic Groups Interface
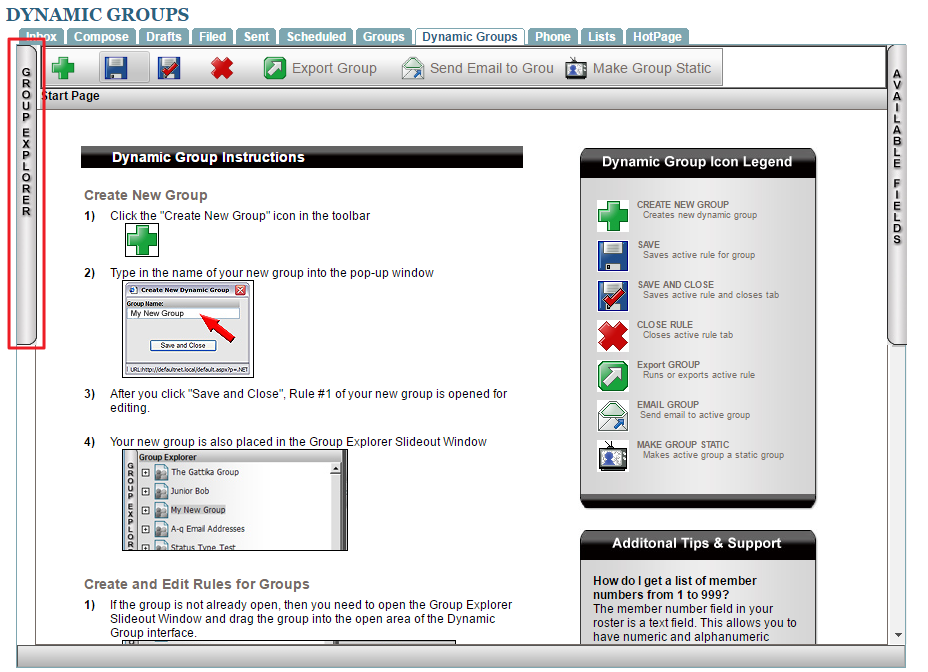
The Dynamic Group Toolbar allows for several options:
Add New Group
Save
Save and Close
Close Out
Export Group: this will allow us to export group information in a new window, or export to CSV.
Send Email to Group: this will take us to the Compose Email Interface to email a specific Dynamic Group.
Make Group Static: mostly used by Clubessential to create special groups for page permissions.
Group Explorer: is where all of the groups are housed.
Available Fields: is where options for creating group rules are located.
Adding Dynamic Groups
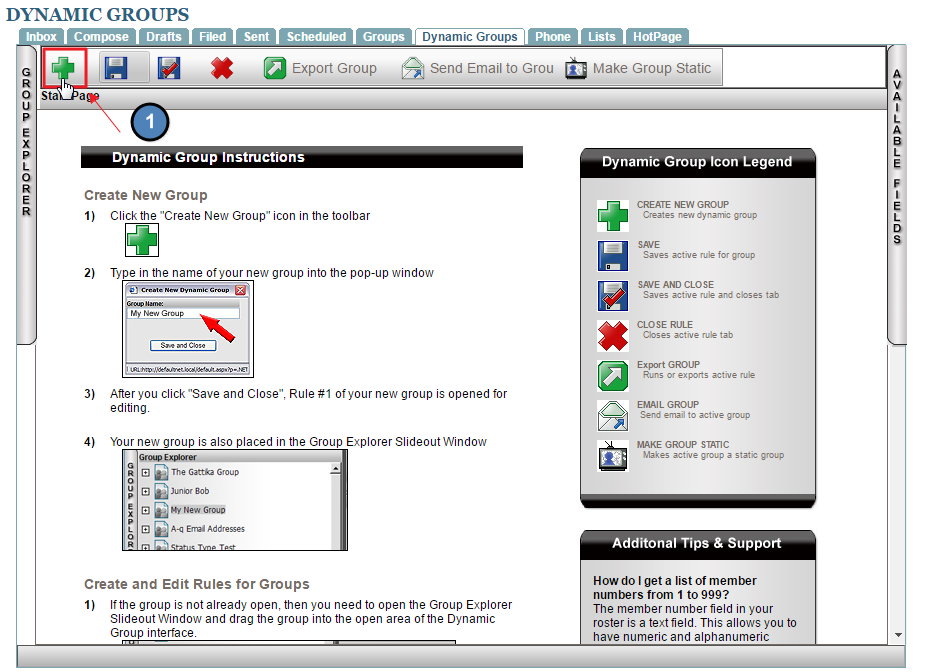
To add a new Dynamic Group, click the Add Group Button (Green Plus Sign).
Add a Name for your Group. Note: this should be detailed to what type of members are in this group (ex: Male Golf Members). Click Save and Close.
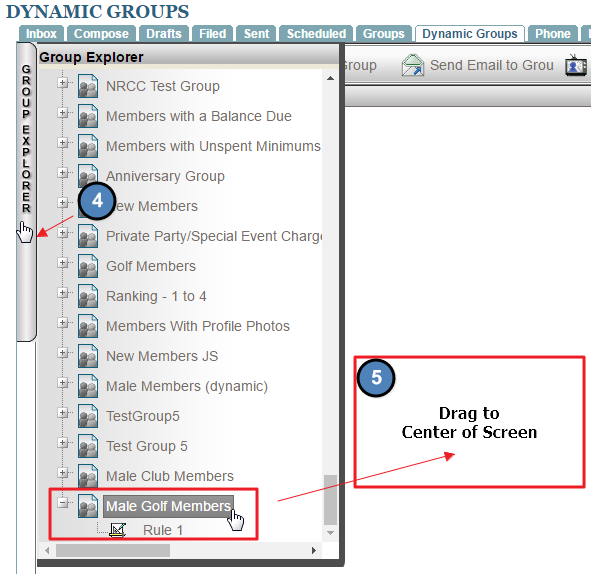
Click the Group Explorer tab.
Scroll to find the group, and then drag the group to the center of the Dynamic Group Interface.
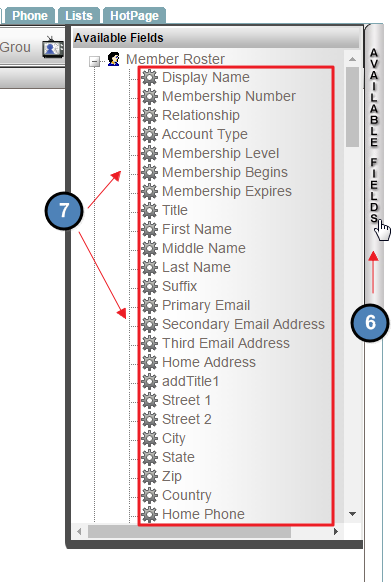
Next, open the Available Fields tab by clicking on it, which will list all applicable areas from the Directory and accounting system.
Choose the appropriate rules needed by dragging them to the center of the interface. Once all rules are added your screen should display the rules in the center of the Dynamic Group Interface.
Once all rules have been added, click the Save button and then Export Group to verify the right members were added. This will take you to the Export Group Interface.
Click Available Fields, to choose which fields to export. (Ex: first name, last name, member number, membership type). Then choose Run or Export.
Run will allow you to review the results in the browser.
Export to CSV will create a CSV export. This is especially useful for off-site data entry or tracking.
Emailing Dynamic Groups
Emails can be sent to Dynamic Groups in two ways, either from the Dynamic Groups tab or by using the Compose Email interface.
To send from the Dynamic Groups tab, click on the group name in the Dynamic Groups tab and drag to the center of the screen. Next, click on the Send Email to Group button. This will bring you to the Compose Email Interface where you may compose your email.
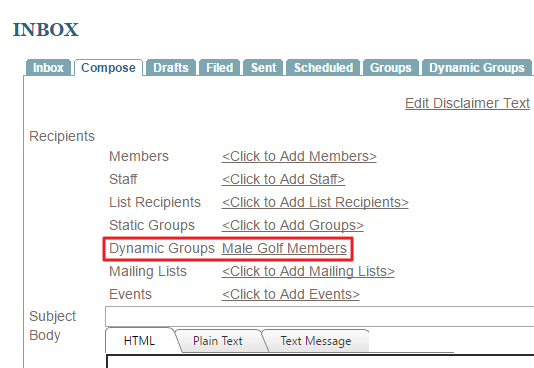
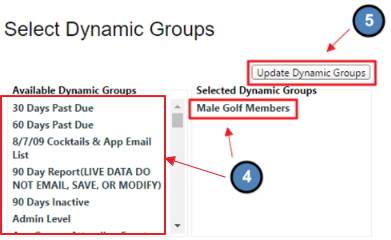
To send from the Compose Email, go to the Compose Email Interface. Click Add Dynamic Groups link. Scroll to find the desired Dynamic Group and click the Dynamic Group name in the Available Dynamic Groups column to move Group to the Selected Dynamic Groups box. Click Update Groups to begin composing the email.
Best Practices
By using Dynamic Groups, effective target marketing via the Blast Email System can be achieved. The more groups available, the easier it will be to ensure that the right people receive the right message. This should also increase email open rates as users are not bombarded with messages that are not relevant to their interests.
Special Dynamic Groups may need to be set up to create certain recurring emails. For instance, if you’re looking to create a group that pulls members between the ages of 35-45 years of age, this is a Special Dynamic Group that must be set up by Clubessential.
Trying to target members who bought a particular beverage or food item? This can easily be done using Dynamic Groups since rules are based upon information from the Accounting System and the Directory. By creating a group of members who purchase a particular beverage or food item, you can then target that group again for specials or certain events based on their purchasing choice.
FAQs
I created a Dynamic Group and have sent an email to the Dynamic Group, but no one received it. Why? A: Double check the Dynamic Group rules to make sure they are set up properly. To do so, export the Dynamic Group to make sure members are in it. If members are in it, see if those members received the email. If they did not, make sure the members have their Received Email option enabled in their Profile.
