| Table of Contents | ||||||||||
|---|---|---|---|---|---|---|---|---|---|---|
|
Overview
In this manual, we will discuss the various functionalities within our Retail POS System. Use Case The Retail POS system is used in Golf Shops, and other areas of the Club (Spa, for instance), where retail goods (or services) are transacted. |
Content
|
|---|
Accessing the Tool
To access the POS,
1) Click Click on the POS Icon.

2) A A logo will display moving around the screen, click anywhere on the screen to get the user login prompt. Enter your Employee Swipe Id (the number assigned to each user).
...
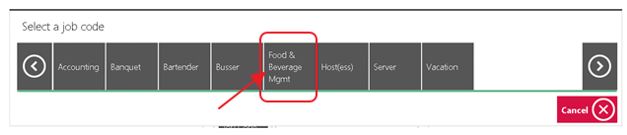
If If you are using the Office system to track hours, an additional screen will display prompting the user to select a Job Code.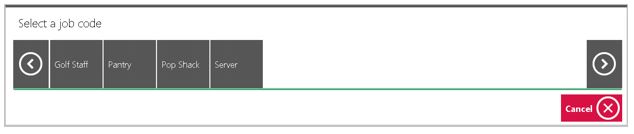
...
If the user only has one Job Code assigned to their employee profile, it will display “you “you have successfully logged in”in”.
Opening a Ticket
In this section we will discuss the necessary procedures to follow when opening a ticket.
1 1) If you have any open tickets they will be displayed on the Tickets Tab: you can touch or mouse click to open the ticket.
2 2) To open a new ticket, click on the green New Transaction button.
...
Notes:
The Tickets screen should be blank before running the End of Shift Report.
The Tickets display can vary depending on what columns you want to see. Columns can be removed or added in CMA. To do so, please navigate to System across the top toolbar and choose Areas.
...
Double click on the Area in question and navigate to the Open Tickets tab on the left pane. Once on the Open Tickets tab, select/unselect the column headers that you would like to see.
...
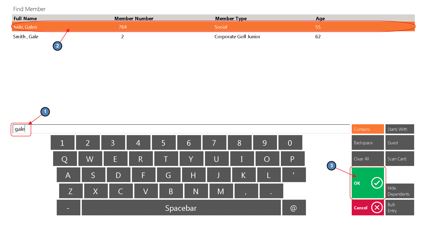
3) Member Lookup - Enter the Member Number or Member Name. If this is not a member, select Guest.
As you are typing the number or name, the screen will display the results. Highlight the member to be assigned to the ticket and hit Enter, or touch the member name, or mouse click on the name to select.

Notes:

If the Contains button is highlighted, the system will search all name columns displayed on the screen that meets the search criteria including First name, Last name, and Member Type.
Example: if you key in John, the system will display all the names that have John in the first or last name such as John, Johnson, Johnnie, etc, or if you key in the name of the Member Type only those members in that type will display. This is the preferred setting.
If the Starts With button is highlighted, the system will only look at the beginning of how the Name is displayed.
Example: if the name is displayed as Aaron, Amy R your search criteria will need be Aaron (not Amy). This is not the preferred setting and often is a support call because
...
a server accidentally hit the Starts With button.
The Hide Dependent button gives user the option to filter out the dependents and spouses from the member display.
You can sort the screen by each column by touching or clicking the column heading.
Navigating the POS Screen
...
Note: There are important areas to point out on the POS screen.
- History
Top Left Corner – The information viewed here can be customized using the information in the member file. Each sales Area can display different information. There is various member information available for display (this will be discussed in more details in Area setup). If you click on Member Info the system will take you to additional information about the member and family. Prefs is an area you can add information about the member such as favorite clubs, color, etc.
History will show closed tickets from current day and previous days.
...
Top
1st1st Line – Displays Area and
Ticket NumberTicket Number.
...
Top
2nd2nd Line – User can choose what Item Categories to be listed on the bar for quick access.
...
This setting is found in Manage Item Categories. Select the Item Category in Question and Navigate to the Areas tab.
Then, select the POS_Navigation column (last column to the right); next to the Areas to display the category at the top of the POS screen.
...
Left Middle – Is the Ordering Screen; it lists the items that have been rung up.
...
Middle – The Screen Group Layout is user defined: buttons can be setup to access a single Item, Item Category, Combo, single Modifier, Modifier Group, or another Screen Group.
...
Bottom – The buttons across the bottom of the screen are system defined and triggers different functionality; see below for a brief and then more in-depth description of each button.
...
POS Main Button Functionality
Top Row
1) 17825797Office - POS Retail Manual#Lookup Item - Allows you to look up an item that has not been set up on the POS screen layout.
2) 17825797Office - POS Retail Manual#Remove Item - User can delete an item from the order.
3) Delete Ticket - Will delete current ticket.
4) 17825797Office - POS Retail Manual#Change Qty - User can change the QTY on an item (including making quantity negative for a credit).
5) 17825797Office - POS Retail Manual#Discount Item - Gives users the ability to discount an item. Requires security rights.
6) 17825797Office - POS Retail Manual#Comp Item - Give users the ability to comp an item. Requires security rights.
7) 17825797Office - POS Retail Manual#Add Ticket - Gives the ability to open another ticket without exiting the POS before completing the first ticket. You can move back and forth to all open tickets from the POS screen.
8) 17825797Office - POS Retail Manual#Change Member - Used if the member to be billed needs to change for any reason.
9) 17825797Office - POS Retail Manual#Upcharge Item - Will prompt for an amount to override and increase the price of the item.
10)Quick Cash - One step process to close the ticket to Cash.
11)Quick Charge - One step process to close the ticket to Cash.
12) 17825797Office - POS Retail Manual#Close Ticket - Take users to a settlement screen with more closing options.
Bottom Row
13) 17825797Office - POS Retail Manual#Exit - Will exit the POS screen back to the main screen.
14) 17825797Office - POS Retail Manual#Change Price - Gives users the ability to reduce the price without using a discount.
15) 17825797Office - POS Retail Manual#Duplicate Ticket - Ability to create a duplicate ticket from another displayed ticket. This is useful if several members are to be charged the exact items.
16)Multi Off - Used in conjunction with Remove Item, Discount Item, and Comp Item; when (ON) users can select multiple Items.
17) 17825797Office - POS Retail Manual#Split Ticket - Used if more than one ticket is required on a transaction and to edit separate tickets.
18) 17825797Office - POS Retail Manual#Coupon Lookup - This button will turn Green to alert the server if the member has a promo coupon available to redeem.
19) 17825797Office - POS Retail Manual#Print Ticket - Prints the pay receipt ticket for signature prior to closing the ticket.
| Anchor | ||||
|---|---|---|---|---|
|
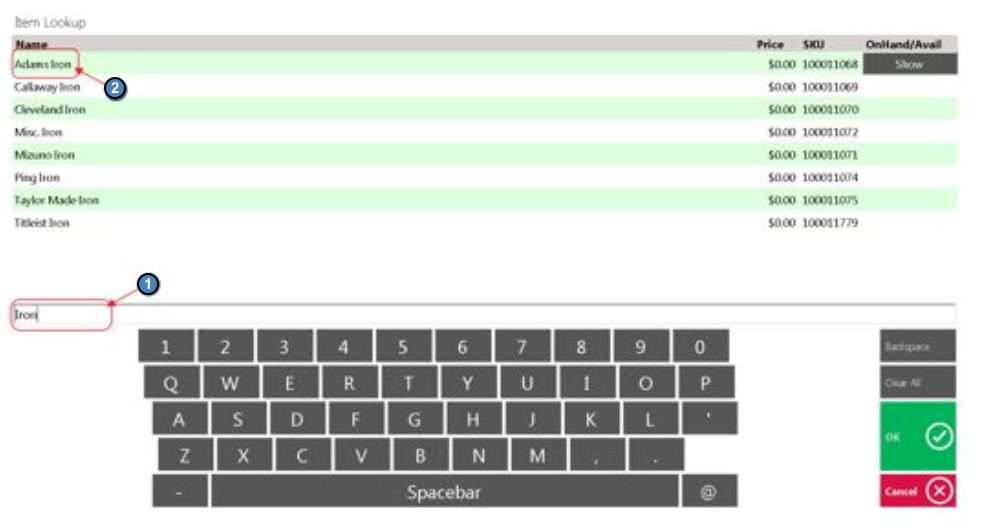
Lookup Item
Allows you to look up an item that has not been set up on the POS screen layout.
1 1) Select Lookup Item.
...
2) Enter Enter the Item Name in the search field and click or touch to select the Item.
| Anchor | ||||
|---|---|---|---|---|
|
Remove
...
Item
User can delete an item from the order.
1) Highlight the Item to be removed from the ticket and click Remove Item.

Note: If you have more than one item to delete follow the Multi-Select (On) instructions.
| Anchor | ||||
|---|---|---|---|---|
|
Change
...
Qty
User can change the QTY on an item (including making quantity negative for a credit).
1) Highlight the Item and click Change QTY.
...
2) Enter Enter QTY. When entering a negative QTY, select the minus (-) sign first and then select the amount of the negative QTY. Use the More option to enter quantities greater than 19.

| Anchor | ||||
|---|---|---|---|---|
|
Discount
...
Item
Gives users the ability to discount an item. Requires security rights.
1) Highlight the item to discount and click Discount Item.

2) A message box will pop up if you do not have security rights to Discount. You will need to get a manager to continue. Select YES and Enter Pass Code.
...
3) Select a Discount reason Select a Discount reason or key in a reason. Discount reasons Discount reasons are optional, if you do not get this prompt then you are not setup to track reasons. For more information on setting up Discount reasons Discount reasons, please refer to the Buttons section of our Retail Areas manual.
...
4) Enter Enter the Discount (on the right side are pre-set percentages, if none of these are what you want click on the % sign to manually enter the desired percentage). If it is a flat dollar discount amount, then use the numbers on the left of the screen. Click OK when finished.
...
Note: If you have more than one item to delete follow the Multi-Select (On) instructions.
| Anchor | ||||
|---|---|---|---|---|
|
Comp Item
Give users the ability to comp an item. Requires security rights.
1) Highlight the item to comp and click Comp Item, the system will discount the item 100%.

2) A A message box will pop up if you do not have security rights to comp. You will need to get a manager to continue. Select YES and Enter Pass Code.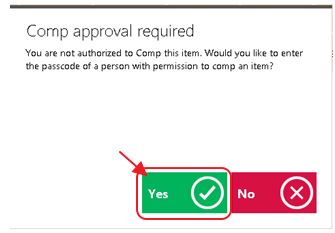
...
3) Select Select a Comp reason or key in a reason. Comp reasons are optional, if you do not get this prompt then you are not setup to track reasons. For more information on setting up Comp reasons, please refer to the Buttons section of our Retail Areas manual.
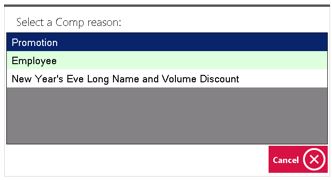
Note: If you have more than one item to delete follow the Multi-Select (On) instructions.
| Anchor | ||||
|---|---|---|---|---|
|
Add Ticket
Gives the ability to open another ticket without exiting the POS before completing the first ticket. You can move back and forth to all open tickets from the POS screen.
...
1) Click Add Ticket.

2)
...
Search and select the member or select Guest if this is not a member.
...
3)
...
If you have more than 1 ticket open you will see buttons labeled 1, 2, 3, etc. For each ticket, click on the button you wish to work with.

Notes:
User can see what member is assigned to a ticket by the information at the top left corner; which will show member number and name. Other information displayed is also specific to the member on the ticket.
There is no limit to how many tickets you can have open.
| Anchor | ||||
|---|---|---|---|---|
|
Change
...
Member
Used if the member to be billed needs to change for any reason.
1 1) Click on Change Member.
...
2) Search Search by name or member number, Highlight the member and click OK, or double click the member.
| Anchor | ||||
|---|---|---|---|---|
|
Upcharge Item
Will prompt for an amount to override and increase the price of the item.
1 1) Highlight the Item, click Upcharge Item.

2) Enter Enter the amount to override the price.
...
Note: The amount entered must be greater than the item price. If you want to decrease the price use the Change Price or Discount option.
| Anchor | ||||
|---|---|---|---|---|
|
Quick
...
Settlements
There are two settlement types available for closing the ticket with one step, Cash and Member Charge. These options do not give you the ability to add additional tip, get change amount, or split tender. For more closing capabilities select Close Ticket.
In the POS ordering screen, select Quick Cash or Quick Charge.

Notes:
Quick Cash will not give you the option to key in the amount of money for change back; it will close the ticket for the exact amount owing.
Quick Settlement is a one step process and will not give you any other options in closing the ticket like adding additional gratuity or split tender. For more closing capabilities select Close Ticket instead.
A Settlement Ticket is similar to the pay receipt except it includes the settlement details on the printed ticket.
You have the option to hide the Quick Settlement Types from the POS by Area, or to suppress printing a settlement ticket by POS Terminal.
To hide the Quick Settlements Types from the POS by Area,
1) In In CMA, please navigate to System across the top toolbar and choose Areas.
...
2) Double Double click on the Area in question and navigate to the POS Options tab on the left pane. Once on the POS Options tab, select the Hide Quick Cash/ Quick Member Charge check box. This will remove the Quick Settlements from the Area specified.
...
To suppress printing a settlement ticket by POS Terminal,
1) In In CMA, please navigate to System across the top toolbar and select Terminals.
...
2) Double Double click on the Terminal in question, and put a check mark on Suppress Quick Cash Print or Charge. This will prevent a settle ticket from printing when the Quick Settlements are selected.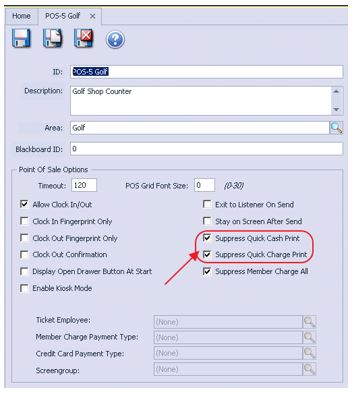
...
| Anchor | ||||
|---|---|---|---|---|
|
Close Ticket
The Close Ticket function gives you additional options on how the ticket is settled. In this section we will cover the various options available.

Tender Keypad
Top left corner of the screen is the Tender keypad.
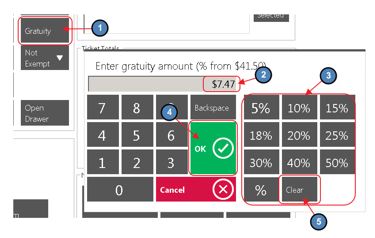
Gratuity - Select the Gratuity button and you will get the Gratuity Prompt. Enter the Gratuity amount (or percentage as applicable) and click OK.
Note: Select Clear on the Gratuity Prompt to clear any wrongly entered Gratuity.
You will see the added gratuity in the Ticket Totals Ticket Totals section.
...
2. Tax/Service Charge Exempt - Select drop down arrow next to Not Exempt and a list of exemptible features will display. Select the option relevant to the current charge (requires security rights).

Options Include:
Not Exempt
Tax Exempt
Service Charge (SC) Exempt
Tax & Service Charge (SC) Exempt
3. Open Cash Drawer will open the cash drawer before completing the settlement.
...
4. Clear Tender will clear the amount entered to re-enter a new amount.
...
5. The The pre-fixed values $10, $20, $50, $100 are applied to Cash settlement ONLY.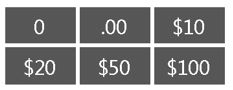
...
Settlements - Settle Ticket
Single Settlement Type Used - If you want to settle the full amount to one settlement type do not enter the amount: simply select the Settlement Type and the full amount will be applied.
...
2. Split Settlement - Is used when the client wants to use more than one settlement type to pay the amount. For example 10 dollars to Cash, 40 dollars to Credit Card Credit Card, and remaining amount to Member Charge Member Charge. Enter the amount to be charged on the Cash settlement type in the Tender keypad and select the Cash settlement type, do the same for the Credit Card settlement type, and then select the Member Charge settlement type and the remaining amount on the ticket will be applied to Member Charge.
...
Note: The amount to split must be entered into the Tender keypad first before selecting the settlement type.

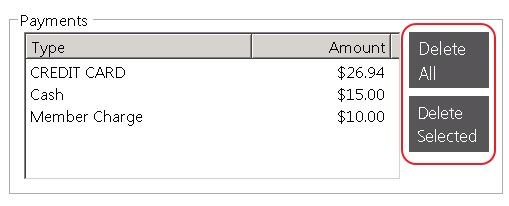
Delete All - will remove all settlements entered to start over.
Delete Selected - highlight the settlement type you want removed and select
Delete SelectedDelete Selected.

| Anchor | ||||
|---|---|---|---|---|
|
...
Exit
Will exit the POS screen back to the main screen.
In the POS ordering screen, select Exit when you want to leave the POS screen.

| Anchor | ||||
|---|---|---|---|---|
|
Change
...
Price
Gives users the ability to reduce the price without using a discount.
1 1) Highlight an Item and click Change Price.
...
2) Enter Enter the price (use Percentages as applicable) and click OK when done.
...
Note: The amount entered must be less than the item price. If you want to increase the price use the Upcharge button.
| Anchor | ||||
|---|---|---|---|---|
|
Duplicate
...
Ticket
Ability to create a duplicate ticket from another displayed ticket. This is useful if several members are to be charged the exact items.
1) In POS ordering screen, select Duplicate Ticket.

2) Select Select how many duplicates you need.
...
3) The The system will generate the number of additional tickets that you selected in the previous step.
...
Note: Use the Change Member feature to change the member attached to any of the duplicated tickets.
| Anchor | ||||
|---|---|---|---|---|
|
Multi Select (Off)/(On)
...
Used in conjunction with Remove Item, Discount Item, and Comp Item; when (ON) users can select multiple Items.
1) Click or touch Multi-Select (Off) and it will change to Multi-Select (On).
...
2) Highlight Highlight all the items by touching or clicking the Item. Select one of the functions below and follow their respective instructions (These are the only functions that can be used in combination with Multi (On)).
a) 17825797 Office - POS Retail Manual#Remove Item
b) 17825797 Office - POS Retail Manual#Discount Item
c) 17825797 Office - POS Retail Manual#Comp Item
| Anchor | ||||
|---|---|---|---|---|
|
Split
...
Ticket
Used if more than one ticket is required on a transaction and to edit separate tickets.
...
Please see our Split Ticket manual for a demonstration on all the ways to split an item or ticket.
| Anchor | ||||
|---|---|---|---|---|
|
Coupon Lookup
The Coupon Lookup works in conjunction with Member Marketing and Item Price Scheduling.
Please see our Coupons manual for more information on their setup.
1)
...
Place the order, and click on Coupon Lookup.
...
2)
...
The screen will display all available coupons for redemption. Touch or click the one you want.

Note:
...
If the member does not have any active coupons the button will be grayed out.
If a coupon has been applied to an item and you wish to remove the discount, click or touch the Remove Coupon button.
| Anchor | ||||
|---|---|---|---|---|
|
...
Ticket
Print Ticket is used when you want to print a receipt before closing a ticket. This will print out the Pay Ticket when selected. Most often used to acquire a signature prior to closing the ticket.
1)
...
In POS ordering screen, select Print Ticket to print out the Pay Ticket.
...
2) Select Exit when finished.
Notes:
Use Print Ticket to give the customer information on the charges and to get a signature before closing the ticket.
The Pay Receipt can be modified to display discounts, service charge, additional tip, and taxes in a few different formats.
You also have the option to have messages, minimum balances, store credit balances, and other information included on the pay receipt.
...
See Office - POS Retail Manual#Print Preview as an alternative to Printing directly.
Other Button Functionality
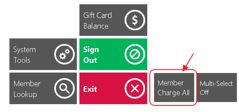
Member Charge All
Another feature Another feature is the Member Charge All button. This button will take all open tickets and close them to Member Charge Member Charge without going through the payment screen.
In this example, there are 4 open tickets (3 members and 1 guest).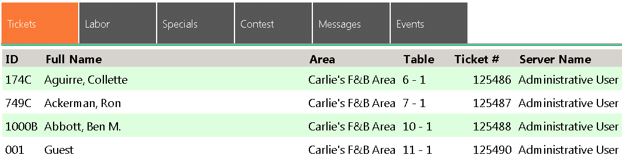
...
Click the “Member Charge All,” button.
...
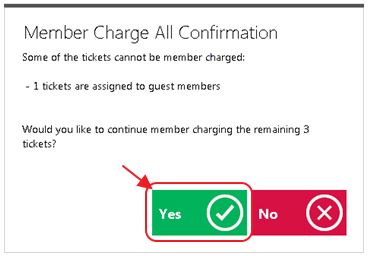
Upon clicking the button, a prompt will display telling the user that one ticket is assigned to guest members and cannot be member charged. The 3 remaining open tickets assigned to members however, will be settled to Member Charge. Select Yes.
Option will exist to Print a receipt. 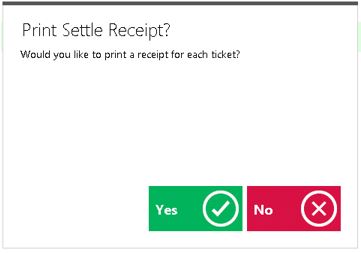
...
Member charge will commence.

Note: Member Charge All can be turned off at the Terminal level if desired. To do so:
1) In CMA navigate to System across the top toolbar and select Terminals.
...
2) Double click the applicable Terminal and select Suppress Member Charge All.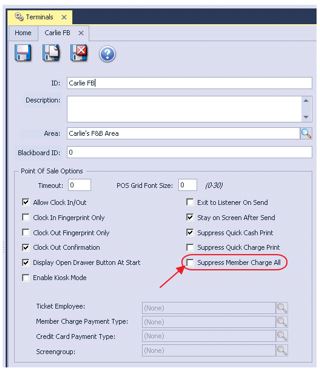
...
Member
...
Preferences
Member Preferences and other information about the member can be manually entered in POS. Food and Beverage uses this feature most often to input information such as preferred tables, foods, drinks, allergies, etc. However, Retail Areas may use this feature to enter tee time preferences, shirt/shoe sizes, etc. If member preferences have been added, the button will turn green to alert the user there is information about the member. This information can also be printed to the receipt printer.
To view preferences, in the top left corner of the POS Screen, select Prefs.

Delete a Preference
To delete a preference, highlight the Preference line, select Delete.

Add New Preference
To add a new preference, select Add New, highlight the Category of preference, in the Enter Preference box enter the description of the new preference, select OK.

Change Preference
To change a preference, the user must delete the preference that needs changed and add the new preference from scratch.
Preference Categories
Add New Preference Category
1) To add a new Preference Category, in the Select Category box highlight the Add New line. Then, in the Enter Preference box enter the description of the new preference (not the new category namecategory name), Select OK.
...
2) The Add Preference Category box will appear, enter the new Category name, and select OK when finished.

Member
...
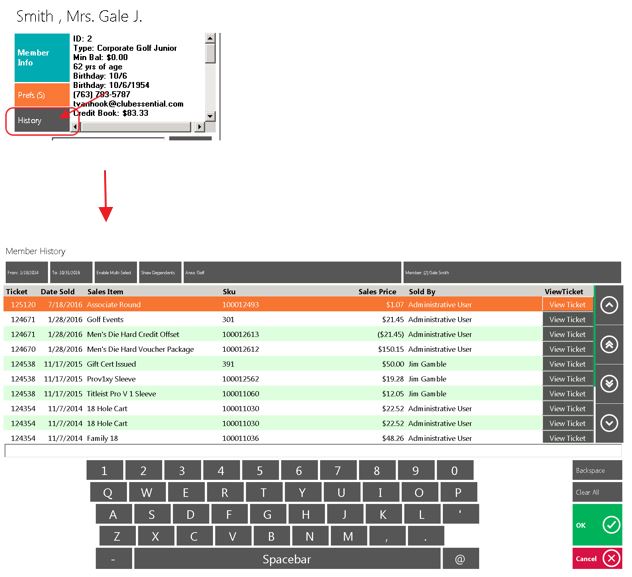
History
Member History will the list the member’s previously purchased Items.
To To access Member History, select History in the top left corner of the POS Screen.
Notes:
- In
In the Search box you can search the name of the item to narrow down the search.

From and To Dates - enter the start and end date to narrow down the search.
Enable Multi Select more than one ticket to print.
Show Dependents - if selected, the system will display all family member tickets. If unselected, only the tickets rung under the member selected will show.
Area name will be the name of the Area you have the ticket open.
The tickets listed will be tickets that were closed in that Area only.
To see tickets closed from a different Area, select the Area button, select the applicable Area.
It is important to remember that if you do not see an Area listed, then the member has NO closed tickets in that Area.
Member Name and Number is displayed at top right corner; you can click on the name to search a different member. When you hit cancel it will take you back to the ordering screen and the original member will still be displayed.

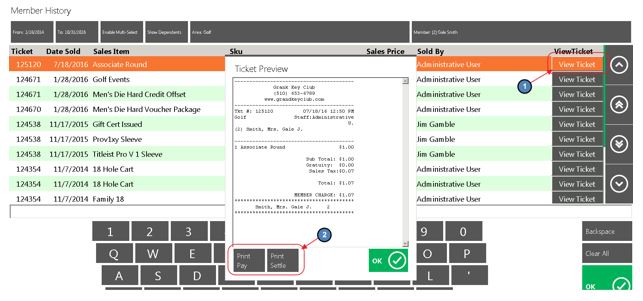
View Ticket - ticket
detail can be viewed on detail can be viewed on the right middle of the screen; highlight the item to view ticket details and select View Ticket.
Print Settle Receipt and Print Pay Receipt; you can reprint a ticket from history at any time.

Print Preview
The Print Preview feature allows the user to see a Print PreviewPrint Preview before any ticket is printed from the POS system. This Print Preview will display exactly Print Preview will display exactly how the ticket will look when printed and exactly what Device/Printer it will print to. Furthermore, the Pay and Settle ticket Print Preview will provide the user the option to email a copy of the ticket to the member as long as the member has a valid email address on file.
Note: This feature must be turned on for each Area the user would like the Print Preview displayed. To turn on this feature:
1) Navigate Navigate to System across the top toolbar and select Areas.
...
2) Select the applicable Area.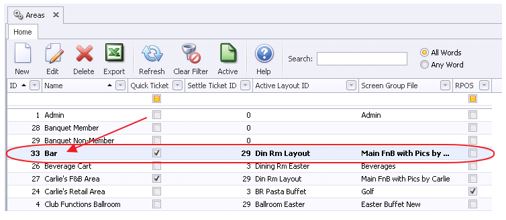
...
3) Navigate Navigate to the POS Options tab and select Show Print Preview on Pay/Settle in POS to get the Pay/Settle ticket preview, and Show Print Preview on Send in POS to get the Send ticket preview.

Print Preview
...
Examples
In this section we will provide a few examples of the Print Preview feature.
Print Preview - Pay Ticket
Select Print Ticket from the
Close TicketClose Ticket screen.

The Print Preview - Pay Ticket prompt will display. Please see below for available options:
a) Email - Emails a copy of the ticket to the member. Member must have valid email address on file to function properly.
b) Print & Email - Prints the ticket and emails the member a copy of the ticket.
c) Print - Prints the ticket.

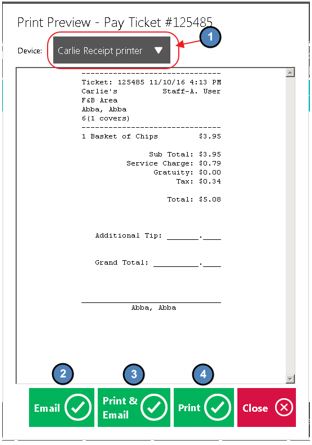
Again, the Print Preview will display exactly what device the Pay Ticket will print - to and, exactly how it will look when printed.
For Pay and Settle tickets the Device drop down will display only one printer. The printer displayed will depend on the
Receipt PrinterReceipt Printer configuration of the specific POS Device the ticket is printed from (Please see our manual for more information).
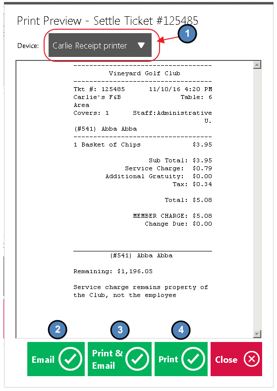
Print Preview - Settle Ticket
1) Select OK or Print & Done when settling a ticket. The Print Preview- Settle Ticket prompt will display> same options as Print Preview- Pay Ticket are available.
...
2) The The Print Preview - Settle Ticket prompt will display. Same options as Print Preview Print Preview - Pay Ticket are available.
Returning an Item
To return an Item,
1 1) Open a ticket for the member that is returning the item.
2) As As explained in the previous section, you will click the History button in the Member Info area of the open ticket to access the Member’s purchase history.
...
3) A A screen with the Member’s Purchase History will display. Search and select the Item being returned. In the example below, the customer is returning a TM Golf Hat purchased on 10/27/2016. Click OK.
...
4) The system will generate a new ticket with the credit for the returned item and the user will close out the ticket as normal. The Close Out screen will display a Change amount instead of a Balance Due.
...
5) Issuing the refund can be done several ways depending on how the customer would like to be reimbursed.
Cash Refund – To issue a cash refund, the user would simply select the Cash settlement button and hit OK/ Print and Done.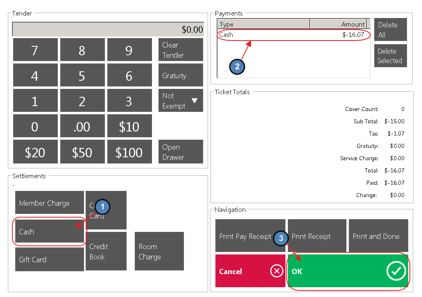
...
Credit the Member’s Account – To issue a credit to the member’s account, the user would simply select the Member Charge settlement button and hit OK/Print and Done. In the image below you’ll see that a credit in the amount of the returned item is issued to the Member’s account.
...
Credit Book – To issue store credit to the customer, the user would simply select the Credit Book settlement button and hit OK / Print and Done. In the image below you will see where credit book was issued to the customer in the amount of the returned Item. The customer may apply this credit towards future purchases.

Rain
...
Checks
To utilize the rain check feature you must first create two Items; an Item to Issue a rain check and an Item to Redeem a rain check. These items are set up like any other Item in the Manage Items section of the Items Module. (See the Clubessential Items Manual for instructions on how to create an item) Then, you must select these items in the Rain Check Settings of System Settings and enter a default expiration day count.
1) To access the Rain Check SettingsCheck Settings, navigate to System across the top toolbar and select System Settings System Settings.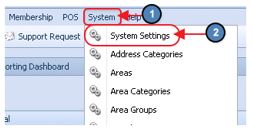
...
2) Select Select Point of Sale on the left pane and apply the Issue and Redeem Item under Rain Check Settings Redeem Item under Rain Check Settings. Also enter a default expiration value in days in the Expiration Day Count Expiration Day Count field.
...
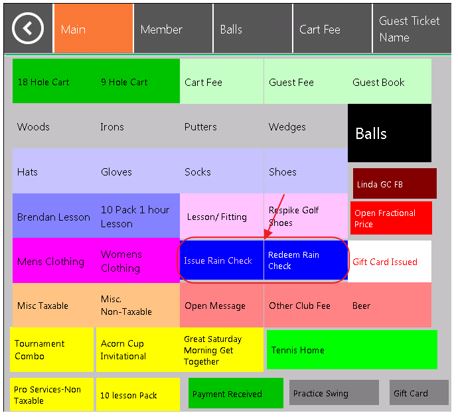
3) Most Most clients place buttons on their POS home screen for the two rain check items. This is optional as you can use the 17825797 Office - POS Retail Manual#Lookup Item Feature to look them up when necessary.
Issuing a Rain Check
To To issue a Rain Check,
1) Open a ticket for the customer as you would normally, select the Issue Rain Check button (or look up the Issue Rain Check item using the 17825797 Office - POS Retail Manual#Lookup Item feature), the I ssue Issue Rain Check Window will display as shown in the image below.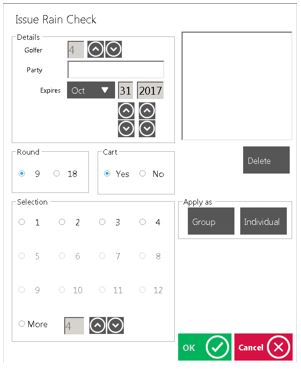
...
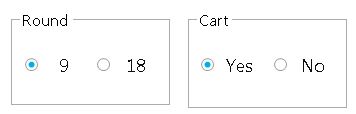
2) Fill Fill out the details of the Rain Check Form.
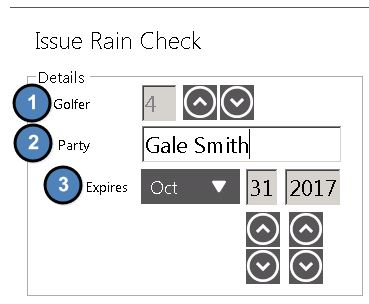
a a) The Golfer Count will default to 4 but you will use the Up and Down arrows to select the number of Golfers.
b b) Enter the Party Name.
c) Enter the Expiration date – The expiration date will default to the date as you determined in System Settings as the default number of days to expire. The expiration date may be overridden by simply using the Up and Down buttons to change the date.
...
3) Select whether the Rain Check is for 9 or 18 Holes18 Holes and if a Cart was used or not.
4) Select Select the number of Golfers the Rain Check is being issued for. (Notice that the system only allows a maximum selection of 4 because the Golfer Count in Step 2 is 4).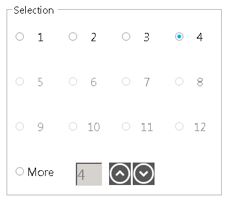
...
5) Select Select to apply the Rain Check as a Group or as Individual Rain Checks.
a) If If Group is selected - The display window will appear as shown below. The user will have one, 9 Hole Rain Check for 4 players.
...
b) If If Individual is selected – the display window will appear as shown below. The user will have four, 9 Hole Rain Checks for 1 player.
...
6) Once Once the rain check details form is filled out, click OK.
7) A A $0 rain check item will display on the ticket and the user will close the ticket as normal.

Redeeming a Rain Check
To redeem a Rain Check,
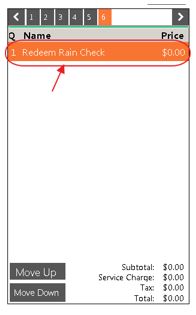
1 1) The The user will open a ticket for the customer as usual, click the Redeem Rain Check button (or look up the Redeem Rain Check Item using the 17825797 Office - POS Retail Manual#Lookup Item feature). The Redeem Rain Check window will open and any rain checks that have been issued will display as shown below. Select the Rain Check being redeemed and then click OK.
...
2) A A $0 redeemed Rain Check Item will display on the ticket and the user will close the ticket as normal.
Credit Book/Gift Cards
Credit Book and Gift Cards are explained in separate documents. Please see our Credit Book manual for more information on Credit Book, and please see our Gift Cards manual for more information on Gift Cards.
Bulk Entry
Bulk Entry is used to quickly charge the same Items to more than one member. For example, a tournament entry fee, lessons, or clinics.
Creating a Bulk
...
Entry
To create a Bulk Entry Ticket,
1 1) Select New Transaction to open a new ticket as normal.
...
2) In In the Member Lookup screen, rather than selecting a single member, you will select the ‘Bulk Entry’ button (located in bottom right corner). Selecting this button will allow you to select multiple members. As you click on members they will list in a window in the top right. Once you have selected all members to be charged, click OK. 
...
3) On On the open ticket screen, notice that the ticket opens under the last member selected in the Member Lookup screen. Select the Item(s) to be charged to each of the selected members. Then, you have two options to close the tickets.
...
a) Quick Charge - This This option will quickly charge the accounts of the selected members for the items ordered all at once.
b) Create Tickets - If you would like to open the tickets so that you may add additional items separately and close each ticket out individually, you will click Create Tickets. A ticket for each member selected will appear in the open tickets screen. Click to access the individual tickets and close each ticket as you wish.

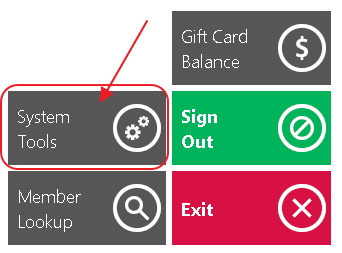
System Tools
Please see our POS System POS System Tools manual for in-depth information regarding functionality contained within the System Tools button and button and associated tabs.
Employee Time Keeping Actions
Clocking-Out vs Ending a Shift
Clocking Clocking- Out and Ending a Shift have a few differences in the Office system. Clocking- Out simply stops the system from recording time on the employee’s timesheet. When an employee ends their shift, the system is prompted to stop recording sales under the employee, until the employee clocks back in. It is important to remember that an employee cannot end their shift without clocking out as well. When an employee clocks back in for the first time after their last End of Shift, this is when the employee’s next “Shift” begins. During this time, employees have the ability to Clock-out without ending their shift at any time. This is mostly used to allow employees to clock-out for breaks, lunches, etc. without ending their shift. This keeps reporting and timekeeping clean as the End of Shift Report will display all sales and transactions completed during the employee’s “Shift” regardless of how many times they clocked out during their shift. Furthermore, an employee’s timesheet will reflect all instances of when an employee clocked in and out during their shift.
Clocking-Out for Breaks
As As previously mentioned, employees have the ability to clock-out for breaks without ending their shift. However, before an employee can clock-out the Tickets screen must be blank reflecting that the employee has no open tickets.

Employees have 2 options when clocking out for breaks.
1) Select Select Clock Out on the main POS screen.
...
The system will prompt, Would you like to end your shift? Select No.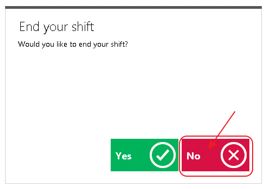
...
2) Select Select Options on the main POS screen.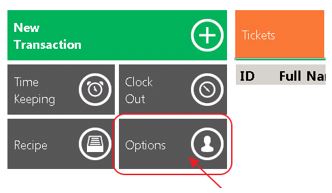
...
Select Clock Out and hit Done.

Notes:
Again, either of these options will clock the user out but NOT end their shift. Meaning that the employee can clock back in and continue working on the same shift.
When clocking back in after a break it is important to remember to clock-in under the SAME Job Code that started the Shift. For instance, if I began my shift under the Food & Beverage Management Job Code and I clocked out for lunch, when I clock back in I need to select the Food & Beverage Job Code again for timekeeping to report properly.
End of Shift Processes
Before an employee ends their shift, the Tickets screen must be blank reflecting that the employee has no open tickets. Close all tickets before proceeding.
End of Shift
...
Report
Once the Tickets display is blank reflecting no open tickets, an End of Shift Report can be printed. This report can be printed as many times as the user wants at any time. In addition, the system also keeps an archive of past End of Shift reports for the user to access and print at any time.
To print an End of Shift Report,
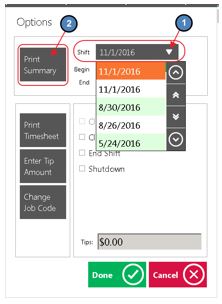
1) Select Options on the main POS screen.

2) Verify Verify that the most current Shift is reflected (The system will default to the latest Shift) and select Print Summary Print Summary.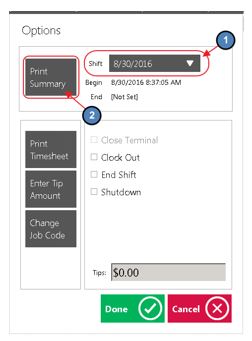
...
3) A A Print Preview will display showing how the report will look when printed, and the Ticket Device the report will print too. Select Print to continue printing.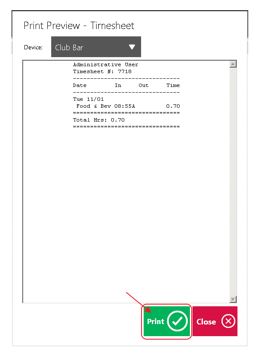
...
4) As As previously mentioned, the system keeps an archive of past End of Shift reports for the user to access and print at any time. To print a past End of Shift Report simply select the appropriate shift in the Shift drop down and select Print Summary.
Ending the
...
Shift
Different operations have different end of shift expectations before an employee can leave; follow the policies and procedures as advised by the club. The Office System requires all tickets to be closed and an End Shift completed. This is the preferred method to ending a shift. Again, please note that an employee cannot end their shift without clocking-out as well.
To end a shift,
1 1) Select Options on the main POS screen.
...
2) Select Select the End Shift box (Clock OutClock Out will automatically select itself when End Shift End Shift is selected). Select Done.
...
Options
...
1) Print Timesheet - when selected, the system will provide a report on total hours worked during the shift per Job Code. A Print Preview will also display when this option is selected. Select Print to continue printing the report.
...
2) Enter Tip Amount - if you report cash tips for tax purposes, select this option and a prompt will display for the user to enter their cash tips. Click OK when finished.
...
The tip amount will then display on the main Options screen.
...
3) Change Job Code - if you mistakenly logged into the wrong Job Code, select this option and a prompt will display asking the user to select the correct Job Code.
...
4) Clock Out - explained in the Clocking-Out for Breaks section of this document.
5) End Shift - this is this is the last step needed before the shift is considered ended. As previously mentioned, Clock Out Clock Out will automatically select itself when End Shift End Shift is selected.
Other Ways to End a Shift
1) Select Clock-Out on the main POS screen.

2) The The system will prompt, Would you like to end your shift? Select Yes.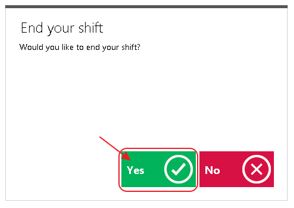
...
3) End of Shift Options will populate.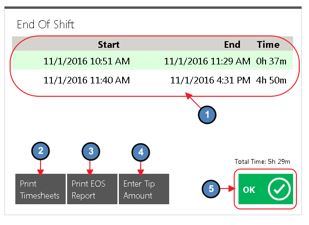
...
a) All All instances of clocking in and out during the shift will display.
b) Print Timesheets
c) Print End of Shift Report
d) Enter Tip Amount
4) Select OK when finished.
Best Practices
When setting up areas, ensure the settings in the system, align with the best possible operational flow of your respective Retail area. If settings are not necessary/used, ensure they are disabled to prevent staff from clicking unnecessary buttons.
Use settings to provide opportunities for your staff to enhance the Member experience. Settings such as Member Info, Member Preferences, and Member History can increase your staff’s ability to provide a better level of service to your Members.
FAQs
Q: When When settings are changed in the POS, do users need to exit out, and log back into the POS for the changes to take effect?
A: Yes Yes, once changes are made, ensure users exit, and log in to a new POS session to ensure change(s) in settings take effect.