| Table of Contents | ||||||||||
|---|---|---|---|---|---|---|---|---|---|---|
|
Overview
POS Workstation Devices are what the user selects when logging into the POS.
POS Workstation Devices have three layers to their setup. The first layer is the Area, followed by the Terminal, and lastly, the Workstation Device. Each specific layer of this hierarchy carries with it specific rules and features that will be used at the POS. For example, the Screen Group (menu) that is visible at the POS, is applied at the Area level. The Area is then tied to a Terminal, which has other POS options. Lastly, the Terminal is tied to a Workstation Device. When logging into the Workstation Device at the POS, the user will have access to all aspects of the Terminal that is linked to the Workstation Device, and ultimately the Area that is linked to the Terminal. Any changes to the bottom layers of this hierarchy, such as changing the Area that is attached to a Terminal, will also change the default setting of the Workstation Device. This is primarily because the Terminal is linked to the Workstation Device, and thus any changes to the Terminal or Area will in due course affect the Workstation Device. In this document, we will demonstrate how to properly set up and link together a Terminal and Workstation Device. For information on Areas, please see our Areas document. Use Case Due to the significant volume of transactions occurring in the Club’s newly expanded Dining Room, Management decided to add another Workstation Device to ensure Dining Servers had adequate opportunities to enter orders and ring out tickets. The Workstation Device was linked to the existing Terminal connected to the Dining Room Area, however, had a separate receipt printer attached to it for ease of processing transactions An Area is used to define settings pertaining to a designated location of the Club where transactions will occur. Although Areas are set up during Implementation, occasionally, an area will need to be modified to coincide with operational changes. In this document, we will discuss the various settings to be maintained in an F&B Area. Use Case The main Dining Room at a Club has a new Manager, and slight changes to the original configuration of the Dining Room area will need to be configured. The Dining Room will be moving to a Buffet-only option on the weekends, and therefore will need to adjust the Scheduled Overrides. Additionally, they will be tweaking a few other options, including allowing the Servers to view the Tee Sheet in the Dining Room, and requiring Servers to now enter Comp reasons when comping an item within the area. |

Content
|
|---|
...
...
Terminals are used to apply certain POS related rules to specified workstation(s).
Accessing the Tool
To access
...
Areas,
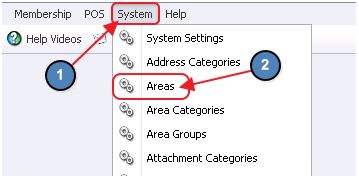
1) Navigate to System across the top toolbar and select
...
Areas.

The Terminals
2) The Areas Grid will launch.


3) The primary functions associated with managing
...
Areas are embedded in the
...
Area setup screen, which can be accessed by
...
double-clicking on an existing
...
Area.
Creating a New Terminal
To create a new Terminal, navigate to the Terminals Grid and perform either of the following to launch the Terminal Type setup screen:
a) Click the New icon on the toolbar.

b) Right-click anywhere on the Member Types Grid and select New.

The Terminals setup screen will launch.

General Information
ID - give the terminal a name that describes which POS workstation or Area it will connect to.
Description - additional description is optional for internal view only.
Default Area - Select the Area that the workstation will default to (keep in mind the Area also determines the default screen group and table layout).
POS Options
Timeout - if idle how long before the terminal signs the server out.
POS Grid Font Size - how wide the member grid lines should be (18 & 19 is the default for touch screens).
Allow Clock In/Out - if using Timekeeping this must be checked.
Clock In Fingerprint Only - only check this field if using a fingerprint device for clock in/out or accessing tickets.
Clock Out Fingerprint Only - only check this field if using a fingerprint device for clock in/out or accessing tickets.
Clock out confirmation - if using timekeeping it is recommended that this field be checked.
Display Open Drawer Button At Start - if checked, a button in the main POS screen will activate allowing the cash drawer to be opened without having to settle a ticket.
Enable Kiosk Mode - Only used when Kiosk Mode is utilized. Please see our Kiosk Mode manual for additional details.
Exit to Listener On Send - if checked, the workstation will exit back to Employee login screen after Send is selected in the POS. This is typically used when more than one server will be using the same Workstation.
Stay on Screen After Send - if checked, the user will stay in the POS screen after send. This setting is mostly used for bar terminals where only one server works the area/terminal.
Suppress Quick Cash Print - if checked, the system will not print a member receipt with Quick Cash Settlements.
Suppress Quick Charge Print - if checked, the system will not print a member receipt with Quick Charge Settlements.
Suppress Member Charge All - if checked, the Member Charge All feature will be removed at the POS.

Lastly, click Save & Close to complete the setup of the new Terminal.

Workstation Devices
...
Accessing the Tool
To create a new Workstation Device, navigate to POS across the top toolbar and select Devices.

The POS Devices Grid will launch.

The primary functions associated with managing Devices are embedded in the Device setup screen, which can be accessed by clicking the New button, or double-clicking on an existing Device.

Creating a New Workstation Device
To create a new Workstation Device, perform either of the following to launch the POS Device setup screen:
a) Click the New icon on the toolbar.

b) Right-click anywhere on the POS Devices Grid and select New.

The POS Device setup screen will launch.

General Information
- Name - enter a Name for the new Workstation Device. Again, this will be the name that appears in the Select Device drop down at the POS.

2. Description - provide a Description of the new Workstation Device (Optional).
3. Device Type- select Terminal from the Device Type Lookup. This will populate additional Terminal options.
Terminal Information
4. Terminal - select the new Terminal that was previously created.
Note: Remember, the Area that is attached to the Terminal selected here will be the Area the Workstation Device defaults to when selected at the POS.
5. Ticket Device - select the Ticket Device (Receipt Printer) that should be used for this Workstation.
Important:
*Please keep in mind that Workstation Devices are concurrent, meaning that regardless of where the user is at the club, if they are logged into a specific Workstation Device, any transactions completed within that Workstation Device will print to the receipt printer that is attached to that Workstation Device. For example, if the user is in the Fitness Center at the club, but they are logged into the Bar Workstation Device, any transaction that is completed will print to the Receipt Printer that is attached to the Bar Workstation Device. This is a great feature when using tablets to ring in POS tickets.
**The concurrent ticket printing feature does NOT apply to Send Tickets (Tickets sent to the Kitchen). Send Tickets are configured at the Item Category Level. Please see our Clubessential Items manual for more information on Item Categories.

Lastly, click Save & Close to complete the setup of the new Terminal.

POS Implications and Helpful Hints
As mentioned, once a Workstation Device is created, it will appear in the Select Device drop down at the POS.
When this Workstation Device is selected, the employee will experience, and have access to all Terminal and Area setting that are attached to the Workstation Device. For instance, being that the Workstation Device we created called POS- 1 Bar is linked to the POS- 1 Bar Terminal and the Area, Bar is linked to the POS 1- Bar Terminal, the Bar Area will show by default when an employee logs into the POS-1 Bar Workstation Device.

Don’t Ask Me Again
If a particular computer will only login to one Workstation Device at all times, the user can select the Device they would like to login into and choose Do Not Ask Me Again.

Now, when the POS application is launched on that particular computer, by default the user will automatically login to the Workstation Device that was selected after Do Not Ask Me Again was chosen.
Notes:
1) If the computer needs to log into several different Workstation Devices, do not select Don’t Ask Me Again.
2) If the user is not prompted to select a Device or accidentally checked the "Don't Ask Me Again" box, please follow the below instructions to get the Select Device drop down back:
Sign into the POS
Select System Tools on the bottom left hand corner of the screen.

Select Utilities, check Always Prompt for Terminal, and select Save Configuration.

The Select Device drop-down will now be visible when the POS application is launched.
Best Practices
When naming Workstation Devices, apply standards in naming conventions to ensure location of stations are clear, especially in areas that have more than one Workstation Device.
...
F&B Areas- Tab Overview
In this section we will review the various tabs within an F&B Area.
Area Setup
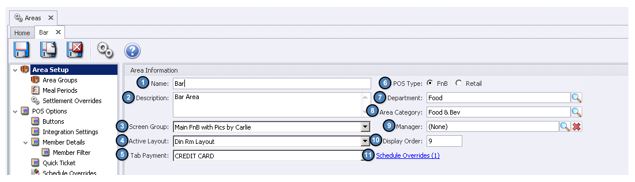
Name - Enter the Name of the Area.
Description - Enter an optional Description of the Area.
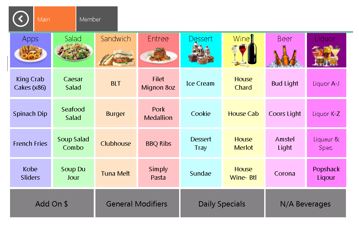
Screen Group - Select the Screen Group/ Menu to be displayed at POS for the Area.
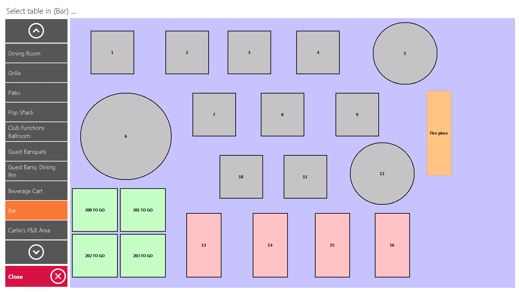
Active Layout - Select the Area Layout to be displayed at the POS for the Area (Select a Table Phase).
Tab Payment - Set this field to the F&B Credit Card Charge Settlement Type. This allows the user to hold a guest’s credit card information on the Tab key in POS.
POS Type - For F&B Areas set this field to FnB.
Department - Select the Department to be associate with this Area (Required).
Area Category - Select the Area Category to be associated with this Area (Required).
Manager - Select the Manager of this Area using the lookup (Optional).
Display Order - Select the Display Order this Area should appear in the Select a Table phase at POS.
Note: For the Display Order to work correctly, each F&B Area must have a sequential Display Order. Otherwise, the Display Order will be alphabetized.
Schedule Overrides - This allows the user to override the Screen Group (Menu) that shows in the POS, during a certain time frame for this Area.
For instance, assume the club has a breakfast buffet on Sunday from 8:00am- 12:00pm and they only want the Buffet Screen Group to show during this time frame.
1 & 2 ) Enter the Start and End Time of the Schedule Override.3) Select the Screen Group to show during this time frame.4) Select Save.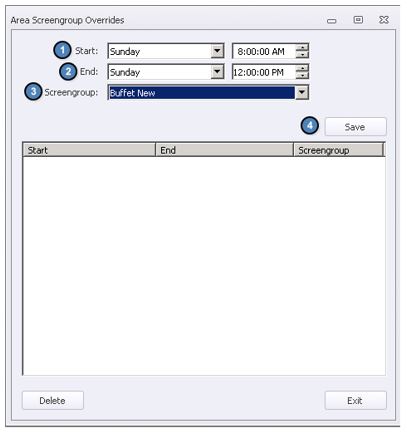
FAQs
Q: I no longer have an option to select my device when I log-in. How can I re-enable this option?
...