...
In this section we will review the various tabs within a Billing Schedule.
General Information

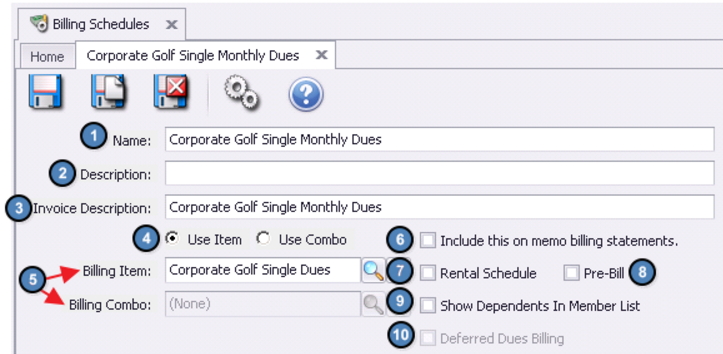
1) Name - Enter the Name of the new Billing Schedule.
...
9) Show Dependents in Member List - If checked, Dependent members will show in the Member Lookup found on the Member’s tab of the Billing Schedule.
10) Deferred Dues Billing - Please see the Deferred Dues Billing section of this guide for more information on creating a deferred billing schedule.
Important: Any Billing Schedule applied to a Dependent Member will also show on the Primary Member’s account.
Schedule
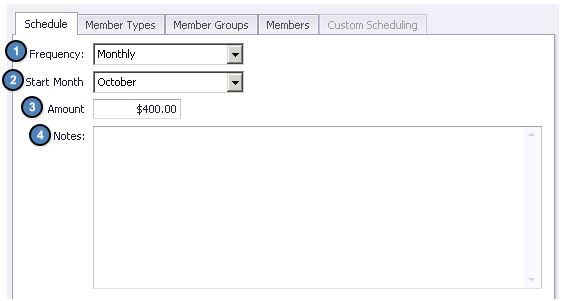
1) Frequency - Select the frequency of the Billing Schedule (Monthly, Quarterly, Semi- Annual, Yearly, or Custom).
2) Start Month - Select the month the Billing will start.
3) Amount - Enter the Amount to be billed.
4) Notes - Add any additional Notes to the Billing Schedule.
...
3) The Minimum setup screen will launch.


4) Complete the General Information, and then navigate to each of the below tabs and enter all relevant information. It is recommended to enter information on these tabs in sequential order.
...

Deferred Dues Billing
In this section, we will discuss how to create a Billing Schedule in which revenue needs to be deferred over a future period.
For instance, a $12,000 Annual Dues billing billed in January 2018 can be recognized January - December 2018. Essentially, once Month End is run in January, AR would be debited the full amount of the billing ($12,000), the specified Deferred Dues Liability Account would be credited $11,000, and Dues Income would be credited $1,000 for the first period of the deferment. The system will then automatically generate Journal Entry Batches moving funds from the Deferred Dues Liability Account to Dues Income for each remaining deferment period.
Important:
Please note that only Billing Schedules configured with a Yearly, Semi-Annual, or Quarterly billing frequency can be setup as a deferred schedule.
Creating a Deferred Dues Billing
Please follow the same steps as explained above when creating a new Billing Schedule. However, once the Frequency of the Billing Schedule is set to Yearly, Semi-Annual, or Quarterly the Deferred Dues Billing check box will populate. Check this box to indicate the schedule will act as a deferred billing. Please also be sure to select the appropriate Start Month of the schedule.

Once the Deferred Dues Billing checkbox is selected, an additional tab will appear called Deferred. Please navigate to this tab and select the applicable Deferred Dues (Liability) GL Account.

Note: Remember to use the Pre-Bill option if the Deferred Billing occurs the month prior to the month the revenue may be recognized (ie - December 2017 Billing for January - December 2018 dues).
Month End
As previously mentioned, once the applicable Month End is run, AR will be debited the full amount of the Billing, the Deferred Dues Liability Account will be credited 11/12 of the full amount of the Billing (if Annual schedule), and Dues Income will be credited 1/12 of the full amount of the Billing.


(When using Pre-Bill, full amount will go to A/R and Liability Account in month 1, and then, will be recognized appropriately in the following months).
Journal Entry Batches
As previously explained, once the Month End Batch has been posted, the system will then automatically generate Journal Entry Batches moving funds from the Deferred Dues Liability Account to Dues Income for each remaining deferment period.
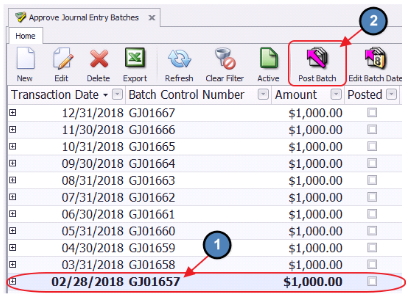
To access these Journal Entry Batches, please navigate to General Ledger on the left user menu and select Approve Journal Entry Batches.

The Approve Journal Entry Batches Grid will launch. Each Journal Entry Batch created when the Month End Batch was posted will appear.

Click to select the next applicable Batch based on the deferment period and click, Post Batch.
A Batch Preview will populate. As you will see, funds are debited out of the Deferred Dues Liability Account and credited to Dues Income. Select Post Batch.

Users have the option to Post all Journal Entry Batches now or during the applicable deferment period. If the user elects to Post all Batches now, please note that the GL will not be impacted until the Transaction Date/ deferment period of the Batches.
Billing Summary in Member Profile
...