...
The Office System has the ability to Track as well as Report on Employee Hours worked throughout the Club. In this manual, we will review various aspects of the Office Timekeeping System including Clocking In, Clocking Out, and End of Shift Processes. Use Case(s) A new Employee will be Clocking In for the first time. Please Note: Job Codes must be assigned to any Employee who will be clocking in/out at the POS. It is the responsibility of Club Administrators/Managers to assign these Job Codes appropriately to their Employees. For more information on Job Codes, please review our Job Codes Manual. |
Content
|
|---|
...
Employees have the ability to clock-out for breaks without ending their shift. However, before an employee can clock out the Tickets screen must be blank, reflecting that the employee has no open tickets.

Employees have 2 options when clocking out for break.
...
a. The system will prompt, Would you like to end your shift? Select No.

2) Select Options on the main POS screen.
a. Select Clock Out and hit Done.
...


Notes:
The above options will clock the user out but NOT end their shift - meaning, the employee can clock back in and continue working on the same shift.
- When clocking back in after a break, it is important to remember to clock-in under the SAME Job Code that started the Shift.
- For example, if I began my shift under the Food & Beverage Management Job Code and I clocked out for lunch, when I clock back in I need to select the Food & Beverage Job Code again for timekeeping to report properly.

Save and Close Reminder!
When finished editing any of the tabs, it is imperative to do a final Save and Close on the Member’s Profile to ensure all changes saved on the tabs, are saved to the overall Profile.
Most Commonly Used Actions - Employee Mgmt
Create Employee for an Existing Position
If a New Employee will perform the same/similar functions as an already existing employee, best practice (and quickest/easiest way to set up employee) is to copy the existing employee’s setup.
To copy an existing employee,
1) Click on Employees to load the Manage Employees Grid. (Or, if accessing from another Employee area, click Manage Employees from the Employee options).
2) Double-click on the Employee to copy from, to load their Employee Profile.
3) Once loaded, select the Save and New icon.
4) Select the relevant fields to copy, and then click OK.
Applicable Fields include:
...
Groups
...
Security
...
Areas
...
Departments
...
The Employee Setup screen will launch.
5) Next, verify that all copied information was transferred successfully on the (5) tabs highlighted below. Return to the System tab when completed.
6) Complete set up, by entering relevant information on the additional tabs highlighted below, as outlined in the Employee Profile - Tab Overview section of this document.
Reminder: Required fields are highlighted with a white exclamation mark inside a red/orange circle.
7) When finished, click Save and Close on the Employee Profile to establish new employee in the system.
Create Employee for a New Position
If an employee is hired for a completely new position, best practice is to first create a new Employee Group for the position. (Please see the Employee Groups Manual for more information on setup.)
Once the new Employee Group is created, please follow the below instructions to create a new employee.
1) Click on Employees to load the Manage Employees Grid. (Or, if accessing from another Employee area, click Manage Employees from the Employee options).
2) Then, perform either of the following to launch the Employee setup screen.
a) Click the New icon on the toolbar.
b) Or, right-click anywhere on the Manage Employees Grid and select New.
The Employee Profile (setup screen) will launch, and will open on the System tab.
3) Complete all necessary information on the System tab. (For more information on how to complete this tab, refer to the System section of this document.)
Reminder: Required fields are highlighted with a white exclamation mark inside a red/orange circle.
4) Next, complete set up, by entering relevant information on the additional tabs highlighted below, as outlined in the Employee Profile - Tab Overview section of this document.
It is recommended that these tabs be entered in sequential order.
Note 1: On the Groups tab, remember to select the newly created Employee Group. This will populate all Security, Area, and Departmental rights.
Note 2: On the Security - > Area, and Departments tabs, verify that all rights were successfully transferred from the Employee Group. Rights inherited from an Employee Group, will be highlighted in blue.
5) When finished, click Save and Close on the Employee Profile to establish new employee in the system.
Troubleshooting Area and Departmental Rights
In previous versions of the Office software, it was difficult to troubleshoot the necessary rights needed to see specific records of a particular module. For instance, if an employee was unable to see a certain GL account, in previous versions, the user would first have to find an employee with rights to the GL account, determine what department(s) the GL account was linked to, and then proceed to find an Administrator who could add the necessary departmental rights.
In versions 5.9 and above, an enhancement has been added to help simplify this process. Specifically, employees can now select the Active button on a specific module’s Grid to pull up All Records. Any instance of the module an employee does not have rights too, will have a grayed-out italicized font.
Troubleshooting G/L Account Access (Department Related Permissions)
Within General Ledger, Accounts, click the Active button to view all records.
Double-click on grayed-out record to determine permission levels needed to access. Click OK to proceed.
Troubleshooting Item Access (Area Related Permissions)
Within Items, Manage Items, click the Active button to view all records.
Double-click on grayed-out record to determine permission levels needed to access. Click OK to proceed.
As noted above, the Employee can double-click any record, to receive a prompt telling them what rights they will need to see that specific record.
Terminating an Employee
When an Employee is no longer employed by the Club, ensure the Employee’s status is updated, and ensure the Employee can no longer access the system.
1) Launch the Employee’s Profile by clicking on Employees, and double-clicking on the Employee.
2) Navigate to the Personal tab, then:
a) Set Employment Status to Terminated.
b) Set Release Date to the date of termination.
3) When finished, click Save and Close to save the settings to the Employee Profile.
4) Next, navigate to Employees, Manage Employees grid. Right-click on the employee, and then click Delete. This is a best practice to keep the Employee Grid clean and up to date with current employment. (Note: Deleted records can still be viewed by clicking the Active button above the grid).
5) Confirm deletion by clicking Yes.
6) Click OK to acknowledge deletion success, and then click Close to return to grid.
Reporting Implications
Many of the canned Item Sales Reports will have a flag to Include Deleted Employees within the report (this flag is checked by default). Verify this parameter is checked to prevent skewed reporting.
Rehiring a Former Employee
In cases where a terminated employee returns to the club, the employee’s deleted profile can be reactivated, or undeleted.
To reactivate an employee:
1) Navigate to the Manage Employees Grid.
2) Select the Active button to pull up All Records.
3) Deleted records will be highlighted in red. Right-click on the deleted record, and then choose Undelete.
4) Confirm undeletion by clicking Yes.
5) Click OK to acknowledge undeletion success, and then click Close to return to grid.
6) Double-click on the newly Activated employee to launch the Employee’s Profile.
7) Next, navigate to the Personal tab, and:
a) Set Employee Status to New Hire, Re-hire, or other appropriate status.
b) Highlight the Release Date and select delete on your keyboard to ensure Release Date is blank.
8) Make any other changes to the Employee Profile as required (new address, new employee group, etc). When finished, click Save and Close to save the settings to the Employee Profile.
...
End of Shift Processes
Before an employee Ends their Shift, the Tickets screen must be blank, reflecting that the employee has no open tickets. An employee must close all tickets before Ending the Shift.

End of Shift Report
Once the Tickets display is blank, reflecting no open tickets, an End of Shift Report can be printed. This report is usually run before the Shift is ended, and will display all sales and transactions completed during the employee’s “Shift” regardless of how many times they clocked in and out during their shift. This report can be printed as many times as the user wants, at any time. In addition, the system also keeps an archive of past End of Shift Reports for the user to access and print at any time.
To print an End of Shift Report:
1) Select Options on the main POS screen.

2) Verify that the most current Shift is reflected (The system will default to the latest Shift) and select Print Summary.

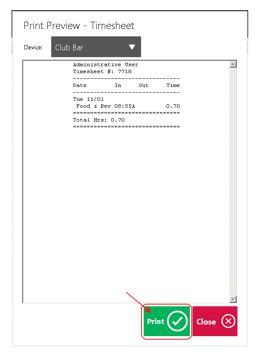
3) A Print Preview will display showing how the report will look when printed, and the Ticket Device the report will print to. Select Print to continue printing.

4) As previously mentioned, the system keeps an archive of past End of Shift Reports for the user to access and print at any time. To print a past End of Shift Report simply select the appropriate shift in the Shift drop down and select Print Summary.

Ending the Shift
The Office System requires all tickets to be closed and an End Shift completed. This is the preferred method to ending a shift. Different operations have different end of shift expectations before an employee can leave; follow the policies and procedures as advised by the Club.
Please Note: An employee cannot end their shift without clocking out as well.
To End a Shift:
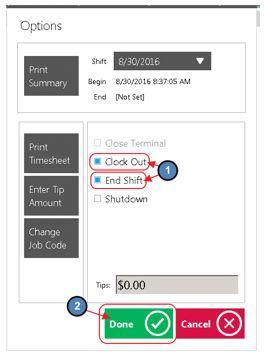
1) Select Options on the main POS screen.

2) Review Options below, and perform when necessary. Once Options have been reviewed/performed (as needed), proceed to step 3 to End Shift.

Print Timesheet
When selected, the system will provide a report on total hours worked during the shift per Job Code. A Print Preview will also display when this option is selected. Select Print to continue printing the report.
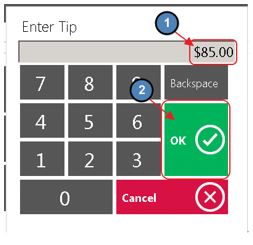
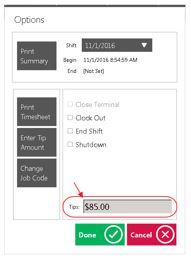
Enter Tip Amounts
If you report cash tips for tax purposes, select this option and a prompt will display for the user to enter their cash tips. Click OK when finished. The tip amount will then display on the main Options screen.
Change Job Code
If you mistakenly logged into the wrong Job Code, select this option and a prompt will display asking the user to select the correct Job Code.

3) To End Shift, select the End Shift box. (Clock Out will automatically be selected). Then, choose Done. This officially ends the user’s Shift.
Best Practices
Assign security by Employee Groups rather than at the individual Employee level.
...