| Table of Contents | ||||||||
|---|---|---|---|---|---|---|---|---|
|
...
The Office System has the ability to Track as well as Report on Employee Hours worked throughout the Club. In this manual, we will review various aspects of the Office Timekeeping System including Clocking In, Clocking Out, and End of Shift Processes. Use Case(s) A new Employee will be Clocking In for the first time. Please Note: Job Codes must be assigned to any Employee who will be clocking in/out at the POS. It is the responsibility of Club Administrators/Managers to assign these Job Codes appropriately to their Employees. For more information on Job Codes, please review our Job Codes Manual. |
Content
|
|---|
Clocking In
To Clock In:
- Click on the POS Icon.

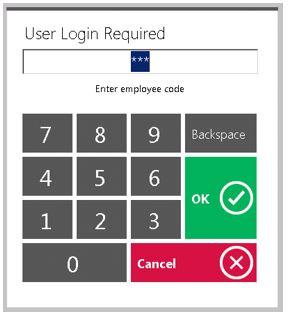
- A Clubessential logo will display (moving around the screen), click anywhere on the screen to access the user login prompt. Enter your Employee Swipe ID (this is assigned within the Employee’s Profile). Please review our Manage Employees Manual for more information.
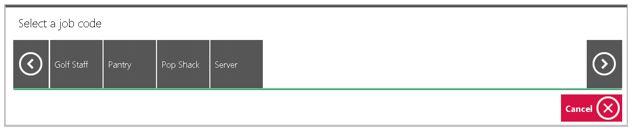
- An additional screen will display prompting the user to select the applicable Job Code.
Please Note: If the user only has only one Job Code assigned to their Employee Profile, the system will display: You have successfully logged in.
Clocking Out
Clocking Out and Ending a Shift are different features in the Office system.
An employee must Clock In at the beginning of their shift. Any breaks, lunches, etc., are to be recorded by Clocking Out (NOT ending the shift). To complete the shift worked, the employee must Clock Out AND End the Shift, after all tickets have been closed. Ending a Shift is covered in the last section of this document.
Please Note: An employee’s timesheet will reflect all instances of when an employee clocked in and out during their shift.
Clocking Out for Breaks
Employees have the ability to clock-out for breaks without ending their shift. However, before an employee can clock out the Tickets screen must be blank, reflecting that the employee has no open tickets.
Areas
The Areas Tab contains which areas the Employee can access in the POS, as well as the reporting module.
Furthermore, for employees to see specific items within the Items module, they will need rights to the Areas linked to the corresponding Item Categories. This is most often used to prevent F&B employees from seeing Retail items and vice versa.
Again, it is recommended to apply areas at the Employee Group level to help quicken the employee setup process (Please see our Employee Groups Manual for more information on their setup).
Areas inherited from an Employee Group, will be highlighted in blue.
While not recommended, individual permissions may be applied if necessary by selecting the required areas. The Select All, and Deselect All buttons are available to assist with quick assignment and unassignment.
Departments
Employees must have rights to at least one department. The Departments Tab is used for security purposes. More specifically, the Departments tab can be used to hide certain aspects of the system from employees.
Please see examples below:
• Supervisors- In the Employees module, supervisors will only be able to see employees in departments to which they have been granted access.
• GL Accounts- To see certain GL accounts, employees must have rights to the department(s) flagged within the GL account.
• Vendors- To see certain vendors, employees must have rights to the department(s) flagged within the vendor profile.
• Companies- With the new multi-company capabilities, to see anything associated with a specific company, the employee will need rights to a department that is linked to that company.
• Members/ Member Types- With the new multi-company capabilities, Member Types are linked to a specific company. To see any Members or Member Types associated with a specific company, the employee must have rights to a department linked to that company.
Departments Inherited from an Employee Group, will be highlighted in blue.
While not recommended, individual permissions may be applied if necessary by selecting the required Departments. Note that the Select All, and Deselect All buttons are also available to use for quick assignment and unassignment.
Note: For timekeeping purposes, an employee must have rights to the departments linked within the areas they will be working. For instance, if a server will be working in the Dining Room area, and the Dining Room area is linked to the Food & Beverage department, the server will need to have rights to the Food & Beverage department for timekeeping to report properly. If the employee does not have the correct departmental rights, they will not show on the Employee Hours report.
System
The System tab controls login information for CMA and POS. This is the default landing screen when clicking on the Employee’s Profile.
Username- Select the hammer icon to generate a unique login. If selected, the hammer icon will produce default credentials of first initial & last name. This field is NOT case sensitive.
Password- This is the password used for CMA. A password must be assigned to every employee. If password is forgotten, a new password can be entered here by an employee with the correct security rights. This field is case sensitive.
Card Swipe ID- This is the username for POS and must be numeric unless using an encoded card (because POS only prompts with numeric keypad to login). This field does NOT need to be assigned to employees who will not be using Timekeeping or POS.
POS PIN- This is the password for POS, and not a required field unless exporting Timekeeping info to another system. This field can be the same as the Card Swipe ID – in which case the user will NOT be prompted for a password.
Payroll ID- Only applicable if client exports Timekeeping to another system. Typically First Initial & Last Name.
Training Mode- If checked, any completed POS charges will be put into a test charge batch. The system will not allow this batch to be posted to prevent skewed financials.
Account is Locked Out- If checked, the employee will not be able to login to the POS or CMA. Ensure this setting is checked for Terminated employees.
Other Information Section
The Other information section contains information that does not apply to any other area, but is relevant to the employee.
Attachments
The attachments tab allows for document attachment to an employee’s file.
To attach a new document (such as the Employee’s application), click the Attachments tab, click the New icon, browse for the document, complete the remainder of the Attachment Editor screen, and click Save and Close when complete.
Custom Fields
Click on the Custom Fields tab to populate additional data regarding the Employee.
These Club defined fields allow a Club to capture additional items such as the Employee’s Education Level, Hobbies, etc.
Notes
The Notes tab allows for additional free-form notes to be put on an Employee’s Account.
To attach a note, click on the Notes tab, click the New icon, enter a Name and Category for the note, type/format the note, and click Save and Close when complete.
...
Employees have 2 options when clocking out for break.
1) Select Clock Out on the main POS screen.
a. The system will prompt, Would you like to end your shift? Select No.
2) Select Options on the main POS screen.
a. Select Clock Out and hit Done.
End of Shift Processes
Notes:
The above options will clock the user out but NOT end their shift - meaning, the employee can clock back in and continue working on the same shift.
- When clocking back in after a break, it is important to remember to clock-in under the SAME Job Code that started the Shift.
- For example, if I began my shift under the Food & Beverage Management Job Code and I clocked out for lunch, when I clock back in I need to select the Food & Beverage Job Code again for timekeeping to report properly.
Save and Close Reminder!
When finished editing any of the tabs, it is imperative to do a final Save and Close on the Member’s Profile to ensure all changes saved on the tabs, are saved to the overall Profile.
...