| Table of Contents | ||||||||||
|---|---|---|---|---|---|---|---|---|---|---|
|
...
POS Main Button Functionality
Top Row
1) Delete Item/Void Item Office - POS F&B Manual/Office - POS F&B Manual - User can delete an item from the order providing it has not been sent to the remote printer. Button will change to Void Item once item sent to remote printer.
2) Add Message - User can add additional message or prep instruction for an Item.
3) Change Modifiers Office - POS F&B Manual - User can add, change, and delete item modifiers.
4) Change Qty Office - POS F&B Manual - User can change the QTY on an item (including making quantity negative for a credit).
5) Change Seat Office - POS F&B Manual - If using seat positions, this allows you to assign or change the seat.
6) Add Ticket Office - POS F&B Manual - Gives the ability to open another ticket without exiting the POS before completing the first ticket. You can move back and forth to all open tickets from the POS screen.
7) Delete Ticket Office - POS F&B Manual - Will delete current ticket.
8) Upcharge Item Office - POS F&B Manual - Will prompt for an amount to override and increase the price of the item.
9) Change Table Office - POS F&B Manual - Use if a member wants to move to a different Table or Area or to join tickets.
10) Charge Tab Office - POS F&B Manual - Button is used to capture Credit Card information at beginning of a transaction instead of waiting until settlement to swipe the card.
11) Save Pref Office - POS F&B Manual - System will save how the member likes his/her item prepared with modifiers.
12) Quick Cash - One step process to close the ticket to Cash.
13) Quick Charge - One step process to close the ticket to Cash.
14) Close Ticket Office - POS F&B Manual - Take users to a settlement screen with more closing options.
Bottom Row
15) Exit Office - POS F&B Manual - Will exit the POS screen back to the main screen.
16) Discount Discount Item - Gives users the ability to discount an item. Requires security rights.
17) Comp Item - Give users the ability to comp an item. Requires security rights.
18) Multi-Off Office - POS F&B Manual - Used in conjunction with Delete Item, Void Item, Discount Item, and Comp Item; when (ON) users can select multiple Items.
19) Change Course - If using coursing, user can use this to change the default course for an item.
20) Get By Bin - Used to lookup Wine bottles by Bin Number.
21) Reorder Item - Used in conjunction with Multi Select (On) to reorder items already ‘Sent’.
22) Cover Count - Used to change the cover count at any time.
23) Change Member Office - POS F&B Manual - Used if the member to be billed needs to change for any reason.
24) Coupon Lookup - This button will turn Green to alert the server if the member has a promo coupon available to redeem.
25) Print Ticket - Prints the pay receipt ticket for signature prior to closing the ticket.
26) Split Ticket - Used if more than one ticket is required on a transaction and to edit separate tickets.
27) Send - Will send order to remote printers.
...
Note: If you have more than one item to delete, follow the Multi-Select (On) instructions.
| Anchor | ||||
|---|---|---|---|---|
|
...
Note: If you have more than one item to delete follow the Multi-Select (On) instructions.
| Anchor | ||||
|---|---|---|---|---|
|
...
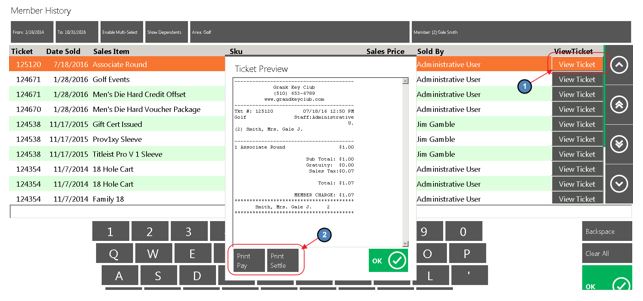
From and To Dates - enter the start and end date to narrow down the search.
Enable Multi Select more than one ticket to print.
Show Dependents - if selected, the system will display all family member tickets. If unselected, only the tickets rung under the member selected will show.
Area name will be the name of the Area you have the ticket open.
The tickets listed will be tickets that were closed in that Area only.
To see tickets closed from a different Area, select the Area button, select the applicable Area.
It is important to remember that if you do not see an Area listed, then the member has NO closed tickets in that Area.
Member Name and Number is displayed at top right corner; you can click on the name to search a different member. When you hit cancel it will take you back to the ordering screen and the original member will still be displayed.

View Ticket - ticket detail can be viewed on the right middle of the screen; highlight the item to view ticket details and select View Ticket.
Print Settle Receipt and Print Pay Receipt; you can reprint a ticket from history at any time.
...
- Select Print Ticket or Print Pay Receipt from the Close Ticket screen.
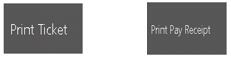
- Select Print Ticket or Print Pay Receipt from the Close Ticket screen.
- The Print Preview - Pay Ticket prompt will display. Please see below for available options:
a) Email - Emails a copy of the ticket to the member. Member must have valid email address on file to function properly.
b) Print & Email - Prints the ticket and emails the member a copy of the ticket.
c) Print - Prints the ticket.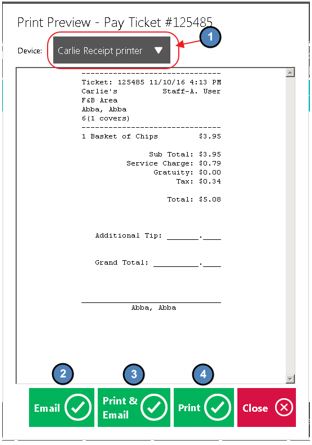
...
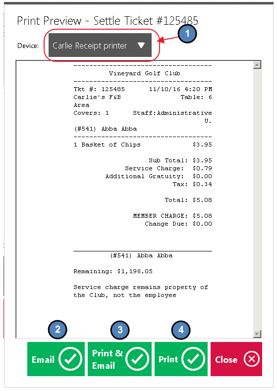
2) The Print Preview - Settle Ticket prompt will display. Same options as Print Preview - Pay Ticket are available.
System Tools
Please see our POS System Tools manual for in-depth information regarding functionality contained within the System Tools button and associated tabs.
...
4) Clock Out - explained in the Clocking-Out for Breaks section of this document.
...