| Table of Contents | ||||||||||
|---|---|---|---|---|---|---|---|---|---|---|
|
Overview
In this guide, we will discuss the proper rules and procedures to follow when settling a ticket to Credit Card and ETS is the Credit Card Processor. Use Case(s) When the Server came back to return the Member’s Credit Card to them after settling the ticket, the Member indicated they were so sorry, but had meant to use a different card, and wanted to know if it was possible to change the card that was already swiped. The Server made the change. Also, at a nearby table, a server inadvertently dumped an entire tray of food on a Member that had just paid via credit card and was leaving. The Manager refunded the Member their entire order. At the close of the shift, all Servers reviewed their ticket screens to ensure all tickets had been closed out, and all gratuities were added and/or finalized. |
Content
|
|---|
POS Order Screen - Split Ticket Feature
...

1) To perform a Ticket Split, first enter Items as usual. You can split before or after the items have been sent.
2) Then, click or touch Split Ticket to open the Split Ticket Screen.

Note: If you split the ticket before you hit Send, all Items will still print to the remote printer (kitchen, bar, etc.) on one prep ticket.
Split Ticket Screen Overview
On the Split Ticket Screen, the ticket on the far left will display the Item details (from the “Selected” ticket) such as modifiers, price, QTY, seat position, and course. It is from this area that you will be moving the items from one ticket to another.
The ticket with the black top/bottom border labeled “Selected” only shows the QTY and Item name. This helps make more room for multiple ticket display.
When more than one ticket is displayed, the ticket labeled “Selected” is the one that will have its items displayed in the far left area.
Important: You cannot do anything with the items from the “Selected” ticket other than view; all action is done from the far left area.

Split Ticket Options
Once the ticket is displayed in the split ticket screen, there are various ways a ticket may be split.
Split By Ticket
One of the simplest splits to perform is the Split by Ticket. A Split by Ticket is when you have more than one member on the table and each wants their own ticket.
1) Within the Split Ticket screen, click the Add Ticket button to create the additional ticket(s) you want for the table. (Before you can move Items you must add the ticket(s) first).

2) Once you have created your ticket(s), highlight the Item from the far left ticket display, then click/touch the ticket you would like the item(s) moved to.
Note: you can highlight more than one item at once.
3) Notice the first ticket is still the “Selected” ticket, and the far left display shows only the Items remaining on the “Selected’ ticket.

4) If you make a mistake and want to move an Item from one ticket to another ticket, first click the ticket that has the item to move; the far left now displays the new “Selected” ticket Items.

5) Once you have the appropriate ticket “Selected”, highlight the Item from the left ticket display, then click/touch the ticket to move the Item to.
Note: You can move multi items by highlighting more items before moving.

6) To change the member assigned to a ticket, click the ticket to make it the “Selected” ticket and select Change Member on the top left corner of the screen. Follow prompts to select new Member.

7) Select OK on the bottom right corner of the screen and your changes will be saved.

Split By Multiplier
Split by Multiplier provides the ability to split an Item or an entire ticket by a specified number.
Example 1 - Item: if you have 3 tickets on one table and they all want to split the bottle of Wine, you can split the Item by 3.
Example 2 - Ticket: if you have 3 members and they want to split the ticket evenly, you can split a single ticket by using the multiplier.
Split by Multiplier - By Item
1) Click Add Ticket and create the number of tickets needed for the split.
2) Touch/click the ticket that has the Item to split, to make it the “Selected” ticket. Highlight the Item you wish to split from the far left display. Click the < > arrows under Split by Multiplier to increase or decrease the multiplier. Select Split Item.

3) The Item will be split by the number you selected. In this example it was split by 3. Highlight one of the splits and touch the ticket to move the Item.
Notes:
- The Split by Item changes the QTY to fractions to calculate the Item price to meet specified amount.
- Once you click OK, the changes have been saved. Once the changes have been saved there is no way to merge the amounts and QTY back to original state. You will have to delete the ticket and start again.
Split by Multiplier - By Ticket
You do not need to Add Tickets; the system will create the number of tickets based on your multiplier.
1) Click the < > arrows under Split by Multiplier to increase or decrease the multiplier. Select Split Ticket.
Notes:
- The Split by Ticket changes the QTY to fractions to calculate the Item price to meet specified amount.
- Once you click OK the changes have been saved. Once the changes have been saved there is no way to merge the amounts and QTY back to original state. You will have to delete the ticket and start again.
- Once you click OK, all subsequent items entered on a ticket will be added to the ticket as a full amount and QTY.
Split By Dollar
Split by Dollar can be used when one party wants to pay a specified amount; in this example one party will only pay $100 out of $206.97. It is advisable to wait until you are ready to close the ticket before performing this option, see notes for more information.
1) Select Dollar under the Split section.

2) Enter the dollar amount to split. Click OK when finished.

3) The system will create a ticket for the amount specified.

Notes:
- The Split by Dollar changes the QTY to fractions to calculate the Item price to meet specified amount.
- Once you click OK the changes have been saved. Once the changes have been saved there is no way to merge the amounts and QTY back to original state. You will have to delete the ticket and start again.
- All subsequent Items entered on a ticket after the ticket has been Split by Dollar will be added to the ticket as a full amount and QTY.
Include Tax
The Include Tax feature is utilized to calculate tax into the the split.
Example - we have one Item on a ticket with a price of $8.00, including tax and service charge totals to $10.30. So let’s say two kids are splitting that Item. One of them only has $4.00, so I need his ticket to only charge him $4.00 tax included. I navigate to the Split Ticket screen, check the Include Tax box and click Dollar. I enter the amount of $4.00. Now I have two tickets – one for $4.89 and one for $3.11. When I click OK and the tickets are created, the original ticket is for $6.30 total and the new ticket is for $4.00.

Split By Seat
Split by Seat allows the user to split a ticket based on seating. This option can only be used if the user is using seat positioning.
1) Assign the seat position to each Item on the ordering screen and select Split Ticket.

2) Select Seat under the Split section. The system will create a ticket for each different seat position.

Split By Course
Split by Course allows the user to split a ticket by course. For instance, one member will be paying for the Appetizer and another member will be paying for the Entrees. Please note that this option can only be used if the user is using courses.
1) Assign the course to each Item on the ordering screen if it is not set by default. Select Split Ticket.

2) Select Course under the Split section. The system will create a ticket for each different course.

Combining Tickets
In the event a member decides to pay for another member sitting at a separate table, the Split Ticket feature can be used to combine the 2 tickets into 1. Please note that in order to combine the tickets, the two tickets will need to be moved to the same table.
1) Use the Change Table feature to move the ticket the member is paying for over to their Table.

2) Once the 2 tickets are on the same table, select Split Ticket.

3) Select the ticket that was moved to make it the “Selected” ticket. Highlight the Items from the far left ticket display then click/touch the ticket to move the Items to.

4) All Items will be moved to the paying member’s ticket and the ticket the Items were transferred from will be automatically deleted.

Best Practices
When ticket splitting is required, ensure to enter Items as normal, and then hit the Split Ticket button to launch the Ticket Splitting screen.
Ensure ticket to be split (or tickets with Item(s) to split) is marked as “Selected” in the Split Ticket screen, prior to attempting to move Items to another ticket.
When combining Tickets, ensure all tickets are at the same table prior to merging them by utilizing the Change Table feature in the main POS screen. Once all tickets are at the same table, utilize the Split Ticket feature to combine the tickets.
FAQs
Q: I need to move an Item back to its original ticket - how do I do that?
A: Ensure the new ticket created is marked as “Selected” in the Split Ticket screen. Then, highlight the Item from the left screen on the Split Ticket screen, and then click on the original ticket to return the item to it.
Q: When splitting a ticket by a fixed amount (ie - $10.00 on one ticket, and the remainder on another), how do I ensure the $10.00 ticket is the final amount due, inclusive of all tax, etc?
A: When splitting a ticket to a fixed all-inclusive amount, ensure to check the Tax Included box, located on the Split Ticket screen when splitting the ticket.Can I give a rain check a fixed expiration date, like 12/31/2017, rather than having it expire in 365 days?
Downloadable Guide
...
Important Rules to Remember
Once a card has been swiped, ETS does not allow the user to add items or increase the ticket total. However, a ticket can be reopened to void items or decrease the amount but not to increase the amount. This includes tips; if the server forgot to add the tip there is no way within the POS to add it.
To delete tickets after a Credit Card has been swiped (either at opening or closing of the ticket), the user must follow the proper delete procedures. Do not reopen the ticket and try to delete the items and the ticket; this will put the ticket in an Invalid state. If the Invalid Ticket message is received, please contact Clubessential Office Support. They will need to fix the ticket and the club accountant will have to contact ETS to delete the Credit Card charge.
It is important to close all Credit Card tickets before the end of day. Once the Credit Cards have been processed, users cannot add tips or make changes to the ticket through POS. The user will need to log into the ETS website to edit the transaction and go through member charges to correct the member account.
If the club is set up to allow additional gratuity, there will be a 2nd step to finalize the Credit Card process. It is important to remember that ALL Credit Card tickets must complete the 2nd step even if they do not have any additional gratuity to add to the ticket. Accounting will not be able to post the batch if the 2nd step of closing a ticket to Credit Card was not completed. Please refer to the Closing Ticket to Credit Card section of this manual for more information.
Credit Card batch close out procedures are communicated by ETS to the club; if the club does not know what time daily credit cards are processed, please contact ETS.
- ETS should have given the club a Login (Username & Password) and trained someone at the club to view & edit transactions from the ETS website. If the club does not know their Username and Password, they will need to contact ETS.
POS Common Tasks
Closing Ticket to Credit Card
To close a ticket to Credit Card within the POS,
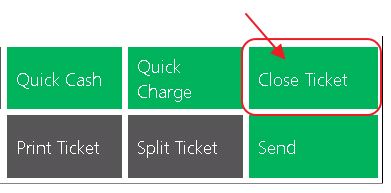
1) In the POS ordering screen, select Close Ticket.
2) Select the Credit Card Settlement Type.

3) Select OK (or Print and Done).
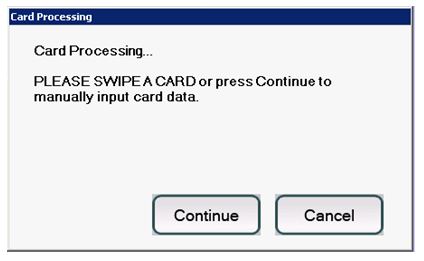
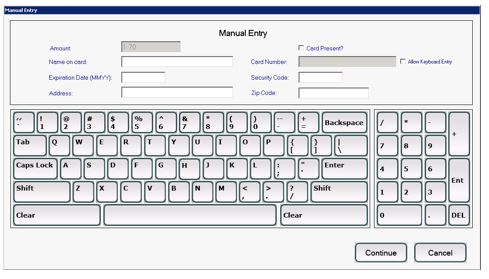
4) Swipe the Card or, select Continue to enter the card manually.
Additional Gratuity Prompt
This is the 2nd step to processing a Credit Card Transaction and where the user enters any additional gratuity. Remember, ALL Credit Card tickets must complete this step even if they do not have any additional gratuity to add to the ticket.
1) After the card is swiped or entered manually, the ticket is sent back to the main Tickets Tab highlighted in yellow.

2) Select the ticket in yellow and the Gratuity Prompt will populate.

3) Enter the additional Gratuity amount (the user can either use the percentages or manually key in the amount).
- To print a receipt showing the added tip, select Print settle ticket on close.
- The ticket can also be reopened from this screen if necessary.
- Click OK to complete the transaction.
- If there is no tip to add, simply select OK to specify a $0 tip.

Notes:
There should be no tickets listed in the main Tickets tab (Yellow or not) before printing End of Shift report.
If the 2nd step was not complete and accounting is unable to post the daily batch click here for instructions to fix.
Delete/Refund Credit Card Tickets
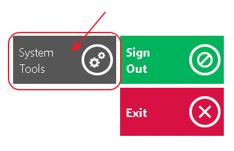
The most important thing to remember when attempting to delete a Credit Card ticket is that the ticket must be completely closed first (both settled and 2nd step) before it can be deleted through System Tools in POS. This is the only way the deleted transaction will communicate back to the ETS.
Note: Credit Card tickets that are deleted within 24 hours will be automatically refunded. If Credit Card tickets are deleted after 24 hours, they will need to be refunded through ETS.- 1) Select System Tools on the bottom left corner of the main POS screen.
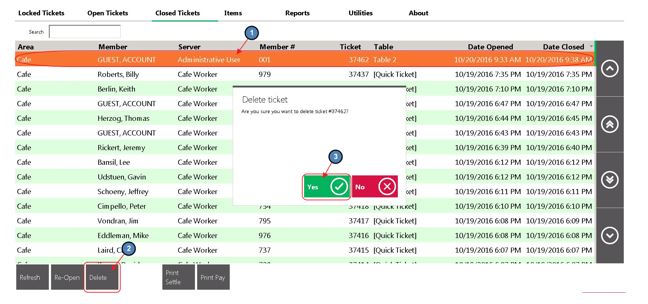
2) Navigate to the Closed Tickets tab.

3) Highlight the ticket and select Delete. The user will be prompted, Are you sure you want to delete ticket #XXXXX? Click Yes.
Reopen a Credit Card Ticket
If a user needs to reopen a credit card ticket to make corrections, remember the user cannot use the Credit Card Settlement Button again. To reclose a Credit Card ticket you must close to the Tab Settlement Type; this will send the adjustment amount to ETS with the difference between the first close and the second close. It is also important to remember that you can only reopen a ticket on the same day as the transaction.
1) Select System Tools on the bottom left corner of the main POS screen.
2) Navigate to the Closed Tickets tab.

3) Highlight the ticket and select Re-Open. The user will be warned that all Payments made on this ticket will be erased. Click Yes.

4) Navigate back to the main POS screen, select the reopened ticket, and make the necessary corrections. When finished, select Close Ticket.

5) On the settlement screen, select the Tab button (located on the keypad under the Exempt button). The Credit Card information is stored on the ticket so the user does not need the Credit Card to reclose the ticket. Click OK to re-close the ticket.

Notes:
- The Tab button will only be visible when the card information is on file for the Credit Card, meaning the card has already been swiped.
- If the Tab button is not visible after reopening a Credit Card ticket, the Tab settlement will need to be activated for the Area the ticket was completed. Please refer to the Activate the Tab Settlement section of this document.
- Basic rule of thumb: if the Tab button is displayed then use the Tab settlement and not Credit Card settlement. If the Tab button is not displayed use the Credit Card settlement to swipe the card (there is no credit card information on file for the ticket).
Use the “Charge Tab” Function
Charge Tab is used to store the Credit Card on the ticket at the time the ticket is open as opposed to swiping the card at the end when closing. Mainly used by clubs who allow nonmember visits; this allows them to capture the Credit Card information before the sale.
If the user wants to capture the Credit Card before the sale, it must be done before any items have been entered.
1) Select Charge Tab, Swipe the Card or select Continue to manually enter the card information.


2) Proceed to enter the order as normal. When finished, select Close Ticket.

3) Select the Tab Button (located on the keypad under the Exempt button). The Credit Card information is stored on the ticket so you do not need to swipe the card again. Click OK to complete the transaction.

Notes:
- If you have not swiped the card, the Tab button will not appear.
- If the client decides to use a different card, please refer to the Change the Credit Card After the Swipe section of this document (Next section).
Change the Credit Card after the Swipe
If a client decides to use a different card after a card has already been swiped, please follow the below instructions to remove the first Credit Card and swipe a new one.
1) Navigate to the Close Ticket screen and select the Credit Card Settlement Type (Do not select the Tab button).

2) The system will prompt with the below warning. Click Yes to change the Credit Card. Select OK (or Print and Done) and swipe the new card.

Note: The swipe prompt will not populate until OK or Print and Done is selected.
Common Troubleshooting Tasks
Tab Payment Button Not Visible in POS
The Tab payment button must be activated for each Area the club sees fit (Not applicable to Retail Areas) in Office CMA. In most cases, this is already set up during implementation. If the Tab button is not visible after reopening a ticket closed to Credit Card, follow the below steps.
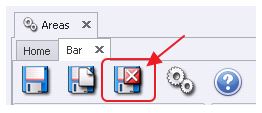
1) Navigate to System across the top toolbar and select Areas.

2) Select the Area that needs the Tab Settlement button activated.

3) On the Area Information section, navigate to the Tab Payment option and select the correct ETS Key.

4) Lastly, be sure to select Save & Close.
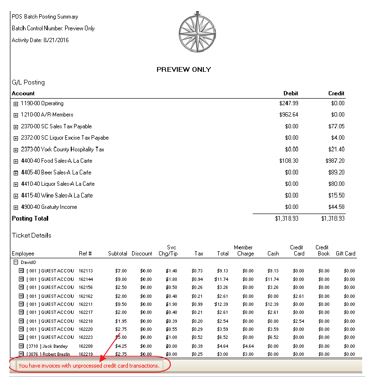
Unprocessed CC Trx Error When Posting
If a batch will not post because of an error stating ‘You have invoices with Unprocessed Credit Card Transactions’ (See below screenshot) this means that a ticket has not been fully processed, and is still waiting for the 2nd step of the Credit Card transaction to be completed.
How to find the Ticket
1) Go to Membership, Approve Charge Batches, and then expand the batch with the error by selecting the + sign to the left of the batch. All tickets within the batch will be displayed.

2) Look at the Open column. (If the open Column is not there, customize the columns to add it.) Any tickets checked as Open have not been fully processed and are still in the 2nd step of the Credit Card Transaction.

3) Double click on the ticket to see what Server has the ticket. (Do Not select Edit Invoice in POS.)

4) The Server’s Card Swipe ID is needed. If the Card Swipe ID is not known, please navigate to the System tab within the Server’s employee profile and make a note of their Card Swipe ID.

5) Using the Server’s Card Swipe ID, sign into the POS.
6) The ticket will be displayed in yellow. Click on the ticket to populate the additional Gratuity prompt.

7) Select Do Not Process and click OK. This will complete the transaction and the batch can be posted.

Notes:
- ETS usually processes the daily credit cards by 5am in the morning; if the user is posting batches for credit card transactions after this time then Do No Process must be select on the Gratuity prompt. The only thing that will not be processed is the additional tip; the sales were already processed.
- If the ticket did have additional tip that should have been processed, the user will need to contact ETS to edit the credit card transaction or…
- ETS should have given the club a Login User & Password and trained someone at the club how to view & edit transactions on the ETS website; if login credentials are not known, please contact ETS.
Best Practices
Ensure all gratuities are added, and all tickets are closed out from the Open Tickets Screen before printing an End of Shift Report.
Utilize the Tab feature if edits to the ticket need to be made after a credit card has been swiped. Remember edits can only decrease, not increase amounts to the ticket.
FAQs
Q: What if I need to add an amount to a ticket that has already been closed and credit card processed?
A: Generate a new ticket to add the item and charge the Member. A ticket may be reopened only to decrease the amount or void an item.
Q: The Tab payment option does not appear after I ran a Credit Card, and need to re-close, how do I enable it?
A: Enable the Tab payment feature in Office CMA by going to System, Areas. Select the area that needs the Tab feature activated. Then, navigate to the Area Information section, Tab Payment option and select the correct ETS Key. Save settings. Exit and re-open the POS to view update.
Downloadable Guide
ETS Credit Card Transactions - Guide