...
The primary functions associated with managing Billing Schedules are embedded in the Billing Schedules setup screen, which can be accessed by double-clicking on an existing Schedule (to edit an existing Schedule), or clicking the New button (to create a new Schedule).
Billing Schedules Setup Screen - Tab Overview
In this section we will review the various tabs within a Billing Schedule.
...
1) Name - Enter the Name of the new Billing Schedule.
2) Description - Enter a Description. (Optional)
3) Invoice Description - This will be the Description that appears on the Invoice at the corresponding Month End.
4) Use Item/Use Combo - If the entity to be charged at Month End is an Item, select Use Item (Selected by Default). If the entity to be charged at Month End is an Item Combo, select Use Item Combo.
5) Billing Item - If Use Item was selected in the previous step, select the Billing Item to be charged at Month End. OR
Billing Combo - If Use Combo was selected in the previous step, select the Billing Combo to be charged at Month End.
...
8) Pre-Bill - Only applicable to Quarterly, Semi-Annual, Yearly, or Custom Schedules. If checked, the system will bill one month prior. For instance, if the frequency is set to Yearly and the Start Month is October, members will be billed on the September 30th Statement.
9) Show Dependents in Member List - If checked, Dependent members will show in the Member Lookup found on the Member’s tab of the Billing Schedule.
Important: Any Billing Schedule applied to a Dependent Member will also show on the Primary Member’s account.
Schedule
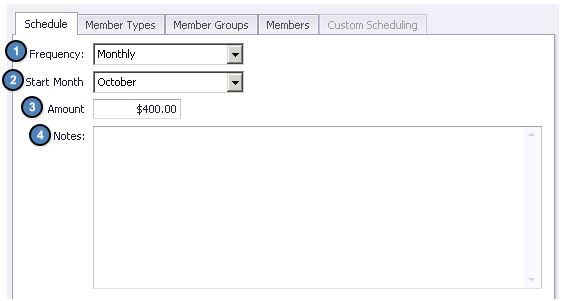
1) Frequency - Select the frequency of the Billing Schedule (Monthly, Quarterly, Semi- Annual, Yearly, or Custom).
2) Start Month - Select the month the Billing will start.
3) Amount - Enter the Amount to be billed.
4) Notes - Add any additional Notes to the Billing Schedule.
Applying the Billing Schedule to Members
Keeping Billing Schedules consistent, and easy to track is an essential process. With this being said, it is most efficient and effective to apply Billing Schedules at the Member Type or Member Group level. It is, however, possible to apply Billing Schedules on an individual Member basis if desired. Please see below instructions on how to apply Billing Schedules at each level.
Important: It is NOT recommended to apply Billing Schedules at multiple levels at the same time.
Member Type
To apply the Billing Schedule at the Member Type level, first navigate to the Member Types tab within the Billing Schedule.
Next, select the Member Types Lookup, click to select the applicable Member Type(s) from the Lookup value, and choose Select at the bottom of the screen.
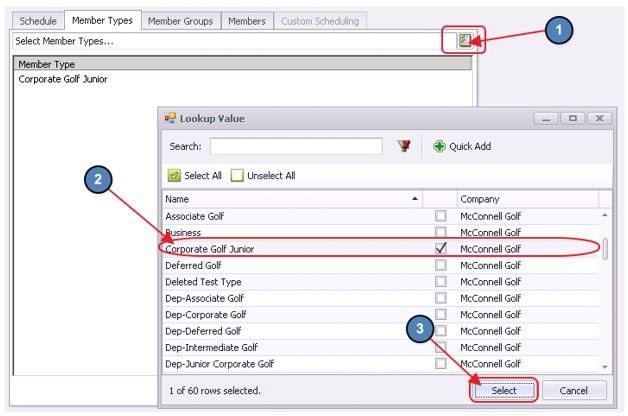
ALL members who are in the Member Type(s) selected on this screen will be billed.
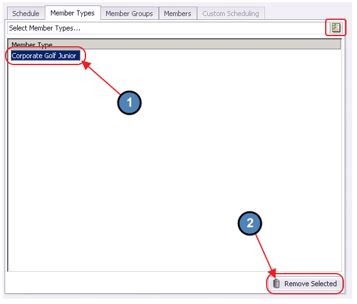
To remove a Member Type from the Billing Schedule, highlight the Member Type in question from the selected Member Types screen and choose Remove Selected.
Member Groups
To apply the Billing Schedule at the Member Group level, first navigate to the Member Groups tab within the Billing Schedule.
Next, select the Member Groups Lookup, click to select the applicable Member Group(s) from the Lookup value, and choose Select at the bottom of the screen.
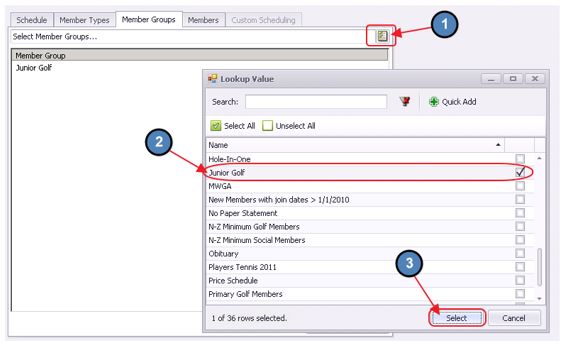
ALL members who are in the Member Group(s) selected on this screen will be billed.
To remove a Member Group from the Billing Schedule, highlight the Member Group in question from the selected Member Groups screen and choose Remove Selected.

Members
Although it is not recommended, Billing Schedules can also be applied on an individual member basis.
To add an individual member to the Billing Schedule, first navigate to the Members Tab within the Billing Schedule.
Next, select the Member Lookup, click to select the applicable Member(s) from the Lookup value, and choose Select at the bottom of the screen.
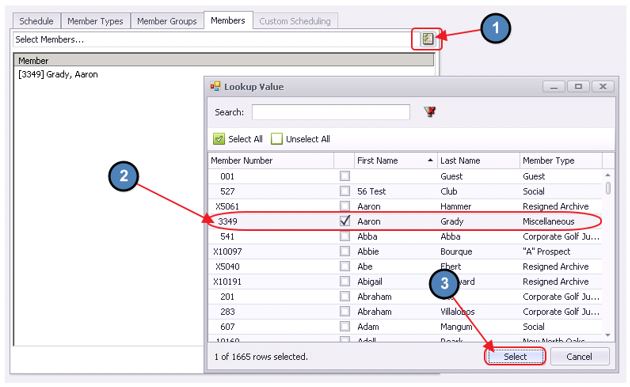
Any Member selected on the Members tab will be billed.
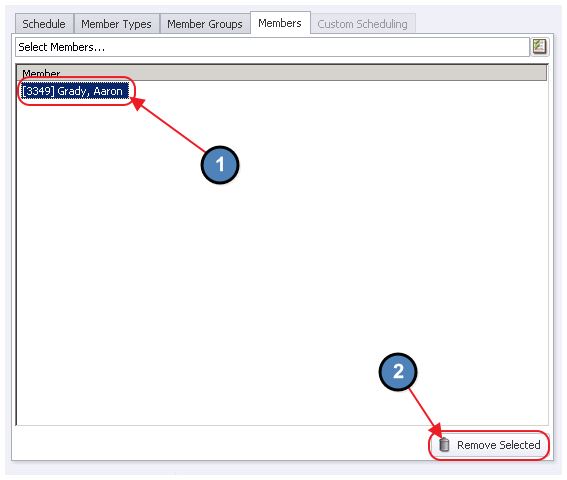
To remove a Member from the Billing Schedule, highlight the Member in question from the selected Members screen and choose Remove Selected.
Custom Scheduling
...
Billing Schedules can also be applied on a custom basis. For instance, with Custom Scheduling, the user can specify which months out of the year the Billing Schedule will apply to their members, or they can specify varying billing amounts depending on the month.
To set up a Custom Schedule, first set the Frequency on the Schedule tab to Custom. As evidenced in the screenshot below, when the Frequency is set to Custom, the Start Month and Amount become Null.
...
Navigate to the Custom Schedule tab, and as you will see the amount that was originally entered on the Schedule tab, has now populated into the Amount field next to each Month. This is used to help simplify the entry process. Please navigate through each Month and apply the appropriate amount to be charged.

Create a New Billing Schedule
...
Please see the Tab Overview section of this document for further instructions on each tab.
General Information
Schedule
Applying the Billing Schedule to Members
Custom Scheduling (if applicable)

Billing Summary in Member Profile
A summary of the Billing Schedules applied to a Member (whether via Member Group, Member Type, or Individual Member application) is available on the Billing Tab within the Member’s profile.
...
Select Billing on the left pane within the member’s profile. A list of the Billing Schedules applied to the member will populate.
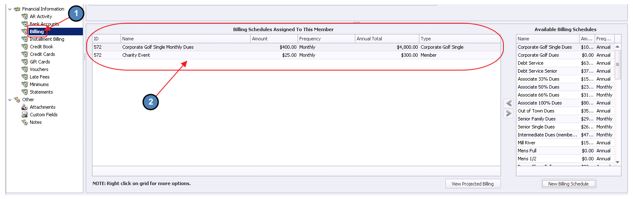
While it is most efficient and effective to add Billing Schedules at the Member Group and Member Type level, it is possible to add and delete Billing Schedules specific to the Member on this tab. Assigned Billing Schedules are on the left. Available Billing schedules are on the right.
...
A. Members who have had Custom adjustments to their billing schedules will not automatically stop applying when the Member leaves the associated group because the system has deemed this as a Member specific billing schedule when the schedule becomes Custom. To ensure the Member is no longer charged for the fee, go into the Member’s profile, Billing Tab, right-click on the billing item (it will say CUSTOM), and click Revert to Default. The billing will then automatically drop off the Member’s account as they are no longer a Member of the Group, and the default billing schedule was based on membership to the Group.
Downloadable Guide