Office - Manage Members - Membership Management
Table of Contents
- 1 Overview
- 2 Required Permissions
- 3 Accessing the Tool
- 3.1 New Member Wizard
- 3.1.1 Member Info Fields
- 3.1.2 Member Groups
- 3.1.3 Member Dependency
- 3.1.4 Addresses/Contact Info
- 3.1.5 Emails
- 3.1.6 Phone Numbers
- 3.1.7 Member Number
- 3.2 Additional Tabs for Member Info
- 3.2.1 Membership Section
- 3.2.2 Groups Tab
- 3.2.3 Pictures Tab
- 3.2.4 Preferences
- 3.2.5 Scheduled Changes
- 3.2.6 Web Settings
- 3.2.7 Communication Section
- 3.2.8 Financial Information Section
- 3.2.9 A/R Activity
- 3.2.10 Bank Accounts
- 3.2.11 Credit Cards
- 3.2.12 Billing
- 3.2.13 Installment Billing
- 3.2.14 Credit Book
- 3.2.15 Gift Cards
- 3.2.16 Vouchers
- 3.2.17 Statements
- 3.2.18 Late Fees
- 3.2.19 MAP (Membership Analytics Predictor)
- 3.2.20 Minimums
- 3.3 Other Information Section
- 3.3.1 Attachments
- 3.3.2 Custom Fields
- 3.3.3 Notes
- 3.4 Save and Close
- 3.1 New Member Wizard
- 4 Best Practices
- 5 FAQs
Overview
A Club builds new Members in their system as they join the Club to ensure they can communicate with them effectively, manage their billings and related payments, and include them in Club offerings such as the Club Website, Reservations system, POS System, and the Club App.
Required Permissions
Manage Members
Add/Edit/Delete Members
Accessing the Tool
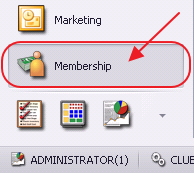
To access the New Member Wizard,
Click on Membership to load the Manage Members Grid.
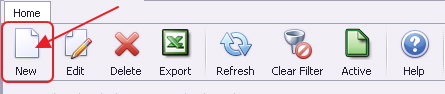
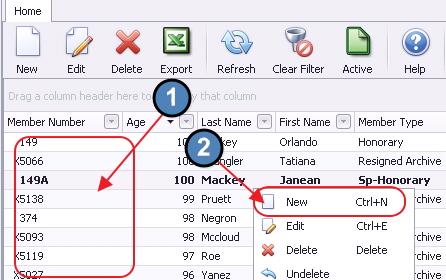
2. Then, perform either of the following to launch the New Member Wizard:
Click the New icon on the toolbar.
Right-click anywhere on the Manage Members Grid and select New.
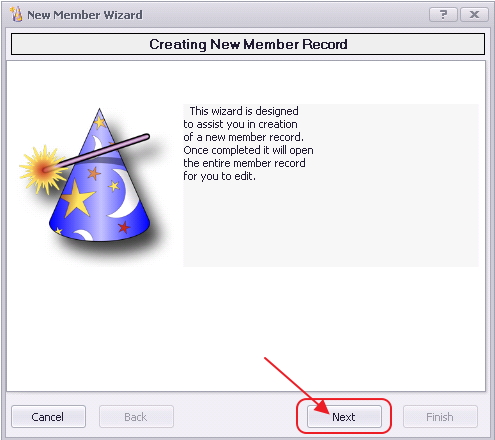
New Member Wizard
The New Member Wizard is designed to assist with the creation of a New Member.
Click Next to proceed through the wizard.
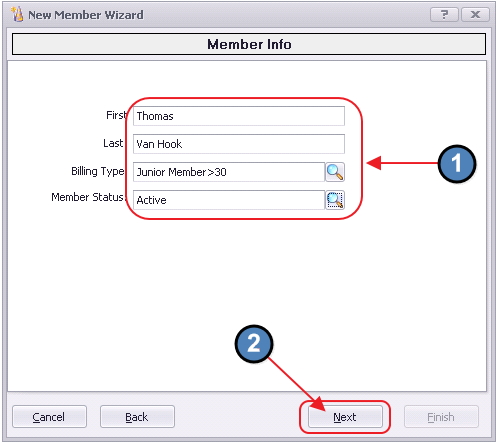
Member Info Fields
Follow prompts to enter First Name (optional), Last Name (or full account description if Party, Reciprocal Club, etc.), Billing Type (Member Type), and Member Status.
Click Next to proceed.
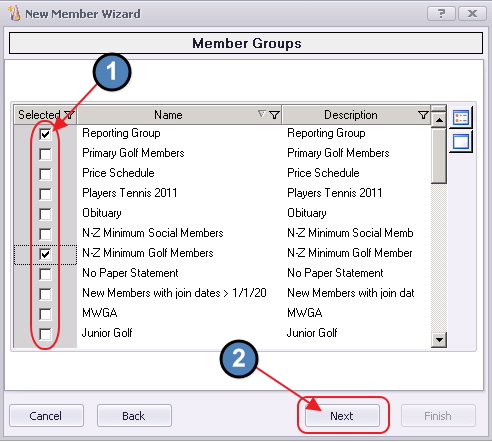
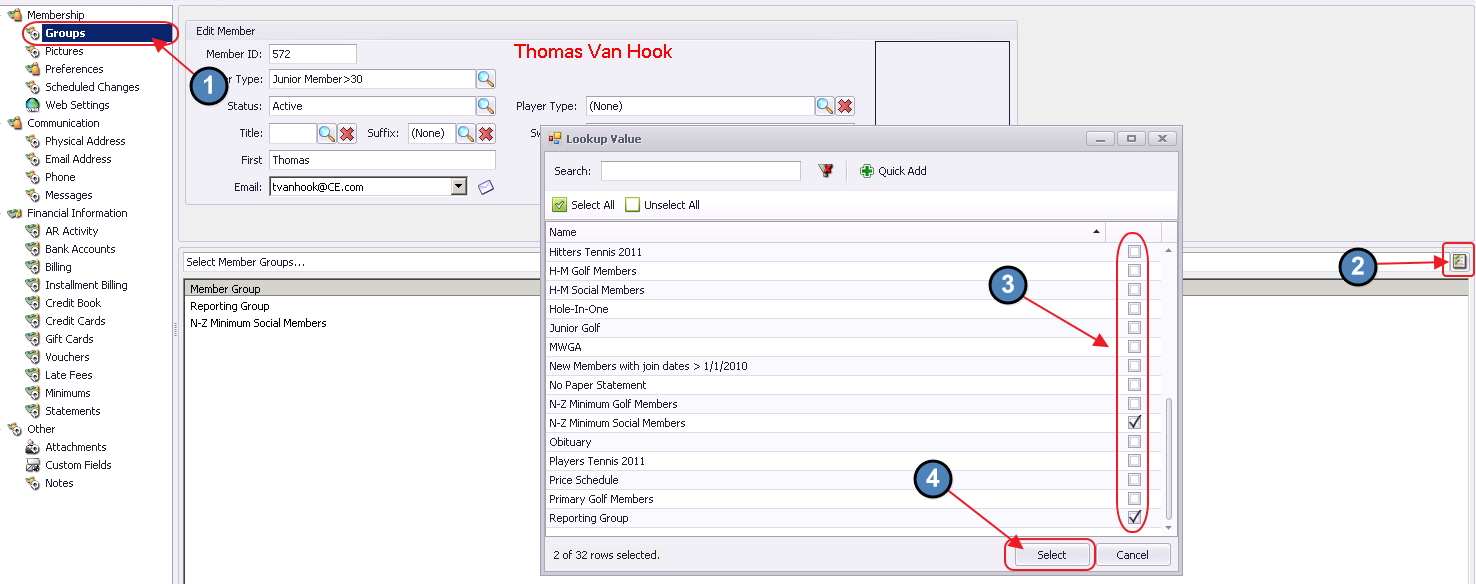
Member Groups
Every account must be included in at least one Member Group, primarily for reporting purposes. For this reason, most will have a group called Reporting Group or All Accounts.
If Minimums are used, Primary Accounts ONLY will need to be linked to the proper Minimum Group.
Select any other applicable groups as needed.
Click Next to proceed.
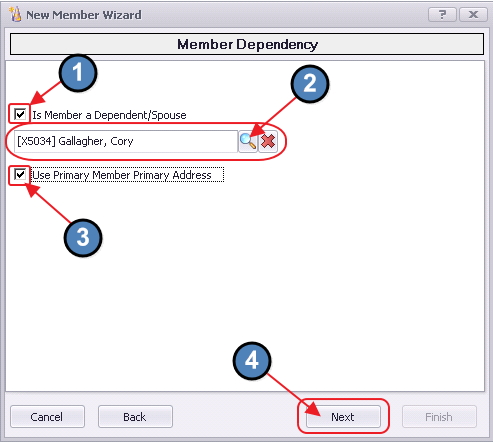
Member Dependency
Check Is Member a Dependent/Spouse IF account being created is to be linked to another account for billing purposes.
IF this box IS CHECKED, then complete the empty box below to designate the account to which this Member should be linked.
Most Dependents will use the same Address as the Primary Member. If this is the case, check Use Primary Member Address.
Click Next to proceed.
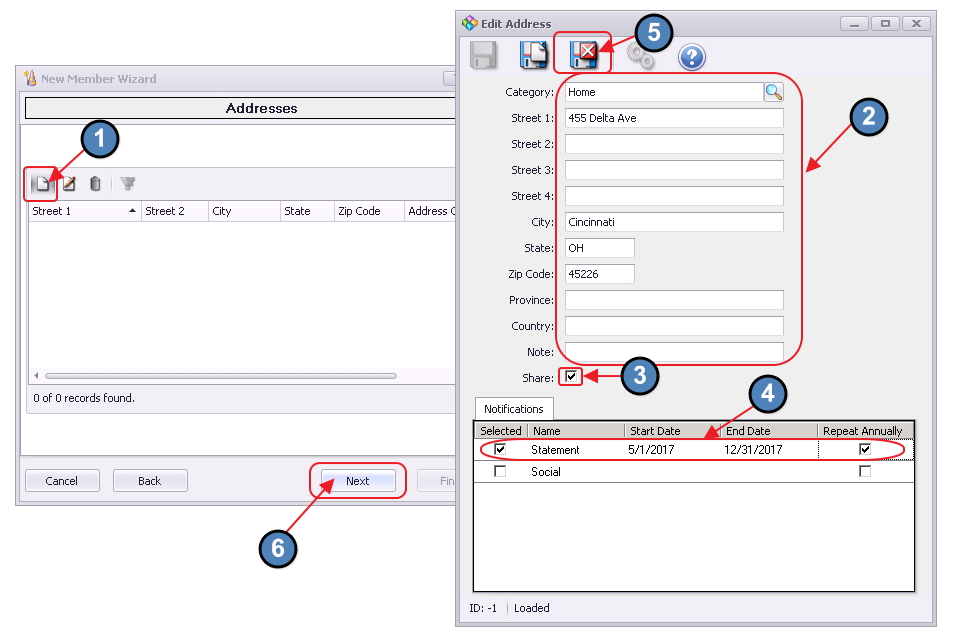
Addresses/Contact Info
Enter a new Physical Address by selecting the New icon. (Note this step is optional and can be completed at a later time if desired).
Enter all applicable address information.
Check Share if address will also apply to spouse and dependents.
Select Notifications if notifications are to be sent to this address.
If Statement is selected, then a paper statement will be printed for this account. If not selected, then an email statement will need to be sent. Note, if the physical address applies only for a designated time period (for instance the Member will live in one residence for 7 months, and another for 5 months), designate the appropriate Start and End Dates that the address will apply for the Member. If the Member has this schedule every year, click the Repeat Annually button. Leaving these fields blank will designate that this address applies for the whole year.
Click Save and Close when complete. Add additional addresses as required.
When finished, click Next to proceed.
Emails
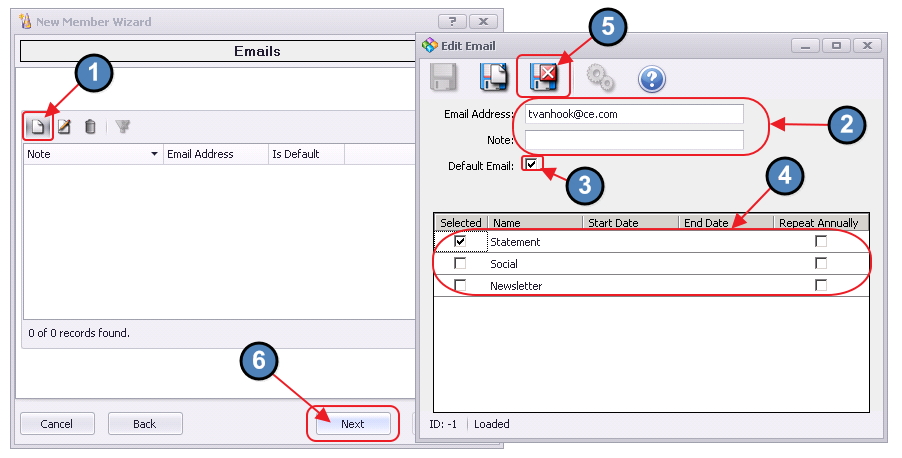
Enter a new Email Address by selecting the New icon. (Note this step is also optional and can be completed at a later time if desired).
Enter the Email Address and add a Note if desired.
Default will be checked for the first email address entered. This can be changed; however, one email address must be marked as the Default, as it will predominantly be used when sending emails through Office.
Select Notifications as needed.
If Statement is checked, an electronic statement will be sent to this email address. (Note: A Spouse can also receive a copy of the Primary Member’s emailed statement. To do so, add the Spouse's email in the secondary email field and ensure both primary and secondary email addresses are checked to receive statements. When statement emails are sent, the Spouse will receive the same email as the Primary Member. Dependents other than Member’s Spouse cannot receive an emailed statement.)
Note, if the email address applies only for a designated time period, designate the appropriate Start and End Dates that the email address will apply for the Member. If the Member has this schedule every year, click the Repeat Annually button. Leaving these fields blank will designate that this email address applies for the whole year.
Click Save and Close when complete. Add additional email addresses as required.
When finished, click Next to proceed.
Phone Numbers
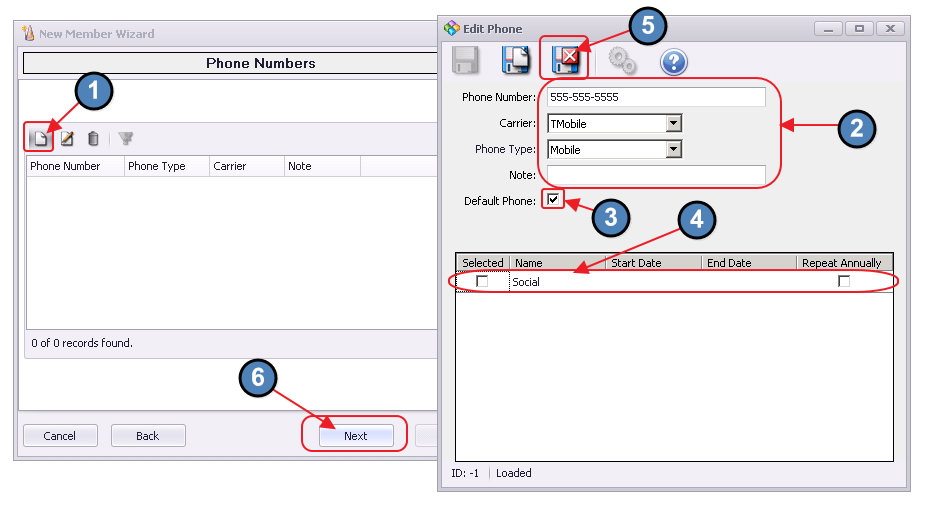
Enter a new Phone Number by selecting the New icon. (Note this step is also optional and can be completed at a later time if desired).
Enter the Phone Number, Carrier, Phone Type, and add a Note if desired.
If Mobile is selected, be sure to specify the Carrier. To send text messages to Members through Office, please see Marketing Wizard document.
Default will be checked for the first Phone Number entered. This can be changed; however, one number must be marked as the Default, as it will predominantly be used for communication purposes.
Select Notifications as needed.
Note, if the phone number applies only for a designated time period, designate the appropriate Start and End Dates that the email address will apply for the Member. If the Member has this schedule every year, click the Repeat Annually button. Leaving these fields blank will designate that this phone number applies for the whole year.
Click Save and Close when complete. Add additional phone numbers as required.
When finished, click Next to proceed.
Member Number
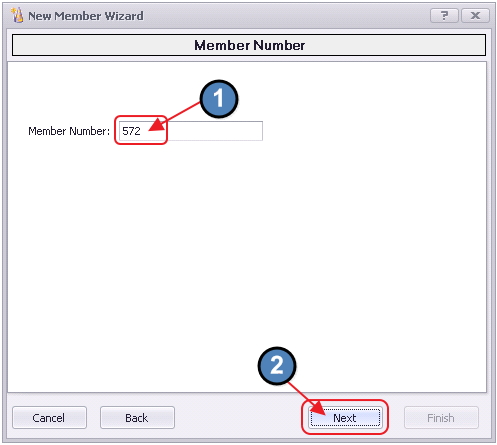
Enter Member Number. If Member is Spouse or Dependent, be sure to include proper suffix (ie -1 or -A).
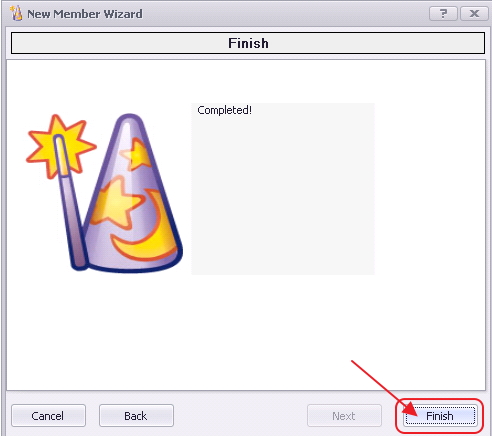
When finished, click Next to proceed, and Finish to confirm completion.
Additional Tabs for Member Info
Once New Member Wizard is complete, the New Member Account is displayed and available for further editing.
Membership Section
The Membership Section contains an opportunity to populate additional information about the Member. For instance the following fields can be found on the Membership tab.
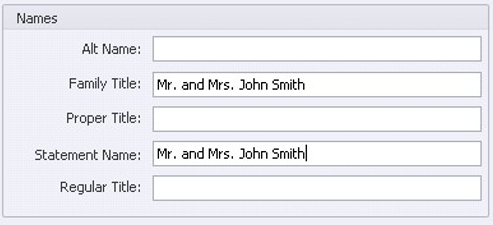
Alternate Names/Titles
Family Title, Proper Title, Regular Title - These fields are primarily utilized when printing Membership Address Labels. For instance, if Family Title is the selected Display Name when printing labels, Family Title must be entered for the label to print properly.
Statement Name can be used to override the name that appears on the statement (ie - Mr. and Mrs. John Smith). If left blank, the first and last name of the Primary Member will appear on the statement.
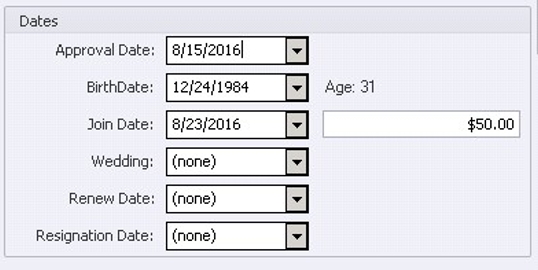
Renew Date and Resignation Date can be entered once those dates are established. If your club goes through a membership renew process, enter that date as needed. When a member has left the club, as opposed to deleting the member, you can set the resignation date.
Approval Date, Birth date, Join Date and Wedding Date can be entered for new members. (Initiation fee can be entered in amount field to the right of Join Date).
Note: For Clubessential/Axis Website users, IF Join Date is utilized, remember to set this to a date less than or equal to the present date. Otherwise, the Member will not show on the Website Roster. If Join Date is blank, the system knows to add the Member to the Roster as normal.
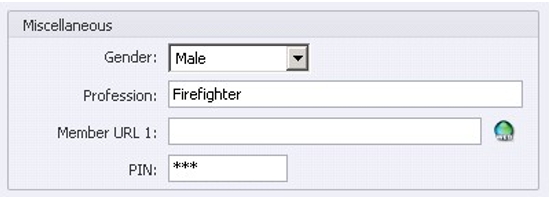
Gender - Specify Gender of the Member.
Profession (Optional) - Enter the Member’s profession.
Member URL 1 (Optional) - Enter the Member’s social site URL.
Pin (Optional) - Only applicable when Kiosk Mode is utilized.
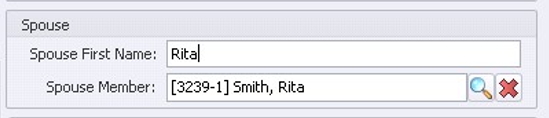
After the Spouse Account is created, return to the Primary Member’s Account. As long as the Spouse Member is in a Member Type marked as Is Spouse (Please see Member Type help documentation), the system will automatically populate the Spouse Member in this field. Spouses, however, can also be manually added to this field.
Note: For Clubessential/Axis Website users, for the Spouse Member to show with a Spouse/Secondary Relationship level, they must be entered into this field. Otherwise, the Spouse will show with a Child/Additional Relationship level.
Other Tabs available within the Membership section allow for further data gathering and Member establishment.
Groups Tab
Use this tab to add a Member to a Group not previously assigned in the Wizard, or to Delete a Member from a previously assigned Group.
Pictures Tab
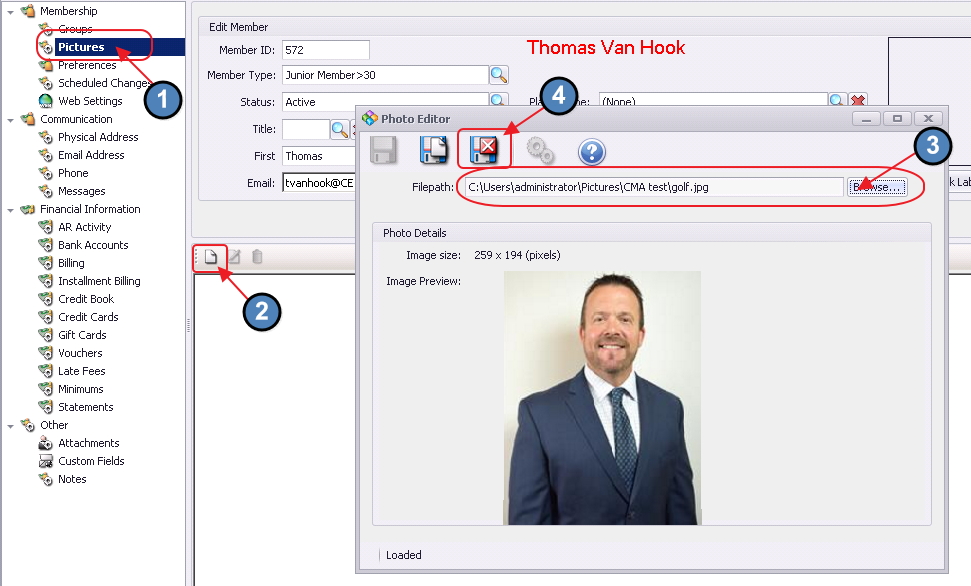
Use this tab to add a Member’s Picture to their profile.
Preferences
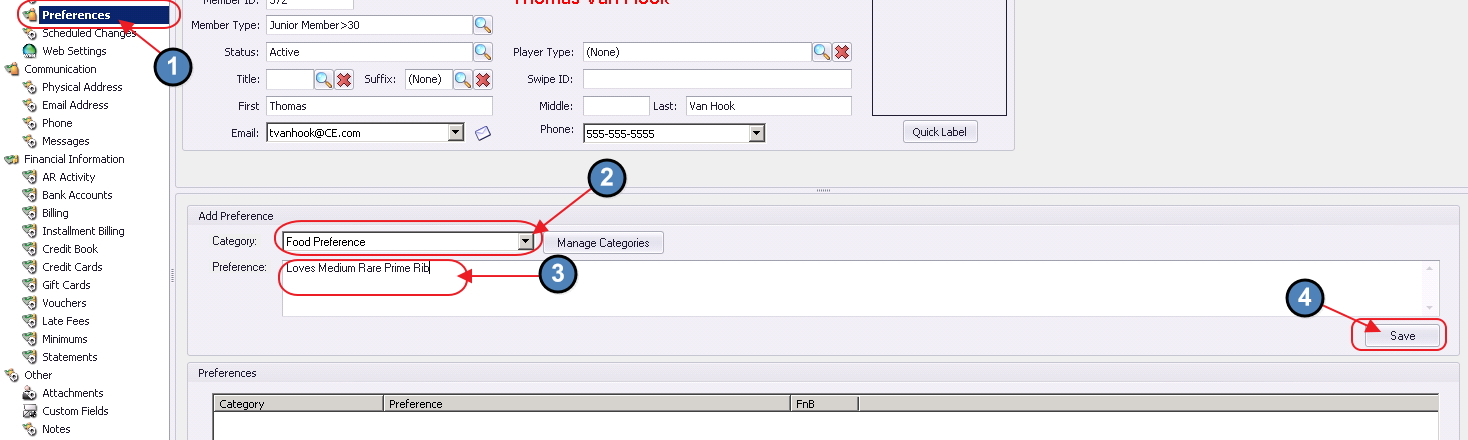
Use this tab to add a Member’s Preferences.
Choose a Category.
Describe the Preference.
Click Save.
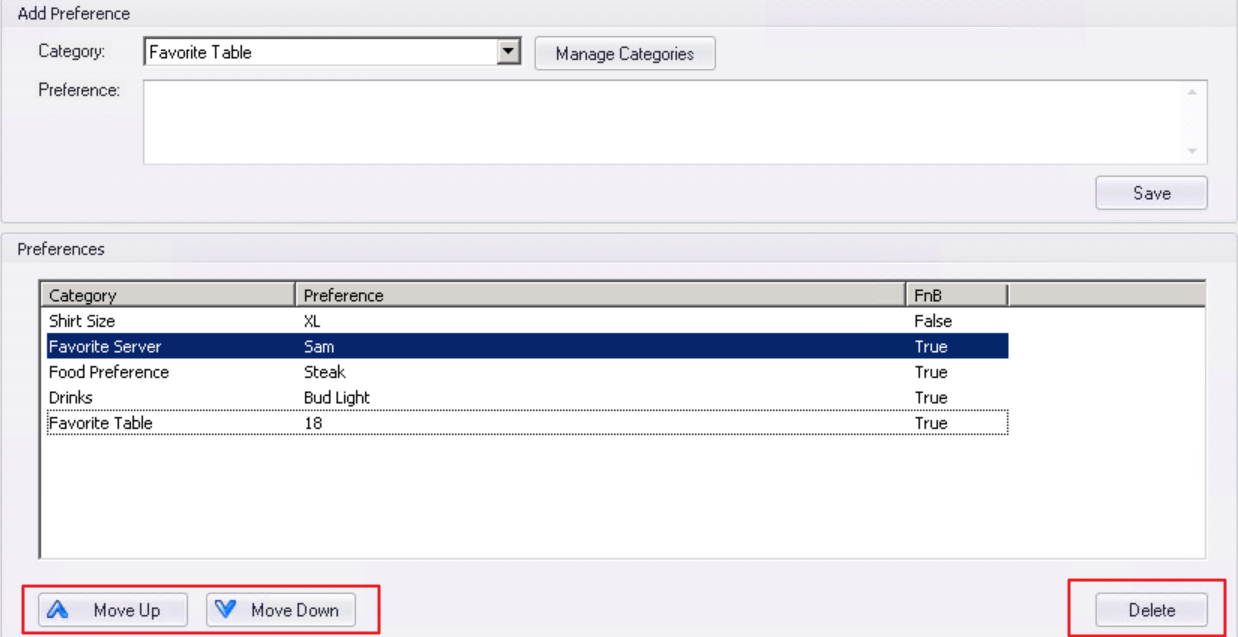
To control the order in which Member's preferences appear, select the preference from the list and use the Move Up or Move Down buttons to reorder. Use the Delete button to delete a Member's preference all together.
Scheduled Changes
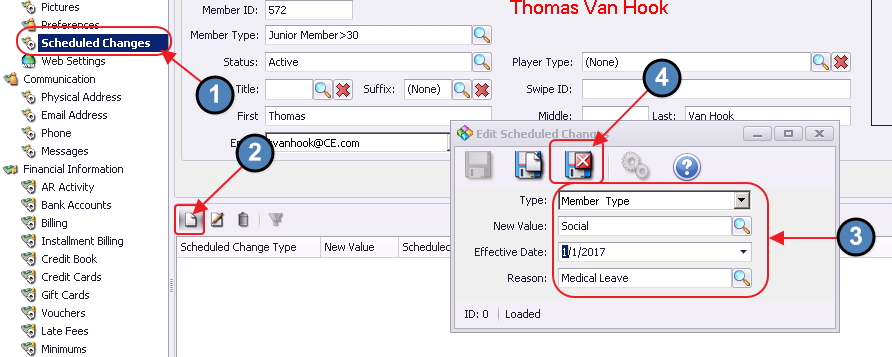
Use this tab to add a Scheduled Change of Member Type or Member Status, when the date is known and in the future.
Specify the Type of Change to occur. Indicate the new value, its effective date, and provide a reason.
Web Settings
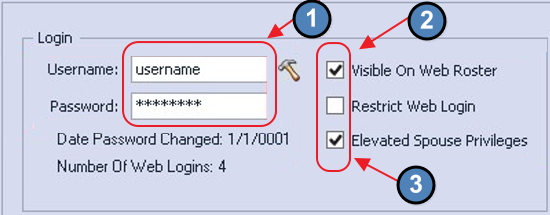
This section is ONLY for Clubsoft Links or Classic CSWEB website users.
If a Clubessential/Axis Website is used, these fields should NOT be entered.
Username - Needed for Website Access (must be a unique value)
Password - Enter password to be used when accessing website
Visible on Web Roster - Must be checked for Member to show correctly on Web Roster.
Restrict Web Login - If checked, the Member will not be able to log in to the Website.
Elevated Spouse Privileges - Optional box that allows spouse to also see financial info on web.
Communication Section
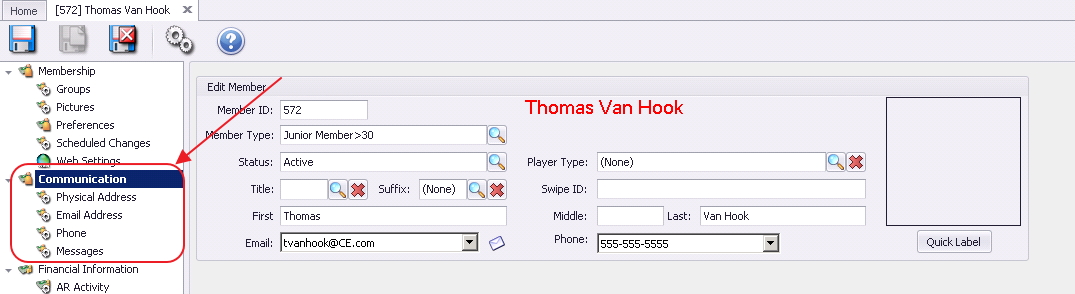
If Physical Address/Email, or Phone numbers were not populated previously in the Wizard, they can be added in the Communication section.
Click on the desired tab and populate information as previously demonstrated.
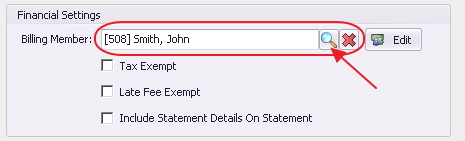
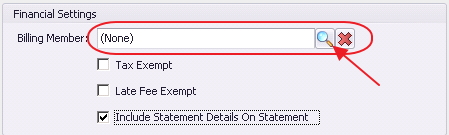
Financial Information Section
If Member is a Spouse or Dependent:
VERIFY Billing Member is correctly linked to the Primary Member.
Note: Click Edit (next to Billing Member) to open Billing Member’s edit screen.
IF Member is Primary: VERIFY Billing Member is set to None.
AR Threshold - Limits the amount a member can member charge using the Member Charge Wizard and POS. Add total AR balance plus current charge, if the total is greater than the threshold the system will populate a question message asking if the club would like to continue
Please Note: Does not currently affect Mobile POS.
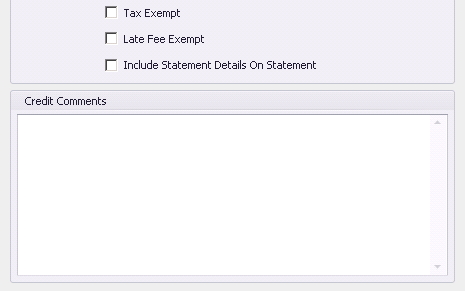
Tax Exempt - Check, if Member should not be charged tax.
Late Fee Exempt - Check, if Member should be exempt from Late Fees.
Include Statement Details On Statement - Check, if Member should receive miniature copies of their chits with the printed or emailed statement.
Credit Comments - Enter free-form comments as desired.
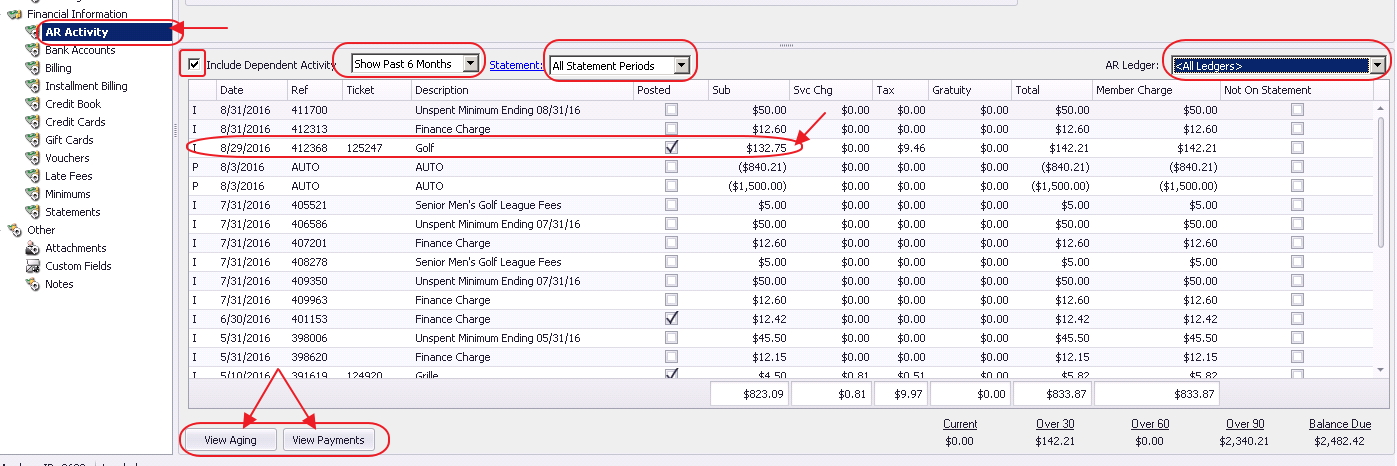
A/R Activity
Use this tab to review Member Accounts Receivable/Payment History. This is a view-only tab for Billing/Primary Members. Options exist to view Dependent Activity, define time periods and statements, and to specify A/R Ledger.
Direct links to the Member Aging Report as well as the Member’s Payment report are available at the bottom. Double-click on a line-item in the Grid to gain additional details of the charge.
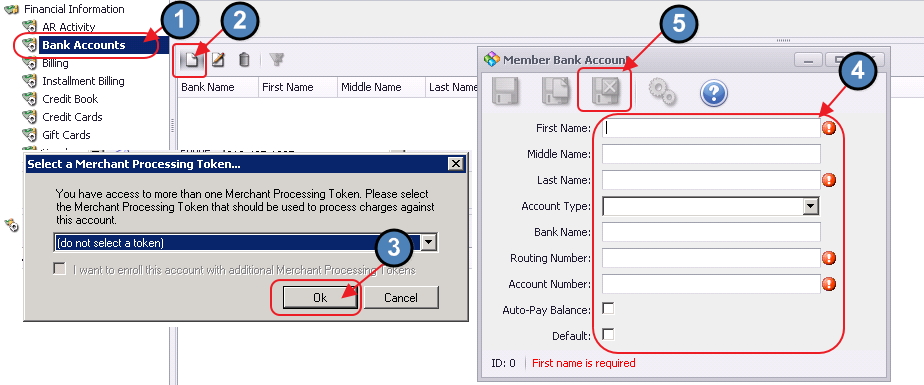
Bank Accounts
Add Banking info on this tab if ACH payments are applicable.
Click the New Icon to add a bank account.
Click OK to move forward without specifying a token.
Complete Member Bank Account Information, and click Save and Close.
Credit Cards
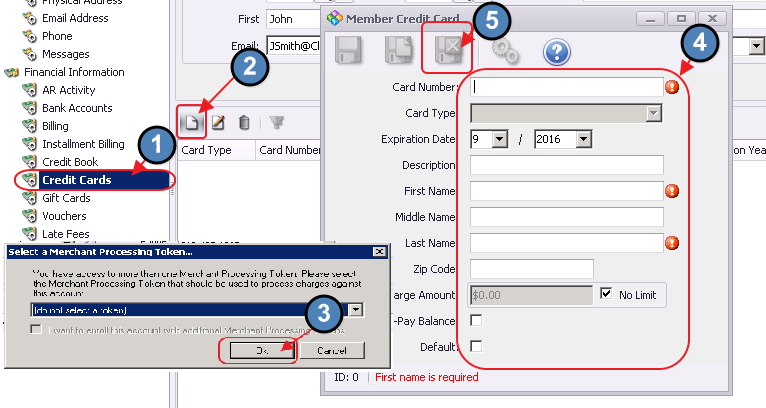
Add Credit Card info on this tab if credit card payments are applicable.
Click the New Icon to add a Credit Card.
Click OK to move forward without specifying a token.
Complete Member Credit Card Information, and click Save and Close.
Billing
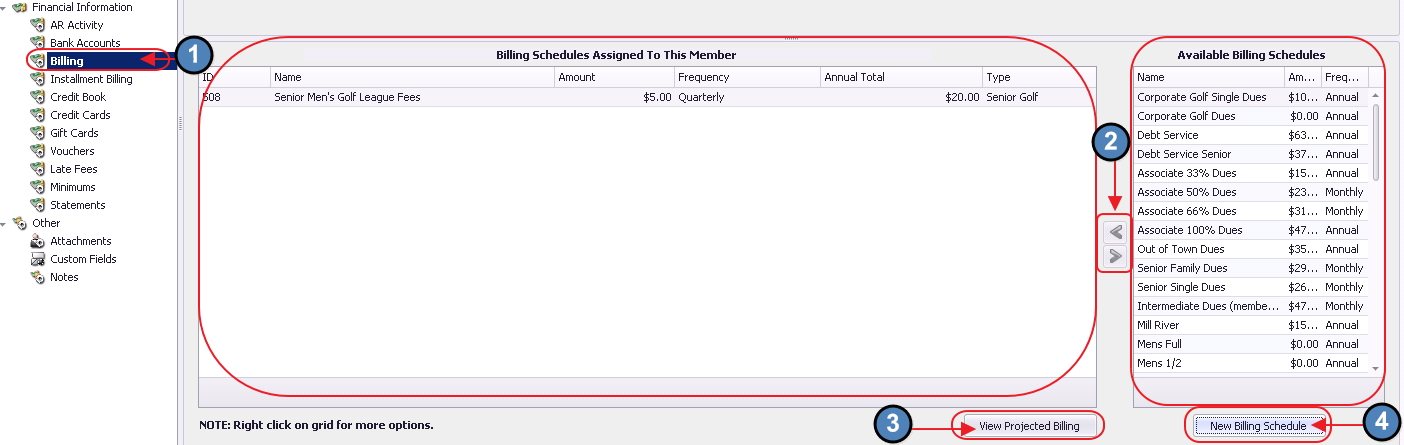
The Billing Tab contains a summary of the Billing Schedules attached to the Member. While it is most efficient and effective to add Billing Schedules at the Member Group and Member Type level, it is possible to add and delete Billing Schedules specific to the Member on this tab. Assigned Billing Schedules are on the left. Available Billing schedules are on the right. Assign a schedule by selecting an Available schedule and clicking on the Left Arrow. Conversely, to un-assign a schedule, click on the Assigned schedule, and then click the Right Arrow. (Note: The un-assign function applies only to the Billing Schedules assigned at the Member level, and will not work for those assigned at the Member Group or Member Type level.) Click on the Projected Billing Report to view billings projected for the future based on the schedules. Additionally, click the New Billing Schedule button to create a new schedule for the Available list.
Installment Billing
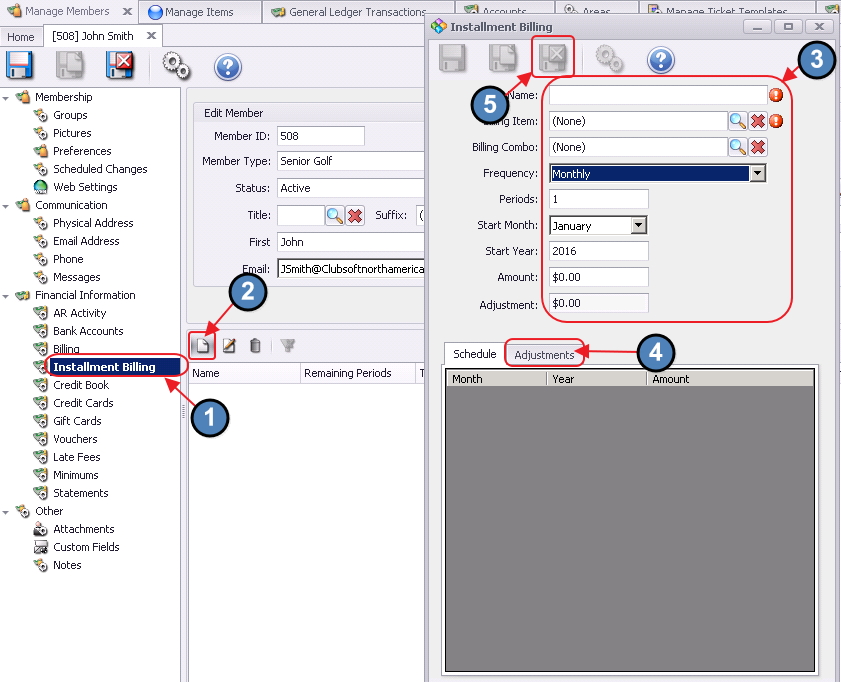
In addition to Billing Schedules, Installment Billings can also be viewed, and built from the Installment Billing tab. To create a new Installment Billing, click the New button. Define the Installment Billing parameters. Note the Adjustments tab can be utilized to create billing adjustments. Click Save and Close when setup is complete.
Credit Book
The Credit Book tab allows the user to view all credit books that have been assigned to the member. You can
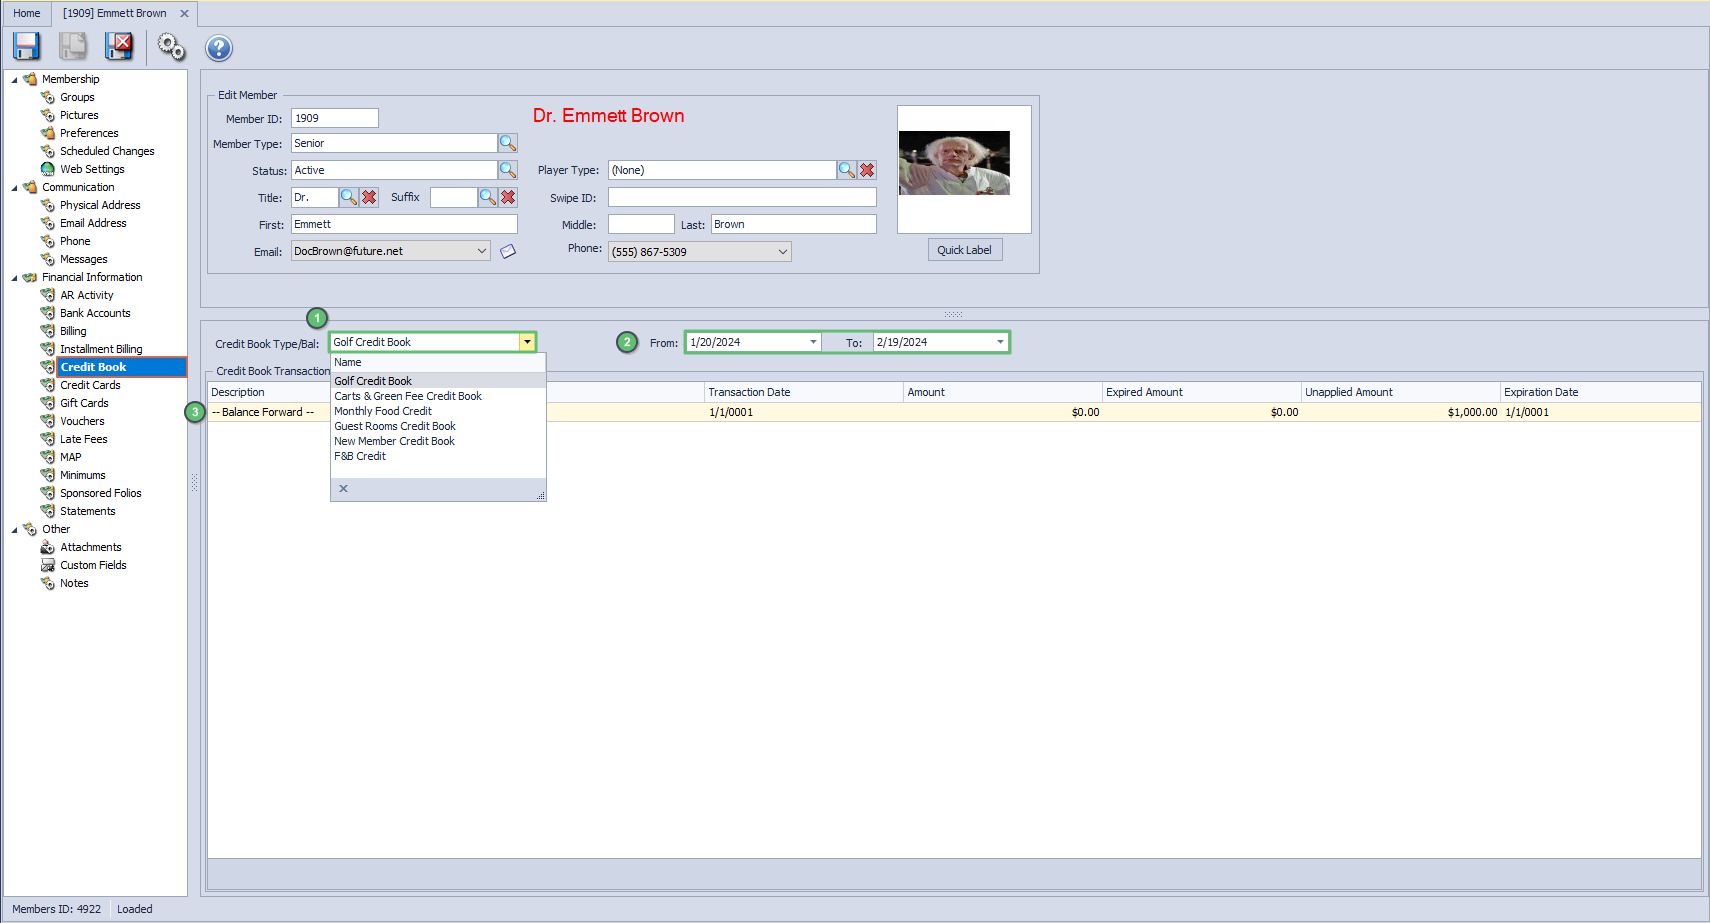
View which credit book you want to see.
Set the date range for the transactions you wish to see.
Credit book transactions.
Gift Cards
The Gift Card tab will show the user the member’s gift card history. You can see the gift cards assigned with issued dates, expiration dates, original and unapplied balances. You can:
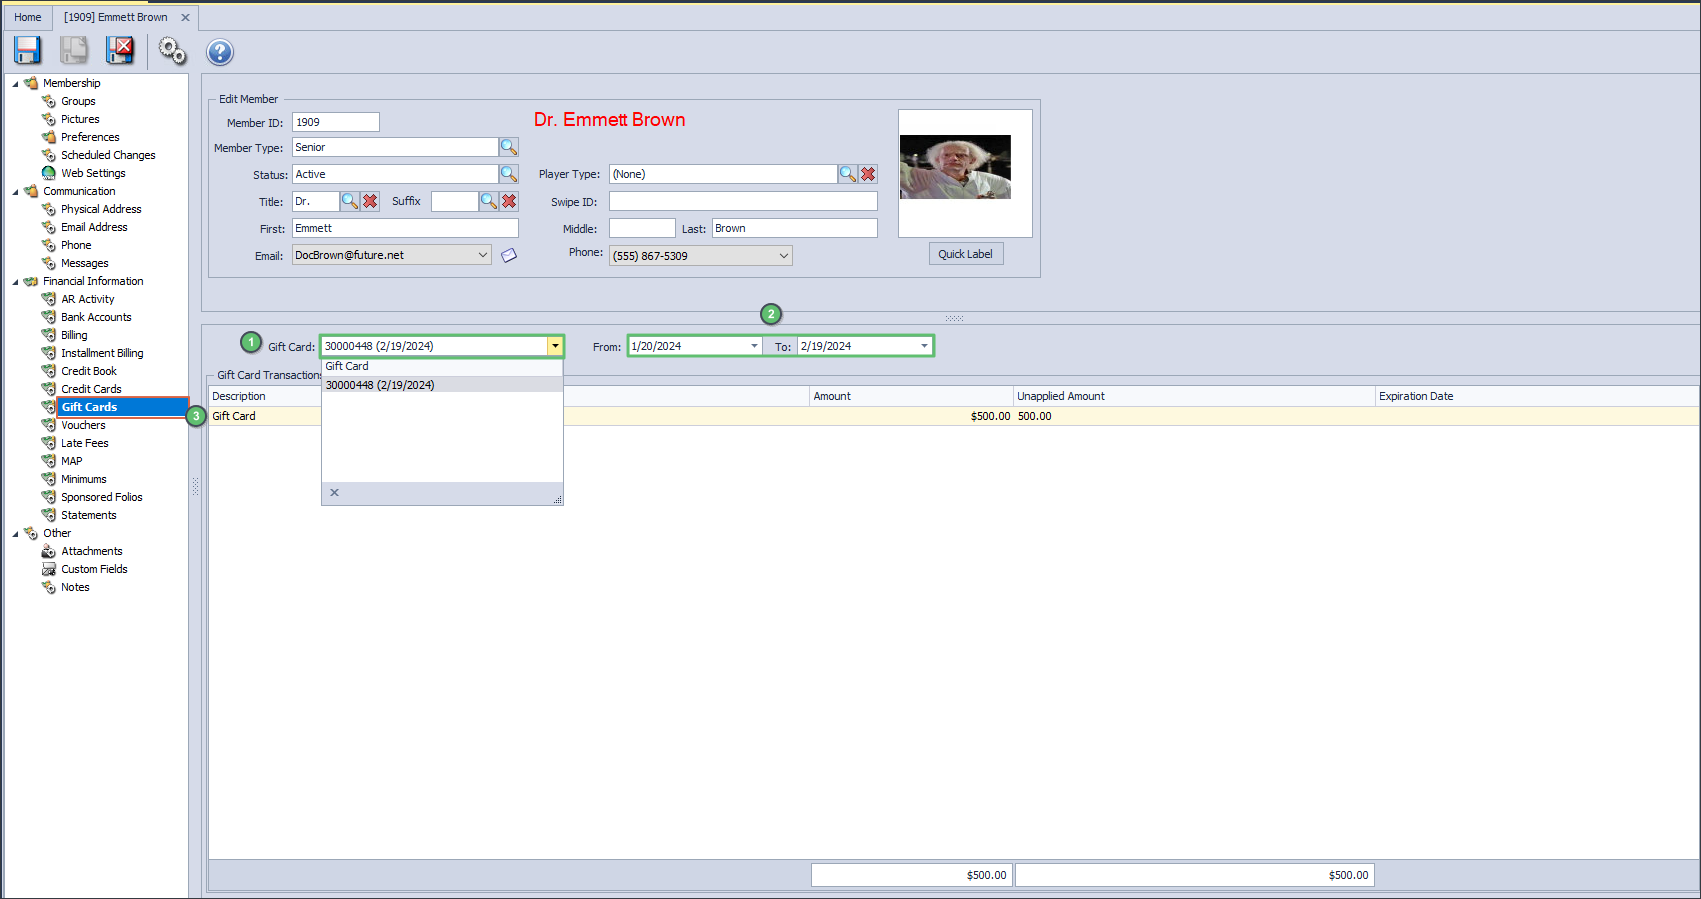
View which gift card type you want to see.
Set a date range for gift cards to show up for.
Gift Card Transactions.
Vouchers
The Vouchers tab will allow the user to set a date range for all Vouchers issued or redeemed. You will see a list of the vouchers showing the expiration date, date sold, sold qty, used qty and remaining qty for each voucher pack. Selecting the dropdown next to a voucher pack will show you the ticket it was redeemed on and for which item the voucher was applied to.
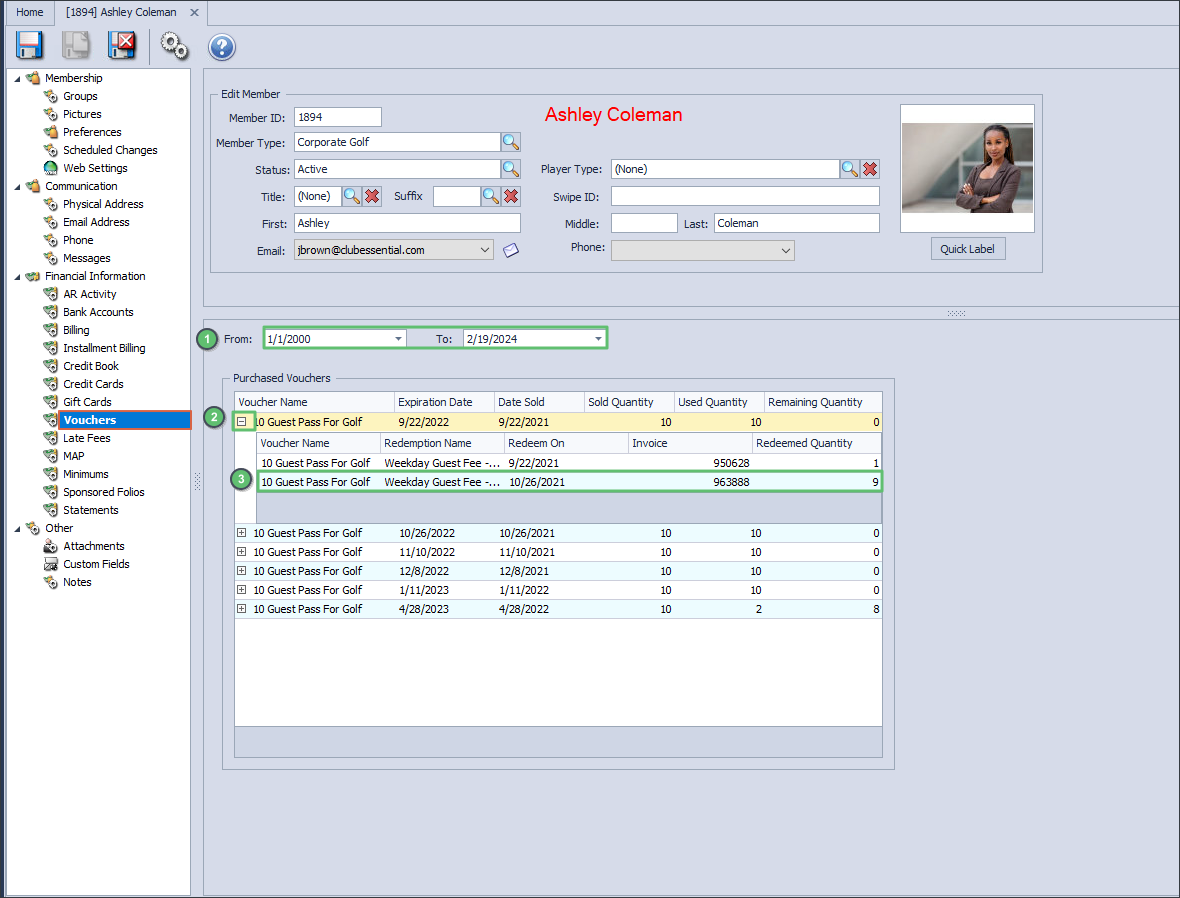
Statements
The Statements tab will allow you to see and print the statements sent out to the member.
Late Fees
To view and/or assign Late Fees to a Member, click the Late Fees tab. The Member Specific Late Fees can be viewed in the top grid.
To apply a late fee to the Member:
Check the box in the Selected column.
To apply all, click the icon to the right of the grid with the list in it.
To unapply all, click the blank icon.
Late Fees based on the Member’s type will display in the lower grid.
MAP (Membership Analytics Predictor)
The MAP tab shows member specific spending an MAP trends for the established MAP period configured in the MAP settings. Please see the guide here for MAP.
Minimums
To establish a Member’s Minimum spending requirements, click on the Minimums tab. Complete the Details of the Minimum.
Click View Minimum Activity button to view the Member Minimum Activity Report, containing the details of the Minimum to Spend, Minimum Spent details, and the Unspent amount.
Other Information Section
Attachments
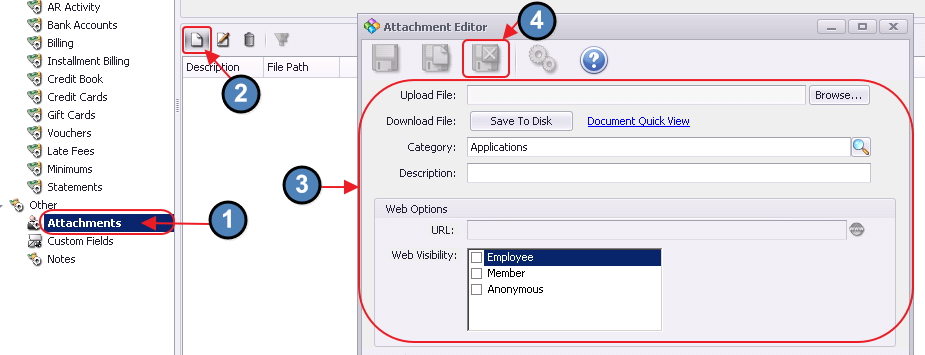
The attachments tab allows for document attachment to a Member’s file.
To attach a new document (such as the Member’s Membership application):
Click the Attachments tab.
Click the New icon.
Complete the Attachment Editor screen.
Click Save and Close.
Custom Fields
Click on the Custom Fields tab to populate additional data regarding the Member.
These Club defined fields allow a Club to capture additional items such as the Member’s Profession, Education level, Boat Name, Hobbies, etc.
Notes
The Notes tab allows for additional free-form notes to be put on a Member’s Account.
To attach a note:
Click on the Notes tab.
Click the New icon.
Enter a Name and Category for the note, type/format the note.
Click Save and Close when complete.
Save and Close
Once changes/updates are complete, click Save and Close in the main heading area to save all changes/edits to the Member.
Best Practices
To ensure New Members are set up consistently and desired Member data is populated, review the Manage Vendors Grid with various filters to identify blanks within the Membership database.
Strive to keep Member records updated with the most applicable data to ensure Club communication and Member experience is most effective.
Join Date can stop a member from syncing to the website if it is a date in the future. If you are creating a member account now and need them to show in the directory now, be sure the join date is set to today or a day in the past.
FAQs
Q. How do I review Member details of a Member no longer on my Manage Members grid?
A. In the Manage Members grid, click on the Active icon to display All Records. All records can be retrieved whether they have been inactivated or deleted.
