Office - Paycloud - Admin Guide - Manage Your System
Table of Contents
- 1 Overview
- 2 Required Permissions
- 3 Manage your System
- 3.1 Users
- 3.1.1 Members
- 3.1.2 Impersonate Member - Troubleshooting Tool
- 3.1.3 System Users
- 3.1.3.1 Adding new System Users
- 3.2 Reports
- 3.2.1 Payment History
- 3.2.1.1 Member Canceled Payments
- 3.2.2 Scheduled Payments
- 3.2.3 Account Change
- 3.2.1 Payment History
- 3.3 Private Content
- 3.3.1 Statements
- 3.3.2 Payments
- 3.4 Member Facing Views
- 3.4.1.1 Monthly Statements
- 3.4.1.2 Transaction Details
- 3.4.1.3 Minimums Spent
- 3.4.1.4 Current Activity
- 3.4.2 Make a Payment
- 3.4.3 Credit Book Activity
- 3.5 Office Posting/Batches
- 3.6 Deleting a Batch/Transaction
- 3.1 Users
- 4 Best Practices
- 5 FAQs
Overview
This guide overviews Admin setups for PayCloud that will affect how the member will interact and engage with the payments system.
Required Permissions
Paycloud Admin
Manage your System
Member’s have the ability to set up and interact with their payment information. If they have any issues during setup or while maintaining their accounts, you can guide them through the process or complete it for them.
Please refer to the PayCloud Member Guide for assistance in helping members set up Bank Account information or Credit Cards for payments as well as scheduling recurring or one time payments.
Users
Members
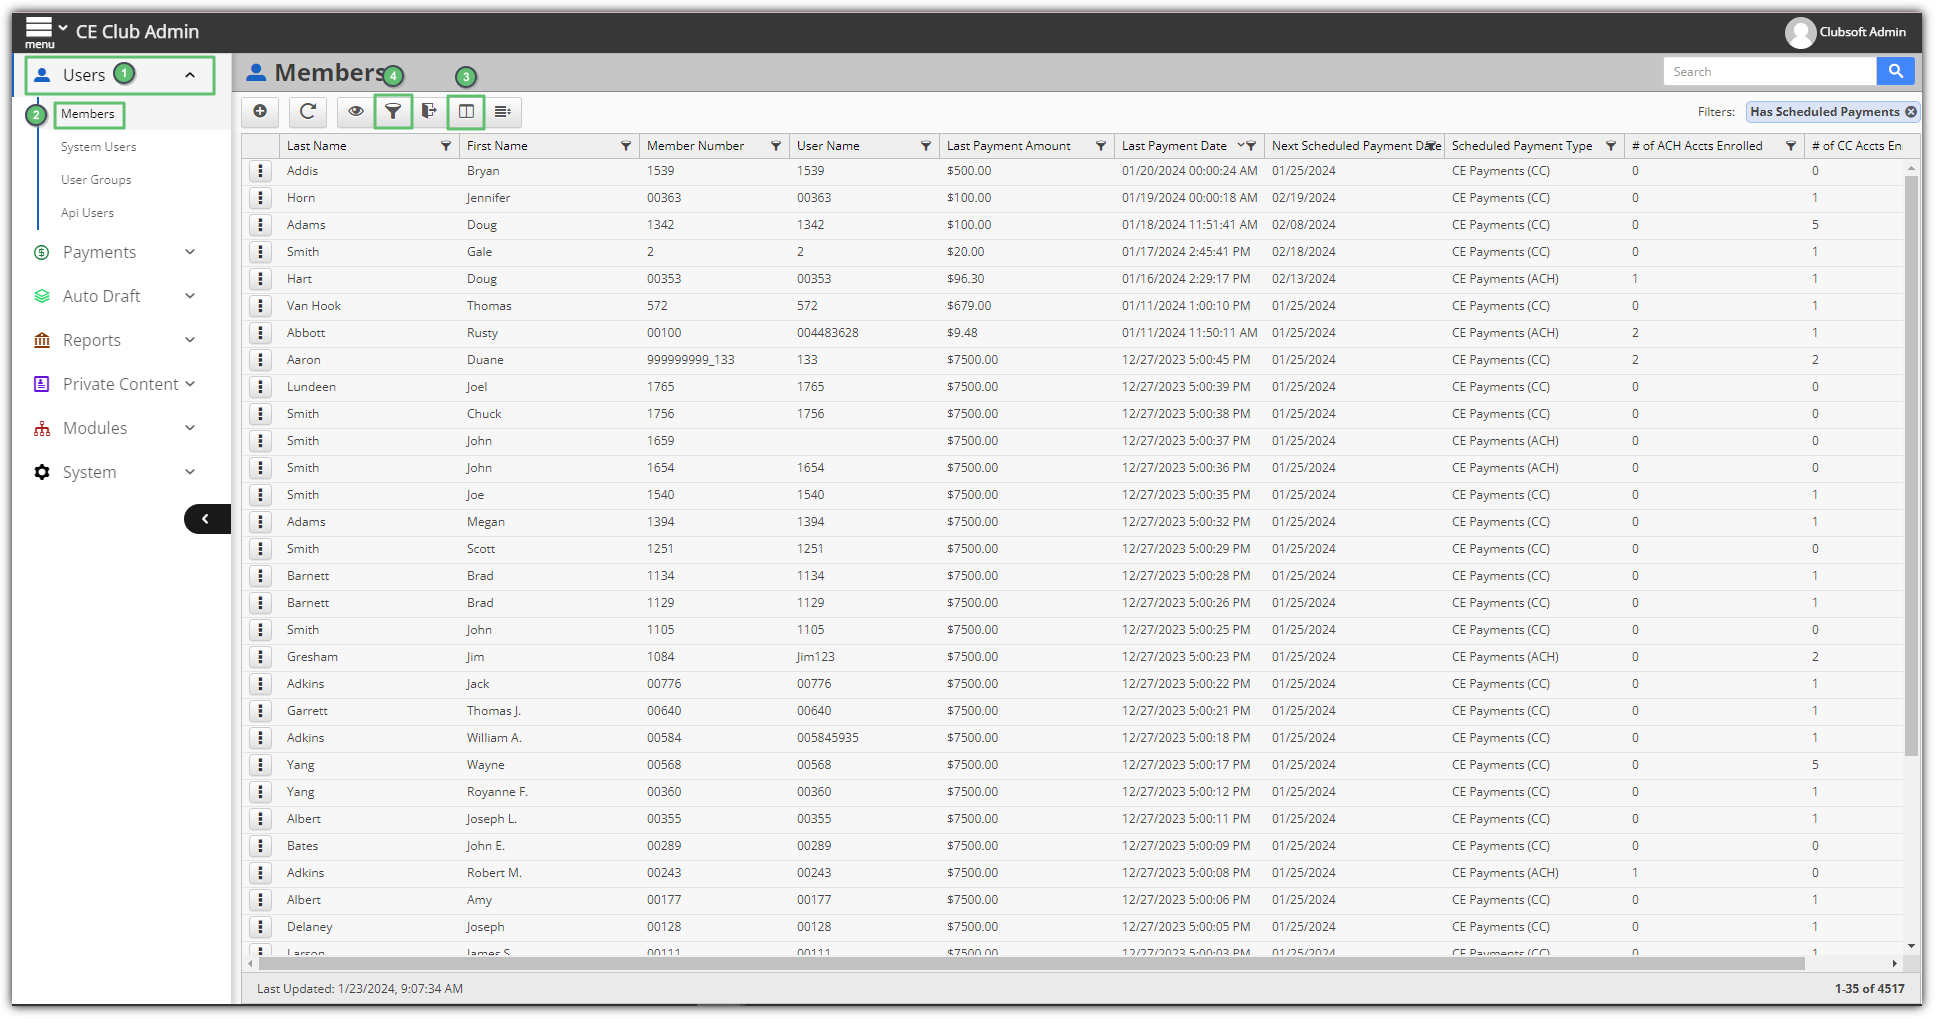
All Club Members can be viewed in the Users - Members section. (For Office clients, the Member list will auto-populate from the Office system.) Columns can be sorted, and/or filtered to easily find desired information. Scheduled Payment columns (Next Scheduled Payment Date, Scheduled Payment Type) and filter (Has Scheduled Payments) can easily help identify Members with upcoming scheduled payments.
Impersonate Member - Troubleshooting Tool
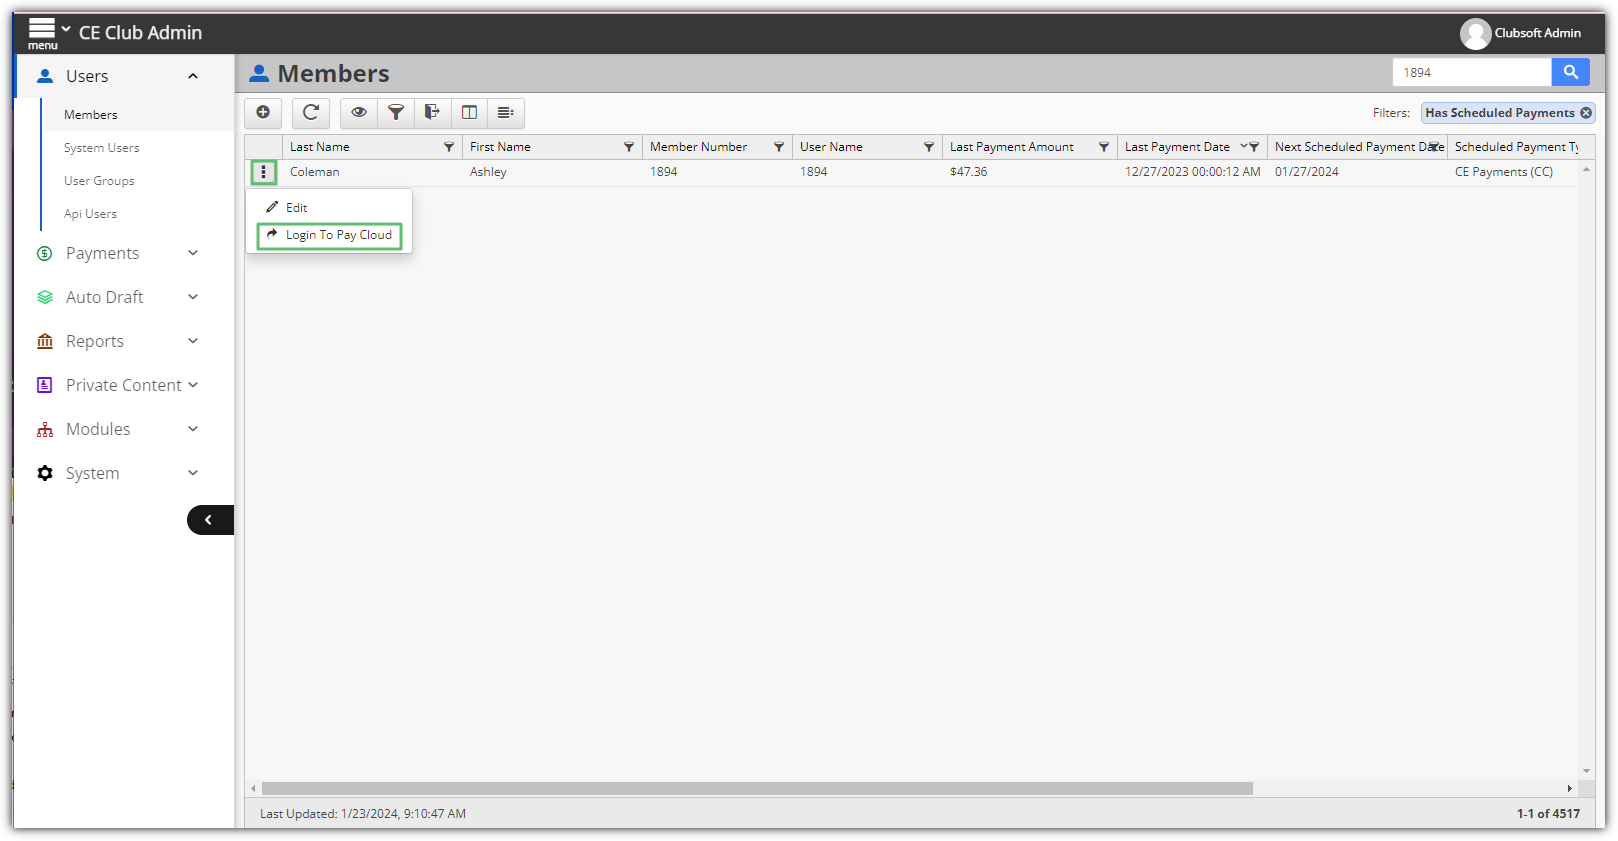
To assist troubleshooting a Member’s account, and view the account from the Member’s view, from the Users - Members menu, click the three dots to the left of a member’s name and choose Login To PayCloud.
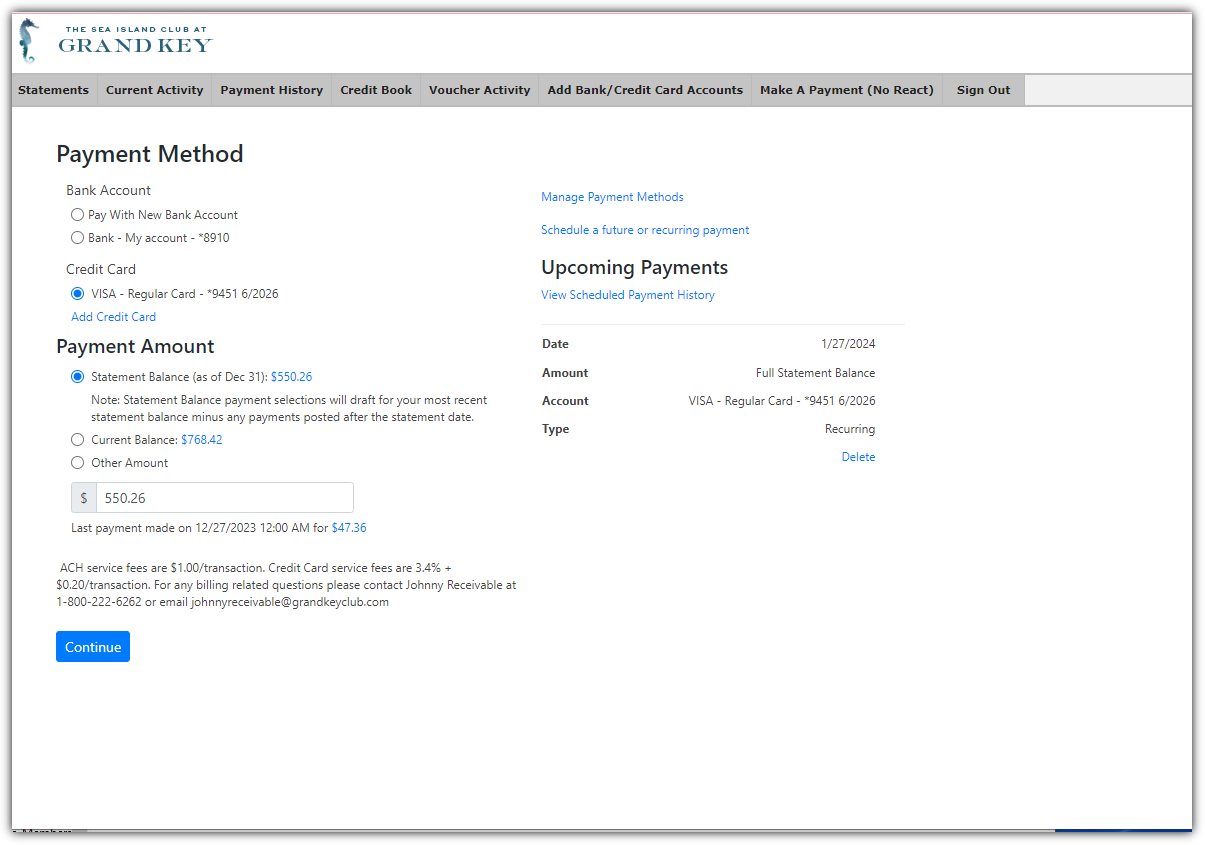
Then, the Member’s view will appear. Troubleshoot as needed.
System Users
The system users section includes club users; any Staff Members who have been granted access to the PayCloud system. Permissions to PayCloud will not be inferred or applied from any other system (Accounting or Website), and must be added here.
Adding new System Users
Add a new user/staff member to the system by clicking the Add button under the System Users menu.
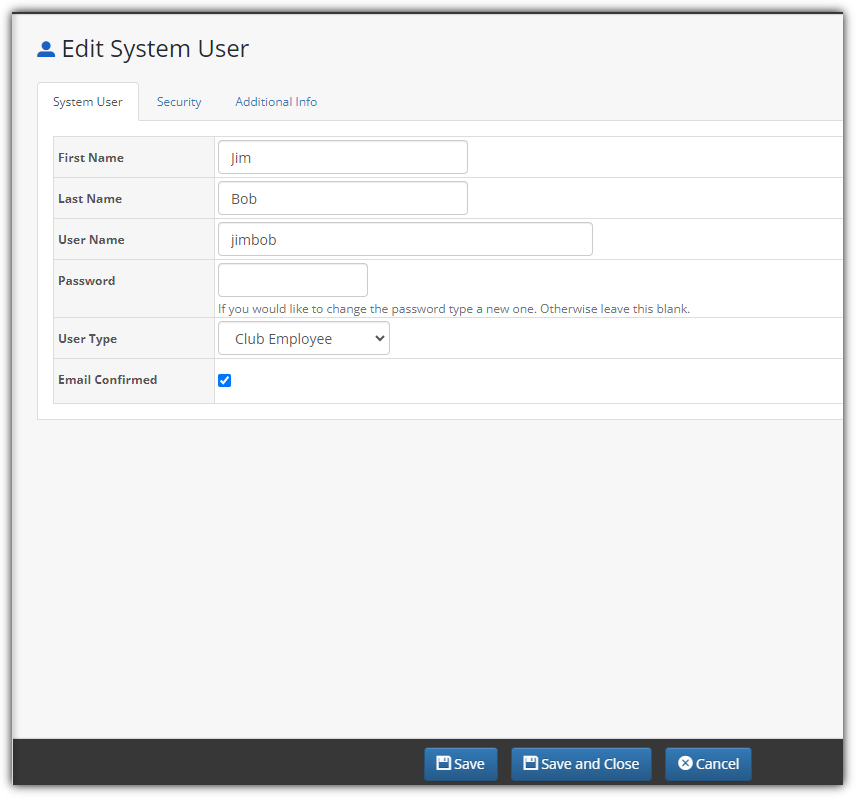
Insert all information related to the Staff Member; first and last name, email, username, and create an initial password for them to login. The User Type will need to be defined as Club Employee or Club Administrator. Club Administrator User Types can edit content, manage various system settings while Club Employee User Types have basic viewing level access.
System Users can be removed by clicking on the three dots next to a user and then selecting Delete.
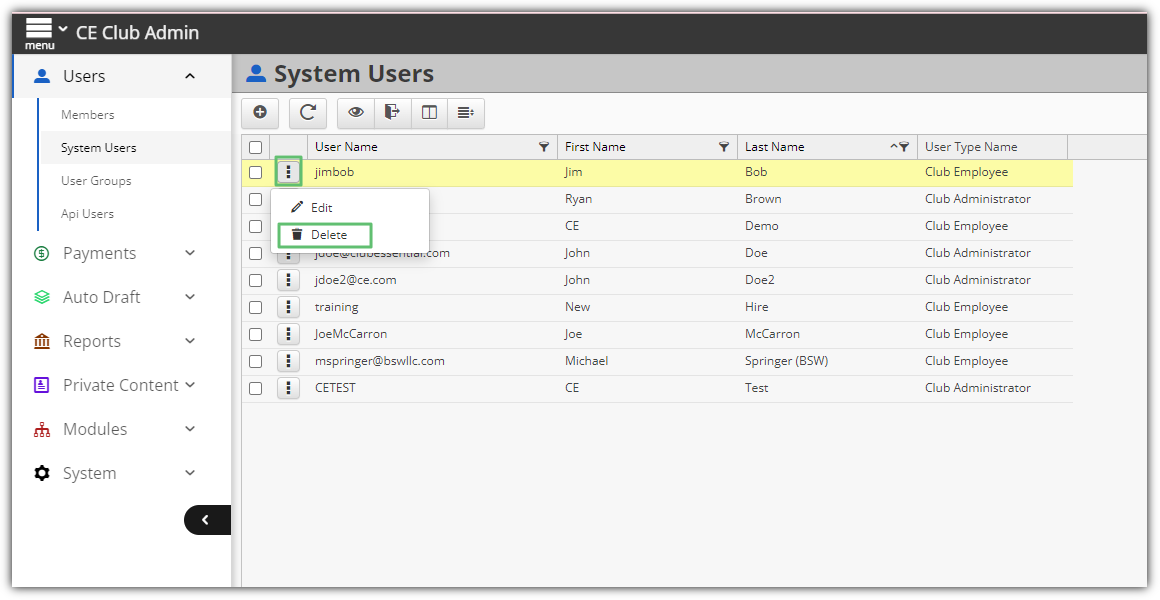
Please Note: Use the Staff Member’s email address when creating a Username. The email address should be unique and therefore will not be be duplicated by another user.
Please Note: Password must be longer than six digits, needs one uppercase character, and one numeric character.
Reports
Payment History
This report contains the payments made by Members using the PayCloud system. The report can easily be filtered (using the predefined filters) and/or customized (using the date range feature) to quickly display the data desired. Easily view payments from Today, the Past Week, Past Month. Also, for Clubs with Autopay enabled, easily view the payments based on status Successful or Unsuccessful.
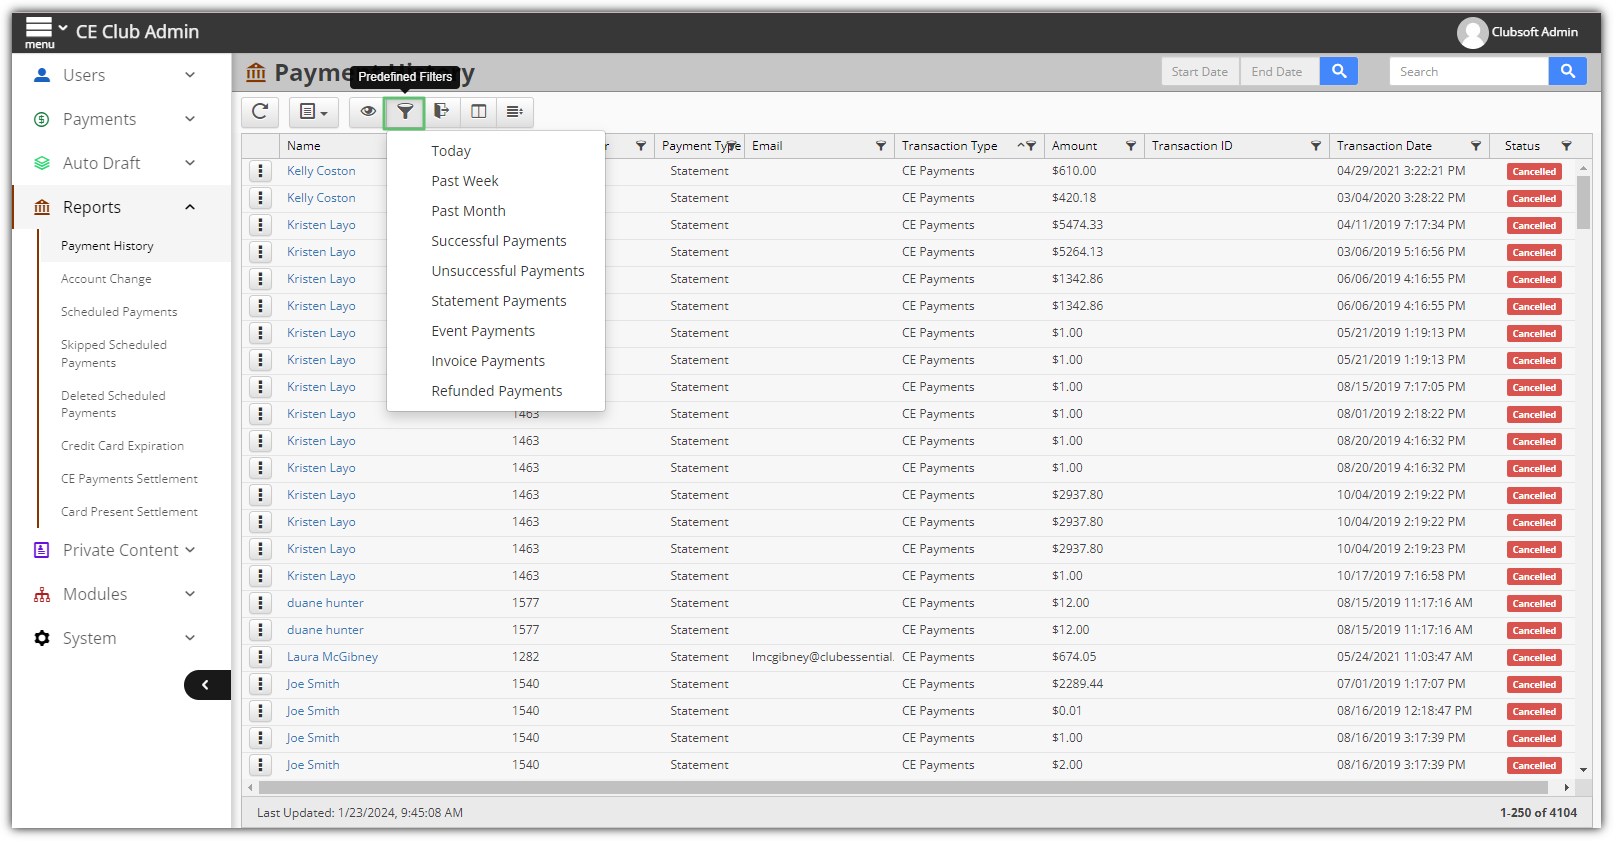
Additional date range filters can be applied to limit results displayed to the date range specified.
To clear date range or other filters, click on the X next to the applied filters to delete them.
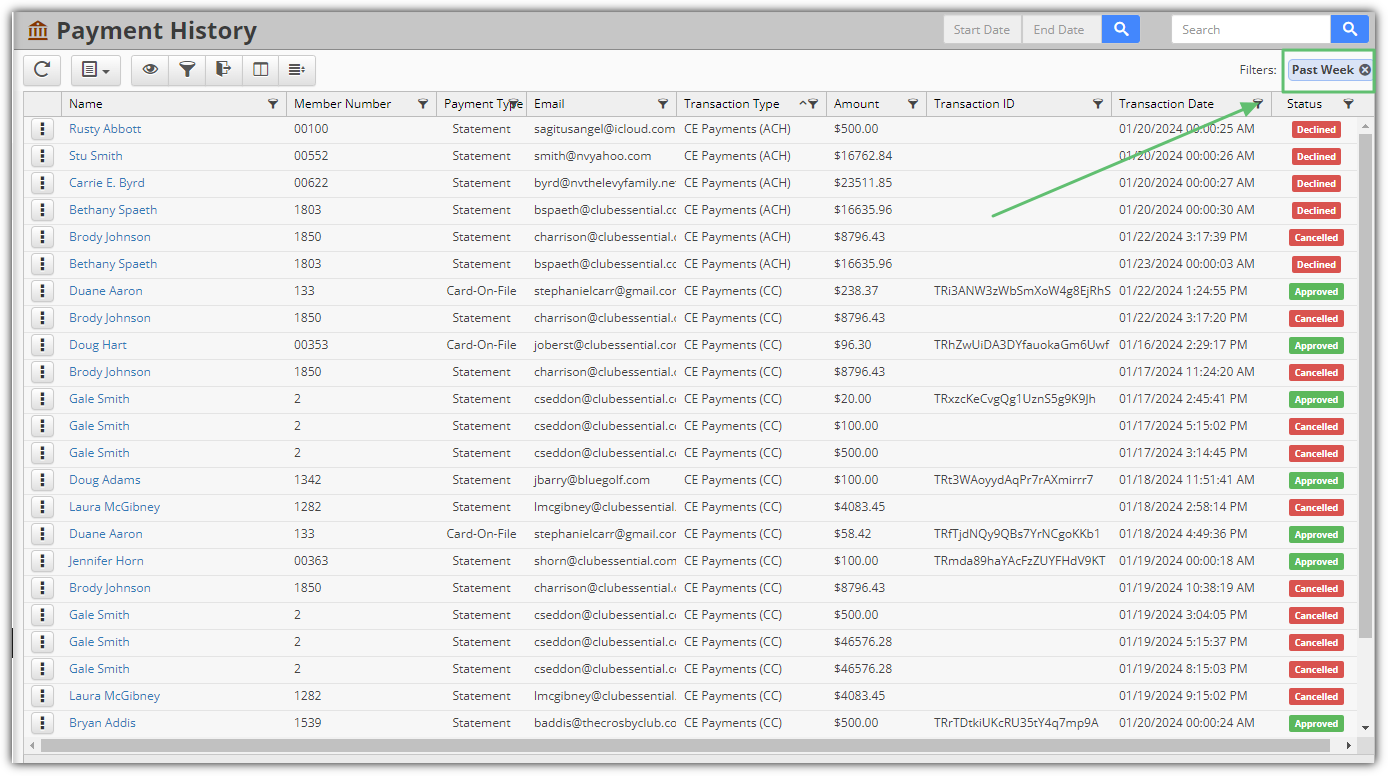
Or, to Search for a specific Member, payment amount, or other data, enter it in the Search box and click the Search icon. Results containing the data will be returned.
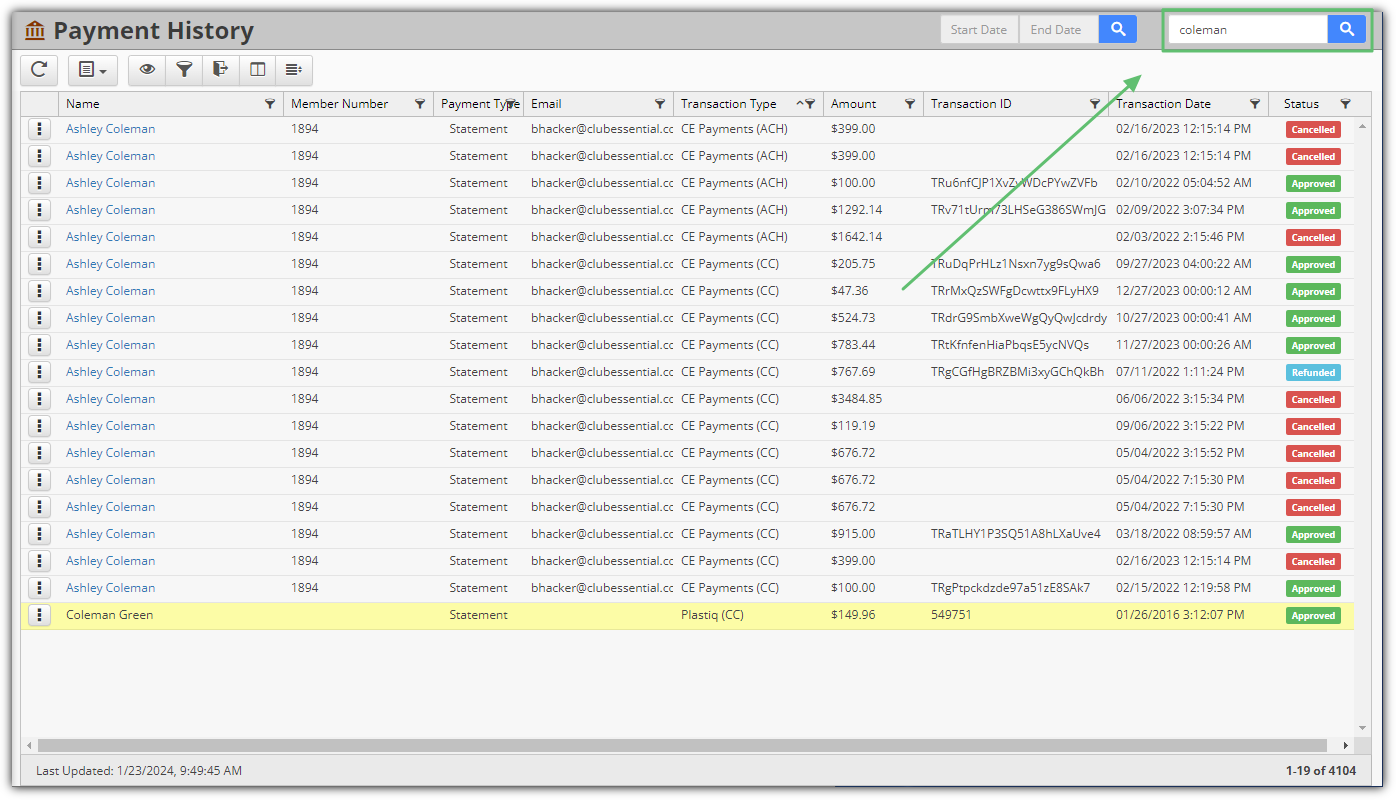
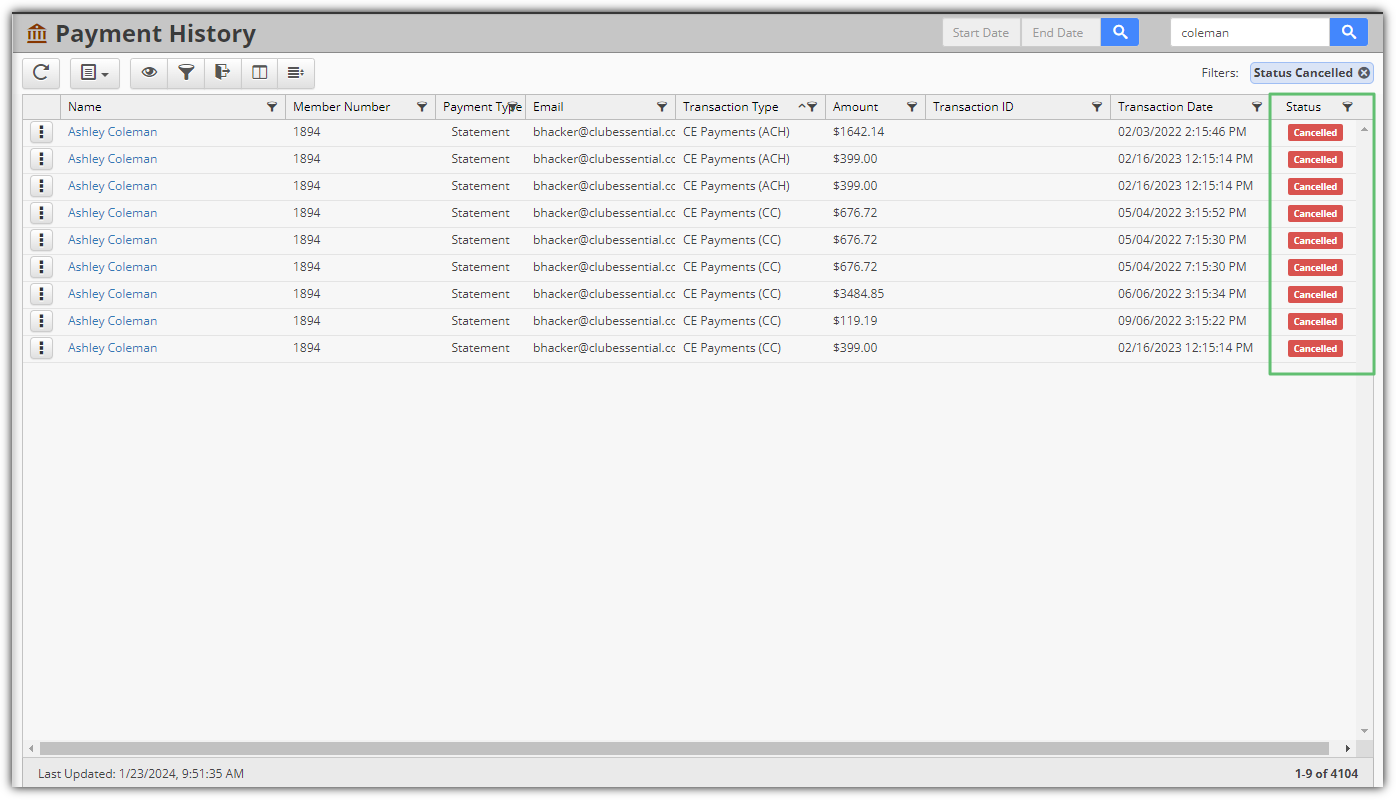
Member Canceled Payments
Canceled payments are added to the report following any of these actions:
Clicking the cancel or back button on the page during the payment confirmation.
Clicking the back browser button during payment confirmation.
Closing the browser during payment confirmation.
Refreshing the page during payment confirmation.
Leaving the page to timeout during payment confirmation.
All these scenarios will now create a payment response record with the status ‘Canceled’ and the response text: ‘Canceled by Member’ to alleviate confusion with the old messaging ‘Unable to find a transaction for this request’
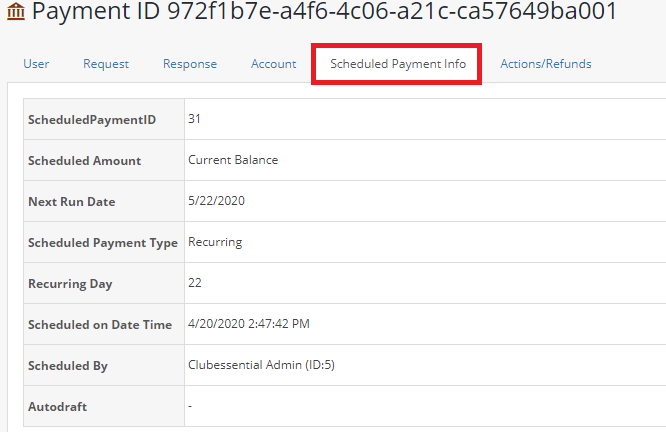
Scheduled Payments
Scheduled Payments displays additional details about the scheduling such as scheduled amount, type, recurring day, scheduled date/time, scheduled by, etc.
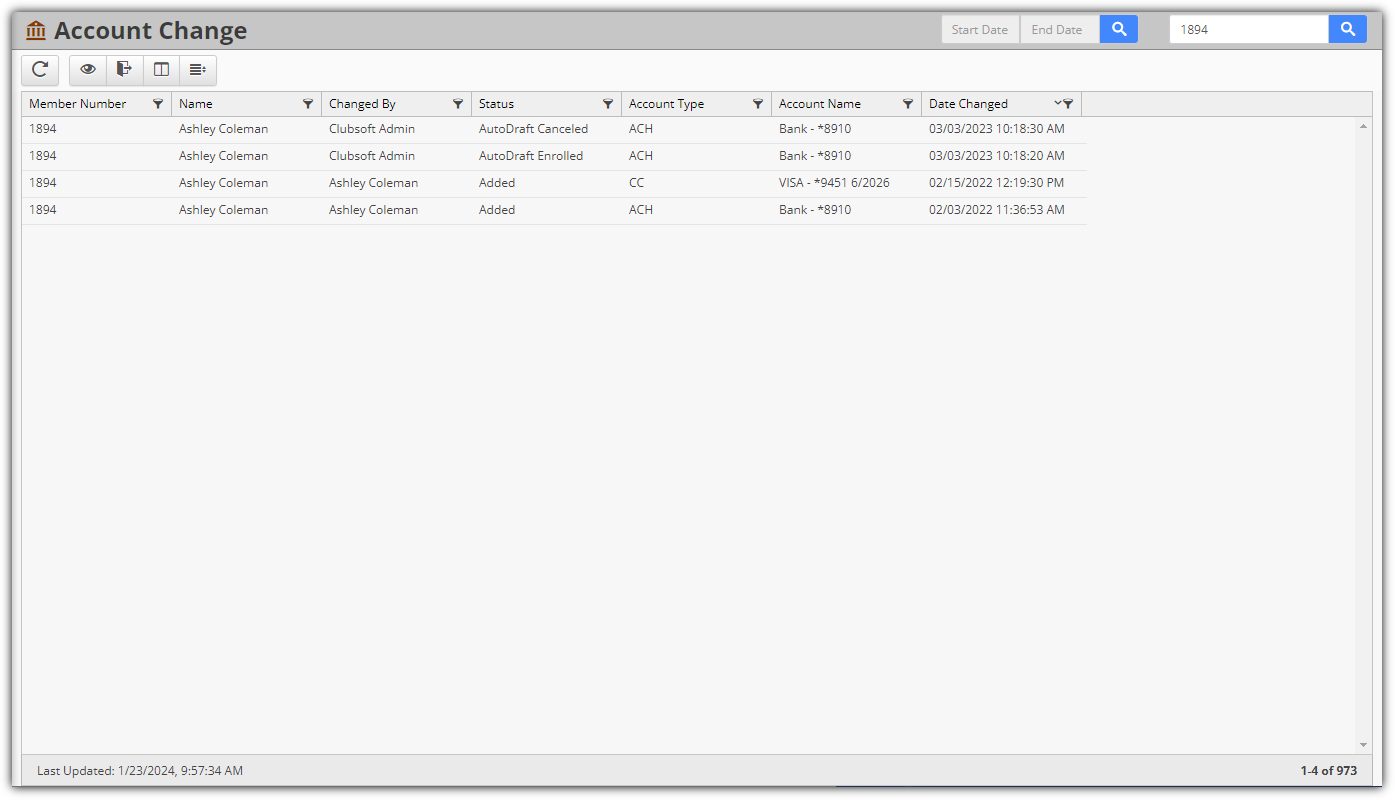
Account Change
The Account Change report contains a log of all Member account changes. This report is especially useful when investigating payment details associated with scheduled payments, and/or other payment issues. The report details the change that occurred, when it occurred and who made the change.
Note: Filters can be applied, and details can be exported.
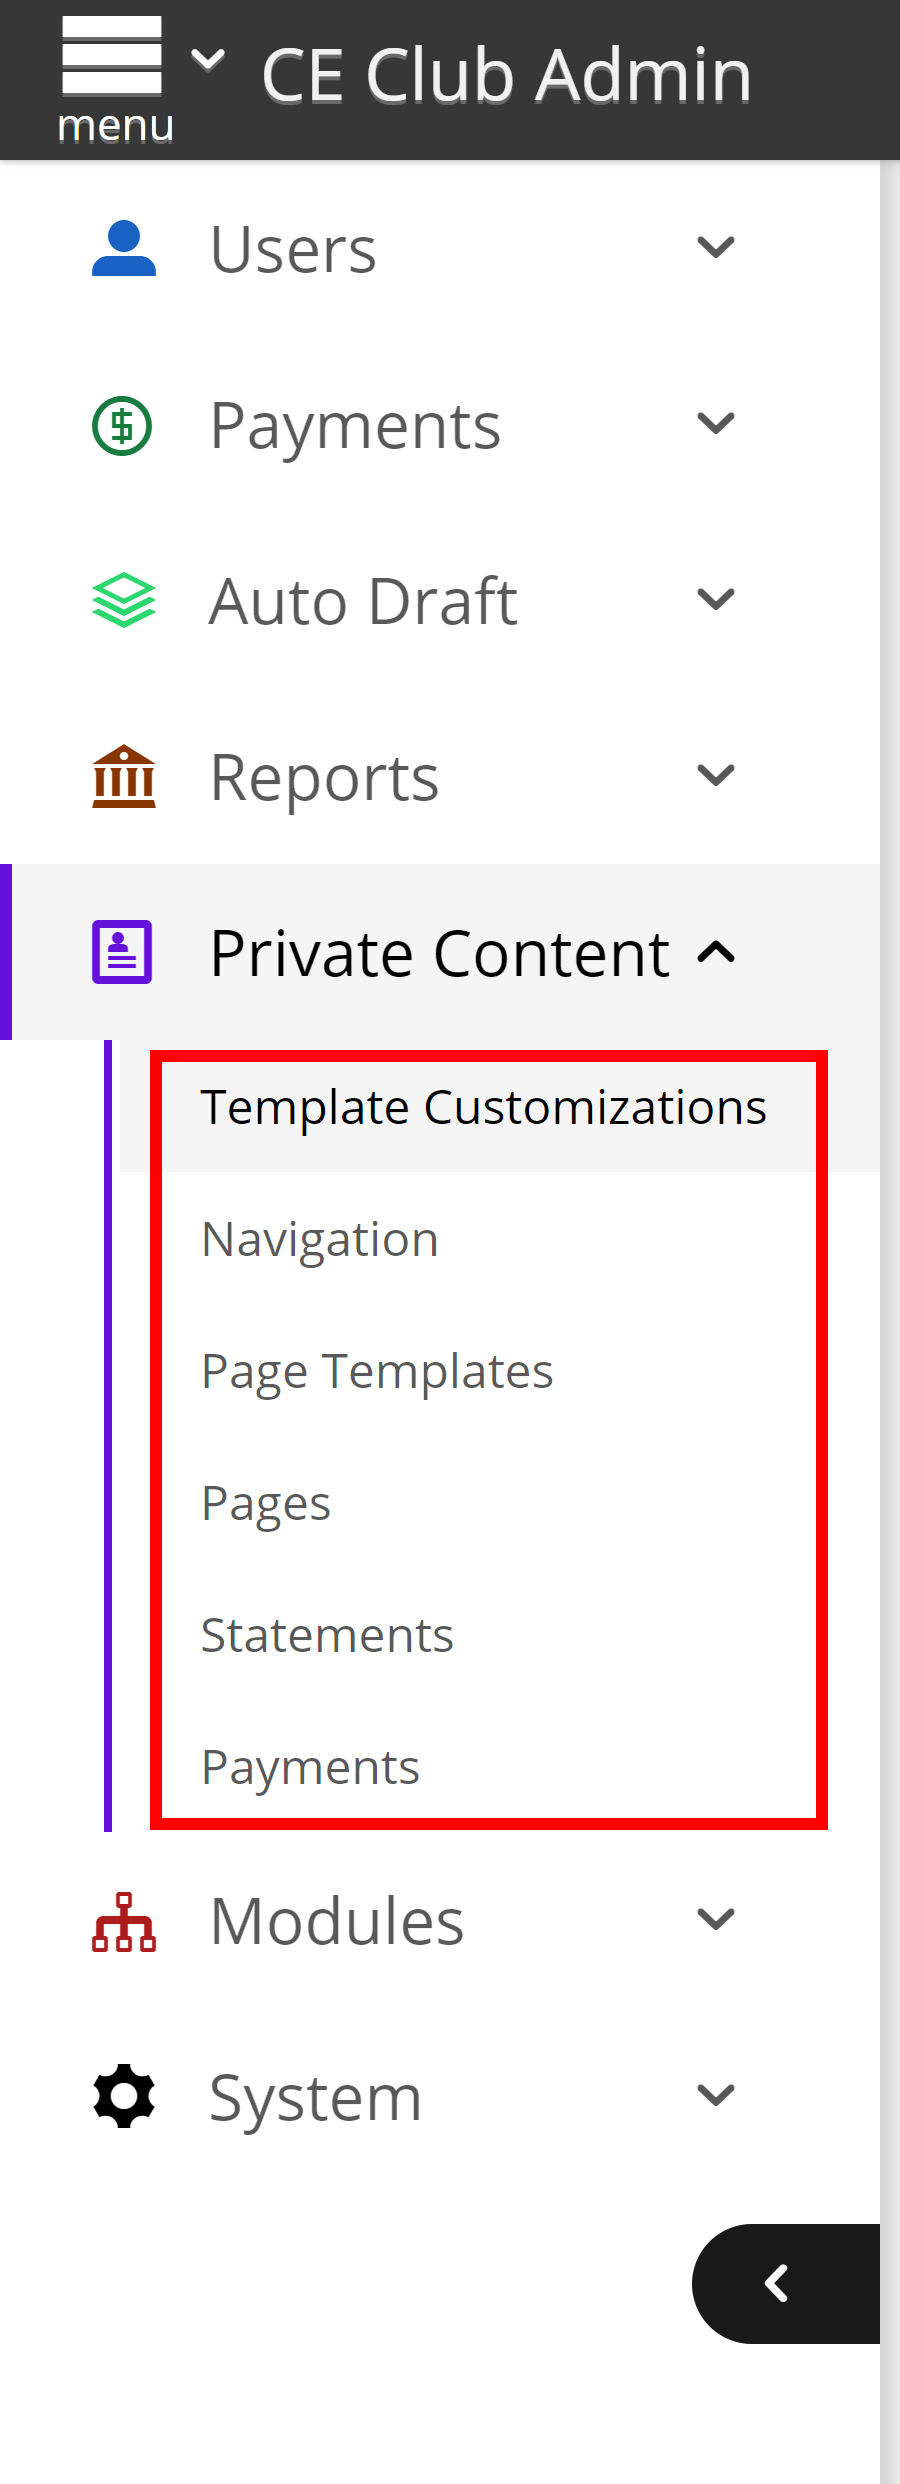
Private Content
The Private Content section contains a couple of areas relevant to Clubs utilizing the PayCloud online payment and statement features. While these areas are typically addressed/populated during implementation, it is important to note where/how these items can be modified as needed.
Statements
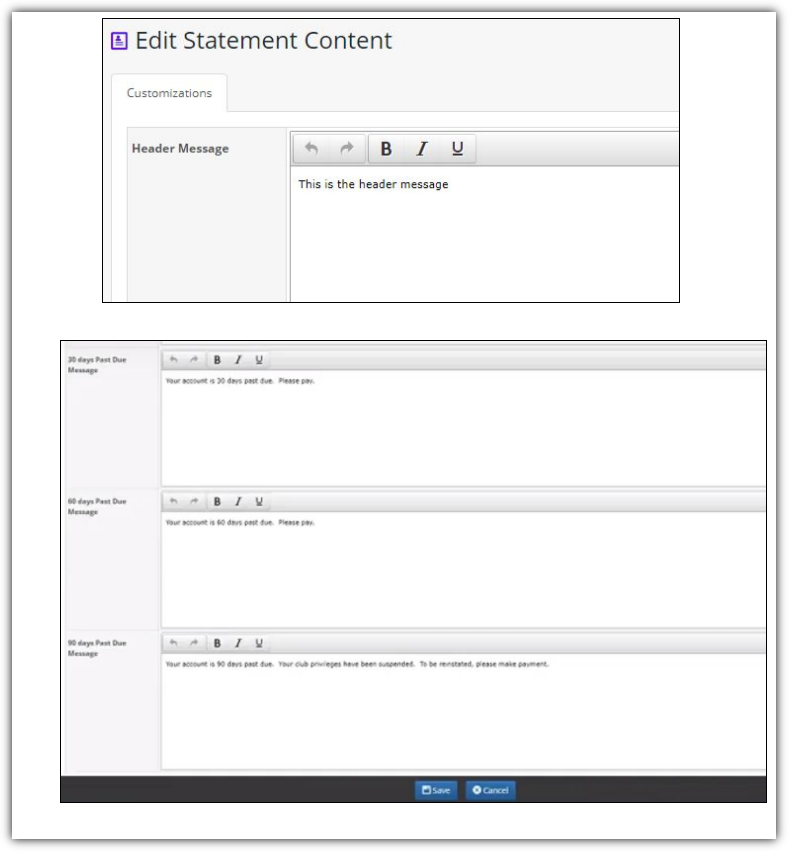
Enter any additional statement data (customized messages) to include in your Club’s online statements. Header, footer, contact info, and/or past due notices (30, 60, or 90 days past due) must be populated on this tab (they do not flow from Office) to be viewable by Members in the PayCloud system.
Payments
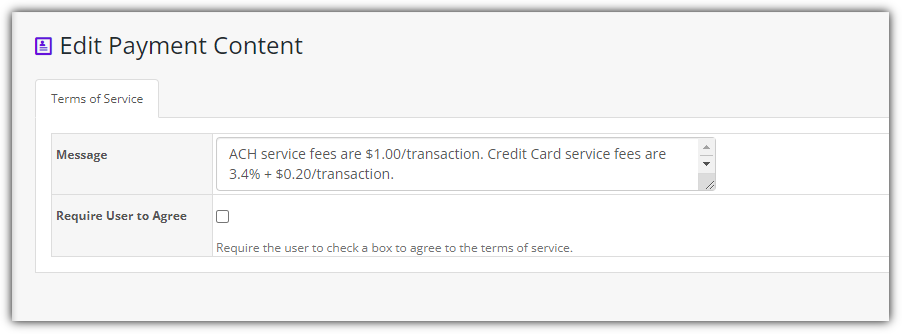
While Terms of Service are not required, they are very useful for Clubs communicating a convenience fee associated with a payment, or other message. The message on this screen appears on the Make a Payment screen for Members, and can either be required for acknowledgment (Member must agree to terms to proceed), or can be for informational purposes only (leave Require User to Agree unchecked.)
Member Facing Views
Part of managing the system, implies that you understand what your Members are able to see, and what options are available to them for use.
Monthly Statements
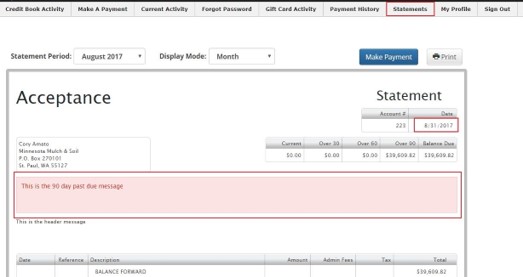
This tab will populate once Statements are run in Office. When running statements, the last day of the club’s month should be used as the statement publish date, and as a result, the statements will appear on the website and trigger past due notices appropriately.
Transaction Details
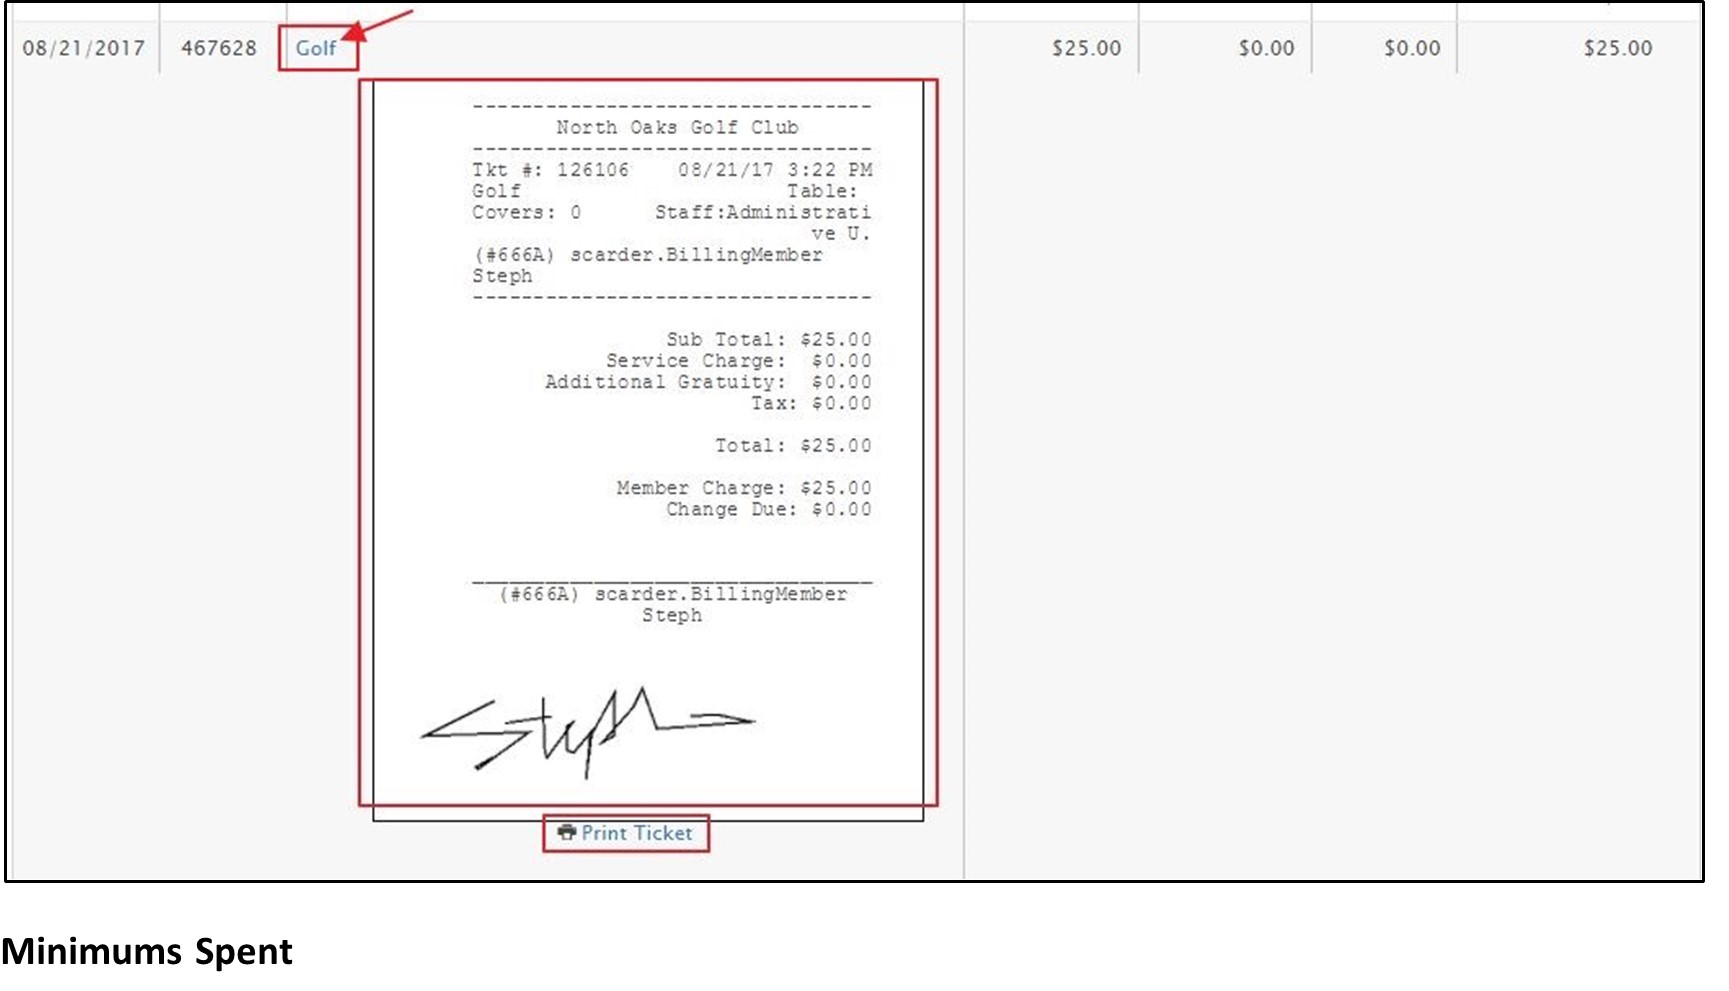
Members can easily view Transaction level details by clicking on the Description hyperlink. Transaction details will then appear. Transaction details (ticket) can be printed if required as noted below (Print Ticket).
Minimums Spent
Members can easily view their Minimums spent in the Current period at the bottom of the statement.
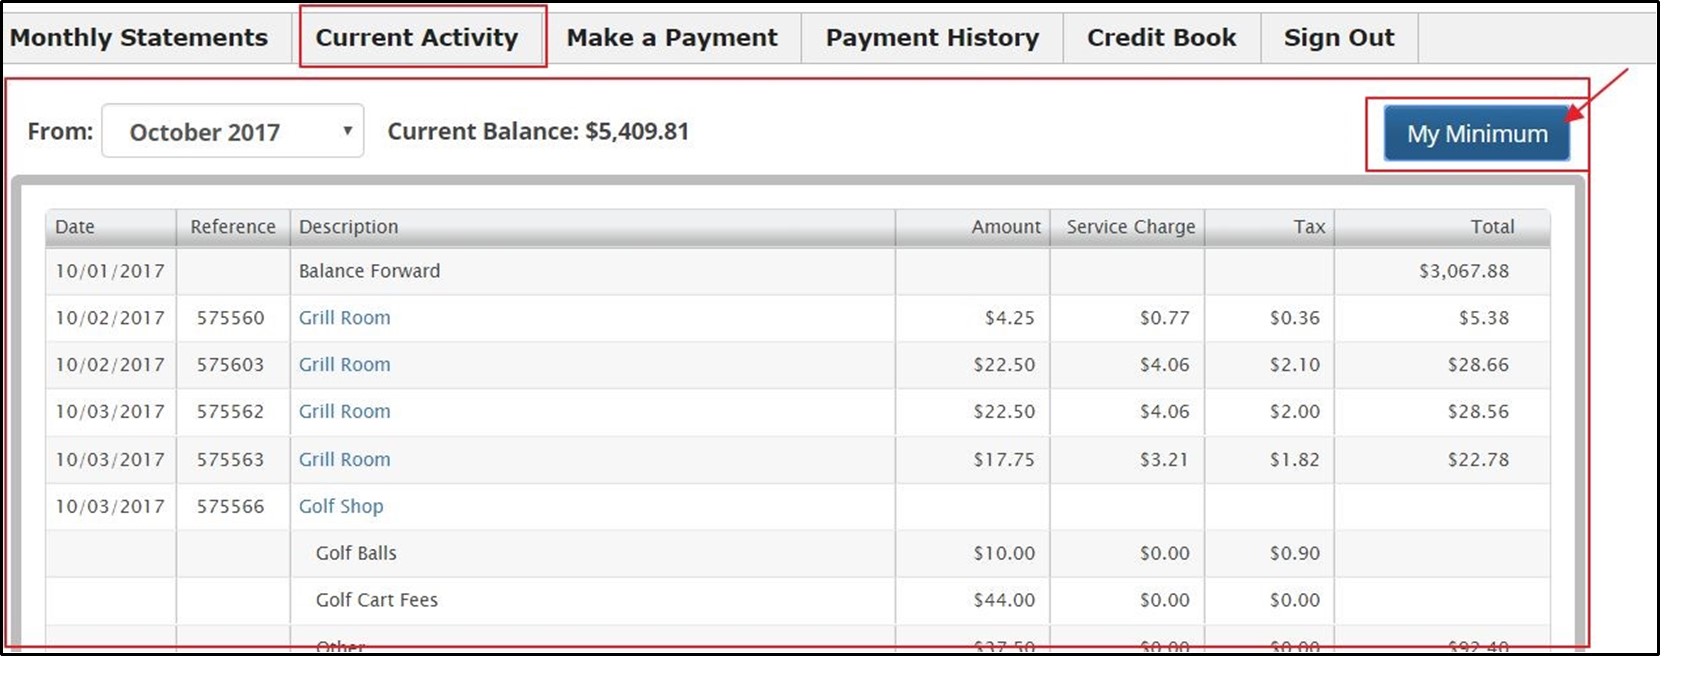
Current Activity
Members can view all charges for the current month (including Minimums spent), on this tab. Minimum details appear in a pop-up box after My Minimum is clicked.
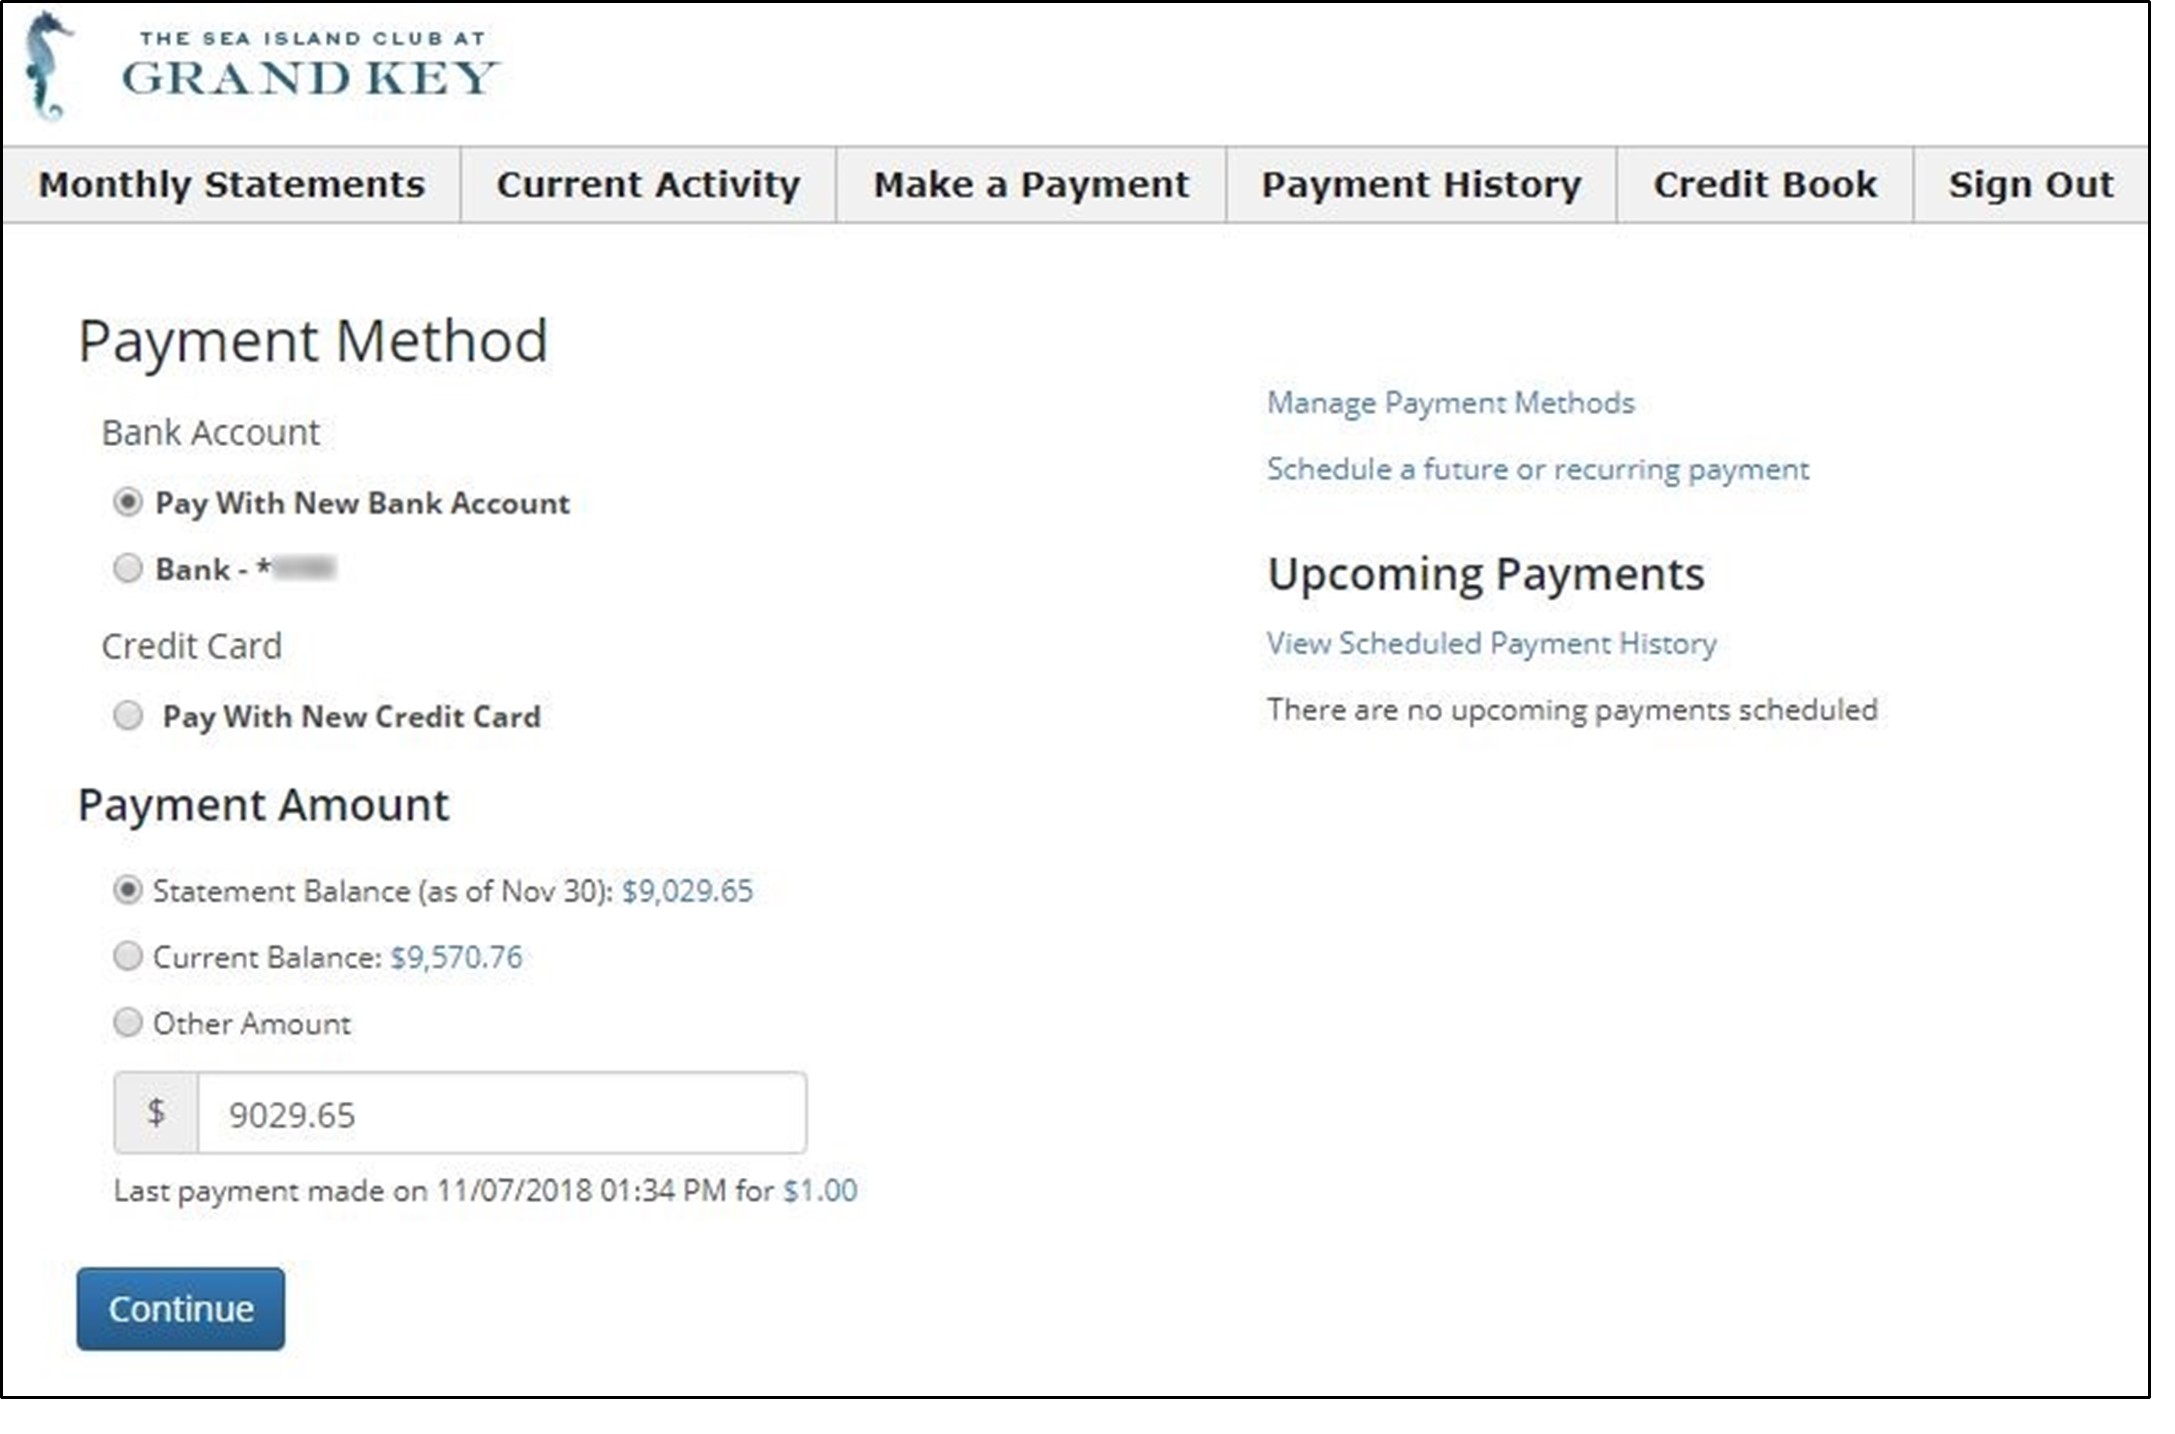
Make a Payment
Members can easily designate payment method, payment amount, manage their payment methods, and/or schedule a one-time or recurring payment for the future. More details can be found in the PayCloud Member Facing Guide pertaining to these features.
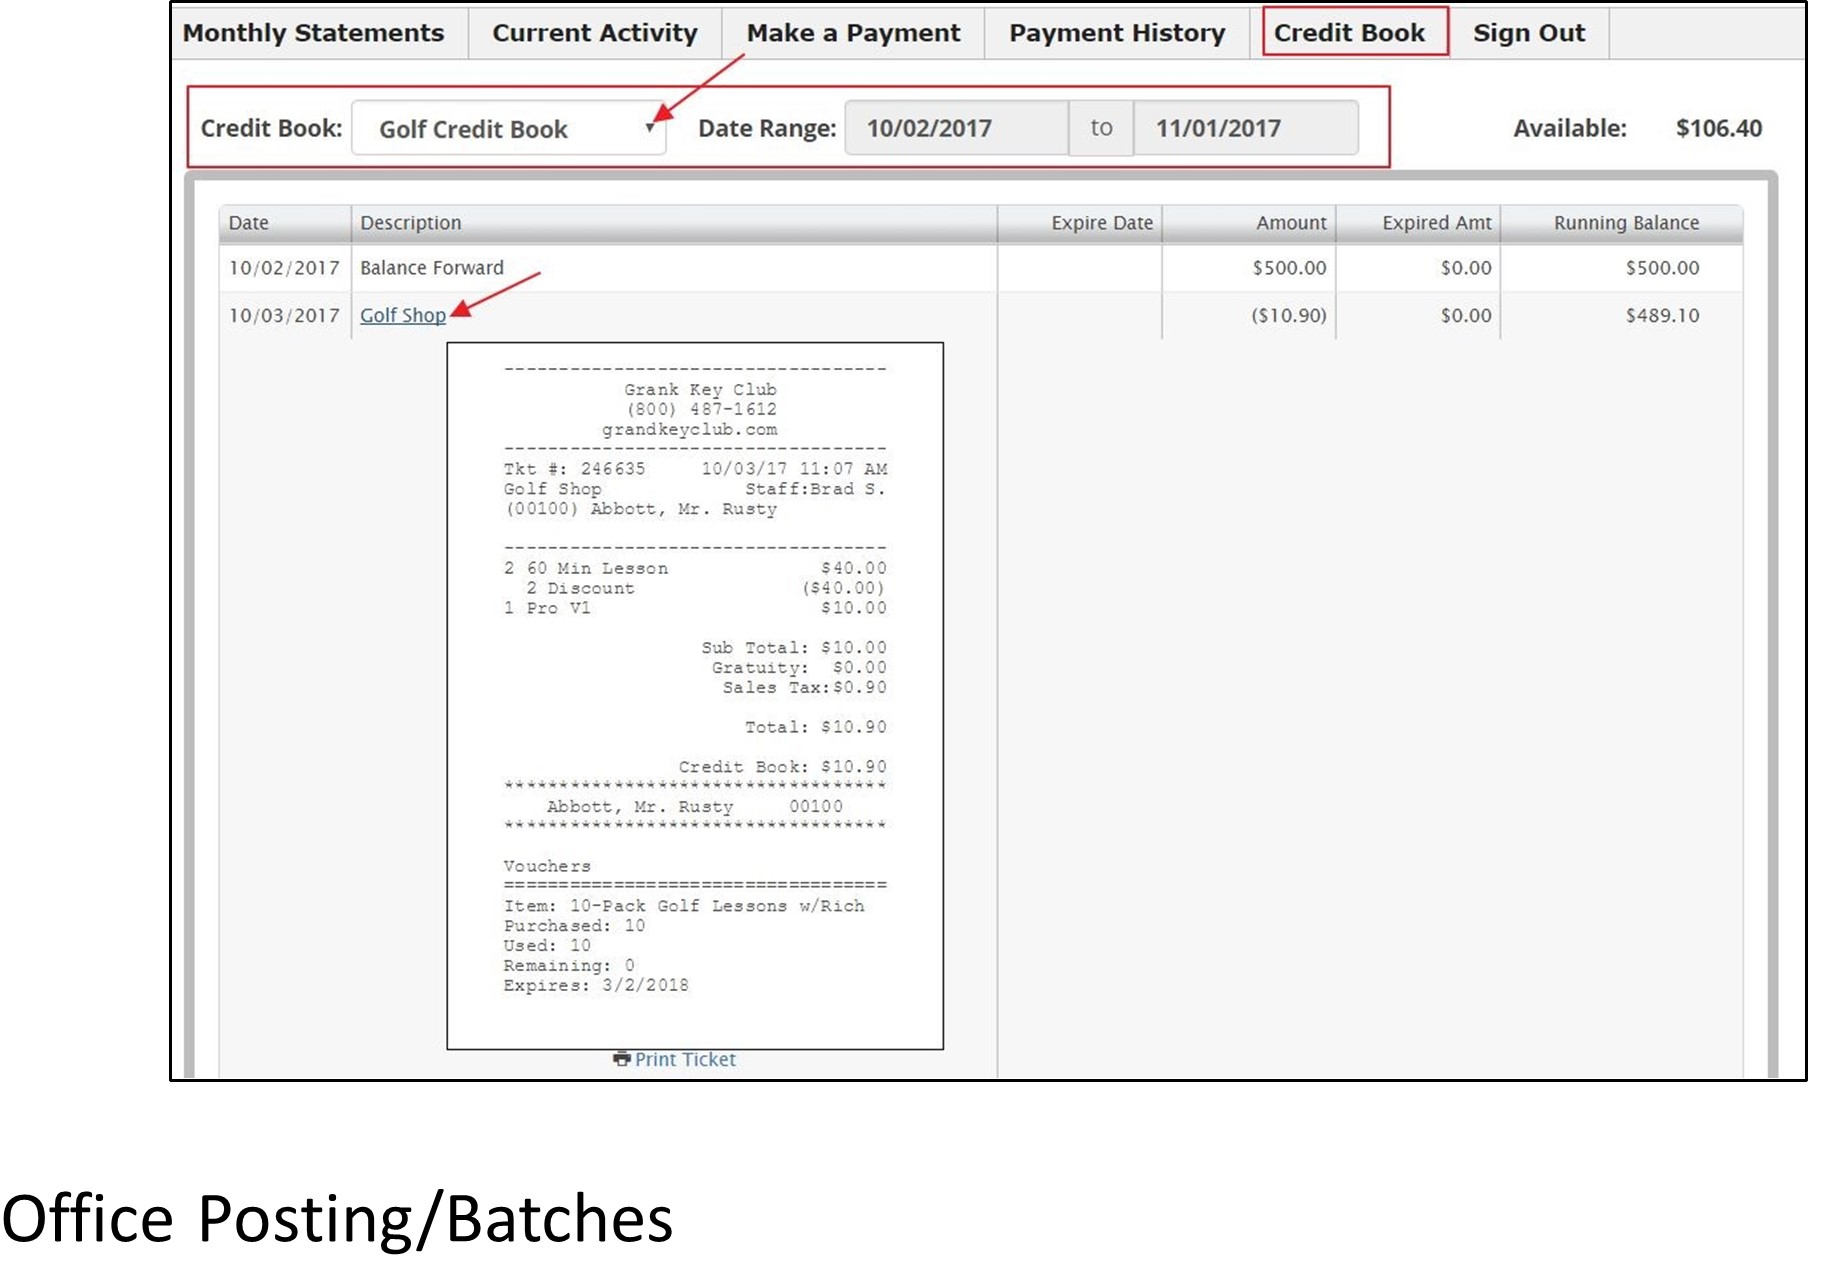
Credit Book Activity
This tab contains details associated with Credit Books. If more than one Credit Book type is available, it may be selected from the drop-down. Additional Date Range filters can be applied to adjust returned results. Similar to the Statement and Current Activity screens, transaction level details may be accessed (and printed) by clicking on the Description.
Office Posting/Batches
PayCloud batches automatically flow into Office for easy posting. Two cash receipt types work with Paycloud Payments; Paycloud CC, and Paycloud ACH. Clubessential will ensure these two cash receipt types are set up and configured to apply to the same debit account settings as the other cash receipt types for your club during the implementation process.
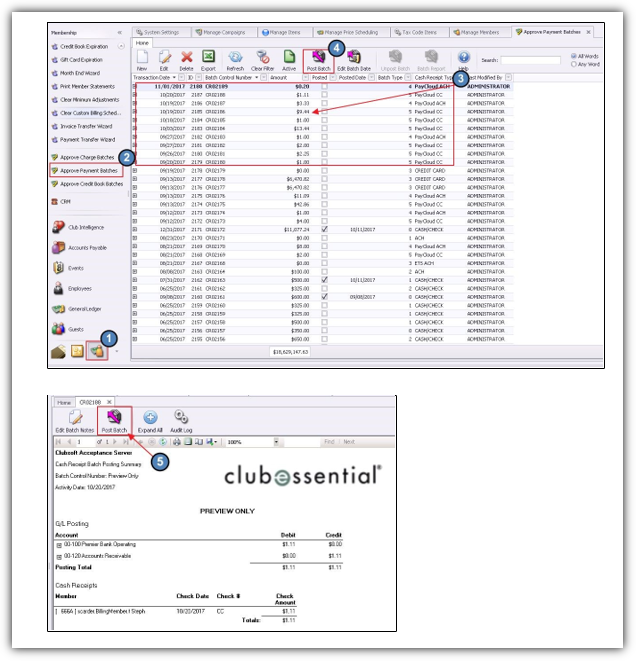
When ready to Post, go to 1. Membership, 2. Approve Payment Batches, 3. select the batches, and 4. post.
The club can also double click on a batch in the grid to view the details. 5. to post from this tab.
Please Note: In the event a payment is rejected by the Processor (which can take up to (3) days), it is important to use the Merchant Reporting available from the Processor to identify the adjustment that must be manually input into the Office batch(es) for rejections. These do NOT automatically flow through to the Office system. However, if using CE payments it will. More information about the failure of a payment made through CE Payments can be found here.
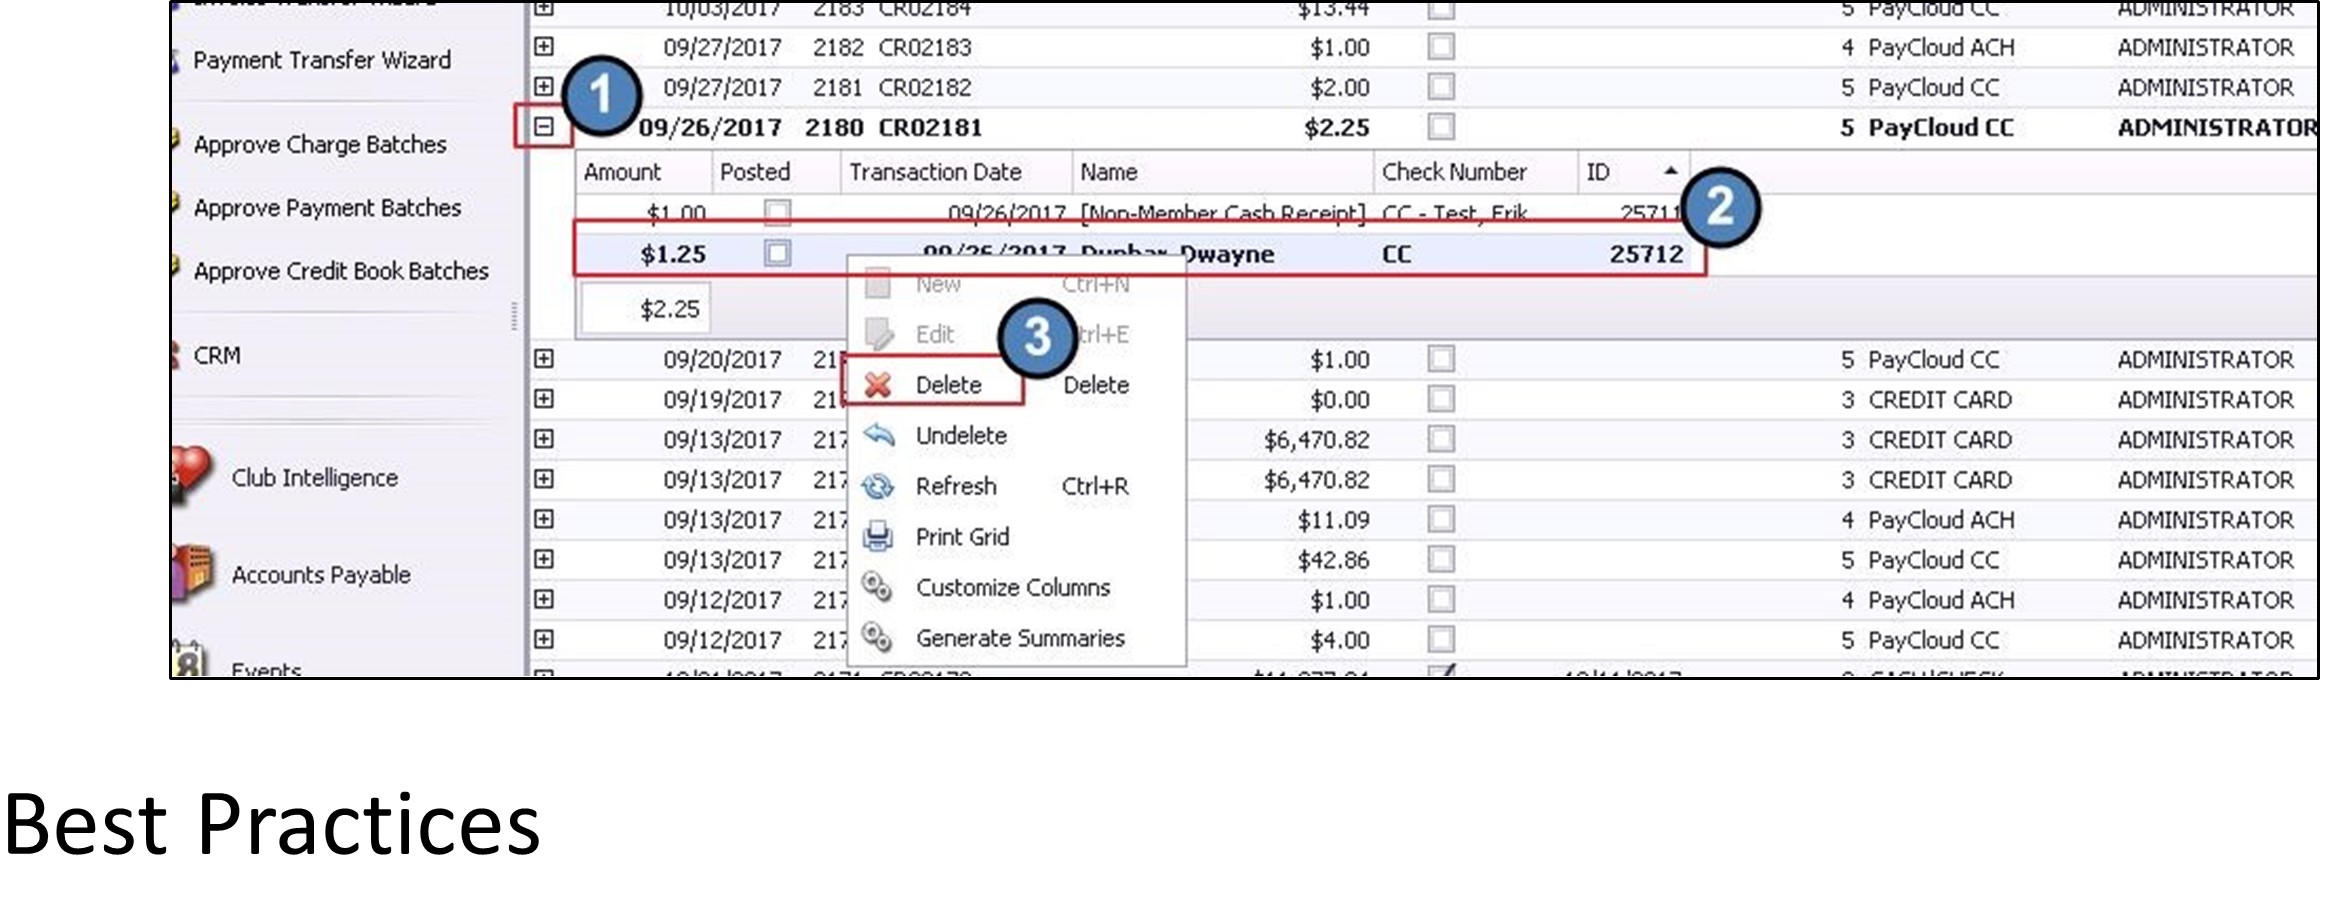
Deleting a Batch/Transaction
To delete a rejected transaction, while in Approve Payment Batches, expand the batch with the rejection, highlight and right-click on the row/transaction (rejection) to delete, and select Delete.
Best Practices
When adding a new System User and creating the password, the password must be longer than six digits, needs one uppercase character, and one numerical character.
When adding a new System User, use the Staff Member’s email address when creating a Username. Typically, the email address is unique and will not be be duplicated by another user.
To obtain current information on ACH, or Credit Cards, you have the option to contact your payment processor and they export the information to a CSV file for an easy upload. This process tends to vary so if you have any questions please contact Clubessential for clarification.
Reconcile Processor data to Clubessential/Paycloud data timely, ensuring any rejections are manually adjusted in the Office batches.
FAQs
Q: What if our Club does not want to allow Members to schedule a payment on a certain day or days of the month (ie - month end)?
A: Use the blackout feature to prevent Members from making/scheduling payments on a certain day. Click here for more info.
Q: How do I change the landing page my Members see when they first log-in to Paycloud?
A: Go to System, Club Settings, Website Tab. Click here for more info.
Q: How do I batch my PayCloud payments and post them?
A: PayCloud automatically batches and sends payment batches to the Clubessential Office system. To post, go to Membership, Approve Payment Batches, select batch to post, and click post. For more info, click here.
