Office - Guest Rooms - Overview (Module Version 5.5)
Table of Contents
- 1 Overview
- 2 Required Permissions
- 3 Accessing the Tool
- 3.1 Guest Rooms Dashboard
- 3.2 Making a Reservation
- 3.2.1 Room Reservation Information Pane
- 3.2.2 Other Tab Options
- 3.2.3 Blocking Guest Rooms
- 3.3 Checking In a Reservation
- 3.3.1 Cancelling or Wait Listing a Room
- 3.3.2 Viewing a Folio
- 3.4 Night Audit Wizard
- 3.5 Transferring Charges between Folios
- 3.6 Manual Folio Charge
- 3.7 Using the POS to charge back to a Folio
- 3.8 Checking Out the Reservation
- 3.9 Splitting a Room Charge
- 3.10 Override Folio Charge
- 4 Best Practices
- 5 FAQs
Overview
Learn how to manage your Guest Rooms Module. This guide covers everything from Reserving a room to checking out the guest.
Required Permissions
Guest Rooms
Accessing the Tool
Select the Guest Rooms module to open up the Guest Rooms reservation grid.
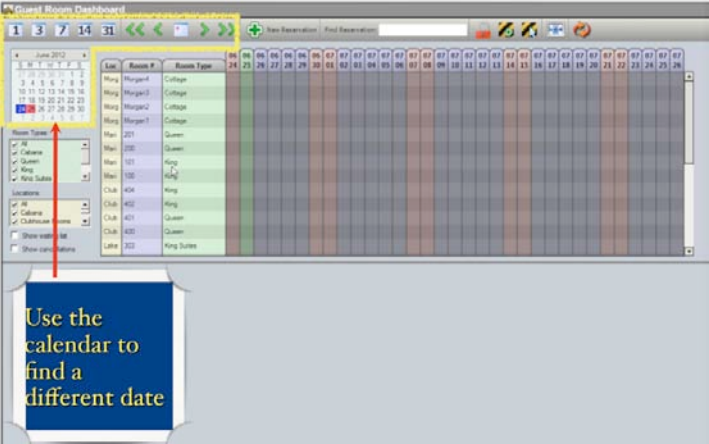
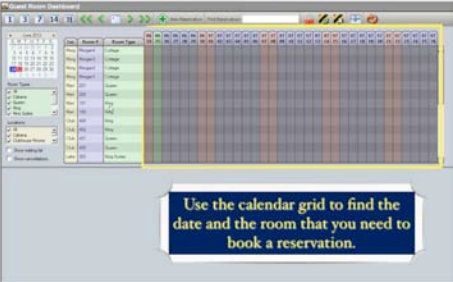
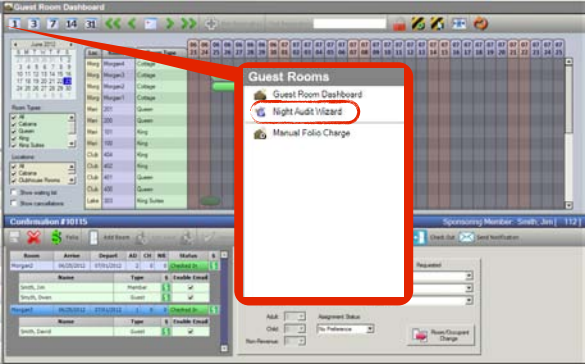
Guest Rooms Dashboard
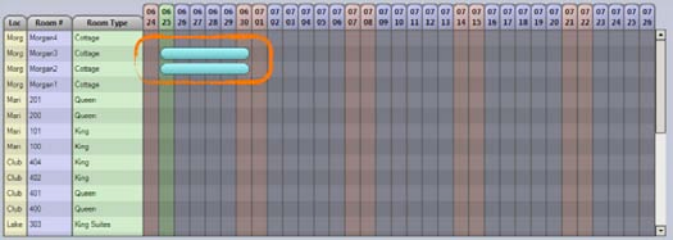
Use the Calendar to find the date of the occupant’s arrival. Use the single green arrows to navigate the grid one
day at a time. Use the double green areas to navigate the grid one week at a time.Use the filters seen here to change your view on the grid. You can choose a view that shows, one day, three days,
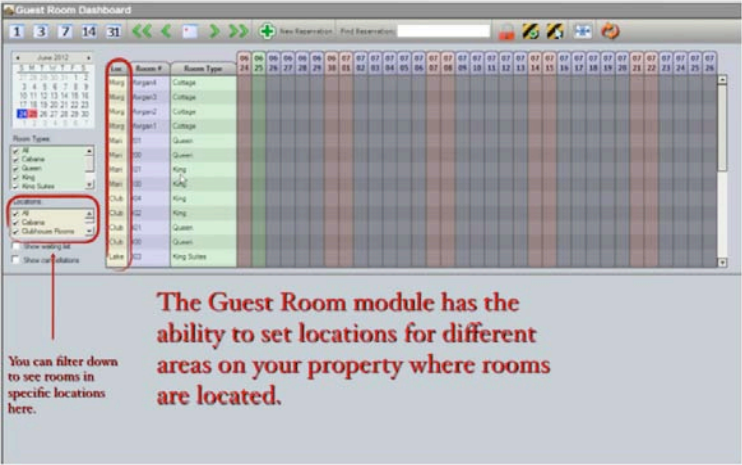
seven days, 14 days or 31 days on the Guest Room Grid.The Guest Rooms module has the ability to set locations for different areas on your property where rooms are
located. You can use the filters on the left to view the specific rooms set up for each location.Note: You may click on the location column header to sort the list of locations.
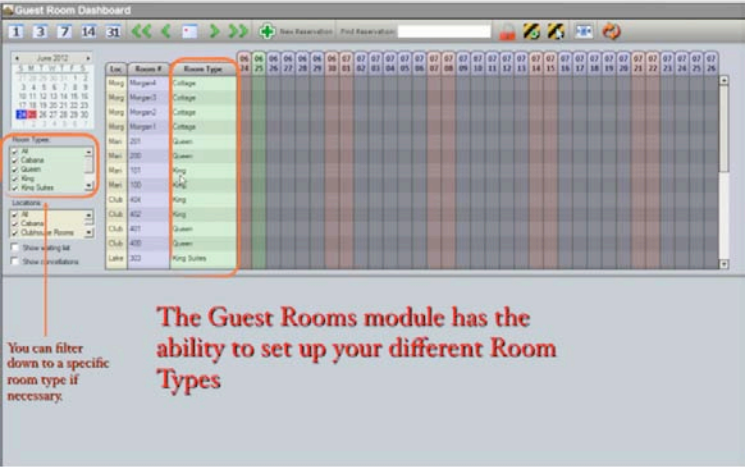
The Guest Rooms module has the ability to set room types for your rooms. You can use the filters on the left to
view the specific room types you need to view.Note: You may click on the column header for Room Type to sort the list of room types.
Use the calendar grid to find the date and the room that you need to book the reservation.
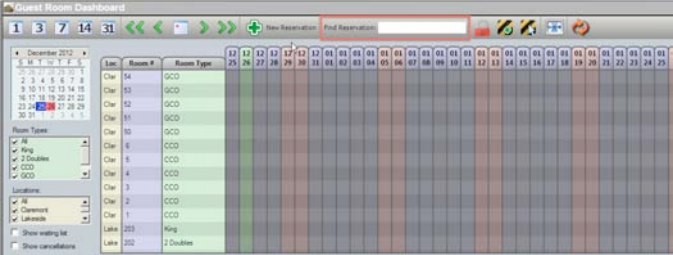
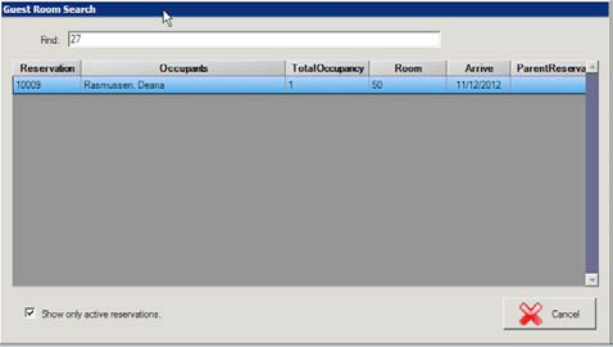
Find a Reservation by typing in a name or folio number in the search box.
Note: You may filter on active reservations or reservations that have checked out by selecting the “Show only active
reservations” button. Double click the reservation to view the Folio.
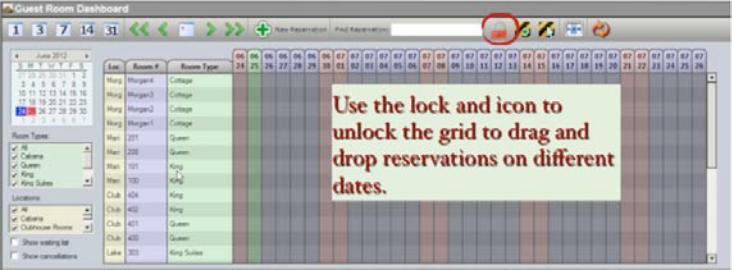
Use the lock icon to Lock and Unlock the drag and drop feature to move reservations to different dates or rooms
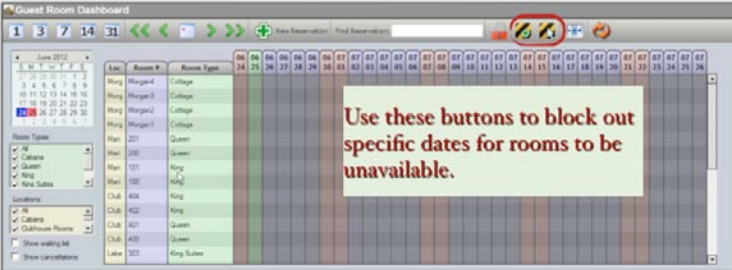
on the Guest Rooms grid.Use the Block Room buttons to initiate the blocking feature to block specific dates and rooms that
need to be unavailable for various reasons.Note: Further details on this functionality will be covered later in the manual.
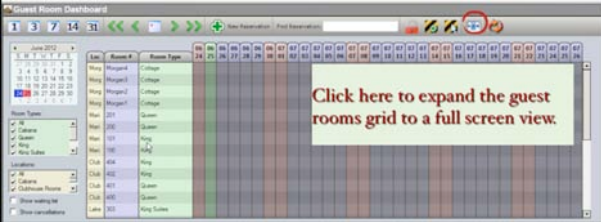
Click on the expand screen button to expand the Guest Rooms grid to a full screen view
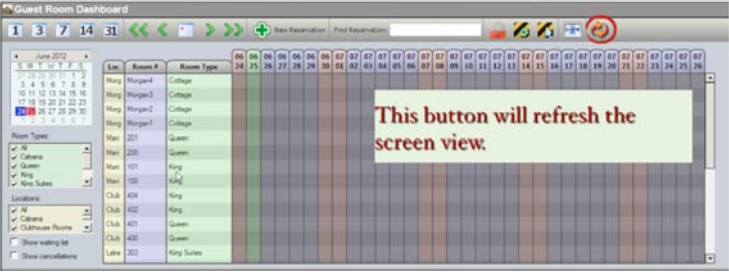
Click on the Refresh Button to refresh the information on the grid.
Making a Reservation
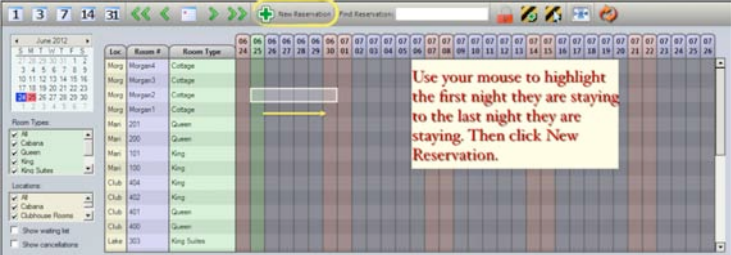
There are two ways to start making a reservation. First you can use your mouse to highlight the first night of
the arrival until the last night of the arrival by dragging your mouse across the desired dates and select New
Reservation or just select New Reservation and you will have an opportunity to select the dates and room
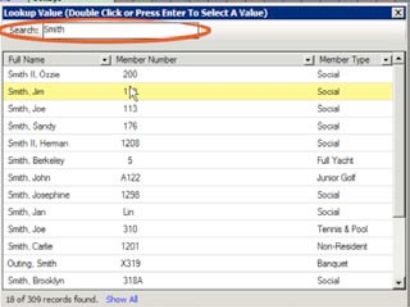
number later.A pop-up window will appear with your membership roster. You need to select a sponsoring member for by
using the search field to find the sponsoring member. Hit enter once you have found the sponsoring member.Note: Every reservation must have a “sponsoring member”. Your sponsoring member can be an A/R account you have
set up in the system. Keep in mind that some accounts are limited in their ability to use the member charge
feature. For non-member reservations you can use either the guest account or some clubs have set up special room
accounts or marketing accounts to track these non-member reservations.
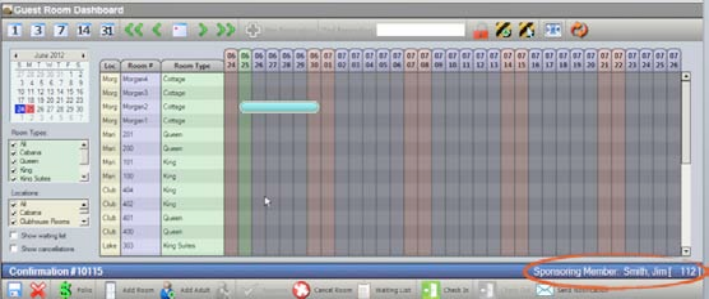
The sponsoring member’s name will appear in the lower right hand corner of the Guest Rooms grid.
Should you need to change the sponsoring member at some point you can click on the sponsoring member name
and the membership roster pop-up screen will appear again allowing you to
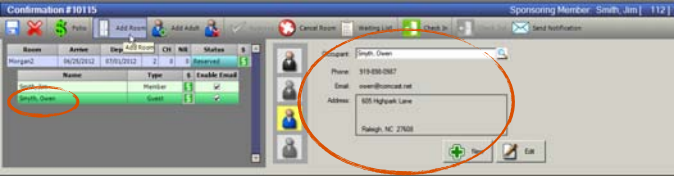
choose another sponsoring member.Once you have selected your sponsoring member you will see the bottom pane fill with the room reservation
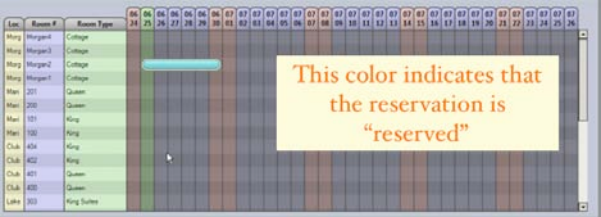
information.Note: You will see the color of the reservation turn an aqua color. This indicates that the room is now in a “Reserved”
status.
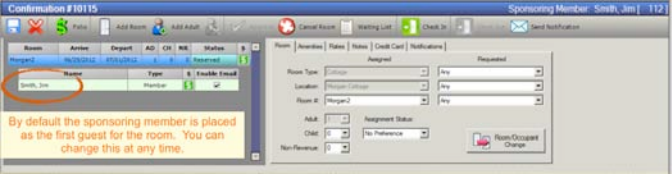
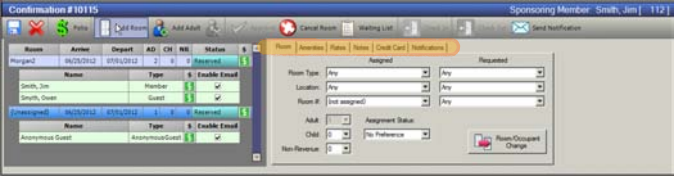
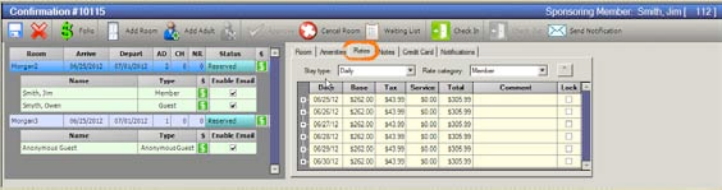
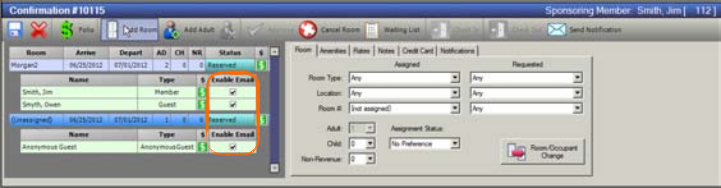
Room Reservation Information Pane
Once you select your sponsoring member, the information pane for this reservation opens below the
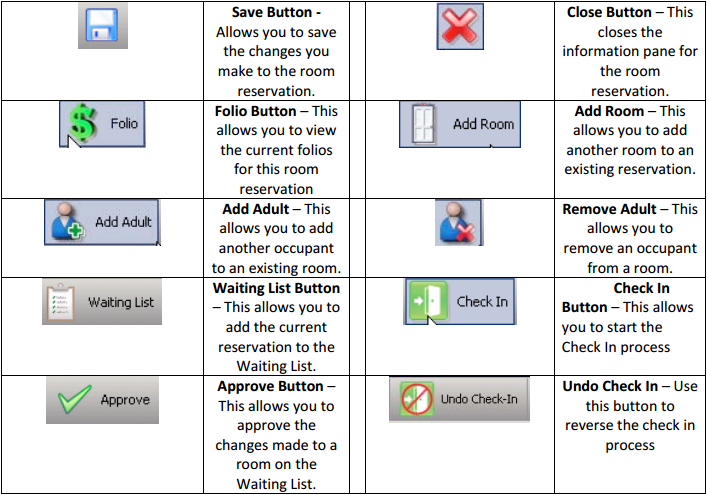
reservation grid. This is where you will enter the details of the reservation.Here is a close up view of the buttons used on the reservation information pane.
When you select the sponsoring member, by default that name is entered as the first occupant in the
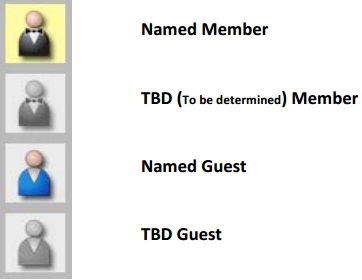
reservation. You have the ability to change this if necessary.If you need to change to the first occupants name, select his name and then you have four options to choose
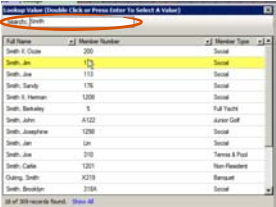
from.When you select a Named Member, the membership roster window will appear. Search for the member, and
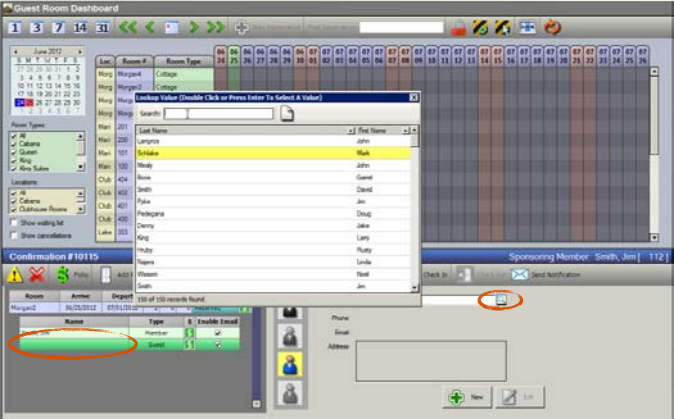
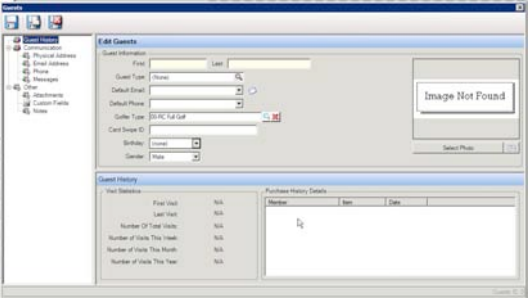
hit enter or double click on the member to insert the name into the occupant spot.When you select a Named Guest you have two options to enter a guest’s name. First you can choose the guest
lookup to see if that guest has stayed there before or ...select the New Guest button to enter in the new guest’s information. This will open up the screen you use in the Guest module where you can record as much information as you need to record. The guest information that you entered will show up on the right hand side of the information pane.If you need to add a room to this reservation, click on Add Room and this will open a new
section below the first room listed for you to assign.You can assign the room by using the dropdown menu when you have selected the Room tab.
Once you have assigned the second room, we will see it appear on the grid in the same aqua color.
Other Tab Options
Let’s take a look a look at the other tab options listed in the reservation information pane.
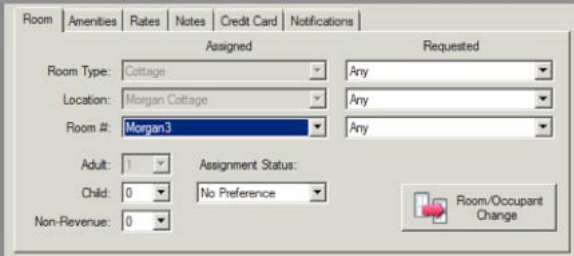
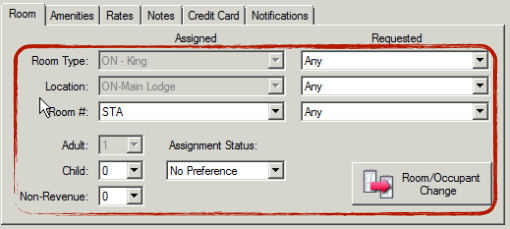
Room Tab: Under the room tab you can change the Room Type, Location, Room # for the reservation. The user
may also use the Requested fields to indicate a preference on a Room Type, Location, Room # if the room is
put on a Wait List.If an occupant needs to change rooms during the middle of their stay, use the Room/Occupant Change button to
assign them a new room. This will allow the user to assign the new room but keep their existing folio attached to
the occupant.
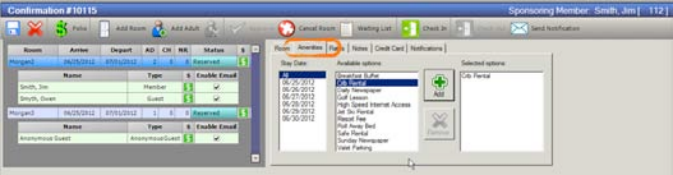
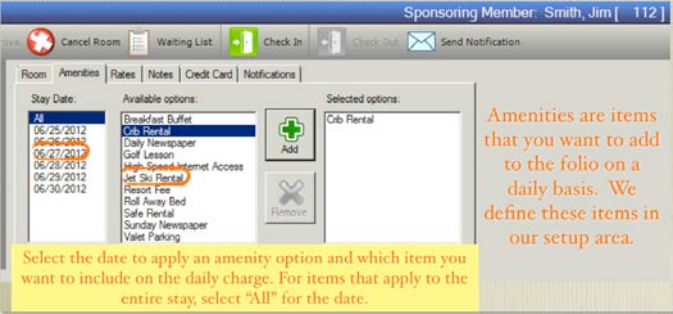
Amenities Tab: Amenities are items that the user wants to add to the folio for a daily charge. These items are
defined amenities setup section.Select the date to apply an amenity option and which item you want to include on the daily charge. For items that
apply to the entire stay, select “All” for the date.
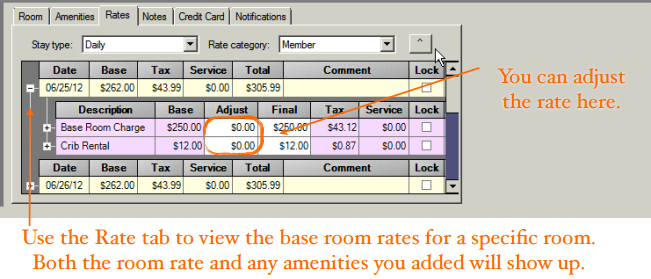
Rate Tab: Use the Rate Tab to view the base room rates plus any amenities added to the base rate for a specific
room.You can adjust the room rates if you need to upcharge or provide a discount from the current rate. Once you have
posted a room rate to a folio, the date of the posting will appear in the Comment field next to the day that has
been posted. You can also lock the rate by selecting the lock checkbox for each day. By locking the rate, no
changes can be made to that rate until the rate is unlocked.
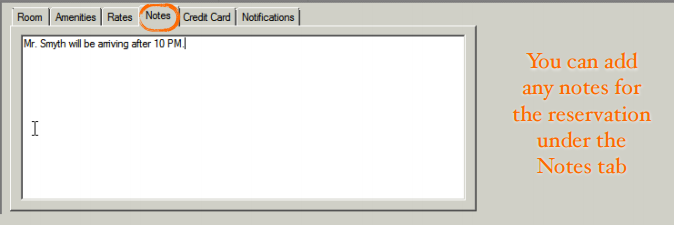
Notes Tab: The user can add any notes for the reservation under the Notes tab.
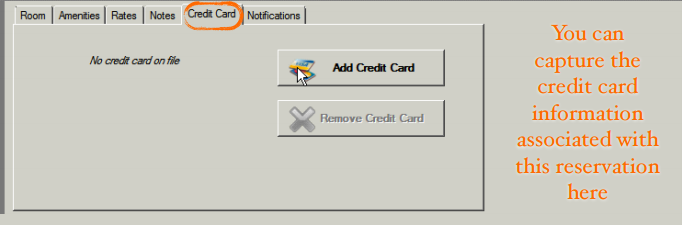
Credit Card Tab: The user can capture the credit card information associated with the room reservation on this
tab.When the user selects Add Credit Card, the user will be able to enter the credit card information for the room that
can be used later during check out to settle the folio.Note: The credit card information will be applied to the room folio, not to individual occupant staying in the room.
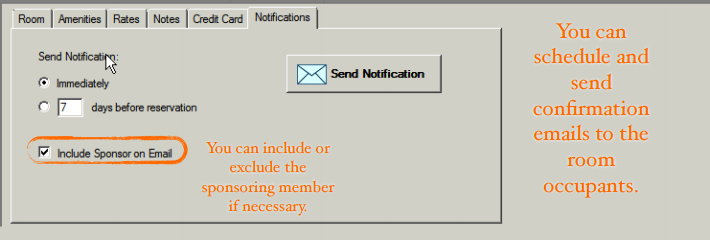
Notifications Tab: With the notifications tab, the user can send out confirmation emails for the reservation.
The confirmation emails can be sent immediately, or can be scheduled at intervals the user determines. The user
can also determine if the sponsoring member should receive a copy of the confirmation email.Note: The user has the choice to email specific room occupants by enabling their email setting. A guest will receive
a copy of the email confirmation if the user has entered the email address for the guest.
Certain sections of the email confirmation can be customized for each club at the beginning of the setup process.
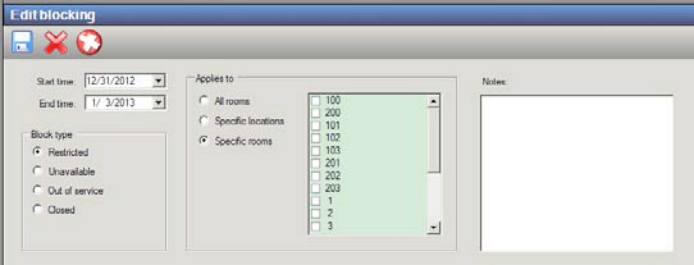
Blocking Guest Rooms
Select the ‘Add Block’ icon.
Enter the dates needed for the block.
Enter the block type for this block.
Select if this block applies to specific rooms, specific locations, or all rooms
Select save to apply this block.
Note: If you need to cancel the block at anytime, select ‘Remove Block’ icon
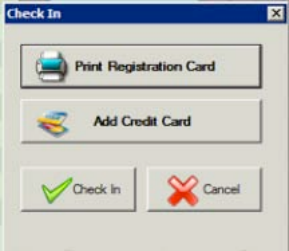
Checking In a Reservation
When it is time to check in your occupants, select the Check In button to start the check in process.
During the check in process the user can print a registration card, add a credit card on file to the room
reservation, or Check In the room.Note: The registration card is a standard format which can not be changed.
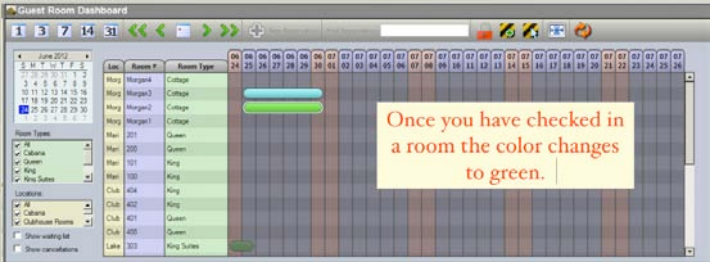
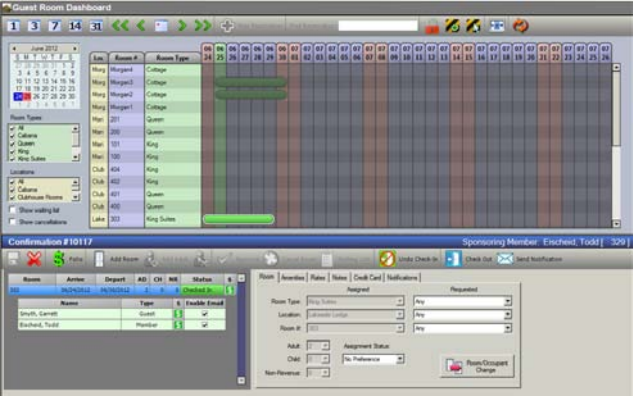
Once the user checks in a room reservation, the color of that reservation on the guest rooms grid
changes from aqua to green.If you ever need to “Undo” the check in, click on “Undo Check-In” to return the room to a reserved
status.Note: By design, the folios of a reservation will become “Active” starting on the scheduled day of arrival for the
reservation. This allows the occupants to use the facilities and charge back to their room folios prior to the
actual check in
Select ‘Add Credit Card’ if you want to add credit card information for the room reservation. The credit card
information is only applied to the room folio, not to an individual occupants folio.Select ‘Check In’ to complete the check in process.
Cancelling or Wait Listing a Room
To cancel a room make sure that it is not checked in and select ‘Cancel Room’. This will turn
the reservation to a red color.To Wait List a room make sure that the room is not checked in and select ‘ Waiting List’. This will
turn the reservation to a purple color.Note: A room on the waiting list and a cancelled room will be listed on the bottom of the grid. Use the filters on the left to view any rooms that are cancelled or on the waiting list.
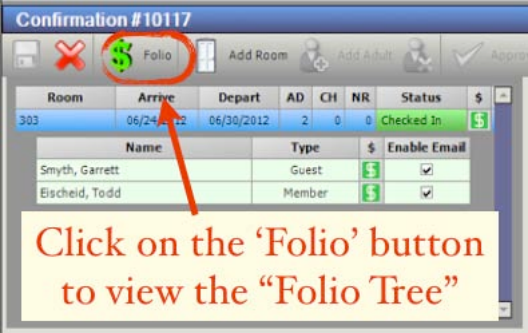
Viewing a Folio
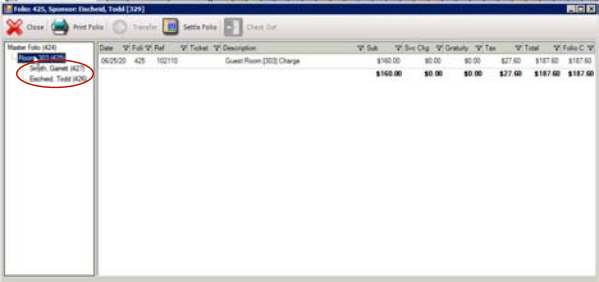
A ‘Folio’ is the billing record for an individual currently staying in one of the guest rooms.
Select a reservation from the Guest Rooms grid to open the reservation information pane below the grid
Select the ‘Folio’ button to open the ‘Folio Tree’ for that reservation.
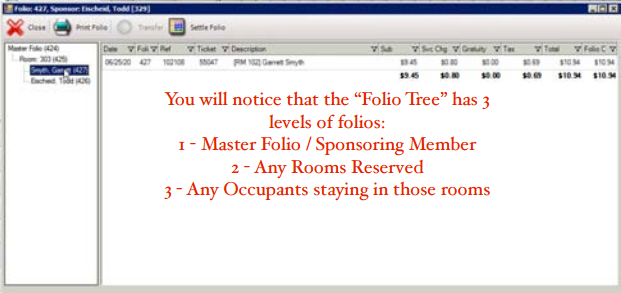
Note: The Folio Tree has three different levels. First level is the Master or Sponsoring Member level. This level
covers any occupants or rooms listed under the reservation. Second level is the guest room level. This level
covers any rooms made by the sponsoring member. Third level is the occupant level. This level covers any
occupants that are staying in the guest rooms.
Master / Sponsoring Member Folio: The system has the flexibility to reserve more than one room under the
same sponsoring member. At the end of the stay, all room and occupant’s charges can be transferred to the
master folio.Room Folio: Each room reserved will have a folio created to post nightly room charges. A credit card may be
attached to a room folio to settle the charges to a credit card.
Note: A credit card can not be attached to the individual occupant’s folio if more than one occupant is
staying in a room.Occupant’s Folio: For each occupant listed in a room, a folio will be created to record any charges while the
occupant is on the property.Note: A credit card cannot be attached to an individual’s folio. It will be recorded to the room folio.
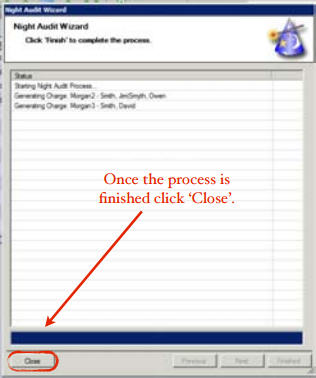
Night Audit Wizard
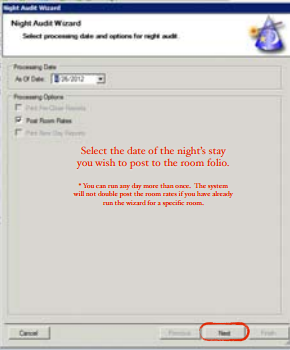
In the upper left hand side of the Guest Rooms Dashboard, the user can find an option called the ‘Night Audit
Wizard’ to post the room rates to the room folios.Select the date of the night’s stay to post to the room folio. You can run any day more than once. The system
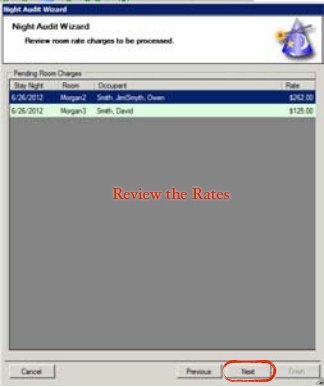
will not double post the room rates if you have already run the wizard for a specific room.A summary will show the rooms that are charged, the occupants in those rooms, and the room rates which
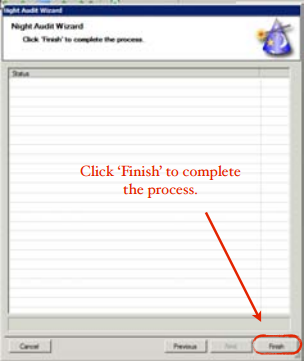
include an amenity charges or adjustments the user has made.Select ‘Finish’ to complete the Night Audit Wizard.
Once the process is complete select ‘Close’.
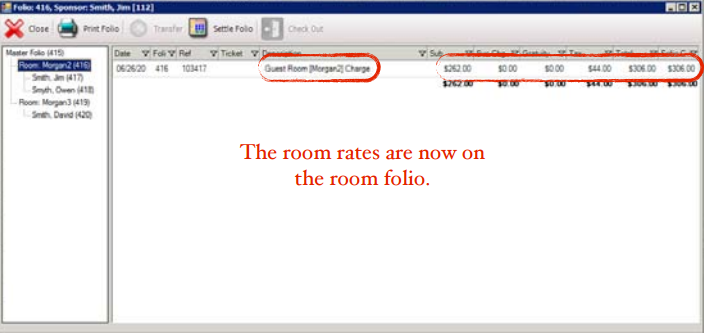
The room rates are now on the room folio.
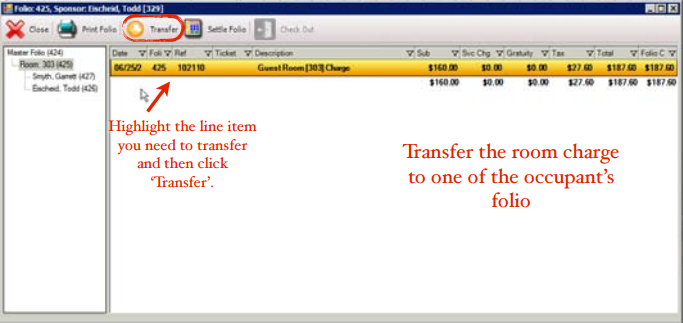
Transferring Charges between Folios
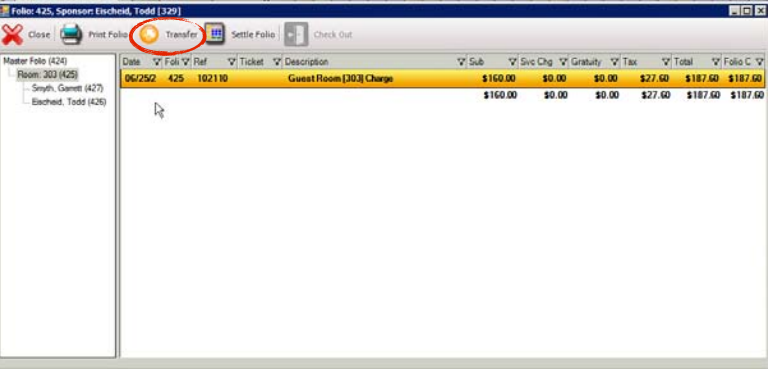
The Guest Rooms module will allow you to transfer charges from the different levels of the folios.
To transfer an item from one folio to another, open the folio for that reservation.
Select the transaction that needs to be transferred to another folio within the ‘Folio Tree’. To select more than
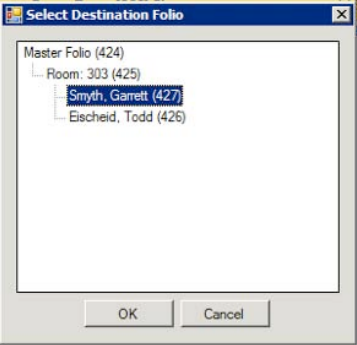
one transaction to transfer, hold down the ‘shift’ key to allow multiple transaction selection.elect the ‘Transfer’ button to open a popup window of the destination folio.
Select the destination folio and click ‘OK’. This will transfer the highlighted charge to the destination folio.
Note: You can only transfer transactions within a folio tree within the same reservation. You can transfer
balances from one folio to another folio by using the Point of Sale module.
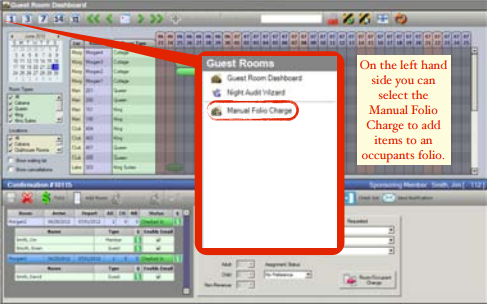
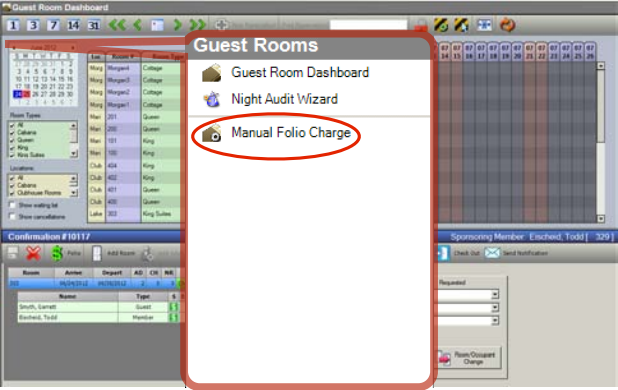
Manual Folio Charge
If you need to manually enter items to an occupant’s folio, the user can accomplish this through the Manual Folio
Charge option.
Select the ‘Manual Folio Charge’ from the left hand corner of the Guest Rooms Dashboard.
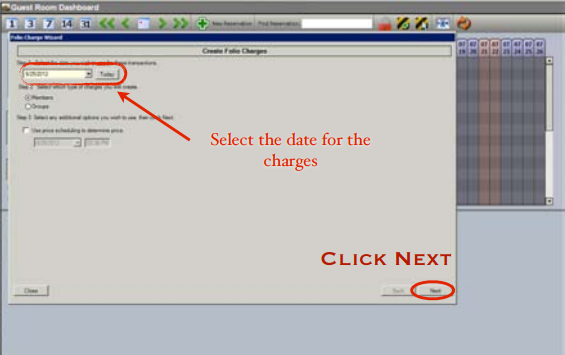
Select the dates for the charges to post.
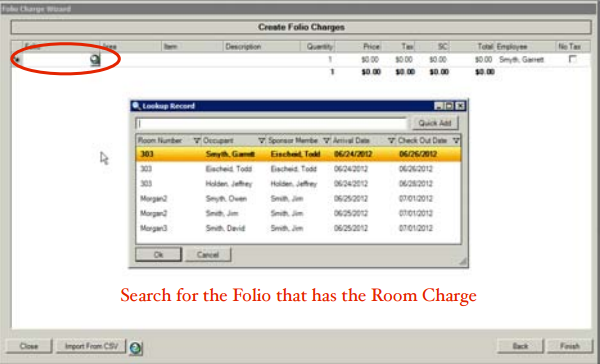
Select the Folio that needs to have the charge added. A popup window will appear and show a list of active
folios. A folio is considered active on the day of arrival up until the day of departure. Your system will keep a
folio active the entire day of departure in case the occupant wants to put other POS charges back on his folio
such as dining charges or recreational activities such as golf or spa.Choose the Sales Area that the items will be sold in. Ex: for a golf lesson choose the Golf Shop sales area.
Choose the item to charge to the occupant’s folio.
Enter a description for the transaction.
Enter the quantity and amount for this transaction.
Repeat these steps as many times as needed to include all items.
Click ‘Finish’ once all the items have been entered.
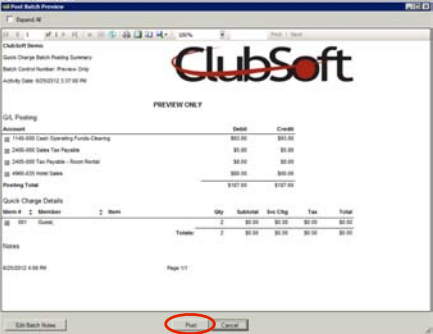
A summary screen will appear where you can preview the transactions. Next you can post the charges to the
folio accounts.
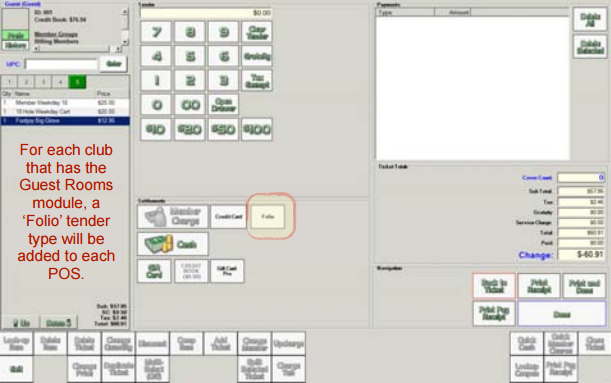
Using the POS to charge back to a Folio
The Guest Rooms module will be able to tender any POS charges back to a specific occupant’s folio listed in the
Guest Room module. The folio becomes “Active” on the day of arrival. The folio will remain active 12 hours after the
occupant has checked out.
Start a new transaction in a POS terminal.
Select the member account or guest account to start the transaction.
Note: It is recommended that you set up a guest room account for each room to help audit any
transactions. Start each POS transaction to the occupant’s room account.
Select the items needed for the transaction.
When you are ready to close the ticket, the user will be able to select different settlement types. A settlement
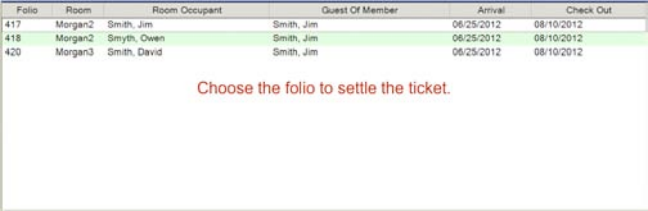
type, generally labeled “Folio” or “Hotel Charge”, will be listed. This button can be called whatever you like.Select the ‘Folio’ settlement type to show a list people staying in the Guest Rooms.
Select the name of the occupant’s folio to tender the ticket.
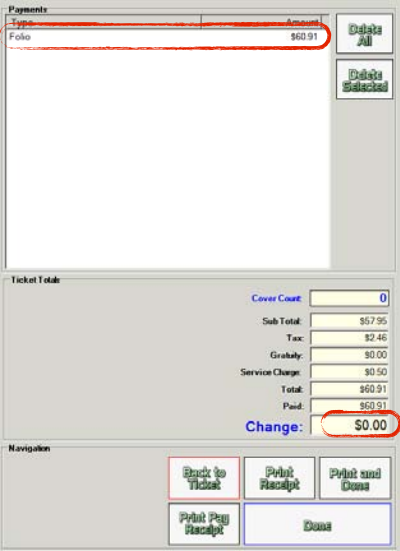
The user will see that the ticket now has a zero balance, and that “folio” is listed as the tender type. Click ‘Print
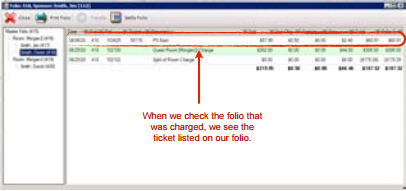
and Done’ or ‘Done’ to close the ticket.The transaction is now listed on the occupant’s folio.
Checking Out the Reservation
Now it’s time to check out the rooms. First we must settle out each individual’s folio. The individual folio must have a
zero balance to be able to check out the room folio. We do this by either transferring the charges to the room folio or
settle the individual folio.
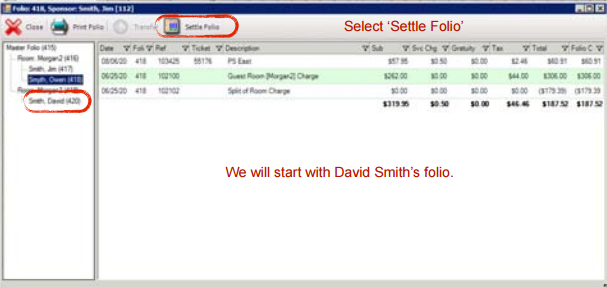
Select either the folio button or the check out button to open the reservation folio.
Select an occupant’s folio and select ‘Settle Folio’.
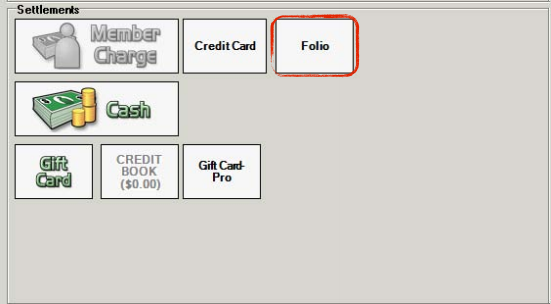
The ‘Folio Settlement’ popup window will let you choose between settling the folio to the sponsoring member’s
account or to settle the folio with Cash or Credit Card.By choosing Member Charge the sponsoring member’s account will be charged.
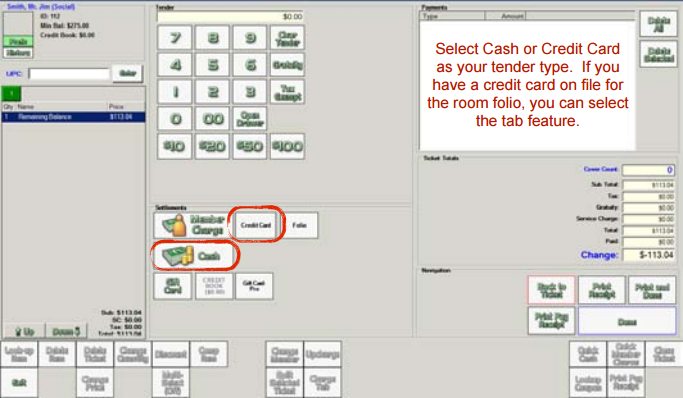
By choosing Cash / Credit Card , a POS terminal for rooms will launch allowing you to tender the
folio to cash or credit card. It is important to remember that all Guest Rooms settlements are tendered
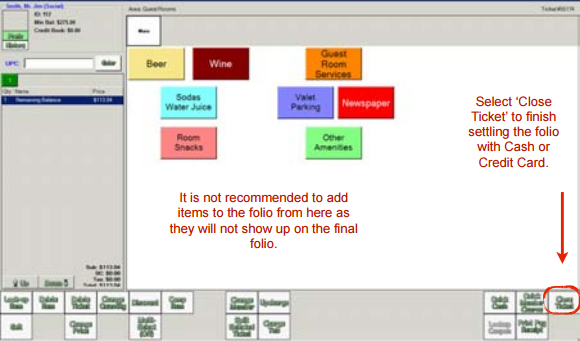
through the designated Guest Rooms terminal.Select ‘Close Ticket’ to finish settling this folio.
Choose Cash or Credit card to settle the folio
Note: If you have a credit card on file for the room folio, select the ‘Card on File’ option to settle the
folio to the card on file.
Select ‘Print and Done’ or ‘Done’ to return to the folio screen.
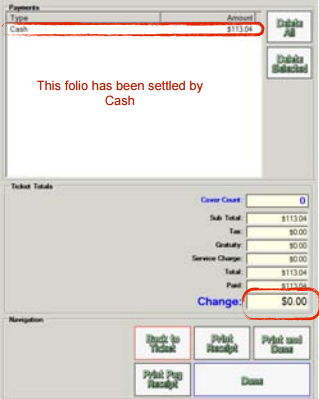
You can see that the folio has a zero balance.
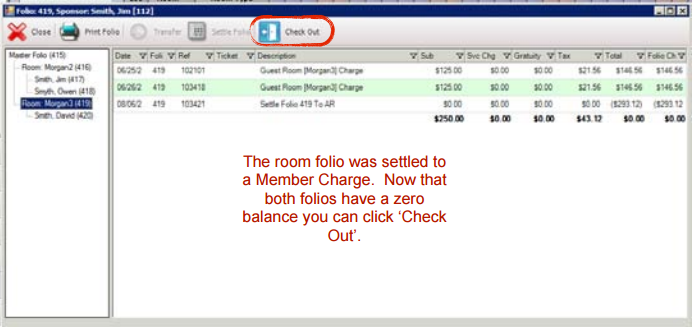
Once all folios have a zero balance, the Check Out button will appear to check out the room.
Select ‘Print Folio’ to print out a copy of the occupant’s folio to present after checking out.
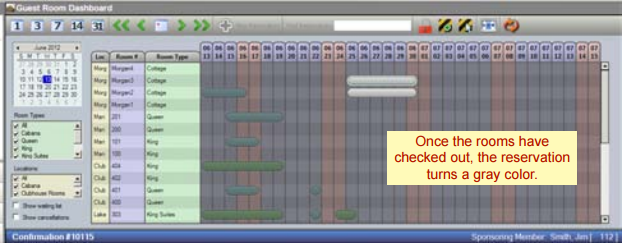
Once the room is checked out, the room reservation on the Guest Rooms grid turns a gray color.
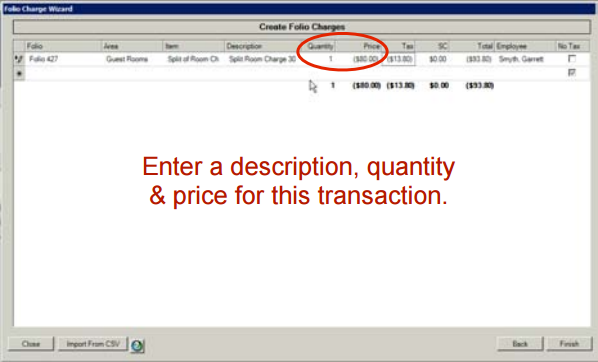
Splitting a Room Charge
If you have a need to split a room charge between two occupants, you will need to use the Manual Folio
charge to credit one occupant’s folio for half of the night’s stay and charge half of the night’s stay to the
other occupant’s charge.
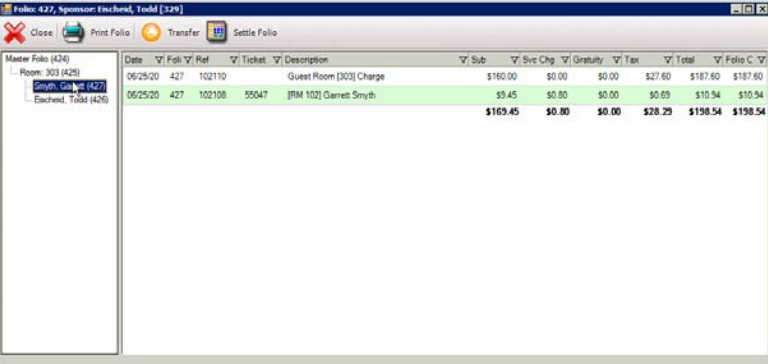
Here is a reservation with two guests sharing a room.
Each occupant has their own folio, while the room rates are posted to the room folio.
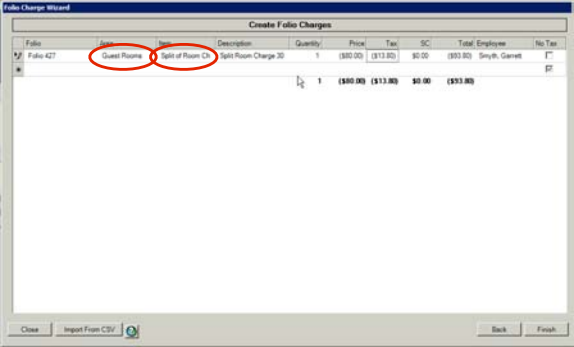
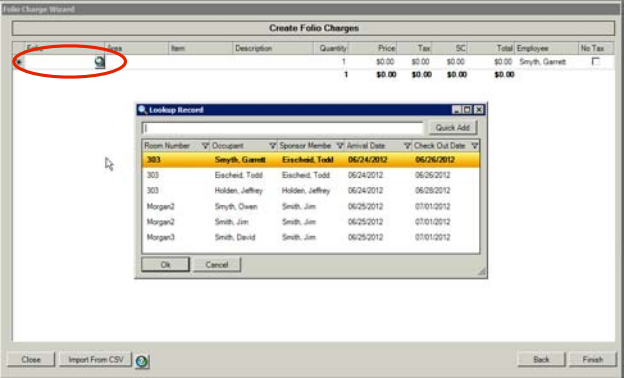
First, transfer the room charge from the room folio to one of the occupant’s folio.
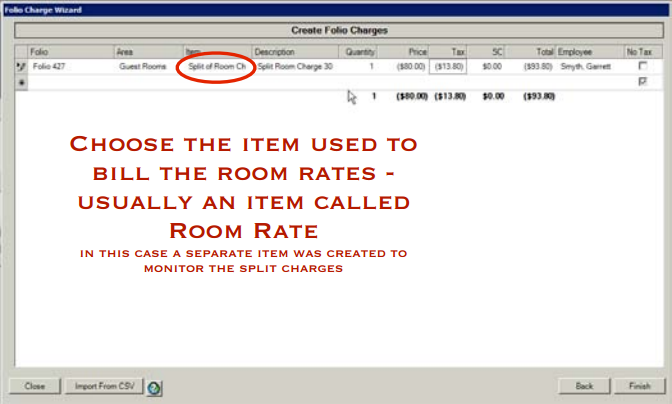
Once the room charge is transferred, select the ‘Manual Folio Charge’ option.
Select the Date for the charges.
Search for the occupant’s folio that has the room charge.
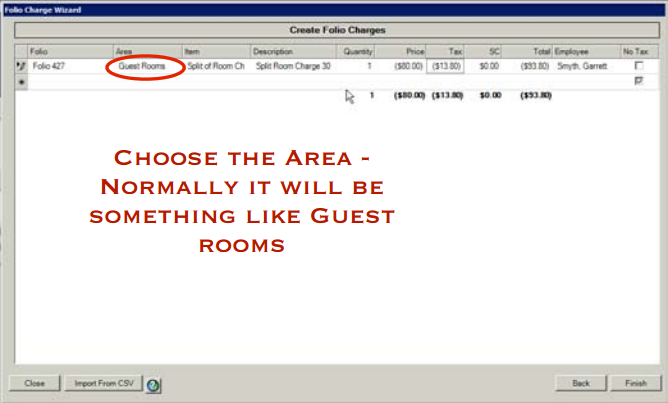
Select tab and fill in each field.
Enter a description for this transaction.
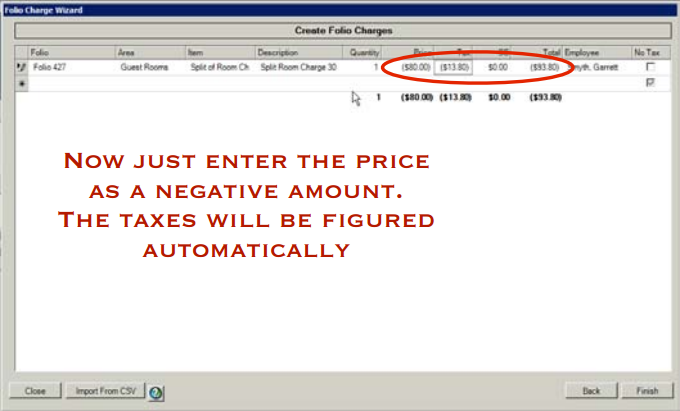
Enter the price to credit half of the room rate. You will enter this amount as a negative amount. The
quantity will be a positive number but the price will be the negative amount. Hit tab until you reach the next
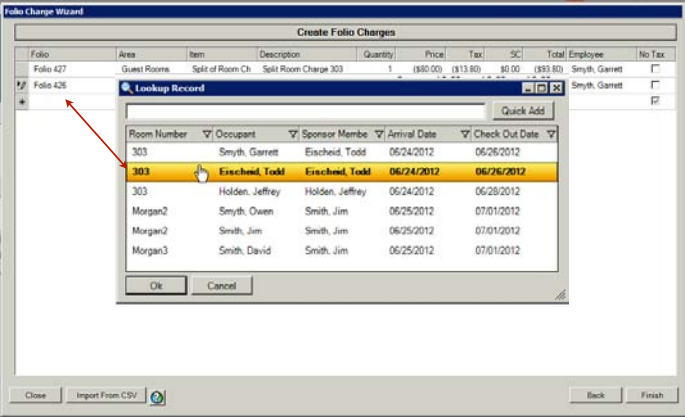
line.Now select the folio for the other occupant in the room.
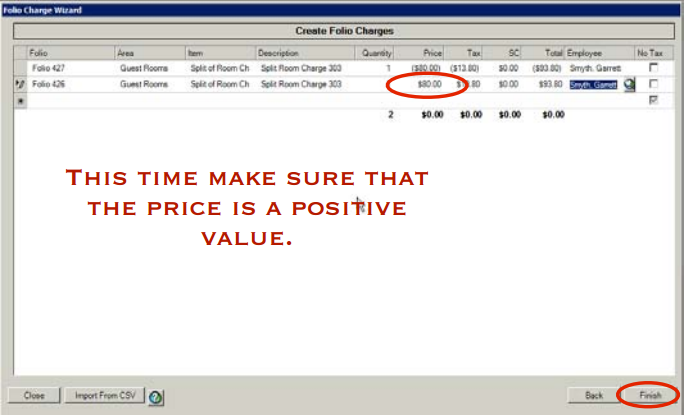
Repeat the steps listed above to fill out each field. This time make sure that the price for the split charge
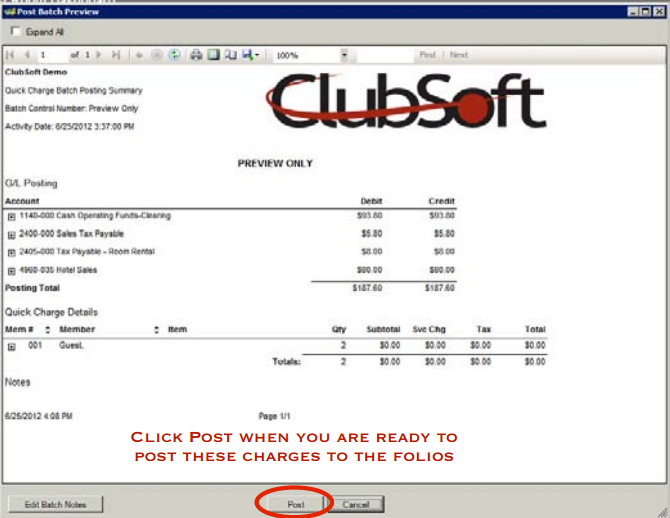
item is entered as a positive value.A summary screen will appear for you to check the charges. Click ‘Post’ when you are ready to post these
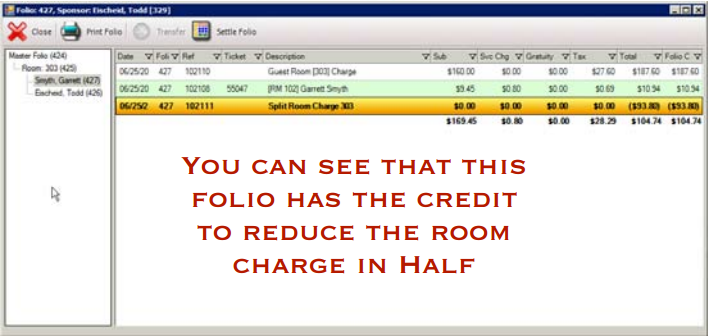
charges to the folios.When you return to the folio tree, you can see that one occupant’s folio has the credit for the room charge
to reduce the room charge in half. The other occupant’s folio has the charge for half of the room rate.Note: You only have to do this one time for one day. Even if the stay was for 3 nights. Each occupant can have
one night’s stay transferred to their folio, and split only the third night.
Once the room charge is split, you can settle each folio with using the normal settlement process.
Override Folio Charge
Override Folio Charge is used when you have a folio from the past that you need to add a charge back to
that folio. This is usually a high level function so each employee must be given permission for this
functionality.
You will want to have the folio # on hand as you will have to select which folio # that needs to be charged.
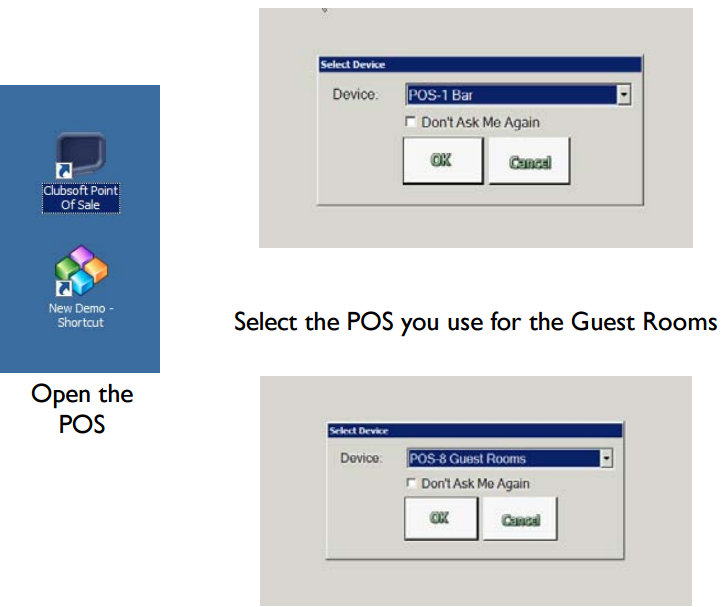
To Add a charge back to a room folio that has checked out in the past, open up the POS module and
select the Device. A golf shop charge will use the Golf Shop device. Guest Rooms charge will use the
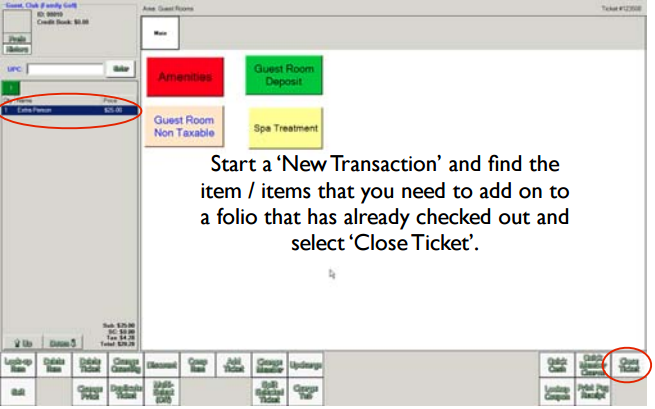
Guest Rooms device.Start a ‘New Transaction’ to an AR account and find the item or items that you need to add back to a
folio that has already checked out.Select Close Ticket
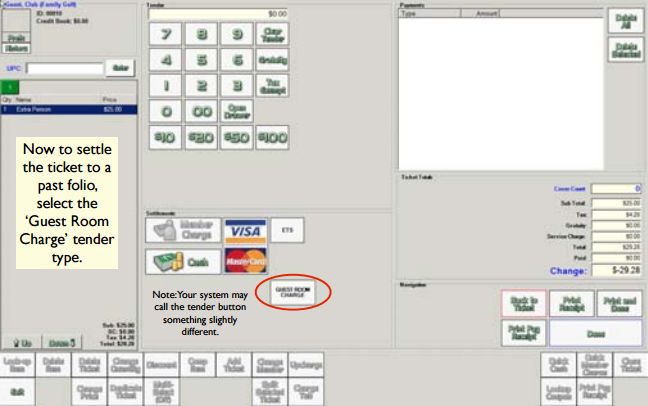
Now to settle the ticket to a past folio, select the ‘Guest Room Charge’ settlement type.
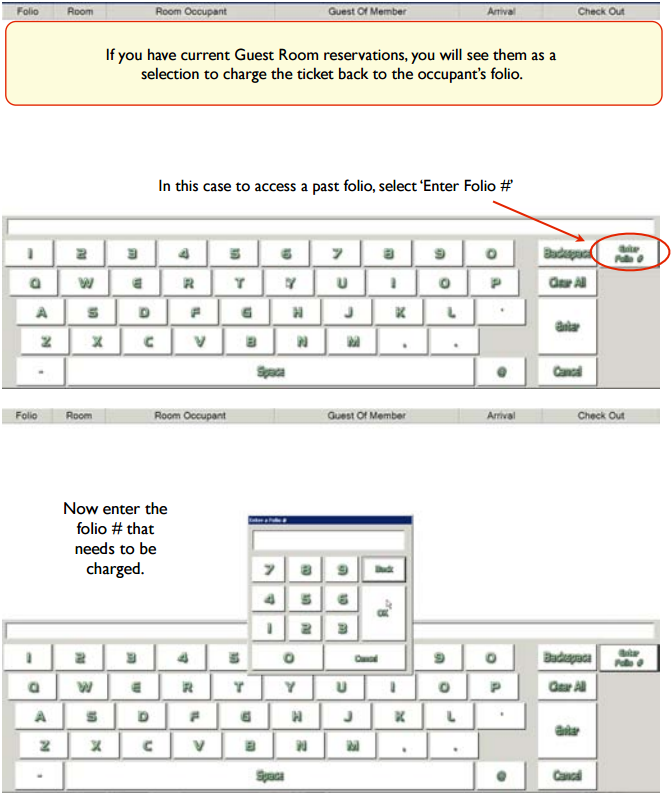
If you have current guest room occupants, you will see them listed in the main window as a selection to
charge the ticket back to the occupant’s folio. In this case a past folio will not show up. You must select
the ‘Enter Folio #’ button.For this example, Folio #123 checked out three days ago, but we needed to add a charge to the folio.
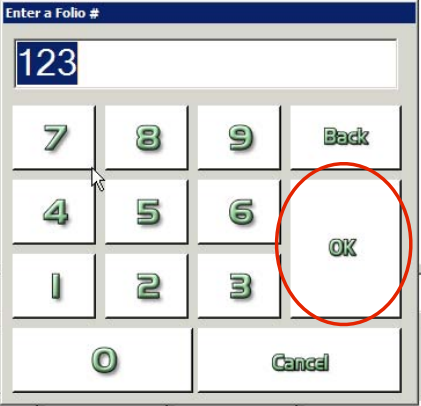
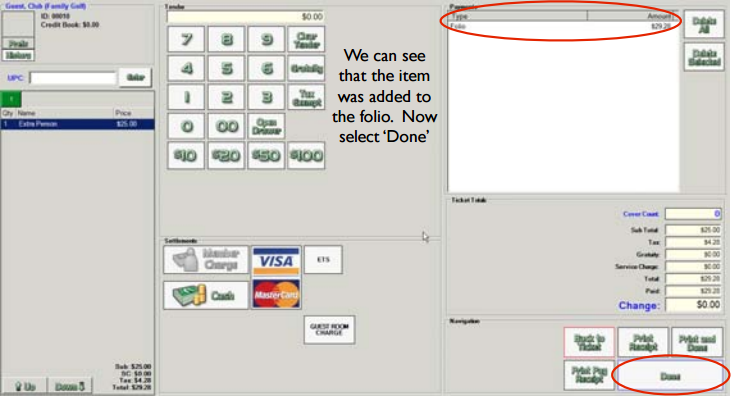
After entering the folio number, select ‘OK’ to apply the charge to the folio.We can see that the item was added to the folio. Now select ‘Done’.
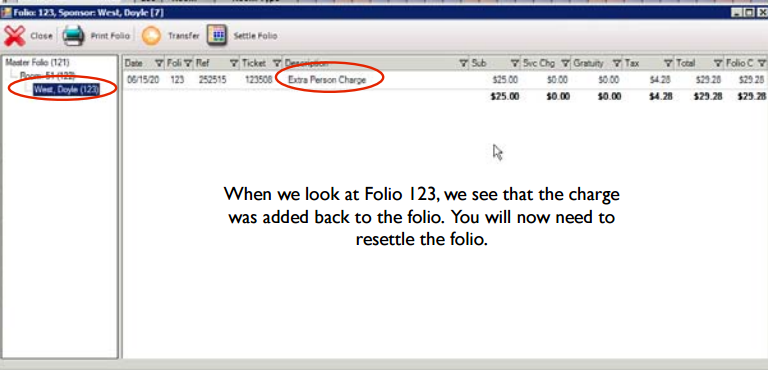
When we search for folio 123, we see that the charge was added back to the folio. You will now need to resettle the folio.
Best Practices
FAQs
