Office - POS Charge Settlement Types
Table of Contents
Overview
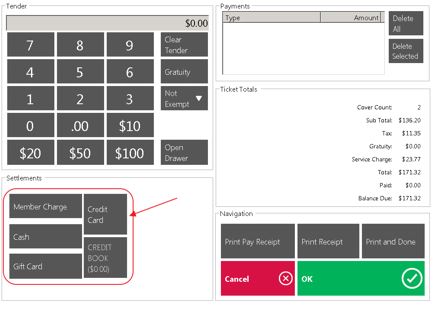
Charge Settlement Types are the settlement buttons in the Close Ticket section of the POS. They are used to tell the system what settlement buttons should display on what terminals, and where the buttons should appear on the settlement screen. They are also responsible for storing the debit account when posting payments to the General Ledger.
Required Permissions
Admin
Accessing the Tool
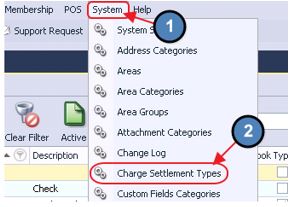
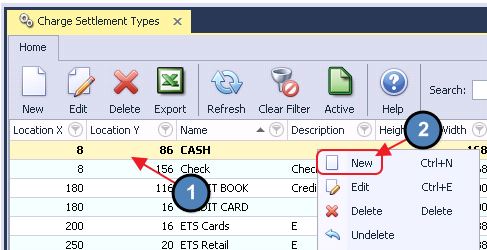
To access Charge Settlement Types,
In CMA navigate to System across the top toolbar and select Charge Settlement Types.
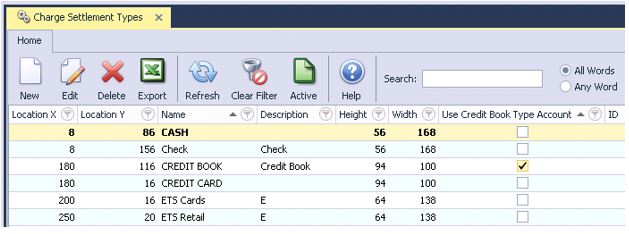
The Charge Settlement Types Grid will launch.
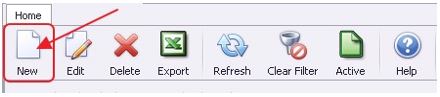
The primary functions associated with managing Charge Settlement Types are embedded in the Charge Settlement Type setup screen, which can be accessed by double-clicking on an existing Type, or clicking the New button.
Creating a New Charge Settlement Type
By default the system is loaded with Member Charge, Cash, Gift Card, Credit Card and Credit Book, but there can be as many settlement types as needed.
To Create a Charge Settlement Type,
Navigate to the Charge Settlement Types Grid and perform either of the following to launch the Charge Settlement Type setup screen:
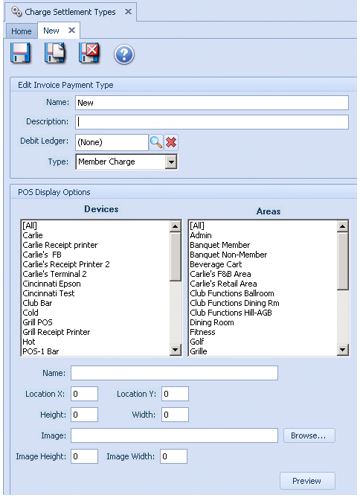
The Charge Settlement Types setup screen will launch.
General Information
Begin by populating the general information associated with the Payment type listed below.
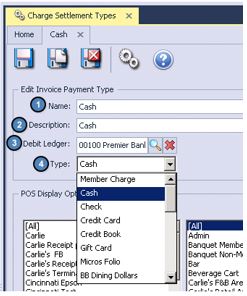
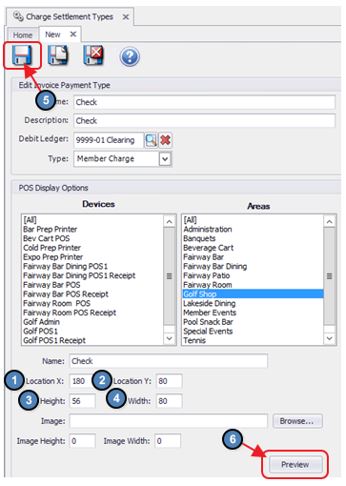
Name – Fill in a descriptive name.
Description – Optionally, provide a description. This field is used to provide more information regarding the Charge Settlement type.
Debit Ledger – Enter the General Ledger account to which these payments should post.
Type – Specify the Payment Type based on desired function of the button, and its associated reporting.
Options include:
Member Charge – used to charge payment to the member’s Club account.
Cash – used to settle ticket to cash.
Check – used to settle ticket to check. Does not have a column in the body of the batch report, but will break out in the summary at the bottom. Some clubs use Cash instead for this reason.
Credit Card – used to settle tickets to credit card. When the system is licensed to process credit cards through POS it will use the Debit Ledger on the Charge Settlement type to see if the system is configured or not. When it is configured, it will prompt for the swipe of the card. When it is not configured it will simply close the ticket.
Credit Book – used to settle the ticket to credit book if available and the items being purchased are configured to allow it.
Gift Card – used to settle to Gift Card. When selected, will display the list of open Gift Cards.
Micros Folio – used with a custom interface, contact support before using.
BB Dining Dollars – used with a custom interface, contact support before using.
BB Flex – used with a custom interface, contact support before using.
Room Folio – use to settle a ticket to a Guest Room. When selected, it will display a list of all Rooms that have been checked in.
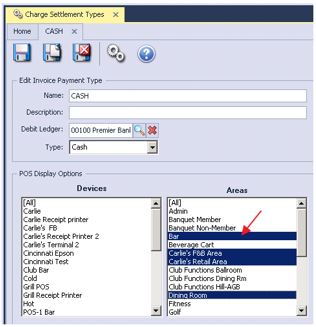
POS Display Options
The Charge Settlement Type can be set to display on particular Workstation Devices, all devices, or particular Areas or all Areas. There are no pressing rules of thumb to consider when deciding whether/how to use Devices or Areas, however, please note that if using a Device attached to an F&B Area, the Charge Settlement Type will show regardless of which Area is selected in the Select a Table Phase at the POS.
For instance, let’s assume the Club Bar Workstation Device is flagged within the Credit Card Charge Settlement Type, but the Dining Room Area is not. If a user logs in to the Club Bar Workstation Device and decide to choose the Dining Room Area in the Select a Table Phase, the Credit Card Charge Settlement Type will still show in the Dining Room Area because the user is logged into the Club Bar Workstation Device.
To select a Device or Area,
Click once to select a Device or Area.
Click again to deselect it.
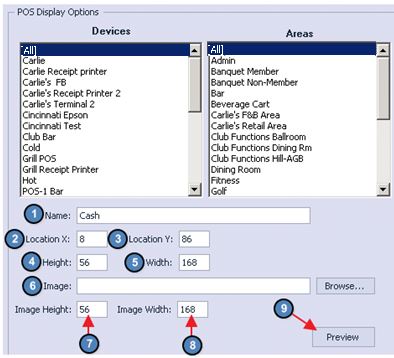
The remaining options address how the button will display in POS; its label, where it is positioned, its size, and its associated image (if applicable).
Name – label that will display on the button in POS. Used when Image is not available.
Location X – the starting point (in pixels) of the button on the settlement screen horizontally.
Location Y – the starting point (in pixels) of the button on the settlement screen vertically.
Height – height of the button (in pixels).
Width – width of the button (in pixels).
Image – used to put an image on the button. When used, the Name field should be blank.
Images should be stored in the image directory on the server.
The size should be approximately the height and width of the button (in pixels).
Image Height – height of the image (in pixels). Normally matches Height field.
Image Width – width of the image (in pixels). Normally matches Width field.
Preview – used after changes are saved to Preview how the button will look in POS.
Best Practices
When creating a new button, the easiest way to approach Location, Height and Width is to use the existing buttons as a guide.
Open an existing Charge Settlement Type.
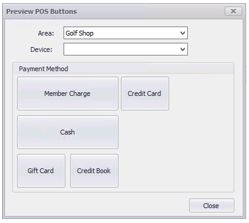
Click Preview.
Click Yes when prompted, no need to save since no changes have been made.
Select the Area for which you are adding the button.
The existing settlement button layout for that Area will display.
Make note of the positions of the buttons on the screen.
Close out of the Preview screen.
Close out of the Charge Settlement Type.
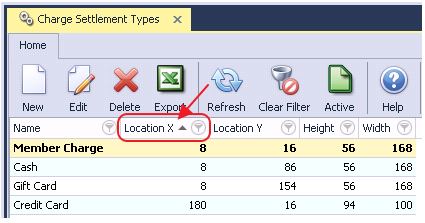
On the Charge Settlement Types Grid make sure it is displaying the Location X, Location Y, Height and Width.
Sort by Location X column by clicking the column header.
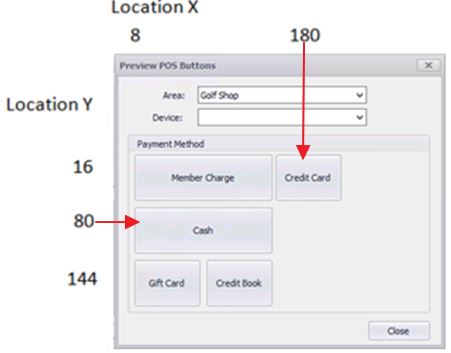
As an example, to add a Check button below the Credit Card button and to the right of the Cash button use the Location X of Credit Card and the Location Y of Cash as the starting point.
To place the button to the right of the Cash button the Location X would be the same as the Credit Card button, 180.
To place the button below the Credit Card button the Location Y would be the same as the Cash button, 80.
To make it the same size as the Credit Card button, use the Height and Width the Credit Card Button is set to, Height = 56, Width = 80.
Click Save.
Click Preview.
POS terminals will have to log out of POS and log back in to see the change.
FAQs
Q: We don’t see the button on our terminal, why not?
A: Ensure the user has logged out and logged back in to the POS to see saved changes. Additionally, verify that the area(s) and/or terminal workstation(s) are configured properly to display the button.
