Overview
Beacons are inconspicuous devices placed in designated locations in a Club or on a Club’s Golf Course that transmit small amounts of data via Bluetooth Low Energy (BLE) up to 150 feet, that can be read by a Club’s Mobile App, and translated into an actionable message to either a Member, or a Staff Member. Use Case(s) For instance, a beacon placed at the entrance of the Dining Room, could automatically trigger a message to the General Manager when a Member with a birthday, or even an overdue balance has entered the room. Or, a Beacon placed at the entrance of the Club could send a Welcome message to all Members and alert the General Manager of the Club when certain Members (perhaps Board Members) are on-site. |
Content
Beacons
When Beacons are initially set up for a Club, Clubessential encrypts the Beacons each with a unique identifier, and assigns a defined range to the beacon as to how far the beacon will transmit its bluetooth signal (based on info gathered from the Club). This is measured in decibels, however, has been translated into approximate distances for ease of reference (i.e. short range - (20ft or less), medium range (20 - 70ft), and long range (70 - 150ft). Note this distance translation is an approximation and is also relative, based on factors such as the location of beacon placement, and what fixed objects are in the area. The Beacon is then associated with a Beacon Zone.
Beacon Zones
A Zone holds the beacon in a collection that associates an area of the club with the Beacon(s). A zone may contain more than one beacon, or may contain just one (more common). When defining Beacon Zones, it is important to define the why behind the zone, and answer the question what will you be triggering in the zone. For instance, a beacon placed by the 18th green could hold one beacon that would read a short range, triggering a message to Members about posting their scores. Another zone could be on the Entrance gate, and could trigger a message to the General Manager of the Club when a Board Member enters the premises.
Once the goals have been outlined, it’s time to manage the beacon zones. Note: Clubessential will set up your initial beacon zones, and will assign the individual beacons into beacon zones. In the event your Club wishes to edit an existing zone, or add a new zone, perform the following.
To Manage a Beacon Zone, click on the Admin toolbar, and select Beacon Manager.
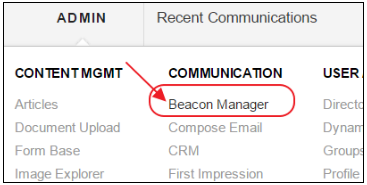
Then, click on the Beacon Zones.
![]()
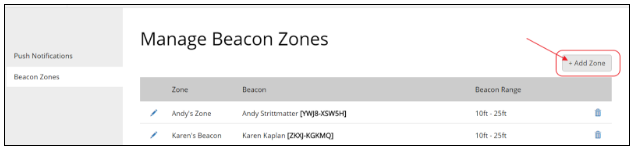
Create a Beacon Zone
To add a new zone, click Add Zone.
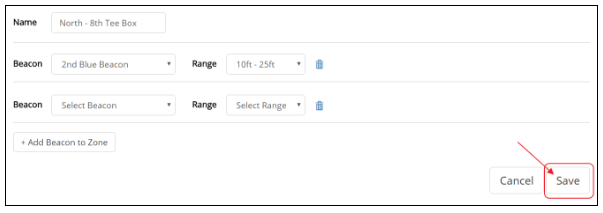
Next, Name the Beacon Zone according to the physical location of where the beacon(s) will be placed for ease of reference.
![]()
Then, select a Beacon from the drop-down list (populated by Clubessential), the desired range, and click Add Beacon to Zone.
![]()
Repeat as necessary, and click Save when finished.
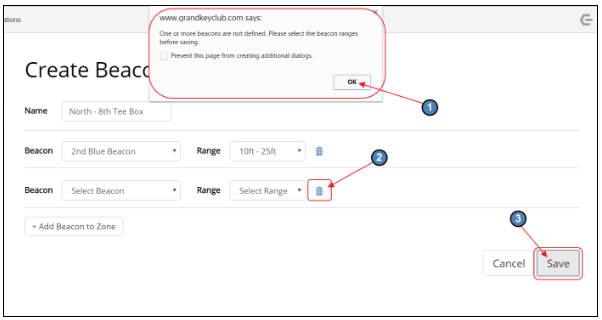
If you get an error message due to an unpopulated beacon line, click OK to dismiss the error message, then click the trashcan next to the blank beacon line to delete it, and click Save again.
Note the new zone, and assigned Beacon have been added to the list of Beacon Zones.
Edit a Beacon Zone
To edit a Beacon Zone, click the pencil next to the zone to open the Edit Beacon Zone screen.
![]()
Make changes to the Name, or assigned Beacons, and Save to continue. Click Cancel to exit without saving.
![]()
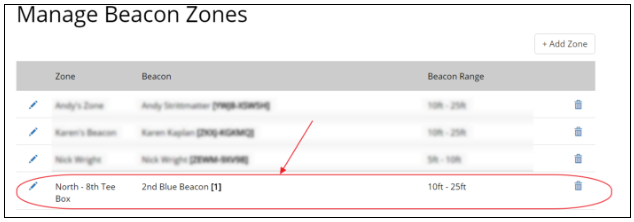
Delete a Beacon Zone
To delete a Beacon Zone, click the Trashcan icon next to the Beacon Zone to delete.
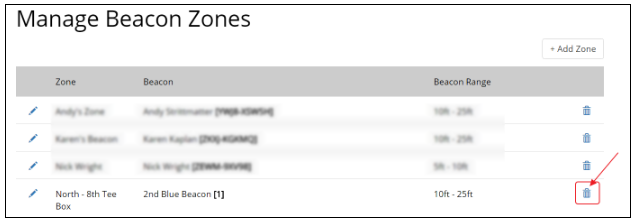
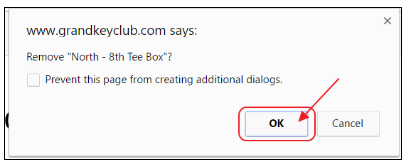
Click OK to confirm deletion.
Push Notifications (for Beacons)
Once Beacon zones have been established, it is time to define what will occur in the form of a push notification, once the Beacon has been triggered. Note: Clubessential will set up your initial push notifications. In the event your Club wishes to edit a push notification, add a new one, or delete an existing one, perform the following.
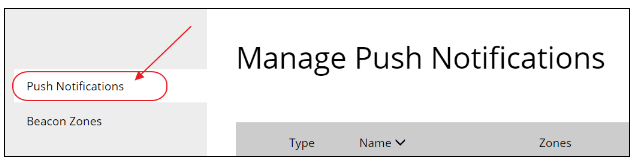
To Manage a Beacon Push Notification, click on the Admin toolbar, and select Beacon Manager.
![]()
Next, or, if already in the Beacon Manager, select Push Notifications from the side menu.
Create a Notification
To add a new notification, click Create Notification.

The Create Push Notification screen will launch.

1) First, Name the Notification so that the action is identifiable.
2) Next, designate the Beacon Zone that will trigger the notification.
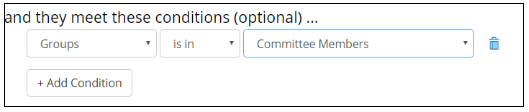
3) Optionally, define conditions that will be applied to determine whether or not to send the notification. For instance, if the notification is only to be triggered if the Member is in the Committee Members group, then a condition could be set as follows.
4) Define the message to be sent to the member.
5) Optionally, opt to include a link. If checked, options will load for selection.
![]()
6) Define Recipients of the message. For instance, if the Member who triggers the Beacon is to receive the message, the Send to the member option should be selected. In the event someone else should receive a message (ie - Club General Manager), when Member (Board Member) triggers beacon, select Send to someone else for more options.
7) Optionally, determine the maximum number of times a member or someone else will receive this notification.
8) For example, the notification could be set to send only one time per year as follows:

Or, any variation of times utilizing the following: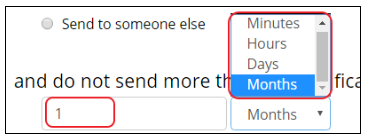
9) Finally, Save the notification, or Cancel to exit without saving.
Push Notification will be added to listing, and will be enabled (active).
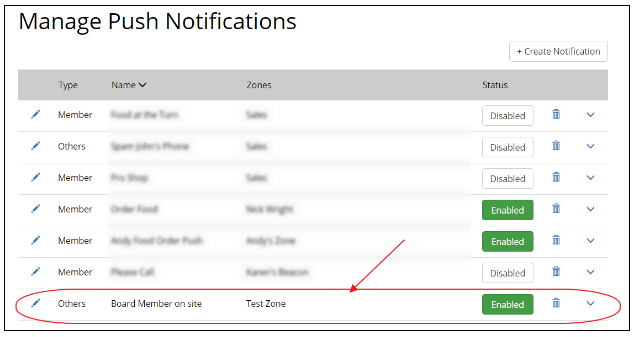
To disable (or turn off) the notification, click the Enabled button.

To re-enable (or turn on) the notification, click the Disabled button.

Edit a Push Notification
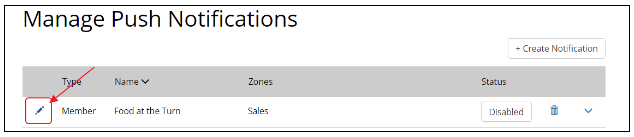
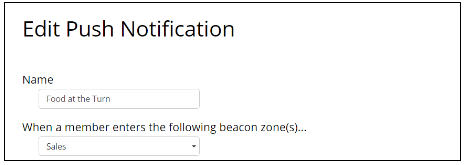
To edit a Push notification, click the pencil next to the Notification to open the Edit Push Notification screen.
Make changes as necessary, and click Save to continue. Click Cancel to exit without saving.
Delete a Push Notification
To delete a Push Notification, click the Trashcan icon next to the Push Notification to delete.
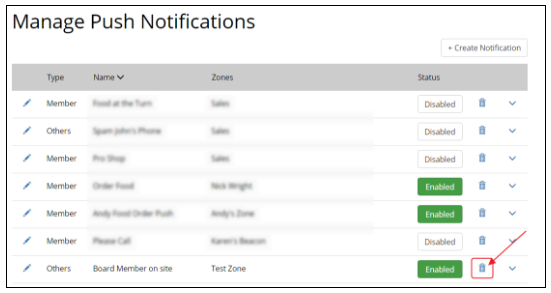
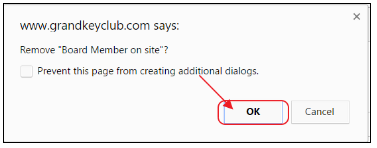
Click OK to confirm deletion.
Beacon Reporting
In the event your Club also has the Clubessential CRM Product, you will also be able to view reporting associated with your Beacons. To view reports within your CRM, perform the following steps.
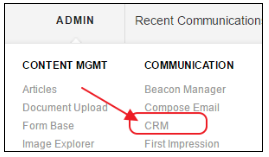
Within your Website, click on the Admin Toolbar, and navigate to your Club’s CRM.
From the side menu, select All Reports (or Report Listing, etc). Name may differ slightly.
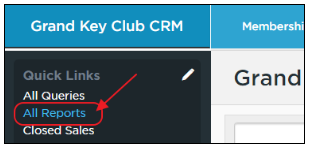
Within the Reports Menu, select Beacons to view listing of available Beacon reports.
![]()
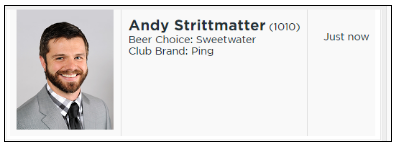
Select Run next to desired report. Report will display Members on site by Beacon Zone, along with their Picture (if available), designated Member Preferences (if captured), and how long ago they entered the Beacon zone.

If more than one Beacon is utilized for reporting purposes, select desired report from listing.

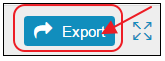
Report results may be viewed and Exported.

To export a report, hover over the export button.
Then, choose from the available formats.
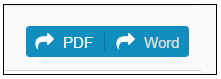
Document will open in requested format.
FAQs
Q: Where is the best place to install the Beacon?
A: Beacons are best placed in high areas as there can be interference with the range due to objects. The Beacons come with velcro that will allow you to place the Beacon on a wall, for instance.
Q: How many Beacons do we receive when we buy an App?
A: You will receive 5 Beacons with the purchase of the App, however, you may purchase additional Beacons as needed. Please contact your Account Manager for detailed information on that process.
Q: Can I move the Beacon?
A: Yes! You may move the Beacon to any desired location. It is important to note, that during initial deployment, the Beacon will be named after the initial placement. For instance, if the Beacon is on the 4th Tee it will always remain named as 4th Tee to our Support Team, so if you move it just note that Clubessential will still refer to its name by its original placement.
Q: How long does the battery life last and will inclement weather harm the Beacon?
A: The battery life lasts about 1 ½ years. To replace the Beacon battery, simply swap the old batteries with 4 new Double A batteries. The Beacons are completely weatherproof, so inclement weather will not harm the Beacon.
Best Practices
- Implement Beacons to encourage full usage of the App capabilities, including automatic notifications to Members to post their score, remind them of upcoming events, and to your Management team know who is on-site, and where they are located at any given time.
- Use care when sending Push Notifications to ensure the frequency is appropriate. Members deeming notifications are too frequent may opt to turn off their push notifications.
Downloadable Guide