Overview
An Area is used to define settings pertaining to a designated location of the Club where transactions will occur. Although Areas are set up during Implementation, occasionally, an area will need to be modified to coincide with operational changes. In this document, we will discuss the various settings to be maintained in an F&B Area. Use Case The main Dining Room at a Club has a new Manager, and slight changes to the original configuration of the Dining Room area will need to be configured. The Dining Room will be moving to a Buffet-only option on the weekends, and therefore will need to adjust the Scheduled Overrides. Additionally, they will be tweaking a few other options, including allowing the Servers to view the Tee Sheet in the Dining Room, and requiring Servers to now enter Comp reasons when comping an item within the area. |
Content
Accessing the Tool
To access Areas,
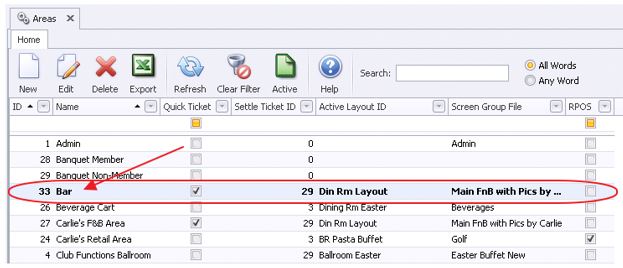
1) Navigate to System across the top toolbar and select Areas.

2) The Areas Grid will launch.

3) The primary functions associated with managing Areas are embedded in the Area setup screen, which can be accessed by double-clicking on an existing Area.
F&B Areas- Tab Overview
In this section we will review the various tabs within an F&B Area.
Area Setup
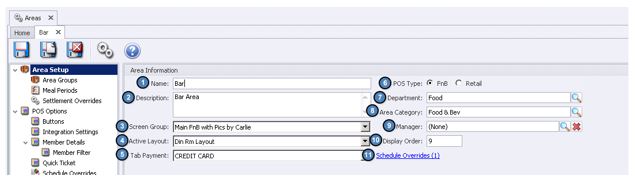
Name - Enter the Name of the Area.
Description - Enter an optional Description of the Area.
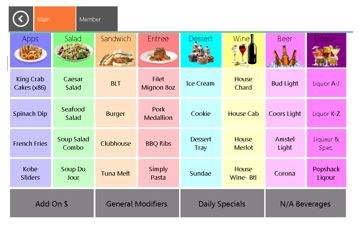
Screen Group - Select the Screen Group/ Menu to be displayed at POS for the Area.
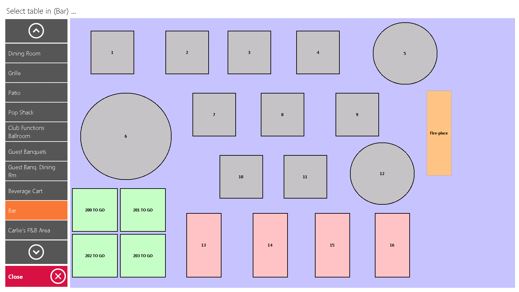
Active Layout - Select the Area Layout to be displayed at the POS for the Area (Select a Table Phase).
Tab Payment - Set this field to the F&B Credit Card Charge Settlement Type. This allows the user to hold a guest’s credit card information on the Tab key in POS.
POS Type - For F&B Areas set this field to FnB.
Department - Select the Department to be associate with this Area (Required).
Area Category - Select the Area Category to be associated with this Area (Required).
Manager - Select the Manager of this Area using the lookup (Optional).
Display Order - Select the Display Order this Area should appear in the Select a Table phase at POS.
Note: For the Display Order to work correctly, each F&B Area must have a sequential Display Order. Otherwise, the Display Order will be alphabetized.
Schedule Overrides - This allows the user to override the Screen Group (Menu) that shows in the POS, during a certain time frame for this Area.
For instance, assume the club has a breakfast buffet on Sunday from 8:00am- 12:00pm and they only want the Buffet Screen Group to show during this time frame.
1 & 2 ) Enter the Start and End Time of the Schedule Override.3) Select the Screen Group to show during this time frame.4) Select Save.
POS Options

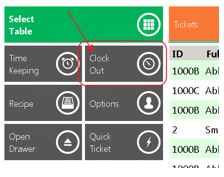
Allow Clock In/Out - Check if employees will be clocking in/out in this Area. When checked, a clock-out button will appear on the POS.
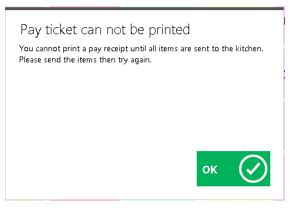
- Require a Send Before Printing Receipt - If checked, the user is required to send all items before a receipt can be printed.
Default POS to Guest Member - If checked, the POS will default to the Guest Member Account at the POS.
- Require PIN and Swipe Card for Login - If checked, users are required to enter an ID to access POS.
- Disable Gratuity Button on Settlement – If checked, the gratuity button on the settlement screen will not be accessible.

- Require Ticket Cover Count – If checked, the user is required to select a cover count on every ticket.
Prompt for Cover Before Send - Prompts the user to enter the cover count before sending items to the kitchen.
Prompt for Cover Before Table Select - Prompts the user to enter the cover count before a table can be selected.

- Disable Gratuity Prompt with Credit Card - If checked, user will not be prompted to enter a gratuity amount when tendering a transaction to credit card.
- Discounts Do Not Change Service Charge - If checked, discounts will not affect the Service Charge on the original total.
- Do Not Require Send Before Exit - When unchecked, the system will require the user to SEND unsent items before they can exit the system. (This ensures that the user will not forget to Send items to the kitchen for preparation).
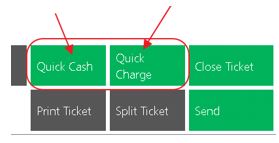
Send With Quick Settlement - If checked, when the user selects Quick Cash or Quick Charge, the system will automatically send items to the kitchen/prep-printers.
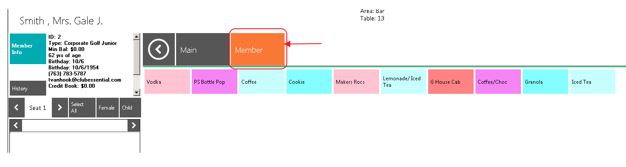
Draw Member Favorites Button - If checked, an additional tab will populate called Members in the POS. This tab shows above the Screen Group when a member is selected. This tab will show the 10 most recent items the member has purchased.
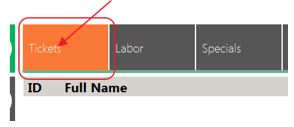
Show all Open Tickets in POS - When unchecked, users will only see their own tickets. Check this box to allow servers to see ALL open tickets.
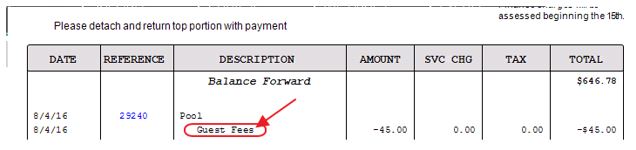
Show Meal Period Name on Statement - If checked, the Meal Period name will show on the Statement for transactions completed within the Area.
Hide Dependents in POS - Removes all Dependents from the POS Member Look-up.
Show Member Preferences - If checked, Member Preferences will be accessible at POS.

Hide Quick Cash - If checked, the Quick Cash button will not be accessible.
Hide Quick Member Charge - If checked, the Quick Member Charge button will not be accessible.
Show POS Check-in - This will display the check-in feature at POS. If the club has an area where members have to check-in (i.e. Fitness Area, Pool) this box will need to be checked for that area.
Member Check- In Item - Select the Item to be charged when a member checks in.
Guest Check- In Item - Select the Item to be charged when a guest checks in.

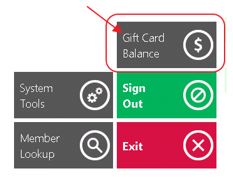
Hide the gift card balance button in POS - This will remove the ‘Gift Card Balance’ button in the POS.
Hide the ‘Labor’ Tab in POS - If checked, the user will not be able to see the Labor Tab in this Area.

Prompt for member on seat in POS - When using a pivot system and entering an order by seat, the system will prompt for member on each seat.
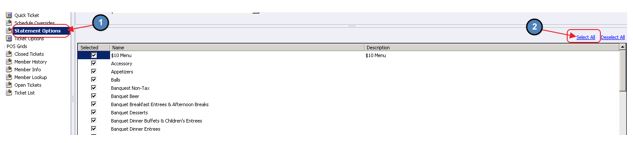
Show Summary Breakout on Statement - If checked, transactions can be broken out on statements either by Item Group or Item Category (Specific Items cannot be shown on a statement, Item Category is the lowest level that can be shown).
Note: If breaking out by Item Category, navigate to the Statement Options Tab and hit Select All. Any category not checked on this tab with show as ‘Other’ on statements.
Prompt for Send on Re-Order - When using the reorder feature, the system will prompt the user if they would like to send the re-order items.

Request Member Email on POS ticket - If checked, the user will be prompted to enter an email address if the member does not have one on file.
Print Email on Same Receipt - If checked, the email entered will print on the receipt.
Use Coursing - If the kitchen uses Coursing, check this box.
Use Firing - If checked, the user will be able to send different courses to the kitchen separately.
Require Comp Selection - If checked, the user is required to select a Comp reason when Comp Item is selected at the POS.

Allow Employees to Change Display Order in POS - If checked, a Move Up/ Move Down feature will be enabled to allow employees to adjust the order of the items appearing on a ticket in POS.

Show Print Preview on Pay/Settle in POS - If checked, the user will be shown a print preview of the print and settle ticket when their respective buttons are selected.
Show Print Preview on Send in POS - If checked, the user will be shown a print preview of the Send Ticket when Send is selected at the POS.

Group Like Items at POS - If checked, like items will be grouped together to create one line on the ticket in POS. For instance, if 2 of the same beers are selected, rather than have 2 separate lines, the POS will group them together on 1 line.

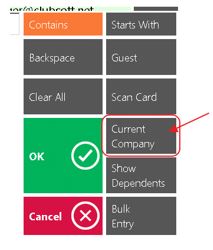
Show Company Toggle in Member Lookup at POS - If a club has a multi-company setup and they want members from all companies to show in the POS, check this box to enable the Company Toggle.
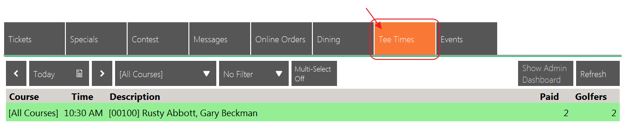
Show Tee-Time as Read Only at POS - Only applicable to Axis clients in F&B areas, if checked, the POS will display a read only mode of the Tee-Sheet in POS.
Buttons
Standard Messages can be created to help quicken the order entry process at the POS. These messages can either be Special Instructions, Comp and Discount reasons, or Void reasons.
To create a new message, first navigate to the Buttons tab, select the New Icon, give the message a Name, Value (This is what will appear at the POS), and a Type. Lastly, select Save & Close when finished.
FAQs
Q: I no longer have an option to select my device when I log-in. How can I re-enable this option?
A: Go to System Tools, Utilities Tab, and check Always Prompt for Terminal.
Downloadable Guide
POS Terminal/Workstation Device Setup - Guide