...
| Table of Contents | ||||||||||
|---|---|---|---|---|---|---|---|---|---|---|
|
Overview
An Area is used to define settings pertaining to a designated location of the Club where transactions will occur. Although Areas are set up during Implementation, occasionally, an area will need to be modified to coincide with operational changes. In this document, we will discuss the various settings to be maintained in a Retail Area. Important: It is NOT recommended to create a new Area without first contacting Clubessential Support. Use Case The Golf Shop at a Club has expanded, and has a new Manager with an increased focus on Customer Service and operational efficiencies. As such, changes to the original configuration of the Golf Shop area will need to be made. For example, the Draw Member Favorites button will now be enabled so that Staff can view and inquire about Member satisfaction regarding the latest 10 items purchased by the Member. Additionally, the Require Comp Selection option will be enabled to ensure visibility is gained as to why staff is providing complimentary items by requiring them to enter a reason code. |
Content
|
|---|
Accessing the Tool
To access Areas,
...
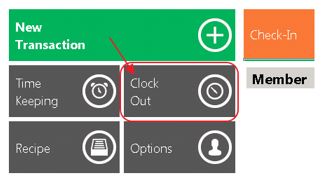
Allow Clock In/Out - Check if employees will be clocking in/out in this Area. When checked, a clock-out button will appear on the POS.
- Require a Send Before Printing Receipt - Not applicable to Retail Areas.
Default POS to Guest Member - If checked, the POS will default to the Guest Member Account at the POS.
- Require PIN and Swipe Card for Login - If checked, users are required to enter an ID to access POS.
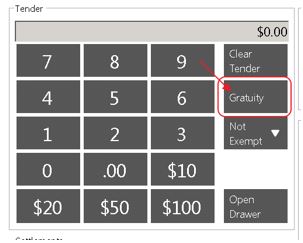
- Disable Gratuity Button on Settlement – If checked, the gratuity button on the settlement screen will not be accessible.
- Require Ticket Cover Count – Not applicable to Retail Areas.
Prompt for Cover Before Send - Not applicable to Retail Areas.
Prompt for Cover Before Table Select - Not applicable to Retail Areas.
- Disable Gratuity Prompt with Credit Card - If checked, user will not be prompted to enter a gratuity amount when tendering a transaction to credit card.
- Discounts Do Not Change Service Charge - Not applicable to Retail Areas.
- Do Not Require Send Before Exit - Not applicable to Retail Areas.
Send With Quick Settlement - Not applicable to Retail Areas.
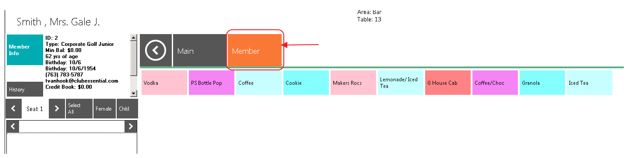
Draw Member Favorites Button - If checked, an additional tab will populate called Members in the POS. This tab shows above the Screen Group when a member is selected. This tab will show the 10 most recent items the member has purchased.
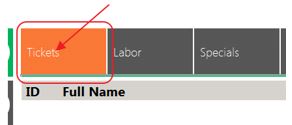
Show all Open Tickets in POS - When unchecked, users will only see their own tickets. Check this box to allow servers to see ALL open tickets.
Show Meal Period Name on Statement - Not applicable to Retail Areas.
Hide Dependents in POS - Removes all Dependents from the POS Member Look-up.
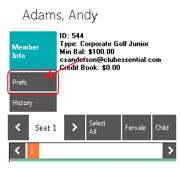
Show Member Preferences - If checked, Member Preferences will be accessible at POS.
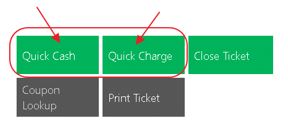
Hide Quick Cash - If checked, the Quick Cash button will not be accessible.
Hide Quick Member Charge - If checked, the Quick Member Charge button will not be accessible.
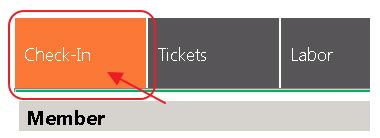
Show POS Check-in - This will display the check-in feature at POS. If the club has an area where members have to check-in (i.e. Fitness Area, Pool) this box will need to be checked for that area.
Member Check- In Item - Select the Item to be charged when a member checks in.
Guest Check- In Item - Select the Item to be charged when a guest checks in.
Hide the gift card balance button in POS - This will remove the ‘Gift Card Balance’ button in the POS.
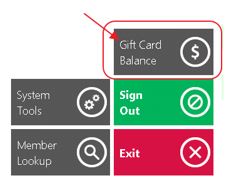
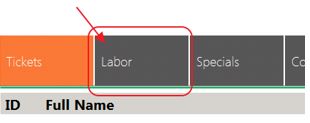
Hide the ‘Labor’ Tab in POS - If checked, the user will not be able to see the Labor Tab in this Area.
Prompt for member on seat in POS - Not applicable to Retail Areas.
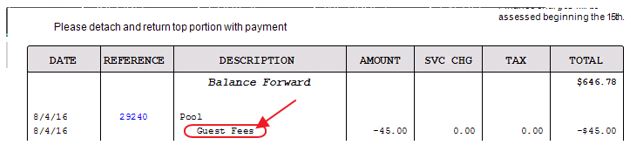
Show Summary Breakout on Statement - If checked, transactions can be broken out on statements either by Item Group or Item Category (Specific Items cannot be shown on a statement, Item Category is the lowest level that can be shown).
Note: If breaking out by Item Category, navigate to the Statement Options Tab and hit Select All. Any category not checked on this tab with show as ‘Other’ on statements.

Prompt for Send on Re-Order - Not applicable to Retail Areas.
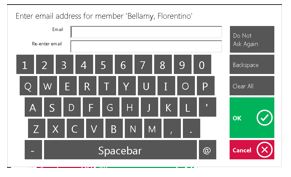
Request Member Email on POS ticket - If checked, the user will be prompted to enter an email address if the member does not have one on file.
Print Email on Same Receipt - If checked, the email entered will print on the receipt.
Use Coursing - Not applicable to Retail Areas.
Use Firing - Not applicable to Retail Areas.
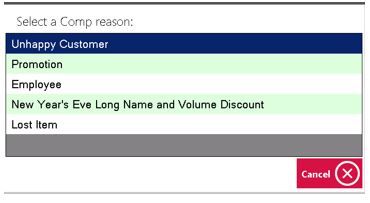
Require Comp Selection - If checked, the user is required to select a Comp reason when Comp Item is selected at the POS.
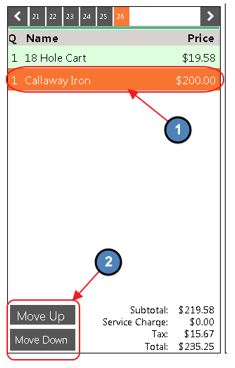
Allow Employees to Change Display Order in POS - If checked, a Move Up/ Move Down feature will be enabled to allow employees to adjust the order of the items appearing on a ticket in POS.
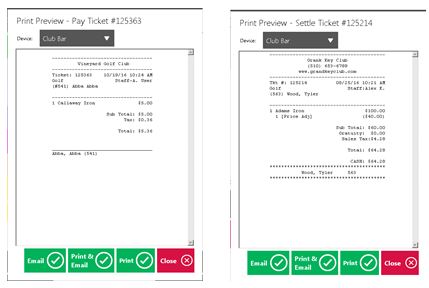
Show Print Preview on Pay/Settle in POS - If checked, the user will be shown a print preview of the print and settle ticket when their respective buttons are selected.
Show Print Preview on Send in POS - Not applicable to Retail Areas.
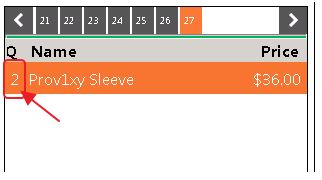
Group Like Items at POS - If checked, like items will be grouped together to create one line on the ticket in POS. For instance, if 2 of the same sleeves of balls are selected, rather than have 2 separate lines, the POS will group them together on 1 line.
32. Show Company Toggle in Member Lookup at POS
If your club has a multi-company setup, leaving this option unchecked will default the POS device to searching ALL Companies when searching for a member to add to a ticket. When left unchecked, there is no way to control narrowing the member search down to just a single company.
...
Use settings to provide opportunities for your staff to enhance the Member experience. Settings such as Member Info, Member Preferences, and Member History can increase your staff’s ability to provide a better level of service to your Members.
After creating a new Area, you will need to go to the Employees Module and locate your profile. Double click to pull up your account and choose Areas under the Security dropdown. Give yourself access to the newly created Area and then access the Employee Groups Tab within the Employees tab at the top of CMA to then grant access to the Area to the employee groups that will be using the Area.
FAQs
Q: When settings are changed in the POS, do users need to exit out, and log back into the POS for the changes to take effect?
...