Versions Compared
Key
- This line was added.
- This line was removed.
- Formatting was changed.
Table of Contents
| Table of Contents | ||||||
|---|---|---|---|---|---|---|
|
| Widget Connector | ||
|---|---|---|
|
Overview
As an administrative CRM User, you have access to almost all of the editable settings within your CRM. This includes creating new fields, adjusting the fields visible in a given View/Layout, and editing the values within an existing picklist field, among many other permissions.
Required Permissions
CRM Admin
Accessing the Tool
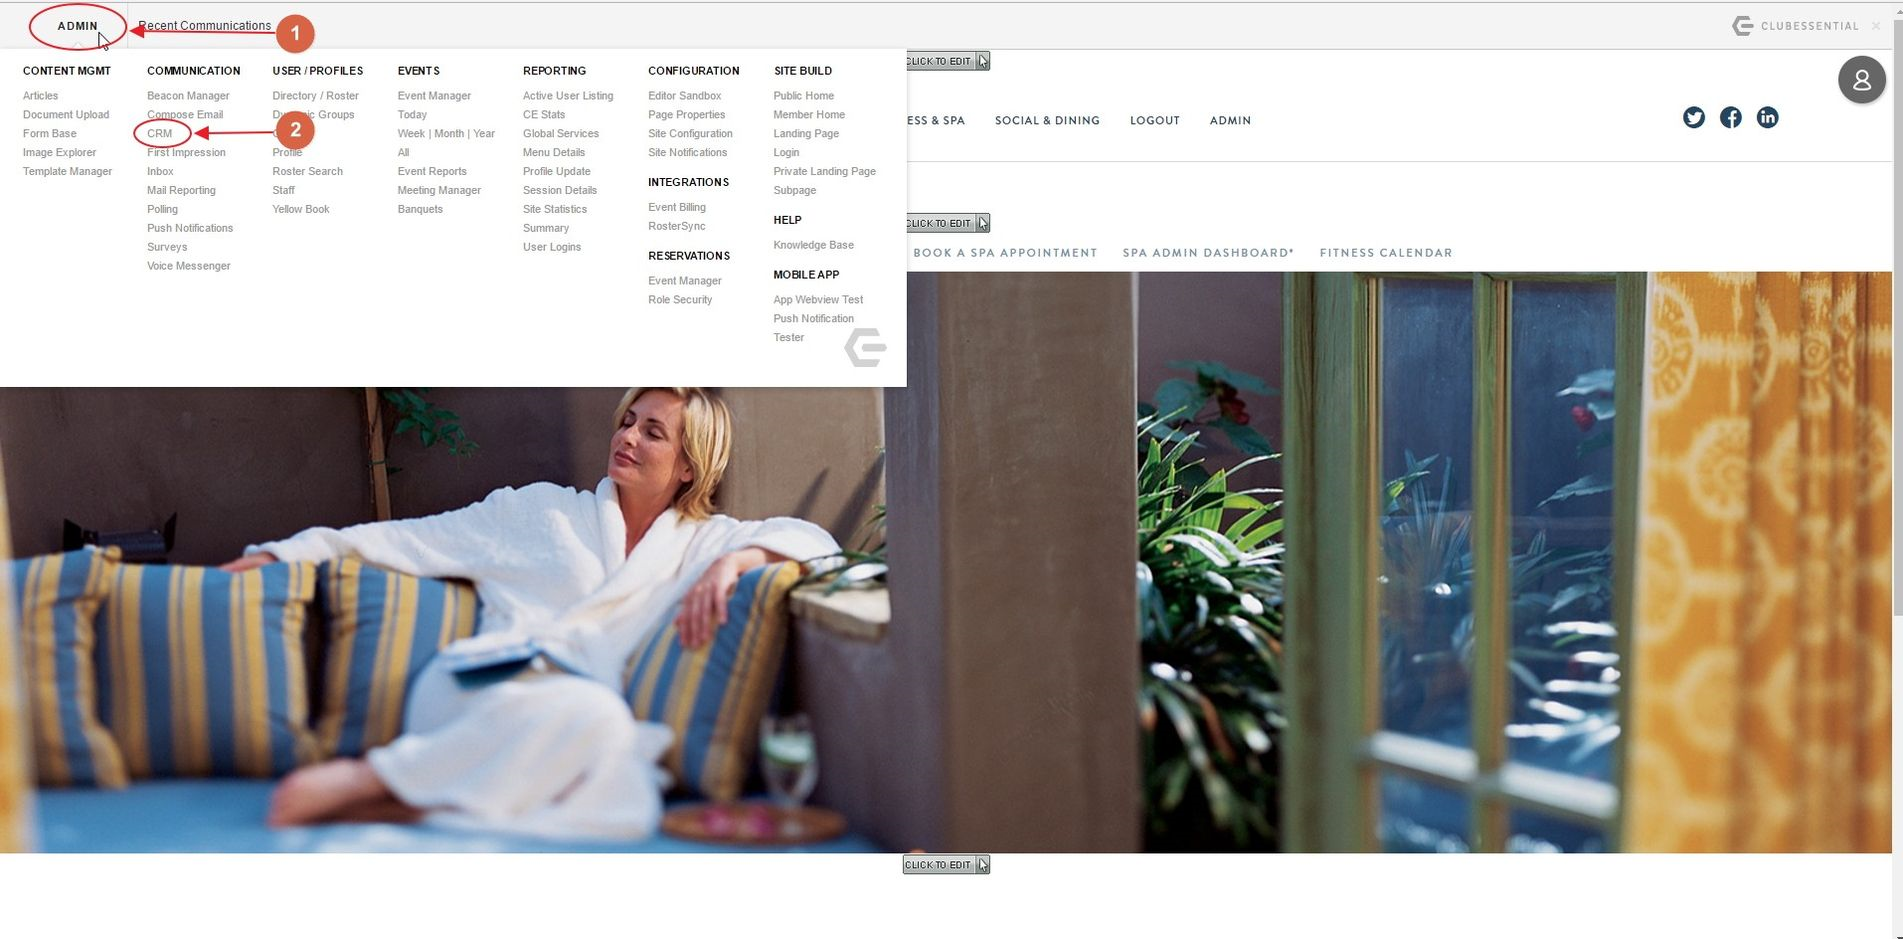
To access your CRM, sign in to your member website as an Administrator. Then, hover over the Admin toolbar in the top, left-hand corner of the page. The CRM link should appear in either the Communication or Content Management section, sometimes titled CRM & Data Warehouse.
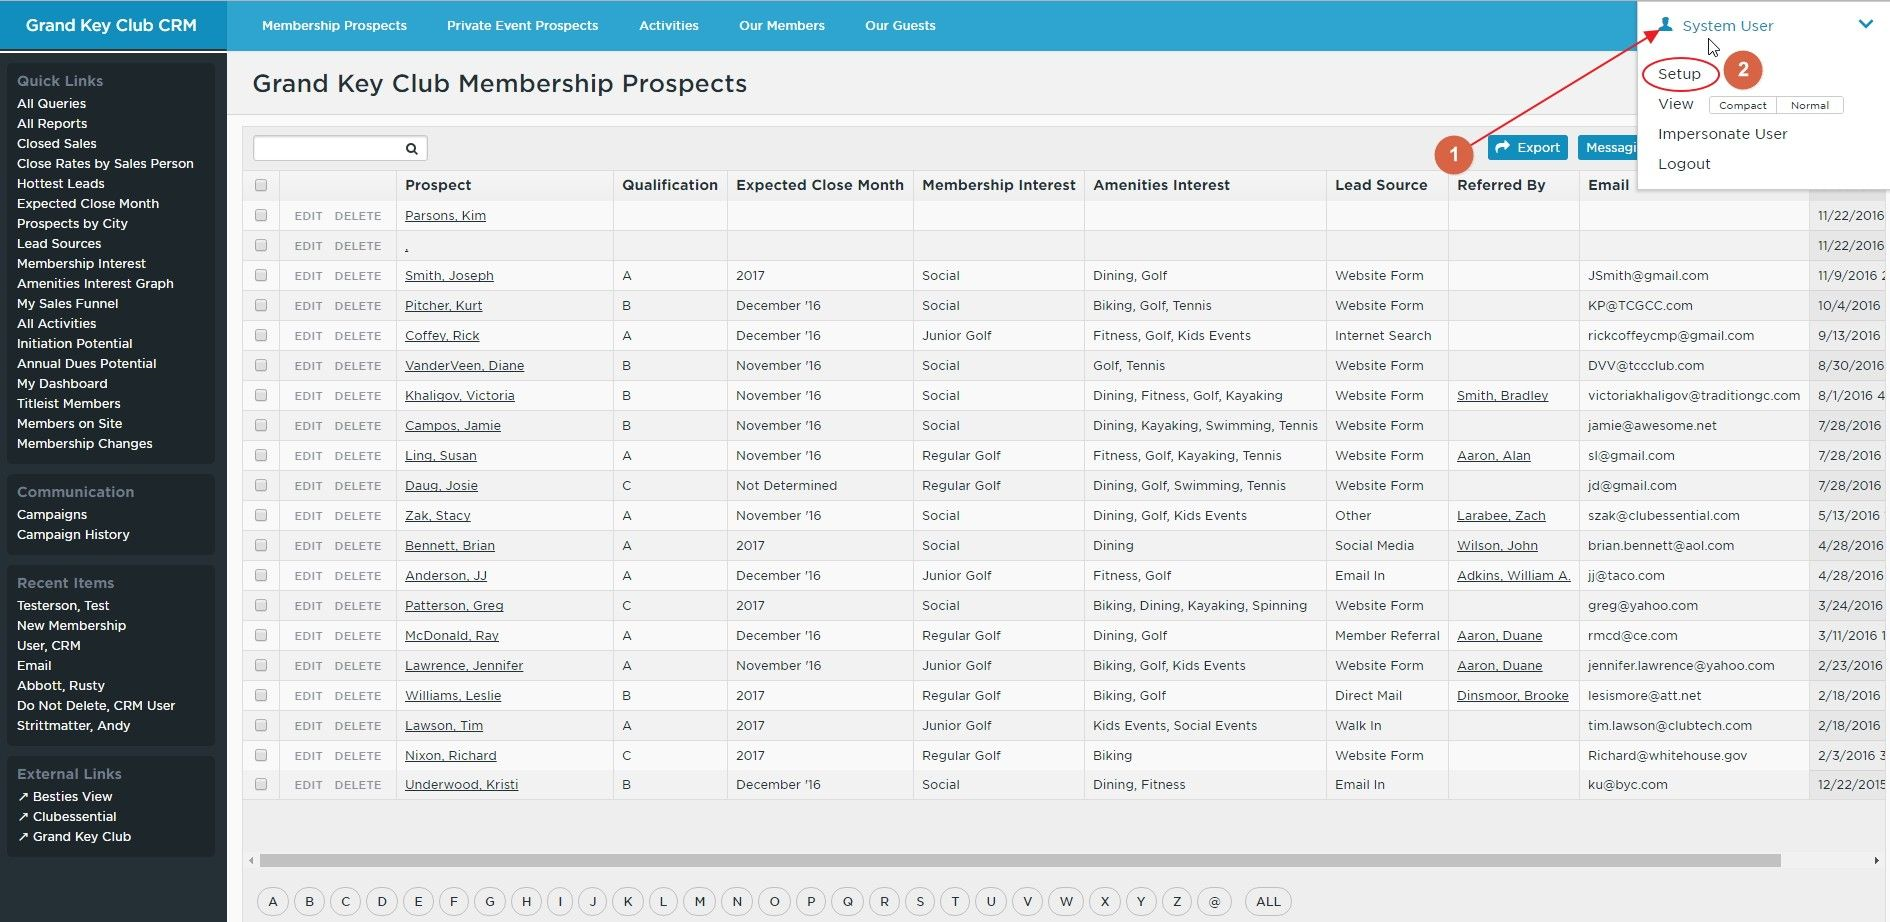
The information covered in this section is mostly found in the Admin Dashboard of the CRM. To access this, while on the main CRM Dashboard, hover over your name in the top, right-hand corner of the CRM, and click the Setup option.
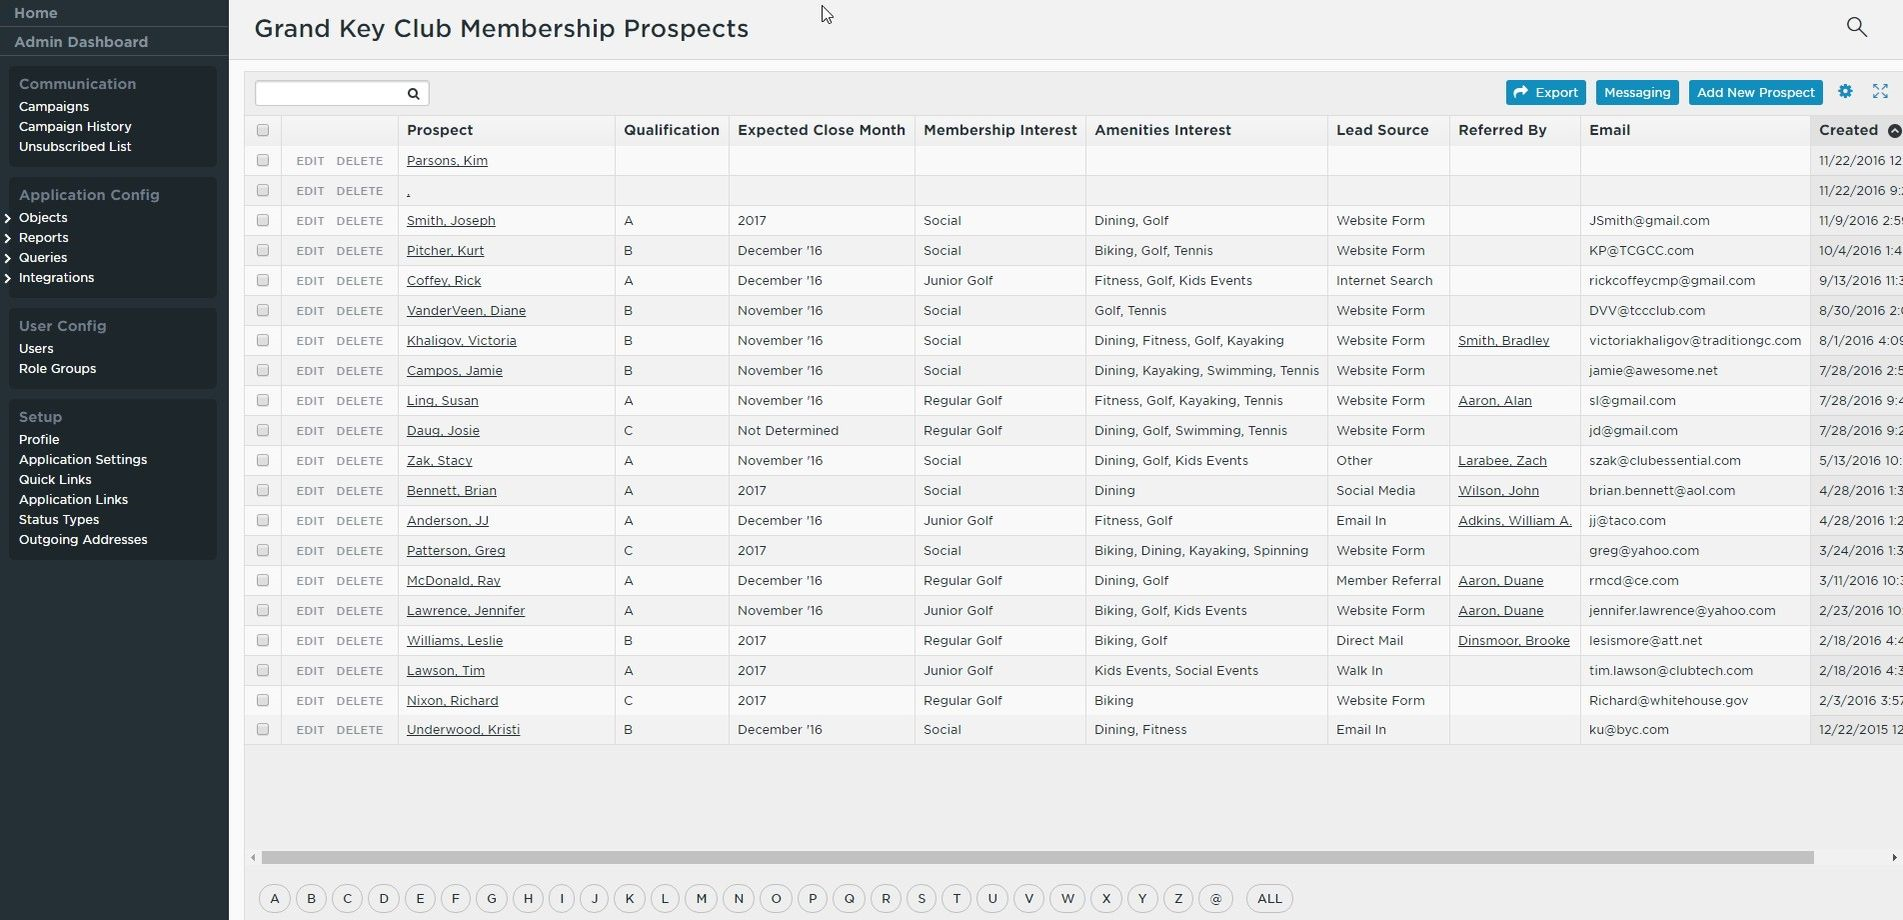
From here, you will see the CRM Admin Dashboard, which looks similar to the CRM Home Dashboard, but with a different sidebar on the left, and no Application Links at the top.
Adding/Editing a CRM View
A View in the CRM is a screen that displays a high-level overview of a subset of records from within a single Object in the CRM. Views typically have filters in place that will display only records that meet certain criteria. For example, the “Our Members” View will display all records in the Contacts Object that have a status of “Member.” The fields displayed in a view are customizable to match the type of record displayed within. For example, the “Member Number” field makes sense to appear in the “Our Members” View, but not in the “Membership Prospects” view.
Adding a New View
To create your View, you’ll first need to access the Admin Dashboard. Similar to adding Fields, you’ll need to think about which Object this View will reside in. In this example, we’ll be adding the new View “Real Estate Prospects” to the Contacts Object.
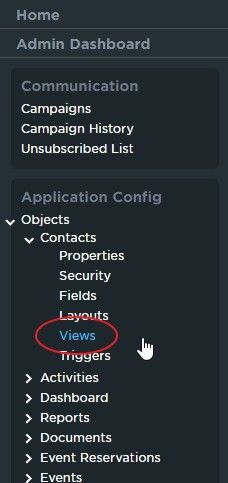
To add your new View from here, you’ll first need to open up your Contacts Object for editing. From the left-hand sidebar, click on Options to expand the list and display all of the Objects present in your CRM. Contacts should almost always be the first Object listed. Click on it to expand the list further, and then click on Views to be brought straight to the Views section of the Contacts Object setup screen.
You should now see a list of all available Views within the Object you are editing. To edit an existing View, click on the gray Edit button immediately to the left of its name in the listing. To see a live representation of this View, click on the gray View button immediately to the left of its name in the listing. To add a new View, click on the large blue button titled + Add New View.
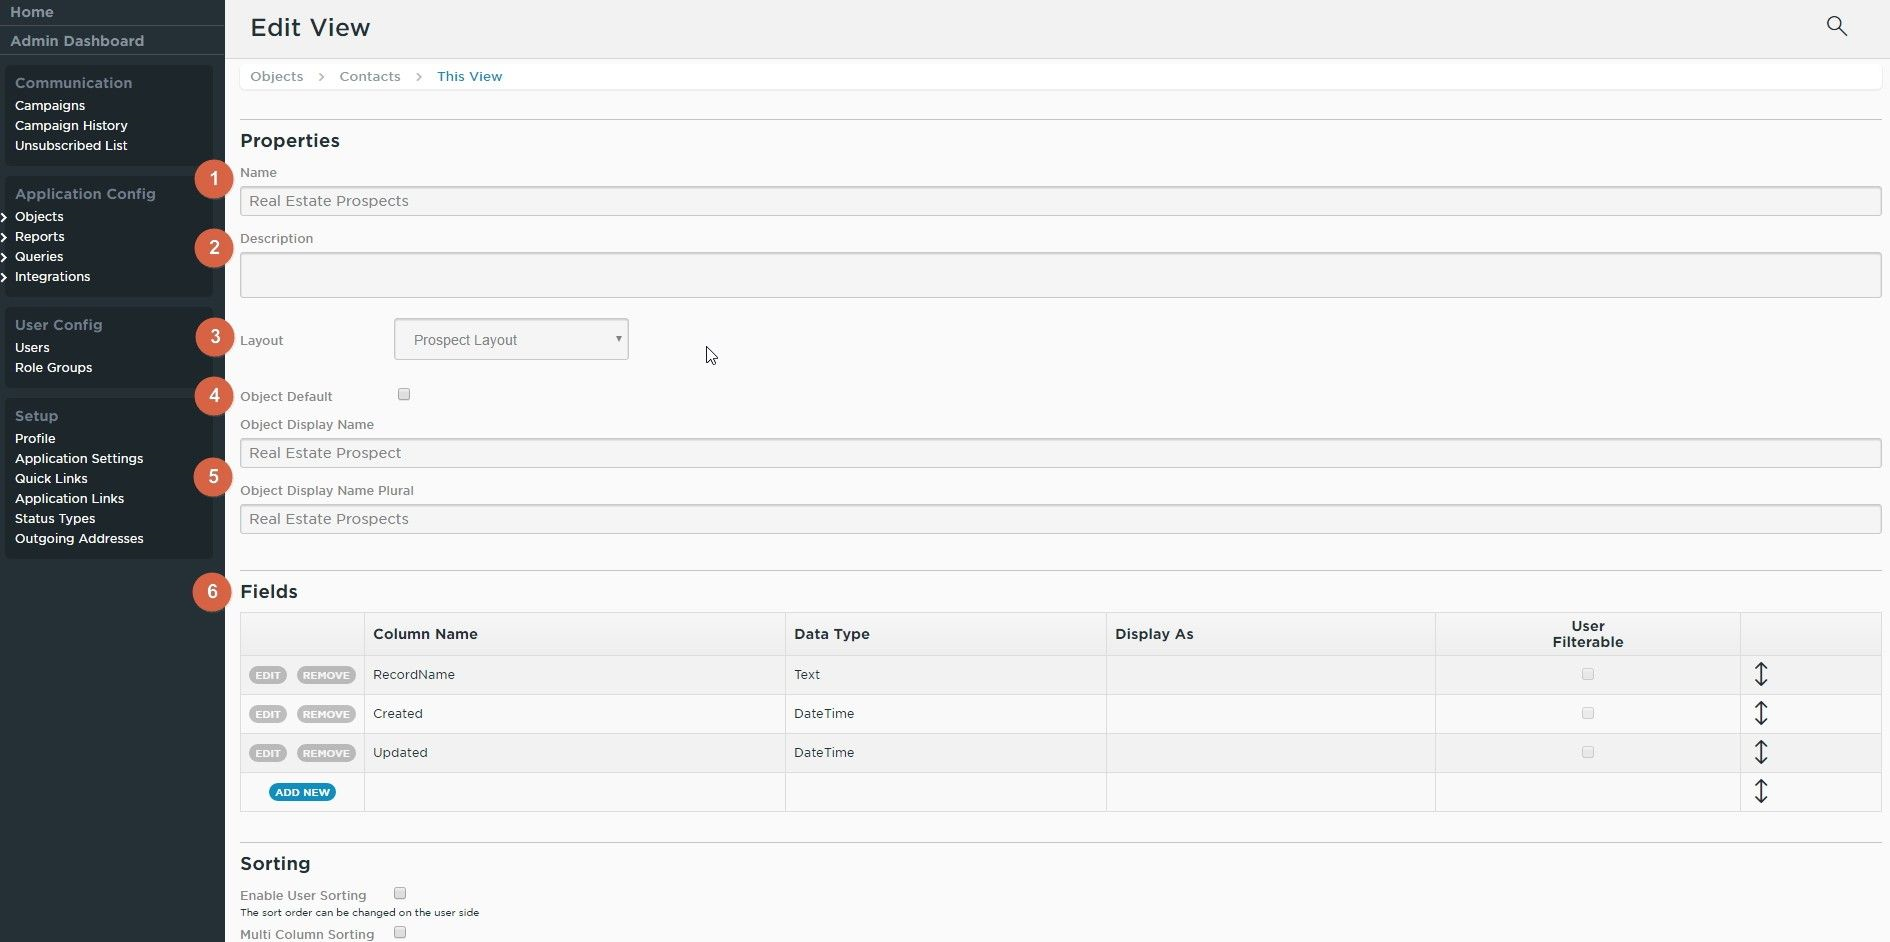
You should now see the Edit View screen:
Name: Enter a short, descriptive name for this View. Ex: “Real Estate Prospects”
Description: Optionally, enter a longer description of this View. This would be seen only on the Views overview, and not from the View itself.
Layout: Select which Layout will be related to this View. Whenever a user clicks to view a record from this View, this is the Layout that will display that record’s information. For example, a new View for “Members” should use the “Members” Layout so that, when a record is opened from within the new View, the full list of Member information is displayed.
Object Default: Check this box to make this View the default for this Object. Any reference to this Object that does not point to a specific View will instead show the Object Default View.
Object Display Name: Dictates how the Object will be referenced from within this View. For example, this changes the verbiage of the Add New Record button from within the View. If left blank, the default is set to the Object Name.
Fields: Lists which Fields are visible within this View. By default the system fields RecordName, Created, and Updated are visible. The order that the fields appear in this list is the same as how they will appear in the View (the top-most field will appear furthest to the left in the View). The options for each row are:
Edit: Allows you to change the value in the Display As and User Filterable columns for this row.
Column Name: Displays the Column Name of the field that is set to display in the View in this position.
Data Type: Displays the data type of the field that is set to display in the View in this position.
Display As: Allows you to change the verbiage that displays for this field in the View. For example, you could change the wording of the Updated field to Time of Last Update.
User Filterable: Enables this field to be added to an Advanced Filter in the View, for on-the-fly filtering.
Positioning Arrow: Click and drag this arrow up or down to reorder the fields within the table. At the bottom of the list of fields is a blue button titled Add New. Clicking this button will add a new row to the bottom of the existing list, and allow you to configure a new field in this View.
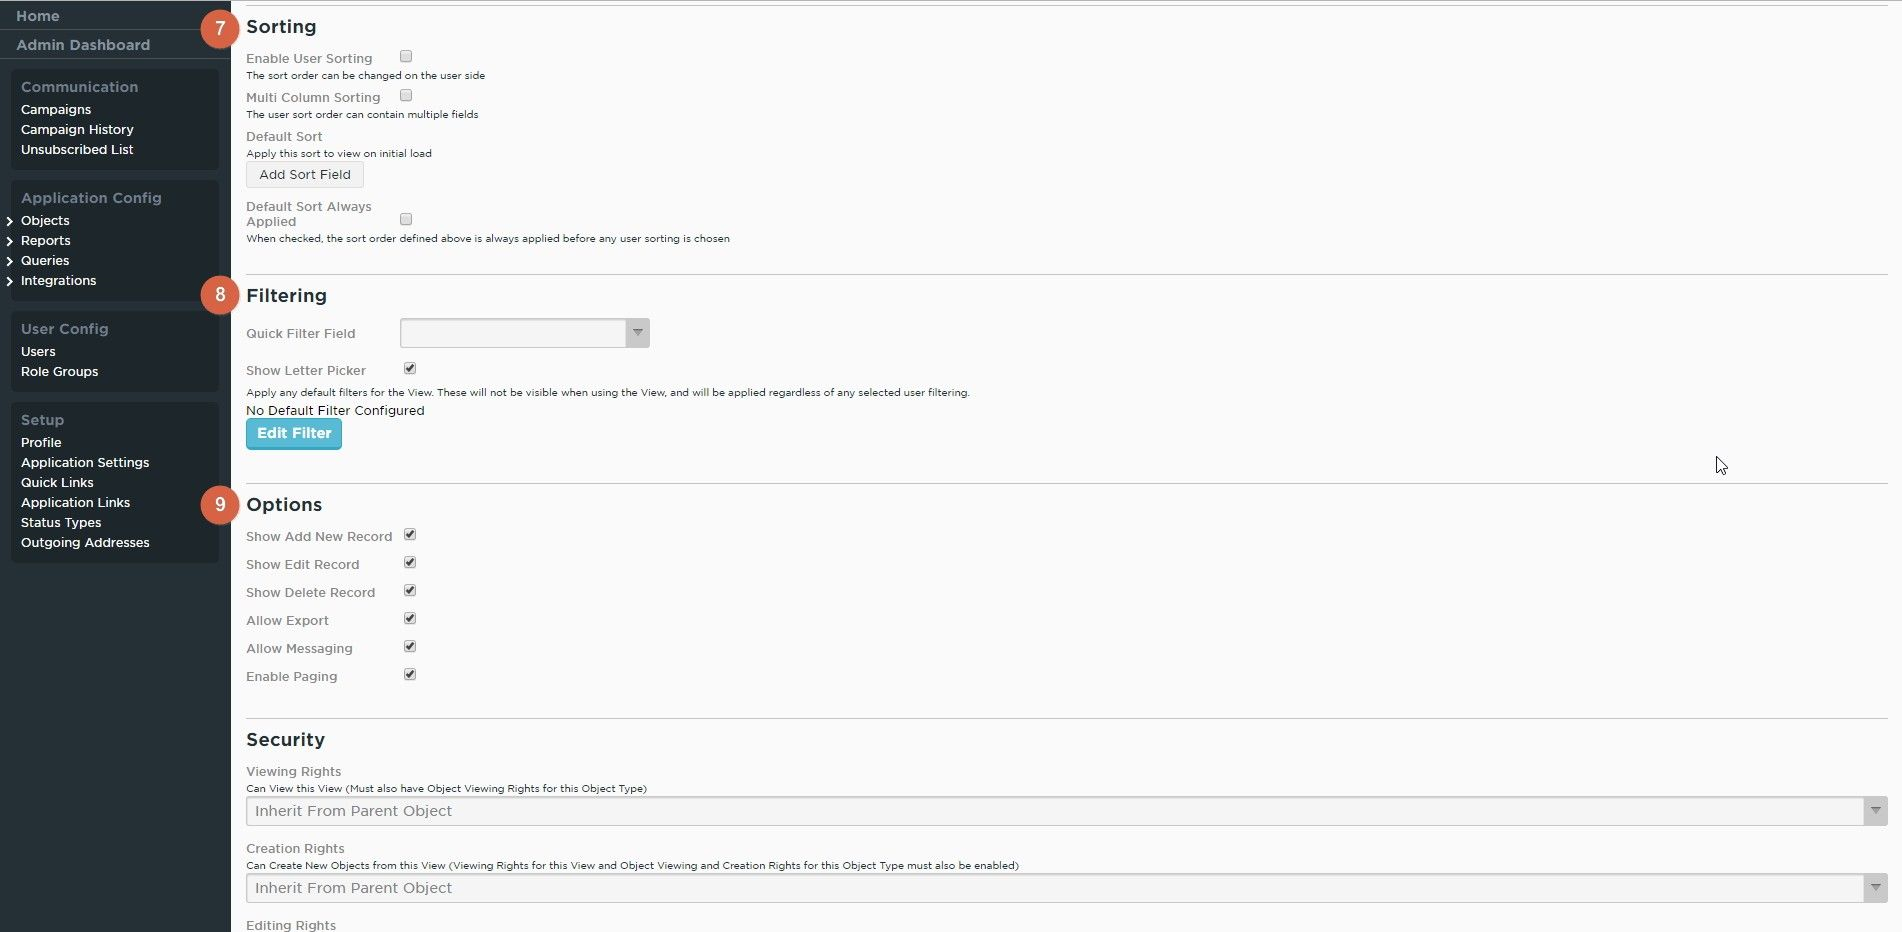
Sorting: Allows you to configure the sorting options for records within this View. All sorting can be in either ascending order (lowest to highest) or descending (highest to lowest) order.
Enable User Sorting: Enables users to change the sort order in this View manually by clicking on the column header. Checked by default.
Multi Column Sorting: Enables users to sort this View by multiple columns.
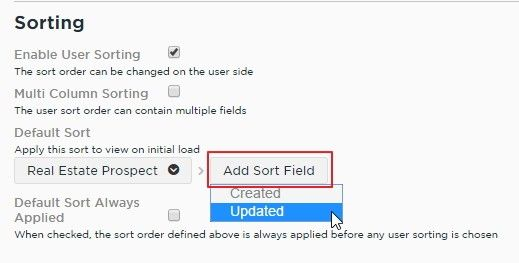
Default Sort: Configures the sort order that will be applied to the records within this View by default when it first loads. More details on this below.
Default Sort Always Applied: When checked, the default sort order will always apply. Any user sorting (if enabled) will only take place after the default sort. In many cases, this prevents user sorting entirely, so it is recommended not to select this option unless you want to prevent user sorting.
Default Sort:Under the Default Sort option, click on the button titled Add Sort Field to configure the default sorting of this View. From here, select which field you would like to sort by. The default sort order of any given field is descending (down arrow). Click on the field again to flip the order to ascending (up arrow). You can add additional sort fields to do more advanced sorting.
Filtering:Configure which field(s) this View uses to filter out records, and therefore which records are displayed in the View.
Quick Filter Field: Choose which field(s) will be used in the search field within this View. RecordName is always enabled by default, but you can enable more fields here as needed. For example, in order to search by both Contact Name and Email address, be sure to check the boxes for RecordName and Primary Email - then the desired search criteria will check both the RecordName and Primary Email fields for a match.
Show Letter Picker: Determines whether the letter picker will display at the bottom of the screen in this View. Checked by default.
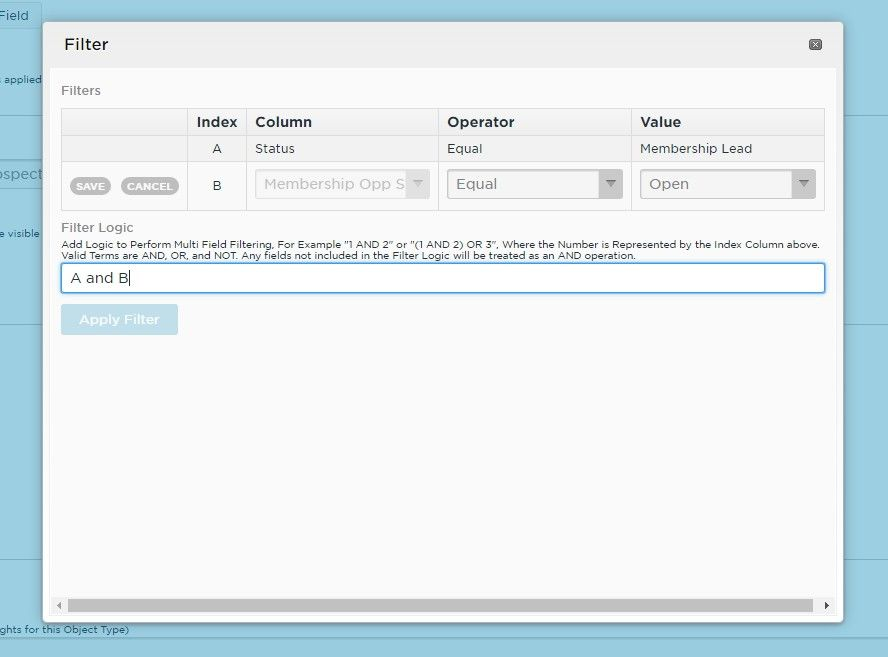
Default Filter: Configures to default filter for this View, so you can tailor which records will be displayed. Click the blue button titled Edit Filter to open a popup window with the filter options: At the top of the popup window is a table in which the field(s) to be used as filters are entered. Click on the blue Add New button to configure a field for this filter. The options for each line of the filter are as follows:
Index: Used in the Filter Logic section below to target this line in the filter. This value is automatically generated.
Column: Select which field to use in the filter.
Operator: Choose how to compare the selected field to the value entered in the Value column.
Value: Enter (or choose, for picklist fields) a value to compare the selected field against.
Once you have filled out all the fields in this line, click Save, and your new field comparison will be added to the table. You can repeat this as many times as necessary to build your filter.
Underneath this section is a text box to enter in logic commands to combine the fields entered in the table. This is only necessary if more than one field is selected in the table (if only one field was chosen to filter, then this section should be left blank). In this section, use the operators “AND”, “OR”, “NOT”, and parenthesis to combine the field comparisons from the table above, using the Index value to refer to a specific line.
Once you have set up your filter as needed, click on the blue button labeled Apply Filter and your filter will be applied to the View.
Options: Use this section to configure some final miscellaneous options for this View. The Options available are:
Show Add New Record: When checked, a button will be present in the View to allow users to add new records. Unchecking the box will hide this button from this View only.
Show Edit Record: When checked, a link will be present next to each record allowing users to edit the selected Record. Unchecking the box will hide this link from all records in this View only.
Show Delete Record: When checked, a link will be present next to each record allowing users to delete the selected Record. Unchecking the box will hide this link from all records in this View only.
Allow Export: When checked, a button will be present in the View to allow users to export the records within this View. Unchecking the box will hide this button from this View only.
Allow Messaging: When checked, users will be able to send messages to records containing email addresses either by hovering the mouse over an email address visible in the View, or by selecting a record and clicking on the Messaging button. Unchecking this box will hide the button from this View only, and also prevent the Message option from appearing under email addresses in this View only.
Enable Paging: When checked, this View will be split into pages of 20 records each, which can be scrolled through to view all records. Unchecking this box will force all records returned in this View to load on the same page, and remove the paging for this View only.
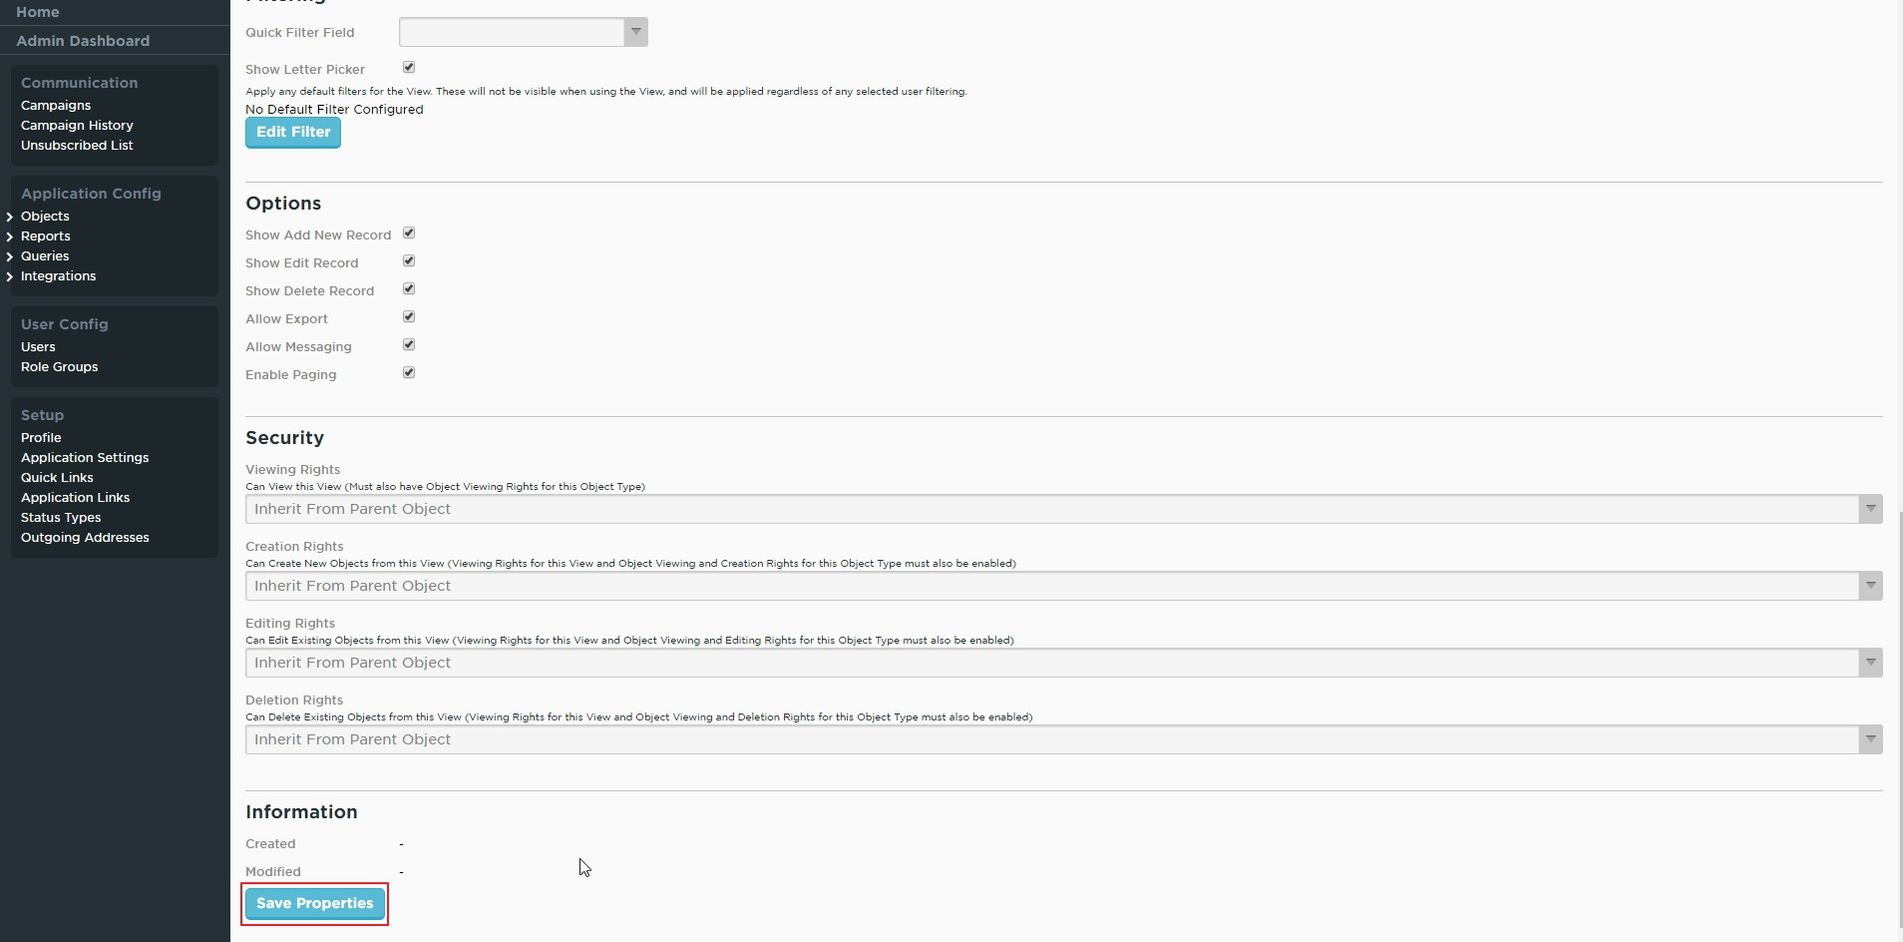
Security: Generally, security options for Views are not configured from the View itself, but rather in the Role Groups section, so we will not cover this section. By default, all options are set to Inherit From Parent Object. Please contact your CRM Support Team if you need to lock down a View from certain users, as we are happy to cover this with you on a one-on-one basis.
Additional Resources
Best Practices
Keep the filters in Views simple - leave the more advanced filtering options for queries/reports. Try to design your Views to display large chunks of similar records, separated out by basic identifying features, such as Status, or Contact Type, etc.
FAQs
Why can't I access the Object settings? I'm receiving an error 'Invalid Permissions to View This Page"?
Only Object Administrators have access to edit settings within an Object. If you are receiving this message, your account may not be set as an Object Administrator. Please note that CRM pricing is based on a per admin user basis, so adding additional Object Administrator accounts may incur additional fees. Contact your Account Manager to discuss this further.
