| Table of Contents | ||||||||||
|---|---|---|---|---|---|---|---|---|---|---|
|
...
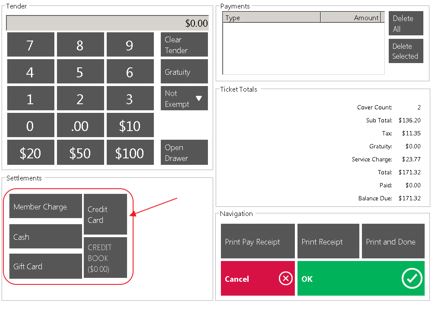
Charge Settlement Types are the settlement buttons in the Close Ticket section of the POS.
They are used to tell the system what settlement buttons should display on what terminals, and where the buttons should appear on the settlement screen. They are also responsible for storing the debit account when posting payments to the General Ledger. Use Case
A Club has decided to start accepting checks, and therefore, will need to set up a new Charge Settlement Type, and configure its corresponding Check Settlement Type button in the POS. |
Content
|
|---|
Plastic Gift Cards
When using plastic Gift Cards with a mag stripe, please ensure the cards already have a number populated on their mag stripe. When issuing, or redeeming Gift Cards, the number on the mag stripe is needed to associate the Gift Card with the Clubessential database.
Furthermore, in order to read the number on the plastic Gift Cards, the club will also need to use an UN-ENCRYPTED swiper. Regular Credit Card swipers from ETS or Openedge will NOT suffice in this situation; these are ENCRYPTED readers.
Recommended Vendor
Many of our clients have had success purchasing their mag stripe Gift Cards through the Custom Plastic Card Company. Contact information for the Custom Plastic Card Company is below:
Custom Plastic Card Company
1801 Green Road
Pompano Beach, Fl 33064
Gift Card Settings
If using manually entered paper/ plastic Gift Cards, automatic Gift Card Numbers can be assigned to Gift Cards as they are sold within the Office System. (Note: This setting would not be used if the club is using plastic Gift Cards with a mag stripe.)
...
Access the Tool
To access Charge Settlement Types,
1) Navigate In CMA navigate to System across the top toolbar and select System SettingsCharge Settlement Types.

2) Select Point of Sale on the left pane and navigate to the Gift Card Settings section.
- Check Auto Number. When checked, the system will automatically assign Gift Card Numbers.
- Enter an Auto Number Seed - This is the first Gift Card Number to assign.

Set Up Gift Cards
In this section, we will review the various procedures needed to set up Gift Cards. This will need to be done regardless of whether the club is using manually entered Gift Cards, or Plastic Gift Cards with a mag stripe.
Gift Card POS Item
A POS Item flagged as ‘Ask for Price’ must be created to be associated with the Gift Card Type (explained in next section). When this Item is selected in either the Member Charge Wizard or the POS, a prompt will display asking for the Gift Card information. Please be sure to link this Item to the correct GL account for accounting purposes (please see our Clubessential Items Manual for more information on creating items).
Gift Card Type
After the POS Item is created, the next step is to set up the Gift Card Type. The Gift Card Type determines the POS Item that will populate the Gift Card information prompt, an expiration value, and the Areas the Gift Cards can be redeemed.
To set up a Gift Card Type,
1) Navigate to Membership across the top toolbar and select Gift Card Types.

2) The Gift Card Types Grid will launch.

3) Perform The Charge Settlement Types Grid will launch.
3) The primary functions associated with managing Charge Settlement Types are embedded in the Charge Settlement Type setup screen, which can be accessed by double-clicking on an existing Type, or clicking the New button.

Creating a New Charge Settlement Type
By default the system is loaded with Member Charge, Cash, Gift Card, Credit Card and Credit Book, but there can be as many settlement types as needed.
To Create a Charge Settlement Type,
1) Navigate to the Charge Settlement Types Grid and perform either of the following to launch the Gift Card Charge Settlement Type setup screen:
- a) Click the New icon on the toolbar.

-b) Right-click anywhere on the Gift Card Member Types Grid and select New. 

42) The Gift Card Type Setup Charge Settlement Types setup screen will launch.

5) Please enter all appropriate information listed below:
- Enter the Name of the Gift Card Type.
- Select the POS Item created in the previous section.
- Enter an Expiration Value.
- Select the Areas the Gift Cards will be redeemable.

Note: To remove an Area, highlight the Area in question from the Selected Areas list and select Remove Selected.

6) Select Save & Close.

Once the Gift Card Type has been added, you can issue the Gift Cards.
Issuing Gift Cards
Gift Cards can be issued through the Member Charge Wizard or the POS.
Member Charge Wizard
Gift Cards can be issued in bulk through the Member Charge Wizard. In this example we have 6 gift cards at 3 different values.
1) In the Member Charge Wizard enter the Member (Member purchasing the Gift Card), Area, the Gift Card Item (POS Item selected in the Gift Card Type), QTY (Number of Gift Cards to be issued), and the Price (Amount to be issued to the Gift Card). Enter the next line as applicable. Select Finish when each line item has been entered.

2) Once Finish is selected, an additional option at the bottom of the screen labeled Gift Card Entry will populate.

3) Depending on your setup, the system will auto-assign the Track and Gift Card Number or you can enter the first number and the system will assign the next sequential numbers. If using plastic Gift Cards with a mag stripe, toggle the mouse in the Track field and swipe the card. The code that is on the mag stripe will then populate into the Track field associating that card with the Gift Card in the Clubessential database. Repeat the same process to populate the code on the mag stripe into the Card Number field.

- If Issued To is checked, it will let you manually enter a guest or event description.
- If Member is checked, it will allow you to search for a member to issue the Gift Card to.
Enter the Expiration Date (will default to the expiration value set in the Gift Card Type) or Never Expires. Enter a Description. Lastly, select Next to move to the next Gift Card.
4) Continue entering all Gift Cards. When the final Gift Card is entered, select Finish.

5) Post the Batch.

Auto-Finish
If you are entering multiple Gift Cards and they will be issued to the same event (i.e. - Golf Tournament Prize) or Member, the Auto-Finish feature may be utilized. Please note that if using plastic Gift Cards with a mag stripe, the Auto-Finish feature cannot be utilized.
1) Once all information has been entered on the first Gift Card select Auto-Finish. This will automatically assign a number to the remaining Gift Cards with the identical information entered.

2) Select Yes on the confirmation prompt.
3) Post the Batch as normal.
Notes:
- Keep in mind that all information is searchable in POS so the more description, the easier to find a gift card.
- Follow the same steps for a single Gift Card except when done entering all the information, click Finish.
- If the Gift Card Entry option does not appear make sure you have the proper Item selected in the Gift Card Type.
POS
Gift Cards can also be entered in bulk through the POS.
1) In the POS Order Screen select the Gift Card Item. Because the Gift Card Item is flagged as Ask for Price, the system will prompt the user to enter a price for the Gift Card (this will be the amount issued to the Gift Card).
2) If more than one Gift Card will be issued at the same amount, select the Change QTY button and apply the appropriate quantity. Continue with all the Gift Card denominations; in this example 6 Gift Cards at 3 different amounts (25, 50, and 100) were issued.
Settle the ticket using Close Ticket or one of the Quick settlement options; once the ticket is settled, this will bring up the New Gift Card box.
Note: If the New Gift Card Box option does not appear make sure you have the proper Item selected in the Gift Card Type.
3) Depending on your setup, the system will auto assign the Track and Gift Card Number or you can enter the first number and the system will assign the next sequential numbers. If using plastic Gift Cards with a mag stripe, toggle the mouse in the Track field and swipe the card. The code that is on the mag stripe will then populate into the Track field associating that card with the Gift Card in the Clubessential database. Repeat the same process to populate the code on the mag stripe into the Card Number field.
- If the Gift Cards will be issued to a guest or event, simply type the appropriate information in the Issued To field. If the Gift Cards will be issued to a member, select Member Lookup and choose the appropriate member. Enter a Description for the Gift Card. The Expiration Date will be based on what was applied in the Gift Card Type.
Lastly, select OK to move to the next Gift Card.
Auto-Finish
If you are entering multiple Gift Cards and they will be issued to the same event or member, the Auto-Finish feature may be utilized. Please note that if using plastic Gift Cards with a mag stripe the Auto-Finish feature cannot be utilized.
1) Once all information has been entered on the first Gift Card select Auto-Finish. This will automatically assign a number to the remaining Gift Cards with the identical information entered.
Reassign Gift Cards
1) From the main POS screen, click or touch the button Gift Card Balance.
2) Use the Assigned To, Card Number, or Description field to narrow down your search. Highlight the Gift Card to edit and click Details.
3) A box with the Gift Card details will display; if you want to reassign the Gift Card to a Member, click or touch Change Member and search for the member. If this is not a member, click or touch Non Member and manually enter the name. Click or touch OK when finished.
Note: The ability to reassign is controlled by the Employee Security Role, Edit Gift Card Name after Issuance.
Redeem Gift Cards
Gift Cards are redeemable at any Area that is selected within the Gift Card Type.
Note: If a Gift Card does not show in a certain Area, the Gift Card Type is most likely not configured to show in that Area.
To redeem Gift Cards,
1) Create a transaction and select a member as normal.
2) Select the item(s) and choose Close Ticket when ready to complete the transaction.
3) Select the Gift Card Settlement Type (If one does not exist please see our Creating a POS Settlement Button manual for more information).
4) The Gift Card Entry screen will load.
- If using plastic Gift Cards with a mag stripe, toggle the mouse in the Track field and swipe the card.
- If using manually entered paper/plastic Gift Cards, use the Assigned To, Card Number, or Description field to narrow down your search. Highlight the Gift Card and select OK.
5) Enter the amount of the Gift Card to apply toward the ticket. The system will automatically enter the maximum amount of the Gift Card that can be redeemed on the ticket. In this example, the ticket has a total of $36.42 and we selected a $100 Gift Card. By default, the system will enter $36.42 as the amount to apply toward the ticket because the Gift Card has a balance larger than the ticket total. Click OK when finished.
6) The Gift Card settlement will now show in the Payment field. Select OK/ Print and Done to close the ticket.
Multi-Settlement
In some cases, a member or guest will want to pay a portion of a ticket with a Gift Card and the other portion with another Settlement Type.
In this example, the member has a $33.21 ticket and will be paying $25.00 with a Gift Card and the remaining $8.21 in Cash.
1) Select the Gift Card Settlement Type, highlight or swipe the $25.00 Gift Card, and click OK.
2) The system will then by default, apply the maximum amount redeemable by the Gift Card to the Gift Card Amount prompt. Click OK.
3) The Gift Card payment will then be visible in the Payments section.
4) Select the Cash Settlement Type.
5) The remaining balance on the ticket will be settled to Cash.
6) Select OK/ Print and Done to close the ticket.
Gift Card Expiration Wizard
The Gift Card Expiration Wizard allows the user to edit the Expiration Date and reduce the Remaining Balance of existing Gift Cards.
Note: Gift Card Balances cannot be increased using this tool.
To access the Gift Card Expiration Wizard,
1) Navigate to the Membership module on the left user menu and select Gift Card Expiration.
2) The Gift Card Expiration Wizard will launch.
As Of Date and Type
1) Expired As Of: enter the date the Gift Card was originally set to expire. All Gift Cards with an Expiration Date on or before the date entered will be listed on the following screen.
2) Or Items w/o expiration date: if you want to edit Gift Cards that were not originally set up with an expiration date, check this box.
3) Type: select the appropriate Gift Card Type by clicking the lookup icon. You can only select one type at a time.
Change the Expiration Date
1) Change the Expiration Date: select this field if you wish to decrease, extend, or expire the Gift Card. The system will list all Gift Cards on or before the As of Date selected in the previous step.
2) Automatically adjust all expired: select this field and enter the appropriate date if you want the system to adjust ALL Gift Cards that meet the As Of Date entered.
Note: Do not choose this option if the cards you want to maintain require different expiration dates.
3) Next: to move to the next screen.
4) Enter the New Expiration Date in the New Expiration Date column. Select Finish.
Note: if you checked “Automatically adjust all expired” the date you entered will be the same for all Gift Cards. At this point you can still change the date to something different.
Reduce Remaining Balance
To reduce the Remaining Balance of an existing Gift Card (balance cannot be increased),
1) Check Reduce Remaining: put a check to reduce all or a portion of the amount.
2) Using Payment Type: click the down arrow and select the Gift Card Settlement Type. The settlement type selected here should be the same as the Gift Card Settlement Type selected at the POS.
3) Automatically reduce all expired: if checked, ALL Gift Cards that meet the As of Date will be reduced to zero. For Example; if all Gift Cards expire at the end of the year use this option.
Note: You can change the amount to expire if there are cards you do not wish to reduce to zero.
4) Item: item to use for the credit (see your accountant if you are not sure). This is the unused portion of the Gift Card.
5) Next: to move to the next screen.
6) Enter the Expire Amount: this is the amount you want to reduce from the remaining balance of the Gift Card. Example: if the remaining is $50 and you want the new remaining to be $30 then you would enter $20 in the Expire Amount column. Select Finish when complete.
Note: if you checked “Automatically reduce all expired” all Gift Cards will be reduced to zero by their remaining amount.
7) Post the batch.
View Gift Cards in Manage Members
A Member’s Gift Card history and balance can be viewed within the Member’s profile. Please note that if a Gift Card is issued to a Member, the card will show on the account the Gift Card was issued to. However, if a Gift Card is issued to a guest or an event, the Gift Card will show on the Member’s account who purchased the Gift Card.
To view a Gift Card on an account,
1) Navigate to the Membership module and select Manage Members.
2) Select the Gift Cards tab from left pane.
The Gift Card’s Description, Transaction Date, Issued Amount, Unapplied Amount (Remaining Balance), and Expiration Date are available.
Gift Card Reports
There are several reporting options for Gift Cards available in Interactive Reports.
Navigate to Interactive Reports and expand Membership.
Gift Card Transactions Report
This report details the Gift Card Transactions for a certain time period and allows the user to filter by Detail Level, Gift Card Type, Gift Card Number, and Member.
Outstanding Gift Cards
This report details the Outstanding Gift Cards and can be filtered on Gift Card Type.
Best Practices
We would recommend that your Club establish a Gift Card policy, and ensure Members are aware of the policy. Covering items such as spouse/family usage of gift cards, expiration practices, and re-assignment of gift cards will help ensure your Club’s gift card program is a success!
FAQs
Q: Can a Family Member use another Family Member’s gift card?
A: It is possible to allow a spouse/family member to utilize a gift card. Ensure Member’s profile is updated to reflect this.
Q: What if someone loses their Gift Card?
A: A record of the Member’s purchase is maintained in the system. In the event a gift card is lost/stolen, have your Member contact your Club to ensure the originally issued card is expired, and a new card can be issued.
Downloadable Guide
...
General Information
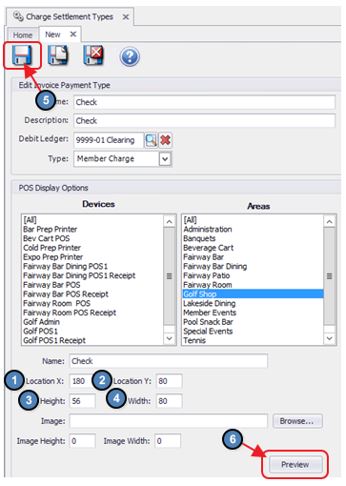
Begin by populating the general information associated with the Payment type shown/listed below.
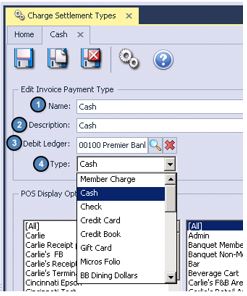
1) Name – Fill in a descriptive name.
2) Description – Optionally, provide a description. This field is used to provide more information regarding the Charge Settlement type.
3) Debit Ledger – Enter the General Ledger account to which these payments should post.
4) Type – Specify the Payment Type based on desired function of the button, and its associated reporting.
Options include:
Member Charge – used to charge payment to the member’s Club account.
Cash – used to settle ticket to cash.
Check – used to settle ticket to check. Does not have a column in the body of the batch report, but will break out in the summary at the bottom. Some clubs use Cash instead for this reason.
Credit Card – used to settle tickets to credit card. When the system is licensed to process credit cards through POS it will use the Debit Ledger on the Charge Settlement type to see if the system is configured or not. When it is configured, it will prompt for the swipe of the card. When it is not configured it will simply close the ticket.
Credit Book – used to settle the ticket to credit book if available and the items being purchased are configured to allow it.
Gift Card – used to settle to Gift Card. When selected, will display the list of open Gift Cards.
Micros Folio – used with a custom interface, contact support before using.
BB Dining Dollars – used with a custom interface, contact support before using.
BB Flex – used with a custom interface, contact support before using.
Room Folio – use to settle a ticket to a Guest Room. When selected, it will display a list of all Rooms that have been checked in.
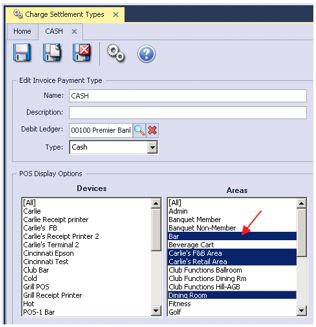
POS Display Options
The Charge Settlement Type can be set to display on particular Workstation Devices, all devices, or particular Areas or all Areas. There are no pressing rules of thumb to consider when deciding whether/how to use Devices or Areas, however, please note that if using a Device attached to an F&B Area, the Charge Settlement Type will show regardless of which Area is selected in the Select a Table Phase at the POS.
For instance, let’s assume the Club Bar Workstation Device is flagged within the Credit Card Charge Settlement Type, but the Dining Room Area is not. If a user logs in to the Club Bar Workstation Device and decide to choose the Dining Room Area in the Select a Table Phase, the Credit Card Charge Settlement Type will still show in the Dining Room Area because the user is logged into the Club Bar Workstation Device.
To select a Device or Area,
1) Click once to select a Device or Area.
2) Click again to deselect it.
The remaining options address how the button will display in POS; its label, where it is positioned, its size, and its associated image (if applicable).

(1) Name – label that will display on the button in POS. Used when Image is not available.
(2) Location X – the starting point (in pixels) of the button on the settlement screen horizontally.
(3) Location Y – the starting point (in pixels) of the button on the settlement screen vertically.
(4) Height – height of the button (in pixels).
(5) Width – width of the button (in pixels).
(6) Image – used to put an image on the button. When used, the Name field should be blank.
Images should be stored in the image directory on the server.
The size should be approximately the height and width of the button (in pixels).
(7) Image Height – height of the image (in pixels). Normally matches Height field.
(8) Image Width – width of the image (in pixels). Normally matches Width field.
(9) Preview – used after changes are saved to Preview how the button will look in POS.
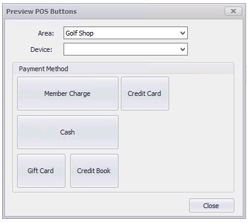
Best Practices
When creating a new button, the easiest way to approach Location, Height and Width is to use the existing buttons as a guide.
1) Open an existing Charge Settlement Type.
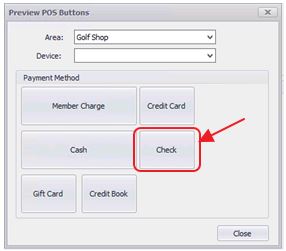
2) Click Preview.
3) Click Yes when prompted, no need to save since no changes have been made.
4) Select the Area for which you are adding the button.
The existing settlement button layout for that Area will display.
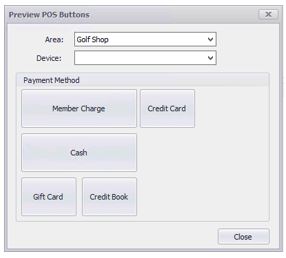
5) Make note of the positions of the buttons on the screen.
6) Close out of the Preview screen.
7) Close out of the Charge Settlement Type.
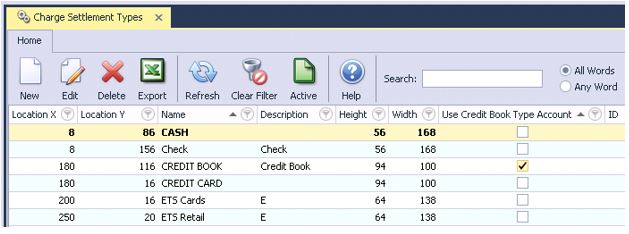
On the Charge Settlement Types Grid make sure it is displaying the Location X, Location Y, Height and Width.
8) Sort by Location X column by clicking the column header.
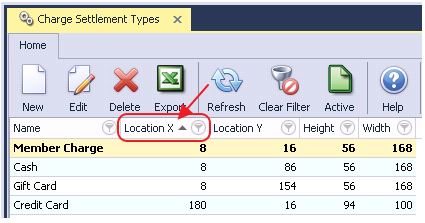
As an example, to add a Check button below the Credit Card button and to the right of the Cash button use the Location X of Credit Card and the Location Y of Cash as the starting point.
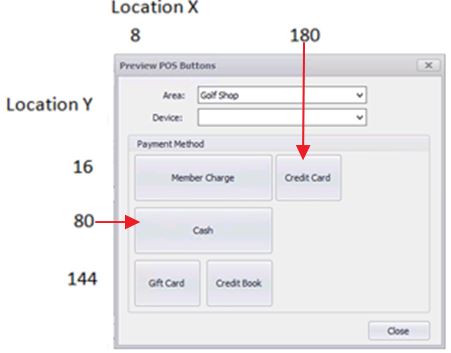
9) To place the button to the right of the Cash button the Location X would be the same as the Credit Card button, 180.
10) To place the button below the Credit Card button the Location Y would be the same as the Cash button, 80.
11) To make it the same size as the Credit Card button, use the Height and Width the Credit Card Button is set to, Height = 56, Width = 80.
12) Click Save.
13) Click Preview.
POS terminals will have to log out of POS and log back in to see the change.
FAQs
Q: We don’t see the button on our terminal, why not?
A: Ensure the user has logged out and logged back in to the POS to see saved changes. Additionally, verify that the area and/or terminal workstation are configured properly to display the button.
Downloadable Guide
Charge Settlement Type - Guide