| Table of Contents | ||||||||||
|---|---|---|---|---|---|---|---|---|---|---|
|
Overview
Clubs choosing to host their Office/POS environment locally, will need to install the application(s) on their Club’s local workstations after the application Server is built and configured. Installing the Office applications on local workstations is the responsibility of the Club’s local IT Technician. These instructions are guidelines to assist your local IT Tech in installing both the Clubessential Management Application (CMA) and the Point of Sale (POS). If you are interested in Clubessential providing this service, please contact support to discuss estimated hours, cost, and to schedule an appointment. Use Case Due to a Club’s IT depth, the Club has opted to host the Office application locally, rather than going with a hosted environment solution. Once the initial Server has been configured, the Club then installs the appropriate applications on the local workstations within their Pro Shop, Administrative Office, Dining Rooms, and Spa so all designated users may log-in and access the necessary programs. |
The following guide will help you with the setup and configuration of your new ETS merchant accounts within the Clubessential Office and POS software. |
Content
|
|---|
Prerequisites to Installation
The shared application folder can be mapped to a network drive on all workstations, though we recommend using the Universal Naming Convention (UNC) path. (Example: \\SRV-NAME\Clubessential).
Note: Using the UNC path can help minimize spread of viruses.
...
Installing CMA and POS
- Install the Clubsoft Prerequisites by going to the Clubessential shared folder > Setup > double click Clubsoft Application Suite Prerequisites.msi then follow the prompts to install it (Next > Install > Finish).
2. Install the Clubessential Management Application (CMA) by going to the Clubessential shared folder > Setup > CMA > double click on Setup.exe then click Install.
NOTE: It is not required for Office to be installed on the Food & Beverage POS terminals, however, many clubs prefer to do this so that Food and Beverage Managers can make quick changes during service if necessary.
3. Install the Point of Sale (POS) by going to Clubessential shared folder > Setup > POS > double click on Setup.exe then click Install.
Best Practices
When mapping the shared application folder, use the UNC path to reduce risk of spreading viruses.
While it is not required, installing the Clubessential Office Management Application at the POS stations is oftentimes helpful for the Food and Beverage Managers to be able to make quick edits/updates to the system.
FAQs
Q. What version of Windows can I use?
A. Clubessential software is no longer tested for Windows XP or previous versions of Windows Operating System. In terms of Server environment, Clubessential software is no longer tested for Windows Server 2003 or previous versions of Windows Server Operating System since they are no longer supported by Microsoft.
...
Q. When launching the application for the first time, I was asked to select the appropriate connection file. What is it?
A. When launching the application for the first time, you may be asked to select the appropriate database connection file. If so, browse to the Clubessential shared folder and select the DefaultConnection.xml file.
Q. When launching the application for the first time, connection to the SQL database failed. Now what?
A. If connection to the database fails when launching the application for the first time, check that the user has rights to the SQL database and has local administrator rights.
If the user has access to both the SQL database and local admin, follow these steps:
1. Click the + sign next to Connection Options.
2. Click the Edit Connection button.
3. Check to make sure the Server Name and the Database Name fields have the correct information. Server name should be the SQL Server computer name and the instance name. In most cases this will be SERVER\CLUBESSENTIAL.
Database name is typically MERCURY in a single database club. Username/Password or Integrated Security options should remain unchanged from the original installation.
Q. What do I do when application Shows “Inaccessible Logs” Error?
A. If you receive the following error, “Inaccessible Logs; Security Data Portal Dot Fetch Error,” follow the instructions below:
Warning: Modifying the registry incorrectly can cause serious system-wide problems. Please make sure to create a backup of the Registry prior to making any changes.
1. Go to Start Menu and launch the Registry Editor.
2. Within the Registry Editor go to: HKEY_LOCAL_MACHINE\SYSTEM\CurrentControlSet\Services.
3. Right-click eventlog and choose permissions. Add full control permissions for Authenticated Users. (Note: If Authenticated Users is not found, click add and type in Authenticated Users).
4. Expand eventlog, right-click security, and choose permissions. Click add, type “Authenticated Users” and click OK.
5. Add full control, and then click OK.
Downloadable Guide
...
Merchant Processing Tokens
This is the first step in the process and can be done in advance of the date you wish to enable payment processing.
Upon account setup, ETS sends an email regarding ETS Setup Information. This email contains the account information needed to setup the ETS accounts “tokens” in Office. This information allows our software to communicate your transactions to ETS for processing. From that email you will receive a Master Key and Client ID for each account. You will need the Client ID and Master Key in the following steps.
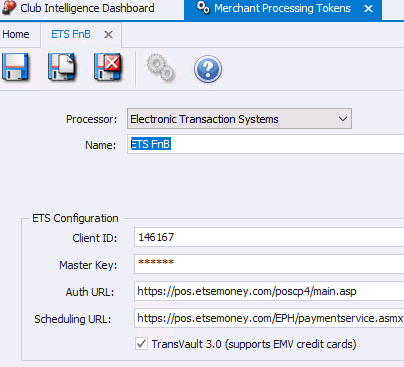
In Office, go to System > Merchant Processing Tokens:
- Processor: select Electronic Transaction Systems from the drop down
- Name: enter a name in the same format as below. Start with ETS and follow with the purpose. Ie. ETS FnB
- Client ID: enter the client ID from the email
- Master Key: enter the Master Key from the email
- Auth URL: enter this url into the field https://pos.etsemoney.com/poscp4/main.asp
- Scheduling URL: enter this url into the field https://pos.etsemoney.com/EPH/paymentservice.asmx
- Check the box for TransVault 3.0. This is required as ETS only supports version 3.0 and above.
Save and repeat for each ETS account you enrolled for.
Install Transvault 3.0.
ETS Transvault is a proprietary application from ETS that is used to transmit transaction securely from the Clubessential Software to ETS. You will need to install Transvault on any workstation that will be processing credit card or ACH transactions. You can install Transvault at any point before you enable ETS for payments as it does not interrupt anything. This can be downloaded from the ETS website and we suggest you do so to ensure you are on the most current version.
Run the installer as a ‘Complete’ install. No additional ‘custom’ settings are needed.
Non-Hosted: you must install Transvault on all the machines using card processing.
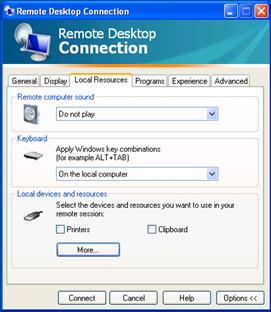
Hosted Clients: please make sure to contact CE Support for assistance with installing Transvault. However, the steps below will need to be completed on each workstation at your club.
Make sure set the Remote Connection setting on the CE RDP.
From the workstation exit the Remote Session.
Right Click on the Icon used to access the Remote connection > Edit.
Local Resources tab: Under ‘Keyboard’ select On the local computer (or it might read On This Computer).
Update the Terminal ID value at each POS
This is required for EMV and non-EMV readers and can be done before you enable ETS with no issues. You will need to do this at each workstation that has a card reader.
Open the POS.
Click System Tools > Utilities > Credit Card.
In the ETS EMV Terminal field enter the readers terminal ID.
Non-EMV USB Magtek readers: use 0000
For EMV USB follow the default values below:
ISC250 USB - 2500
ISC250 IP - 2550
Equinox L5300 IP - 5350
Equinox L5300 USB - 5300
If the value does not work, consult with ETS to get the correct value or to troubleshoot further.
Charge Settlement Types
To ‘Turn on’ ETS you will need to enable the ETS token in the Charge Settlement Type.
If you have ETS accounts for your Golf Shop, F&B outlets and other areas, you will need a separate Charge Settlement Type for each token. This will ensure the funds process through the correct account. If you have never taken credit cards at your POS you will need to create new settlement types.
If you currently take credit cards, you will want to make sure the additional settlement types have been added AND on the day of the switch, make sure the old processor token is disabled. NOTE: This should only be done on the day of switch
Setting Up Charge Settlement Types
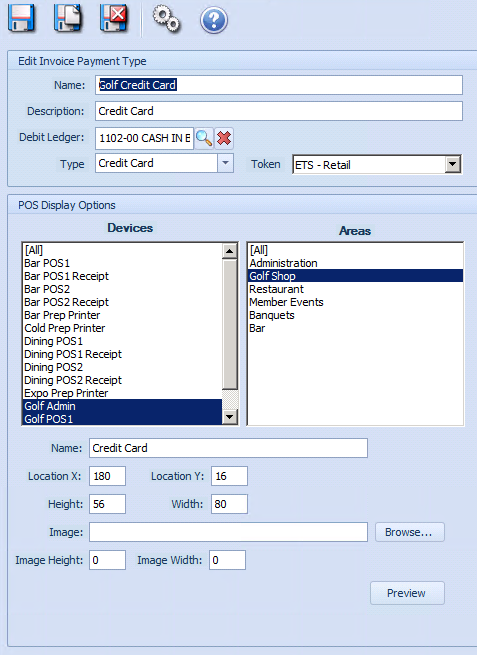
In Office, go to System > Charge Settlement Types.
Click the New icon.
- Name: label this to correlate with the ETS account (i.e. Credit Card-Retail or Credit Card-F&B)
- Description: label this the same as the name
- Debit Ledger: This should be where the funds from the payments should go
- Type: Credit Card
- Token: choose the ETS token from the drop down.
- Devices: Choose the POS devices the settlement type should be made available.
- Areas: This allows you to choose a general area. Note: make sure ALL is not selected if you are splitting the areas and devices between two ETS accounts.
Below is an example of a common setup to follow for the following settings. Click Save when done:
Cash Receipt Types
Cash Receipt Types are involved if you are planning to do ACH or Credit Card drafts from your Office system. If you currently do either of those, this step should be followed on the day of switch. Note: ETS MOTO accounts can only be used for Cash Receipt Type payments.
In Office, go to Membership > Cash Receipt Types.
Go to Bank ACH or Credit Card depending on which you are trying to update. Note: you do not need to update the Paycloud cash receipt types.
If you have never taken payments thru Office in this manner, please do the following:
- Name: should already be labeled, but if not, enter Bank ACH or Credit Card.
- Description: Label this the same as Name
- Debit Account: Should be the account that funds go to, such as your bank.
- Default AR: Choose the AR for these payments.
- Payment Type: ACH or Credit Card depending on which you are setting up
- Token: Choose the MOTO account from the drop down. NOTE: If you already accept ACH and Credit Cards with a processor for payments in Office, you will need to only update this setting.
Device Installation
Device Installation is handled by ETS. If you have received card readers from them and have not had an meeting to install the devices, please reach out to ETS so they can assist with setup and testing.
Online Payments
If you are looking to add ETS for online payments. Please reach out to Clubessential Support for configuration of your account in our Paycloud product.
Downloadable Guide
Setting Up ETS in Office and POS Guide