...
The new Clubessential Email Editor allows for email design flexibility offered with the convenience of a drag and drop interface. Easily create stunning emails based off of on pre-designed templates, or create your own in a few easy steps. The new Clubessential Email Editor separates the concepts of the email body (settings applied to the entire message), structures (rows of the content in the message), and content (text, images, buttons, etc). These elements can be added, removed, or rearranged by simply dragging and dropping options from the content panel to the body of the email. Use Case(s) Website Admins and Editors will use the New Editor when updating content and imagery in Emails. |
...
Members: Select members individually to receive messages.
Staff: Select Staff/Employees individually to receive messages.
List Recipients: Not used
Static Groups: Send to specific Static (fixed Member) groups
All Members: all members active in the directory
All Staff: all staff active in the directory
Dynamic Groups: send to specific Dynamic (fluctuate based on defined criteria) groups.
Mailing Lists: Not used
Events: Attendees from a specific event
...
Once reviewed, the message can be either sent or saved for later sending. Additional options also exist to assist with tracking.
When you are finished editing and saving your message you will need to click the Preview Message button, located below the click to edit area.

First, designate whether to use Primary Addresses, Secondary Addresses, or Both (as defined in the Member setup in the club directory). Most The most common (and Default) option is Primary Address Only.

Next, designate 
Options also exist to assist with tracking. Designate whether to Track the Message (for viewing/delivery statistics within Mail Reporting) , and whether you, the message sender, would like to receive a notification email when sending is complete.

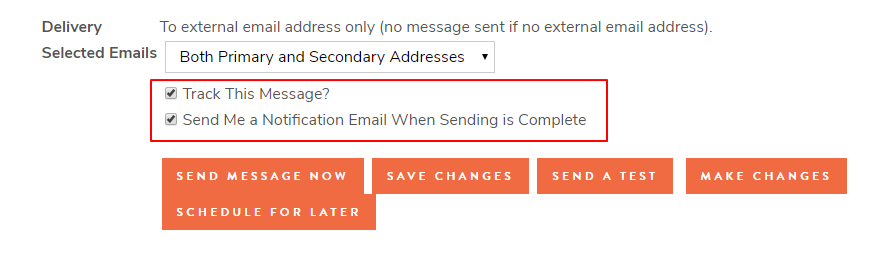
Finally, choose from the following options to define the next steps for deploying your message.


- Send Message Now - Sends the message immediately, this cannot be undone. After sent, it will show in the Sent email tab.

- Save Changes - This will place the message in drafts Drafts email tab to revisit later.

- Send a Test - This will send a test to selected email addresses. Select an Available User, pulled from the directory, or enter an email address (that can be from outside the system) to receive your test message.

- Make Changes - Takes you back to the Compose screen of the Message Center, for further editing.
- Schedule for Later - Allows set-up to send the message at a later date and time.

First, you will want to designate whether the email will be sent once, or will be recurring.
For a One Time message, simply select the date from the calendar and the time from the drop-downs that you would like your message to go out. Click Update Schedule to save and exit.

For a Recurring message, you will want to use the calendar to select the first day your message should go out and select the send time from the dropdowns. Then use the Frequency drop-down to choose if your message should go out Daily, Weekly or Monthly.
If you choose Daily, you can then decide if your message should go out every day of the week, only on weekdays, or on a recurring schedule where you will be asked how often it should be sent.

To send your message Weekly, select how many weeks there should be between send, as well as which day or days of the week your message will go out.

The final option is monthly sending. Here you can choose to send on a specific day of each month (the 1st, 10th, 15th, etc) or on a specific day of the week each month, using the drop-downs provided.

And finally, you will want to decide when your scheduled email should end. The Schedule Indefinitely box is checked by default. If you uncheck this box you will be able to use the second calendar to decide a stop date for your recurring message.

Click Update Schedule to save and exit.
You can also click Edit Message to be taken back to the first Compose screen of the Message. You can also click Cancel Edit, to cancel the sending of this message.
