...
Table of Contents
| Table of Contents |
|---|
...
|
...
|
...
|
...
Overview
The Year End Process consists of opening new periods for the new fiscal year, running the Year End Wizard, and closing the current fiscal year. The Year End Wizard ensures all balances roll forward properly for the new year. Use Case(s)
|
Content
|
|---|
In this guide, you will learn how to Create, Open, Close Periods and run the End of Year procedures in Office.
Creating Periods
Creating General Ledger Periods for a New Year
1) From the Top Tool Bar Select General Ledger > Budgets > click the Plus Sign > Enter the year to create the periods > Click OK.
2) You will be prompted to confirm this is what you want to do > Yes > Close to exit.
Notes: By default, the Periods are closed when they are created and will need to be opened before you can post batches to the new periods.
Opening and Closing Periods
Open or Close General Ledger Periods
1) From the Top Tool Bar Select General Ledger > Periods > Double-Click on the Period you wish to open or close > Uncheck or check the Closed box (if the period is closed it will have a check mark) > Save and Close to exit screen.
Notes:
- Appropriate security rights are required to open and close periods.
- Reopening and Reclosing Periods must be done in sequential order. For example: if you are in period 4 and want to reopen period 1, you will first need to reopen period 3, 2, then 1. To reclose the periods you will need to close period 1, 2, then 3.
- Once you close a period, you will not be able to post batches to the closed period; you will need to reopen the period to post the batch.
Year End Wizard
The Year End Wizard will reset the income and expenses for the new year and create a journal entry to record the retained earnings. The Year End Wizard must be run before you run financials for 1st period of the new year.
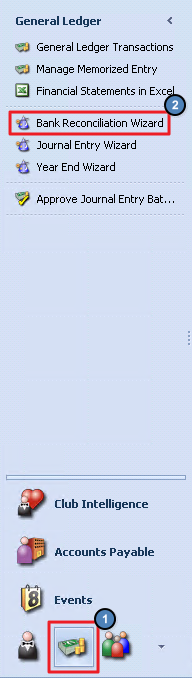
1) From Left Menu select General Ledger > Year End Wizard > Enter the information for Steps 1 – 3 > In Step 4, confirm the year end is correct > Click Next.
Notes:
- When you search the company in Step 2, you will only see companies set up in your system.
- When you search the Retained Earning in Step 3, you will only see Equity Type Accounts listed.
- All Income & Expenses will be reclassified to a single retained earnings account. If any portion of that entry needs to be made in other Equity Ledger accounts, then an additional Journal Entry will need to be created manually for that reclassification.
2) The next screen will display the accounts and amounts to clear > Next.
3) In the next screen select Finish > Once 100% processed, select Preview to preview the batch > Review or print the batch > select Post to complete the process.
Notes:
- You can sort the screen by clicking on the column heading name.
- Back will take you back one screen to make changes.
- Click Cancel if you wish to stop the process and exit the End of Year Wizard.
- If a user creates a year end batch, and closes out of the Year End Wizard without posting the batch, the batch will be deleted. This function was implemented to prevent users from creating year end batches and reusing them as regular journal batches.
Best Practices
Create New Fiscal Periods prior to running your Year End Wizard.
Ensure to re-run the Year End Wizard if additional entries are posted to the prior year, so adjustments properly flow through to the new fiscal period.
FAQs
Q: Can I post batches for the new year before running the Year End Wizard?
A: You can post batches for the new year before you run Year End Wizard.
Q: Can I close the 12th period prior to running the Year End Wizard?
A: Do not close the 12th period until you have run the Year End Wizard: if you closed the period, simply reopen following the steps in the Closing and Opening Periods section above.
Q: What if I need to make adjustments to the previous year and I have already run the Year End Wizard?
A: If you need to make adjustments to the previous year after you ran the Year End Wizard, simply reopen the period (all subsequent closed periods must be reopened too). Example: If you are in June 2018 and need to reopen November 2017, you will need to reopen all closed periods in 2018 and December 2017 before you can reopen a batch or make a new JE in November 2017. Follow the steps in the Closing and Opening Periods section, make your adjustments, and then rerun the Year End Wizard.
Q: How many times can I run the Year End Wizard?
A: You can reopen periods and rerun the Year End Wizard as many times as you need. The system will only find what needs to be cleared out and never creates duplicates, so it is safe to run the Year End Wizard Multiple Times. Please Note: Running the Year End Wizard does not close periods.
Q: Can I generate 1st period financials prior to running the Year End Wizard?
A: The Year End Wizard must be run before you run financials for 1st period of the new year.
Q: I already started a Year End Wizard, but cancelled out, and now cannot find my previously started batch - where is it?
A: If a user creates a year end batch, and closes out of the Year End Wizard without posting the batch, the batch will be deleted. This function was implemented to prevent users from creating year end batches and reusing them as regular journal batches.
Downloadable Guide
|
