...
| Table of Contents | ||||||||||
|---|---|---|---|---|---|---|---|---|---|---|
|
Overview
System Tools contain useful reports, helpful views, and other functions relevant to ticket management and administration of the POS system. The proper security rights are needed to access this toolset. In this manual, we will discuss the various features within System Tools. Use Case(s)
|
Content
|
|---|
Accessing the Tool
To access System Tools,
1) Select System Tools on the bottom left corner of the main POS screen.
2) System Tools opens on the Locked Tickets tab.
Tab Overview
In this section we will review the various tabs within System Tools.
Locked Tickets
The Locked Tickets tab allows the user to unlock any tickets that are “Locked’" in the POS. A ticket is locked when another user is in the ticket, but could also become locked when there is a disruption of service or other connectivity error. If a ticket is locked, the below message will display:
To unlock a ticket: Navigate to the Locked Tickets tab within System Tools and highlight the locked ticket. The user can then select Unlock Selected, to unlock just the highlighted ticket, or Unlock All to unlock all locked tickets. This function is particularly useful when the person who has the locked ticket has already left, or is unavailable.
Open Tickets
The Open Tickets tab allows the user to transfer tickets between servers. This function is useful when a Member decides to change tables, or when servers have a shift change.
To transfer a ticket,
1) Navigate to the Open Tickets tab within System Tools and by default the system will display all open tickets under the server who is currently logged in. To view open tickets under another server, simply select the Server drop-down and choose the applicable server; select ALL to view all open tickets.
2) Highlight the ticket to be transferred and select Transfer Selected. If all open tickets need to be transferred, select Transfer All.
3) Select the server to transfer the ticket to. Clocked-In Users will display by default. If the ticket needs to be transferred to someone who is not clocked-in, select Other and choose the appropriate server.
Note: The column headings displayed on the Open Tickets tab can be altered if necessary. For more information, please see the POS Grids section of our F&B Areas or Retail Areas manuals.
Closed Tickets
The Closed Tickets tab allows the user to Re-Open, Delete, and Re-Print previously closed tickets. Please be aware that users must have the proper security rights to Re-Open or Delete Tickets on this tab.
Important: Only tickets that have NOT been posted will show in the Closed Tickets tab.
Re-Open a Ticket
Please do NOT attempt to Re-Open a Credit Card ticket without first reviewing our Credit Card manuals. Depending on your processor, please review our ETS or Openedge Credit Card Transactions manuals for more information on Re-Opening Credit Card tickets.
To Re-Open a closed ticket:
On the Closed Tickets tab, highlight the ticket that needs Re-Opened and select Re-Open. The user will be warned that all Payments made on this ticket will be erased. Click Yes.
Delete a Closed Ticket
Please do NOT attempt to Delete a Credit Card ticket without first reviewing our Credit Card manuals. Depending on your processor, please review our ETS or Openedge Credit Card Transactions manual for more information on Deleting Credit Card tickets.
To Delete a closed ticket:
On the Closed Tickets tab, highlight the ticket that needs deleted and select Delete. The user will be prompted, Are you sure you want to delete ticket #XXXXX? Click Yes.
Re-Print Closed Ticket
The Settle and Pay Tickets can be Re-Printed for previously closed tickets.
To Re-Print a Closed Ticket,
1) On the Closed Tickets tab, highlight the ticket that needs reprinted and select Print Settle to Re-Print the Settle Ticket, or Print Pay to Re-Print the Pay Ticket.
2) A Print Preview will display. The user has 3 options:
Email - Emails a copy of the ticket to the member. Member must have valid email address on file to function properly.
Print & Email - Prints the ticket and emails the member a copy of the ticket.
Print - Prints the ticket.
Notes:
If a Print Preview does not display, the Area is not configured to show Print Previews. Please see our F&B or Retail POS manual for more information enabling the Print Preview.
The column headings displayed on the Closed Tickets tab can be altered if necessary. For more information, please see the POS Grids section of our F&B Areas or Retail Areas manuals.
Items
The Items tab is designed as a quick edit feature mostly pertaining to Price, Daily Special and Count Down features. Please note that users will need the proper security rights to use this tool. Below we discuss the available options.
Important: Please be aware that all changed made on this tab will also change the Item setup in CMA.
Options
Countdown - Users can change the count of an Item using the Countdown feature.
1) Select the Countdown field.
2) Enter the correct quantity. If the predefined quantities do not suffice, select More and enter the correct quantity.
3) Select Save.
Price - Users have the ability to change the Price of Items on this tab.
1) Select the Price field.
2) Enter the correct Price and select OK.
3) Select Save.
X86 - If selected, the Item will be marked as Inactive so it cannot be sold at the POS. x86 will show on the screen group button for the Item in POS. If the Item is selected, the below message will display.
Daily Special - If selected, the Item will be marked as a Daily Special.
Track Countdown - If selected, the system will track quantity based on the countdown entered.
Show QTY Count - If selected, the quantity of the Item will show on the Item’s screen group button.
Show All Items/ Show Countdown Items - Select Show All Items for all Items in the system to be listed on the Items tab, or select Show Countdown Items for only Items marked as Track Countdown to show.
Reports
The Reports tab allows the user to run specific reports directly within the POS. Please see below for an explanation of each option.
Time Keeping
The Timekeeping option provides the user with a view only report of employees who have worked within a specific time frame. This report will also show total time worked within the specified time frame.
Note: Please note that only employees with clock-in or clock-out activity within the time frame specified will show.
1) Select the time frame in the bottom right hand corner of the screen. The top date field is the Start Date and the bottom is the End Date.
2) The top portion labeled, Employees, will display all employees who have clock-in or clock-out activity during the specified time frame, along with their Total Time worked. The bottom portion labeled, Clock-In/Out Details, will display all instances of clock-in/ out activity during the specified time frame.
Sales
The Sales option provides the user with 3 shift reports. Reports include:
Consolidated End of Shift - Consolidates all employees into a single End of Shift report within a certain time frame. This report can be grouped by:
1) Device
2) Area
3) Area Group
4) Area Category
5) Terminal
Each time Run Report is selected a Print Preview will display. Select Print to print the report.
Shift Summary by Area - Provides the user with a shift summary report by Area. This report is strictly sales specific, providing the user with sales figures by ticket number and member.
Each time Run Report is selected a Print Preview will display. Select Print to print the report.
Shift Summary by Server - Provides the user with a shift summary report by Server. This report is strictly sales specific, providing the user with sales figures by ticket number, member, and Tender type.
Each time Run Report is selected a Print Preview will display. Select Print to print the report.
Ticket Audit
The Ticket Audit allows the user to preview all entry details of a particular POS Ticket. This preview does include deleted tickets. This is a great tool to use if a particular POS Ticket is missing in the system.
To preview a ticket, simply enter the ticket number and select Preview.
Daily Sales
Allows the user to run the canned Daily Sales report directly within the POS.
Hours Worked
Allows the user to run the canned Employee Hours report directly within the POS.
Gift Card Trans
Allows the user to run the canned Gift Card Transactions report directly within the POS.
Utilities
The Utilities tab allows the user to activate/ deactivate certain features within the POS. Please see below for a description of each highlighted option.
1) Always Prompt for Terminal - If the Select Device drop-down does not populate when launching the POS, please follow the below instructions to get the Select Device drop-down back:
Navigate to System Tools and select the Utilities tab.
Highlight Always Prompt for Terminal, and select Save Configuration.
4) Allow Member Lookup - If selected, the Member Lookup button will show in the main POS screen.
5) Always Show Table Number on Selection Screen - If unselected, the table number will not populate if a member is currently sitting at the table. If selected, the table number will always populate even if a member is sitting at the table. This information is relevant to the Select a Table phase in an F&B POS.
6) Only Show Gift Cards with Exact Match - If selected, the Gift Card Settlement button will only show Gift Cards that meet the exact price of the ticket being settled.
7) Don’t Allow Application Switching - If selected, the user will not be able to switch (ALT- TAB) to other applications when the POS is running.
8) Allow Employee to Change/ Save Custom Fields - If selected, employees will be able to change/ Save Custom Fields within the Member Details screen. If unselected, employees will have a view only mode of the Custom Fields tab.
9) Prompt for Signature Capture on Settlement - If selected, the system will prompt for the member/ guest’s signature with each settlement.
10) Use Classic Event System - Only applicable if the Event system within the Back Office (CMA) application is utilized. If the club has a Links or Axis/ Clubessential website, be sure that this is UNSELECTED.
11) Hide ‘Member Charge All’ Buttons - If selected the Member Charge All buttons will not show in the POS.
Terminal Override Date
In the event a ticket needs to be back dated or completed under a previous date, the user can override the time and date of the POS using the Terminal Override Date feature.
To override the time and date of the POS,
1) Select Set in the Terminal Override Date section of the Utilities tab.
2) Select the appropriate date/ time and click OK.
3) The overridden date will show in the Terminal Override Date section.
4) Select Exit in the bottom right hand corner of the screen to exit System Tools. Do NOT select Save Configuration as this will kick the user out of the POS and reset the POS Terminal date back to Default (Current Time).
5) Complete the transaction and completely shut down the POS application. When the application is closed the POS Terminal date will reset back to Default (Current Time).
Best Practices
System Tools provide an extremely useful toolbox to assist your Management and/or Leads with functions and reporting beyond the normal scope of base level POS usage. Ensure your Management/Lead team is familiar with the functions described within this guide to promote elevated Member and Guest experience, staff guidance and system troubleshooting as required.
FAQs
Q: Can someone have rights to System Tools without having rights to adjust Items?
A: Yes. In addition to the Allow System Tools security role, a separate role, Allow Item Management, is available to differentiate those who have the ability to access System Tools with those who have the ability to edit items within the Items tab of System Tools. By disabling the Allow Items Management role, users who may have access to other System Tools will be unable to make edits to Items within the toolset.
Downloadable Guide
| Table of Contents | ||||||||||
|---|---|---|---|---|---|---|---|---|---|---|
|
Overview
Screen Group Designer is a tool used to build various POS menus that will be utilized throughout the club. Screen Group buttons can be customized in terms of their position on screen, size, color, and font. Various types of buttons can be created within a Screen Group. These Button Types include Item Category, Individual Item, Modifier, Modifier Groups, Specials, Item Combo, and Screen Group. In this guide we will discuss how to create a new Screen Group, how to add each type of button created within a Screen Group, how to customize the look and feel of a Screen Group, as well as how to apply a Screen Group to a specific Area. Use Case(s)
|
Content
|
|---|
Accessing the Tool
To access System Tools,
1) Select System Tools on the bottom left corner of the main POS screen.
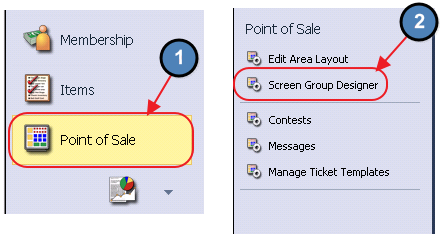
2) The Screen Group Designer Grid will launch.
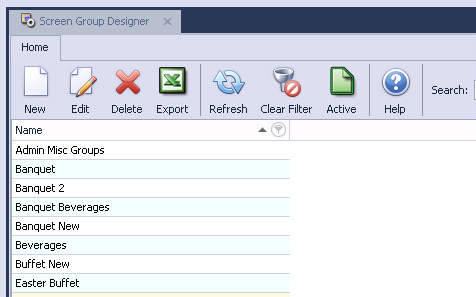
3) The primary functions associated with managing Screen Groups, creation, formatting, assigning, etc., are embedded in the Screen Group setup screen. This screen can be accessed by double-clicking on an existing Screen Group, or clicking the New button.
Creating a New Screen Group
To create a new Screen Group:
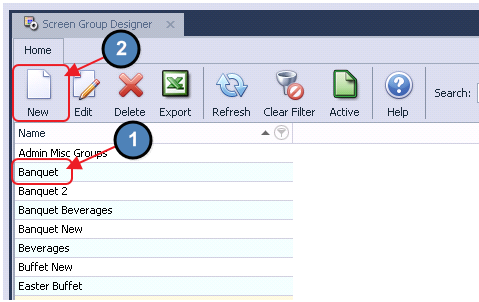
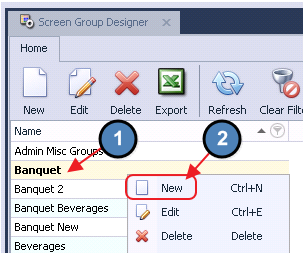
1) Navigate to the Screen Group Designer Grid and perform either of the following options to launch the Screen Group setup screen.
Option 1
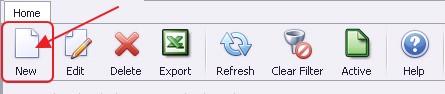
Click the New icon on the toolbar.
Option 2
Right-click anywhere on the Screen Group Designer Grid and select New.
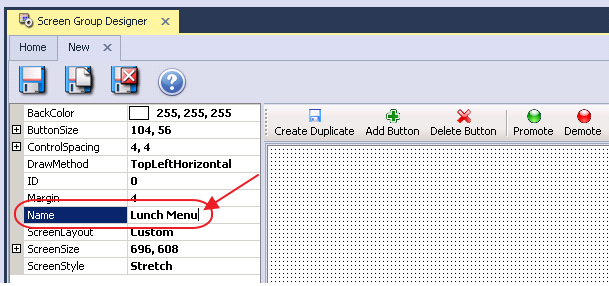
2) The Screen Group setup screen will launch.
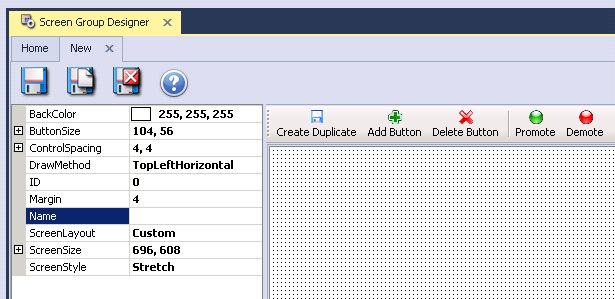
3) Enter in a Name for the new Screen Group (Ex: Lunch Menu).
Please Note: The Draw Method (how the screen is spatially organized) for a new Screen Group defaults to Top Left Horizontal. In this Draw Method, Screen Groups cannot be customized.
Please review the Customizing Screen Groups section of this document for an exact explanation on how to customize Screen Groups.
Button Types
As previously mentioned, there are several types of buttons that can be added to Screen Groups. In this section, we will review each type of button.
Category Button
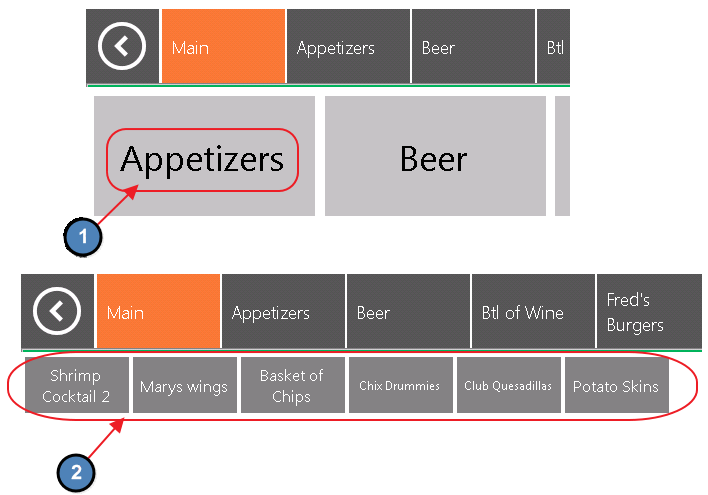
The most commonly used type of button is a Category Button. Selecting a Category Button within the POS will display all Items within the Category. For example, by selecting the Appetizer button, all Items within the Appetizer Item Category will display.
For more information on Item Categories, please see our Items Manual.
Creating a Category Button
To create a Category button:
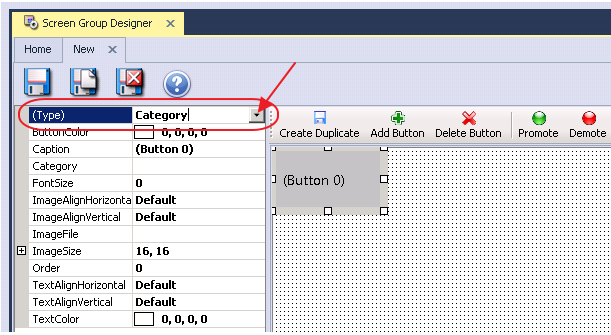
1) Select Add Button.

2) Select Category as the Button Type (Set to Category by default).
3) Select the Category for which you’d like to create a button.
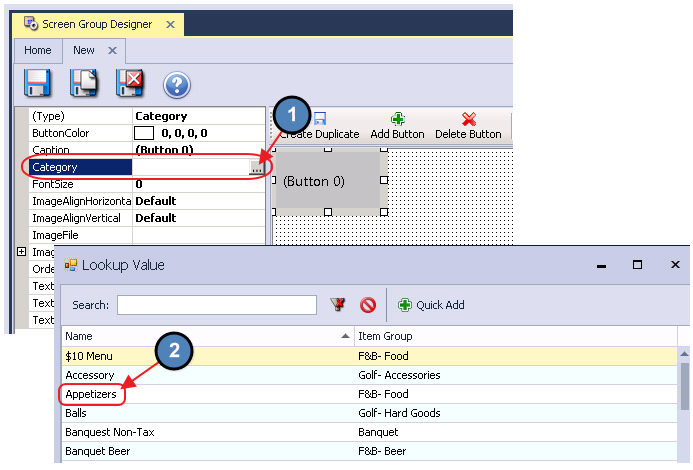
4) This button will link to a screen that automatically displays all Items within the Item Category.
Please Note: It is not necessary to create a Screen Group that includes an individual button for each Appetizer Item, the system does this for you as a result of the Category button.

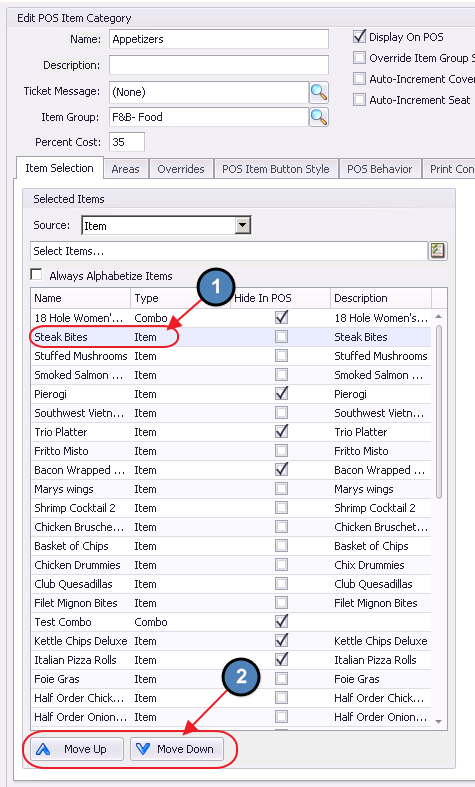
5) If necessary, the order in which the Items within a Category display on screen can be adjusted through the Item Category setup/edit form.
Option 1
Select the Item and use the Move Up and Move Down buttons to arrange the display order.
Option 2
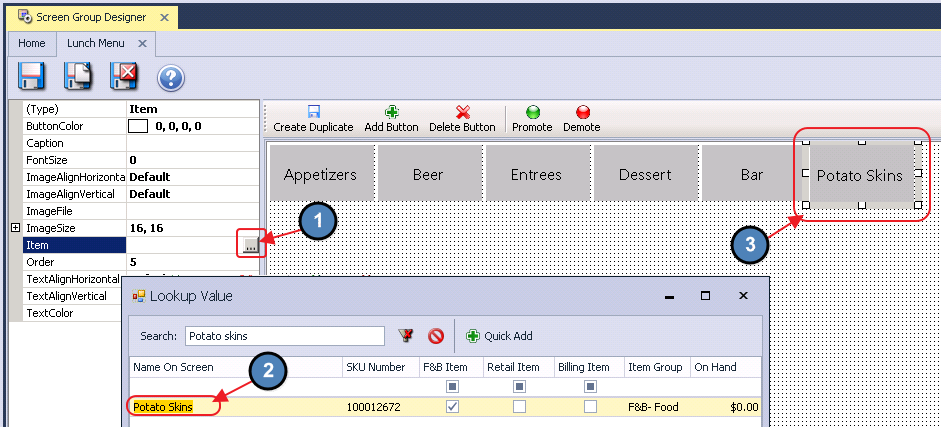
Item Button
Users can use the Item Button to link a POS button to an individual Item, such as Potato Skins. Some Clubs find it useful to add buttons for frequently ordered Items, such as Diet Coke on their home screens. For more information on Items, please see our Items Manual.

Creating an Item Button
To create a button for an individual Item:
1) Select Add Button.

2) Select Item as the Button Type.
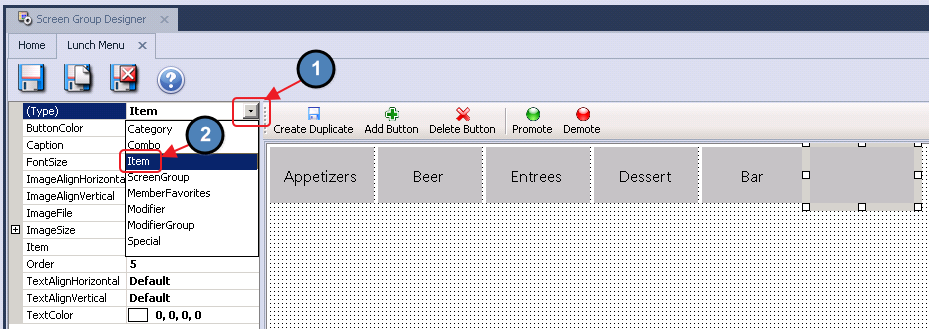
3) Select the Item for which you’d like to create a button.
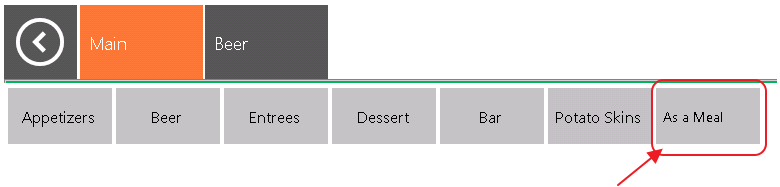
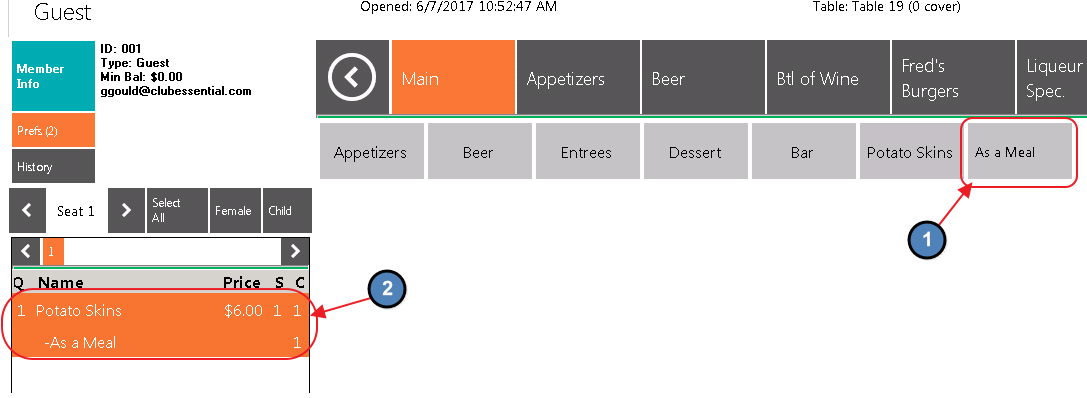
Modifier Button
Modifier buttons provide the wait staff with quick access to frequently used Modifiers. For example, you might place the As a Meal button on your home screen.
Please note: Most Items have forced Modifiers attached to their setup. However, this option gives users the ability to add frequently used Modifiers that would not typically be attached to an Item. For more information on Item Modifiers, please see our Item Modifier Controls Manual.
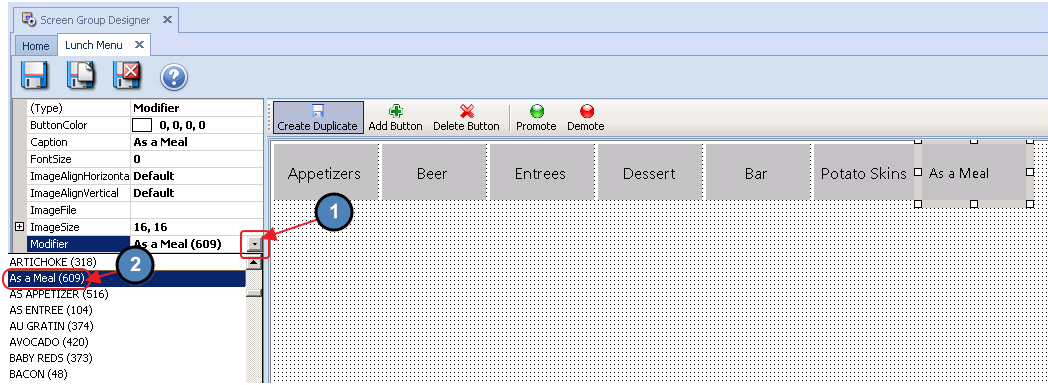
Creating a Modifier Button
To create a button for an individual Modifier:
1) Select Add Button.
2) Select Modifier as the Button Type.
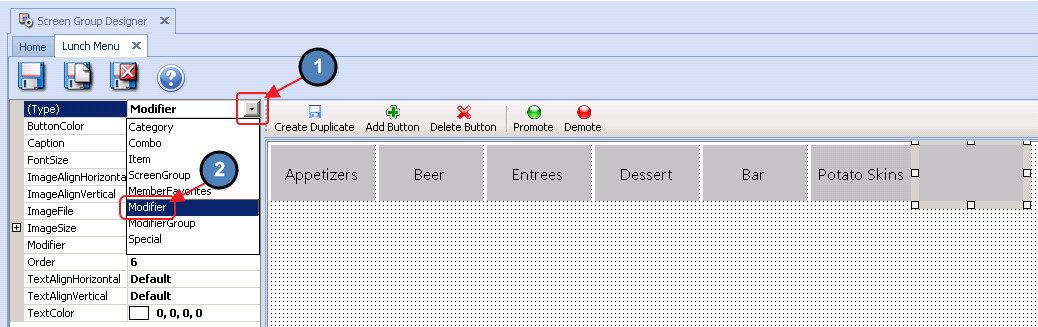
3) Select the Modifier for which you’d like to create a button.
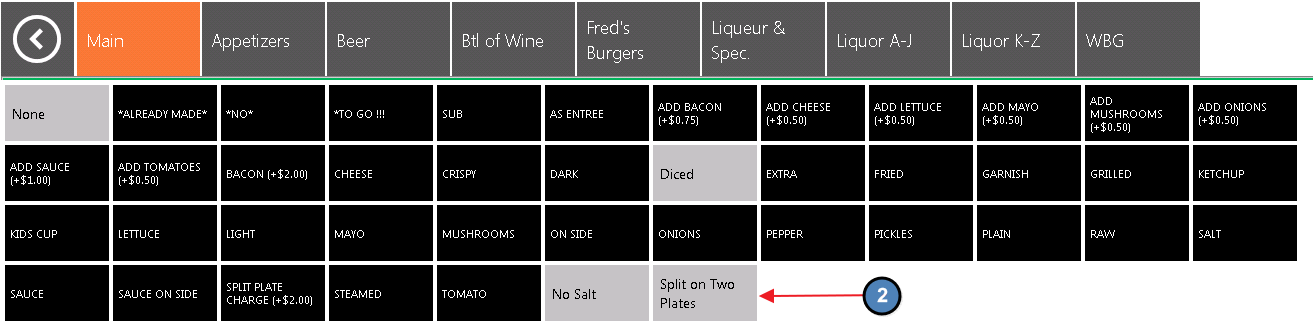
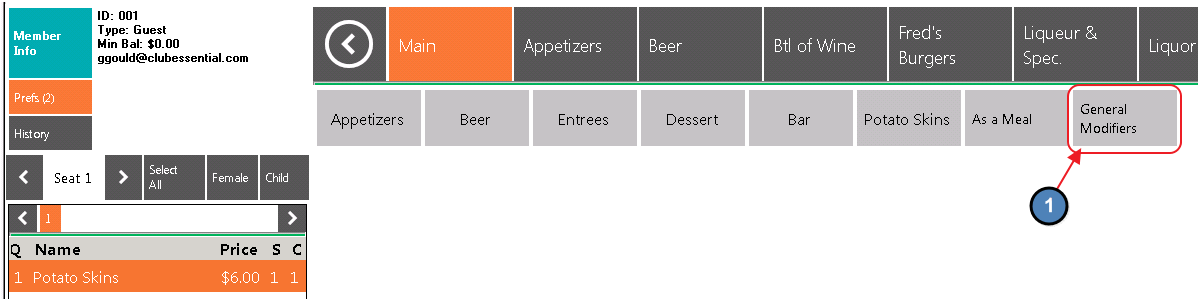
Modifier Group Button
A Modifier Group Button provides the wait staff quick access to frequently used Modifier Groups. Modifier Groups represent a collection of Modifiers nested under a single entity. For example, you might use this to place a button on your home screen that links to a list of General Modifiers such as No Salt, Split Item, or Bring Two Plates. For more information on creating Modifier Groups, please see our Item Modifier Controls Manual. 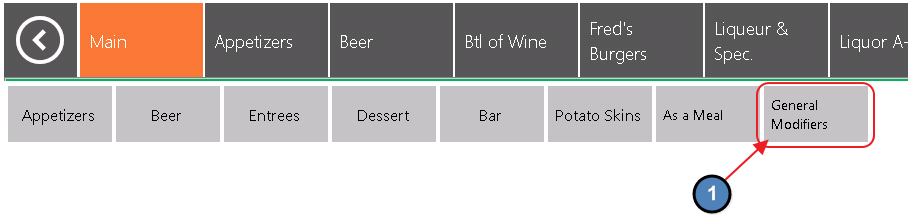
Creating a Modifier Group Button
To create a button for a Modifier Group:
1) Select Add Button.

2) Select Modifier Group as the Button Type.
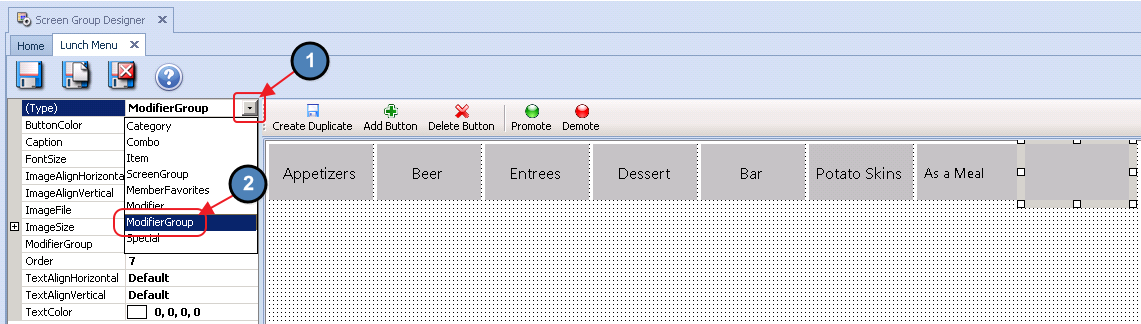

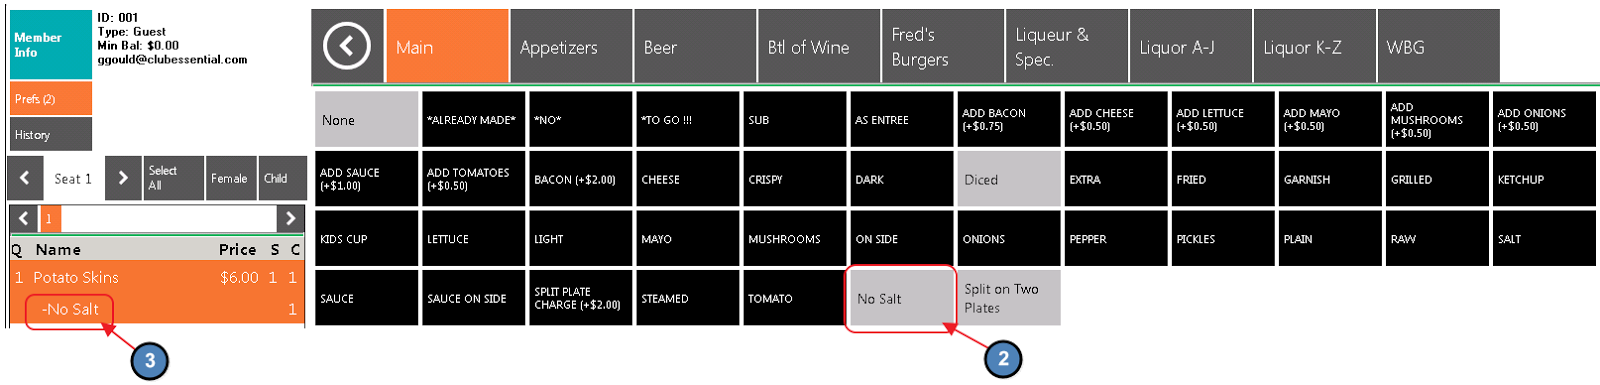
4) Now, when selected at the POS, this button will take the user to a list of Modifiers within the Modifier Group, that can then be used on currently ordered Items.
Daily Specials Button
A Daily Specials button provides the wait staff quick access to the specials of the day.
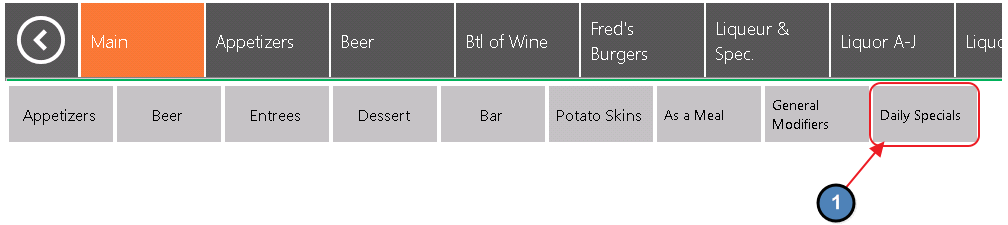
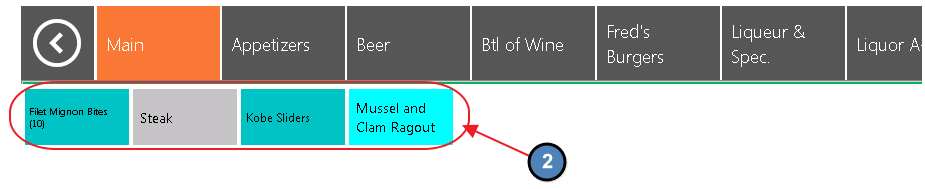
Only Items marked as “Daily Specials” on the Item setup/edit form will display on this screen.
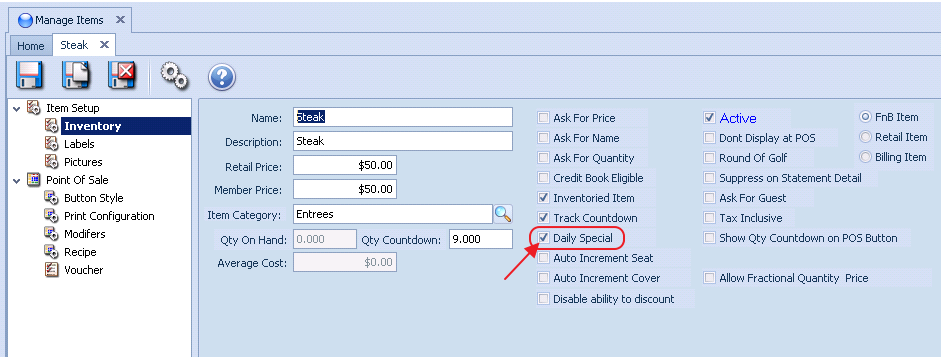
Please Note: For more information on Items, please see our Items Manual.
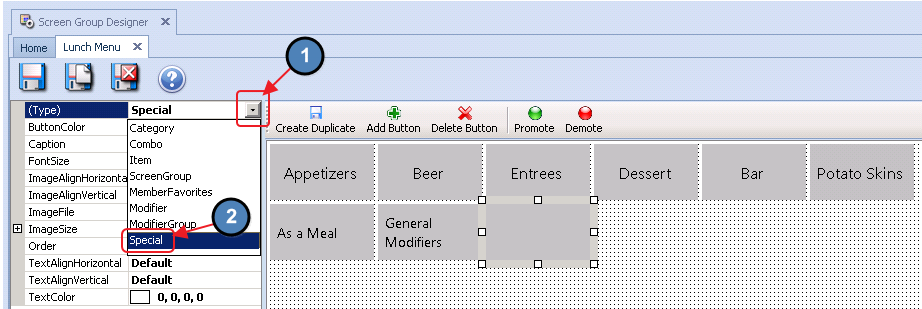
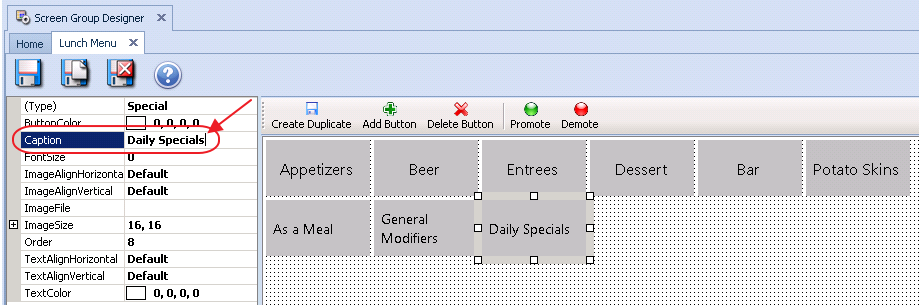
Creating a Daily Specials Button
To create a Daily Specials Button:
1) Select Add Button.

2) Select Special as the Button Type.
Item Combo Button
An Item Combo Button can be used to link a button directly to an individual Item Combo, such as Easter Dinner.
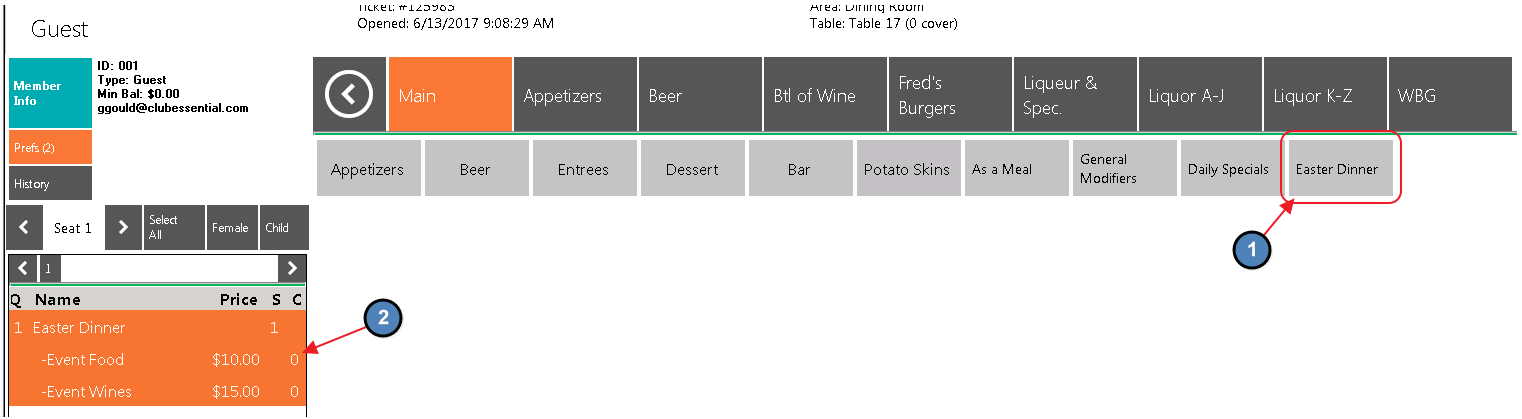
Item Combos allow users to sell multiple items with a single charge at the POS. For more information on Item Combos, please see our Items Manual.
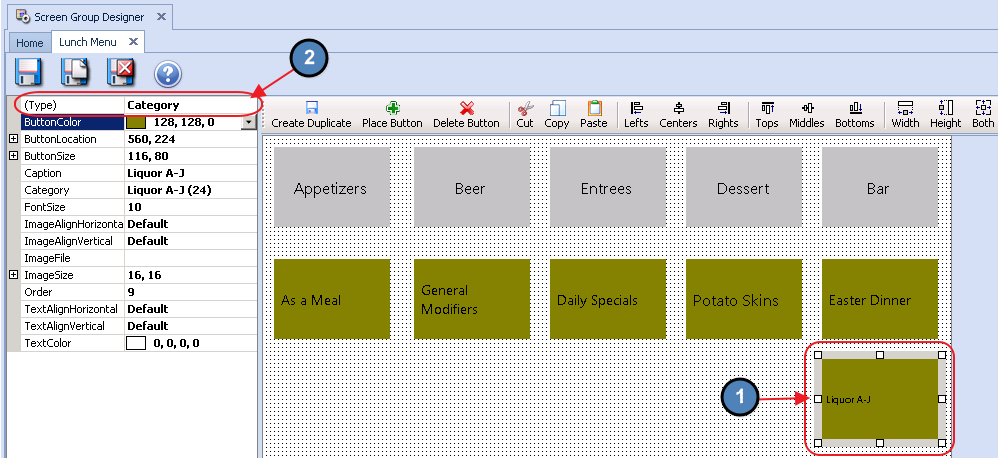
Creating an Item Combo Button
To create an Item Combo Button:
1) Select Add Button.

2) Select Combo as the Button Type.
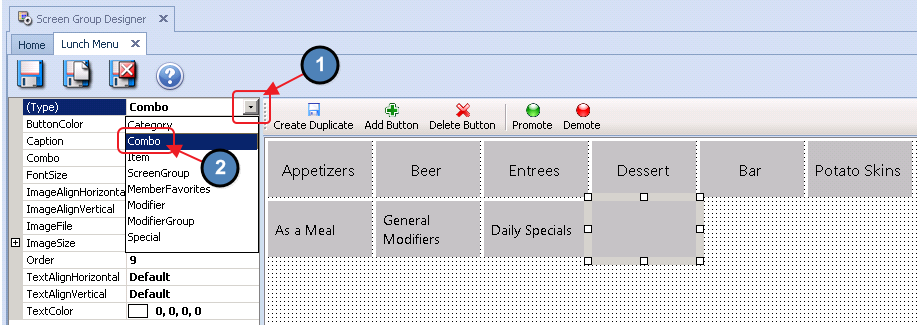
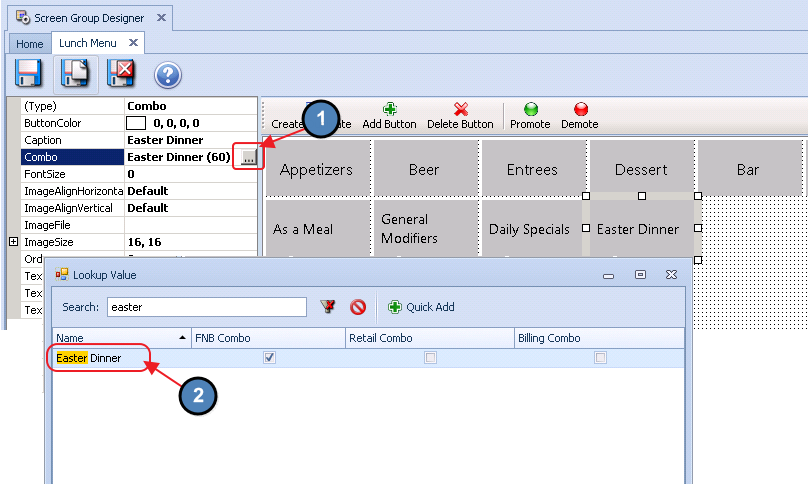
3) Select the Combo for which you’d like to create a button.
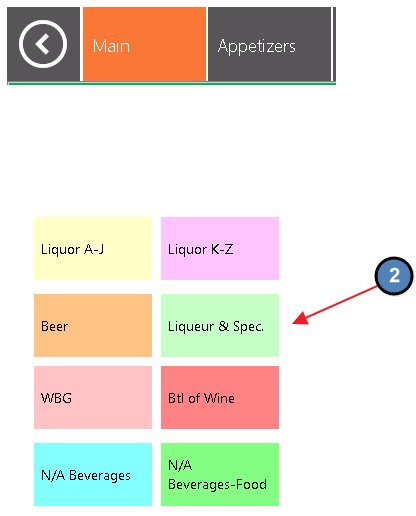
Screen Group Button
A Screen Group Button provides the wait staff with quick access to other Screen Groups/POS Menus used throughout the club.
For instance, many clubs will have a button on their Main Dining Room Screen Group that is linked to their Bar Screen Group. This allows the wait staff quick access to the Bar Menu while sales are still recorded in the Main Dining Room Area.

Creating a Screen Group Button
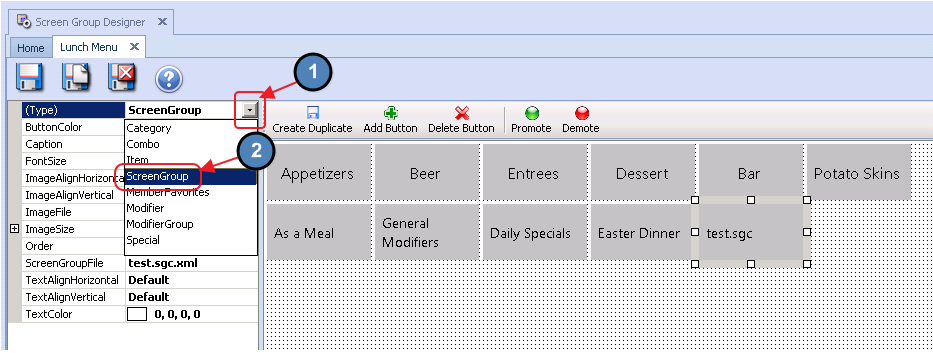
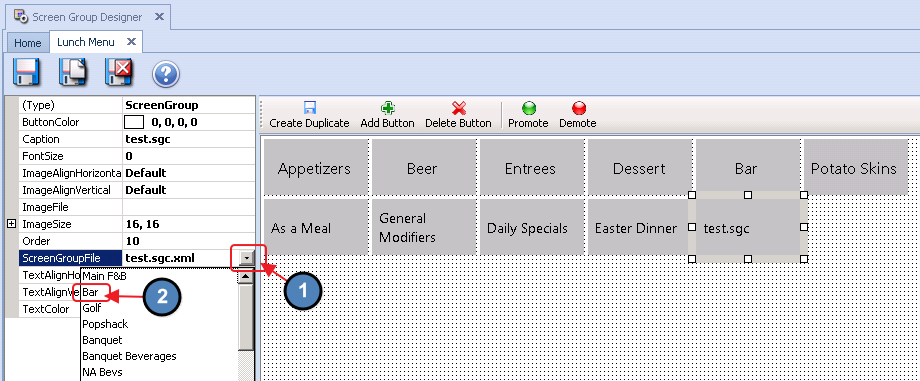
To create a Screen Group Button:
1) Select Add Button.
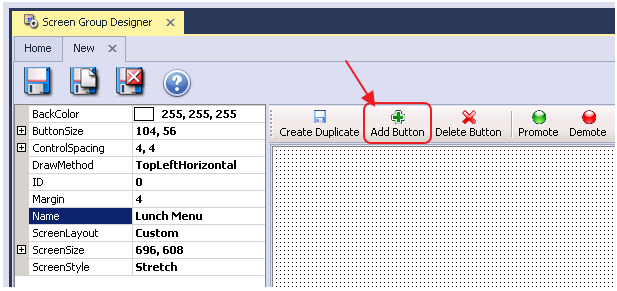
2) Select Screen Group as the Button Type.
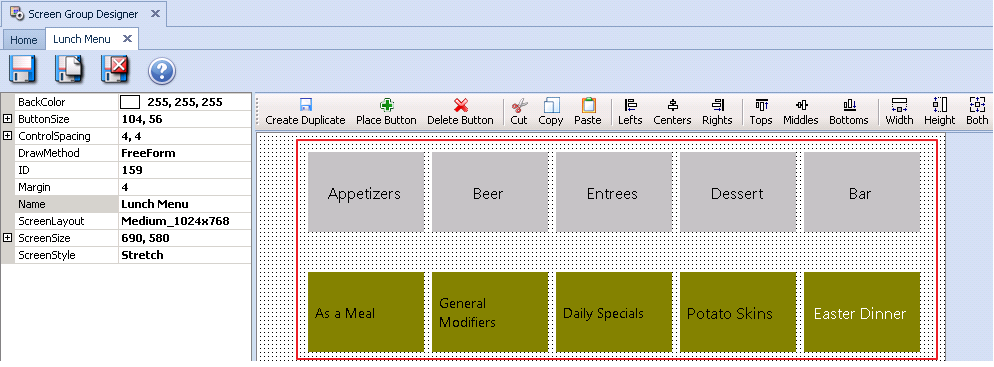
Customizing Screen Groups
As previously mentioned, Screen Group Buttons can be customized in terms of their position on screen, size, color, and font. In this section we will discuss how to customize Screen Groups.
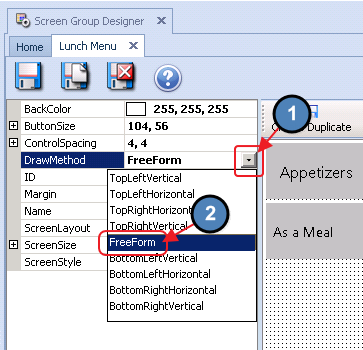
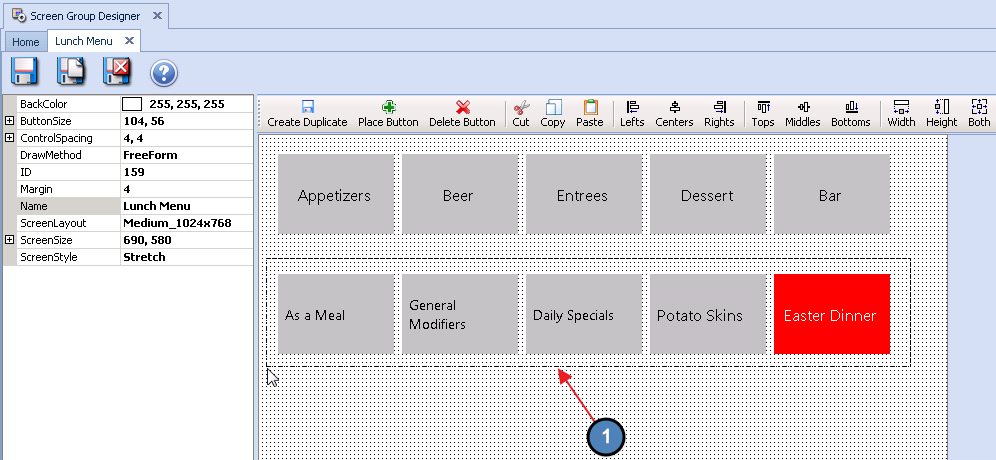
FreeForm
By default, new Screen Groups have their Draw Method set to Top Left Horizontal. In this Draw Method, Screen Group Buttons cannot be customized. Rather, buttons can only be added and their various Button Types applied.
To Customize Screen Groups, the Draw Method first needs to be set to FreeForm. Please see instructions below:
1) Click anywhere within the Screen Group to populate the Screen Group edit form.
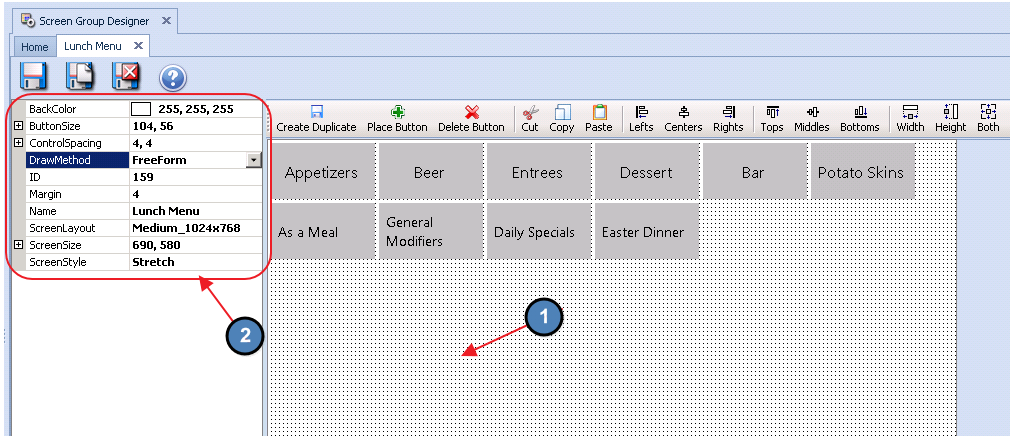
2) Select FreeForm within the Draw Method section.
Please Note: When creating a new Screen Group, best practice is to add ALL buttons to the Screen Group in the TopLeftHorizontal Draw Method first and then customize button size, color, etc.
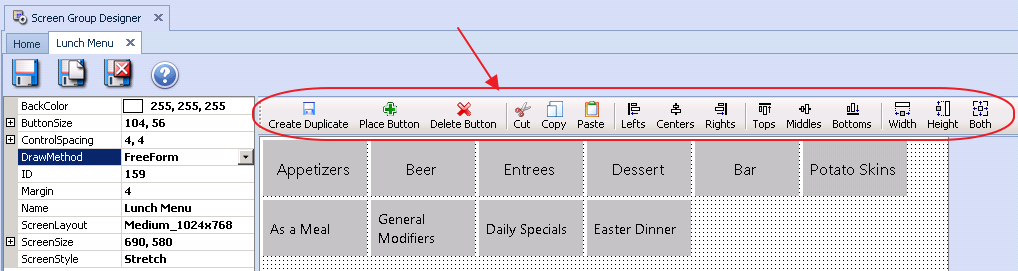
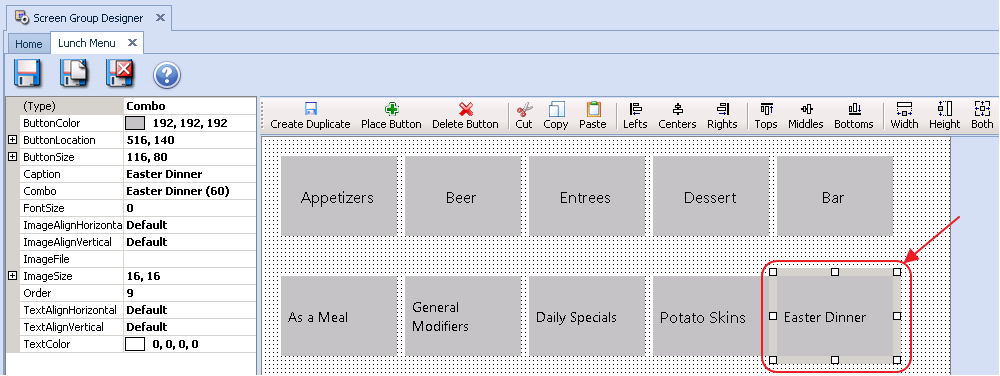
Button Positioning
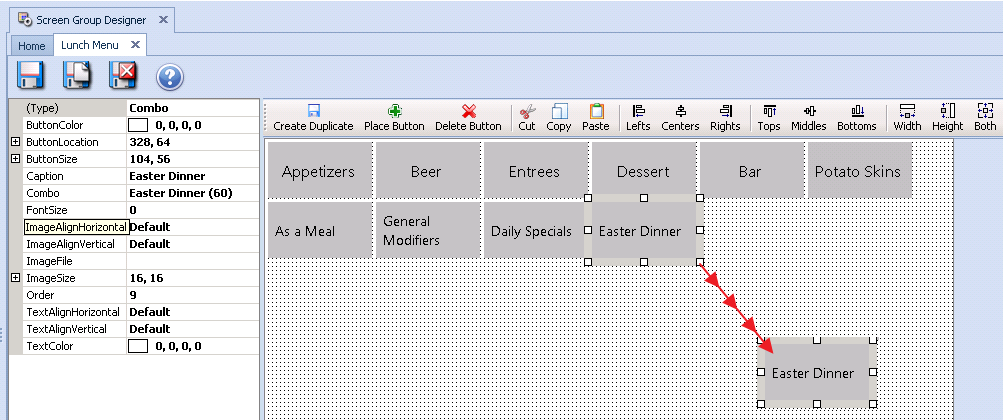
Once a Screen Group’s Draw Method is changed to Freeform, the positioning of the various buttons can be customized.
Click to select the button you wish to reposition, and drag the button to the desired position.
Button Size
In FreeForm, a button’s size can also be customized.
To change the size of a button:
1) Click and hold your mouse on either corner of the button.
2) Then, drag the button to the desired size.
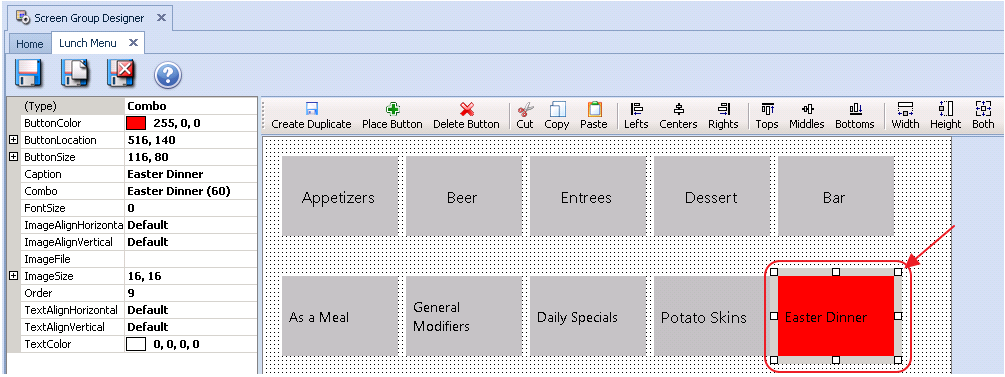
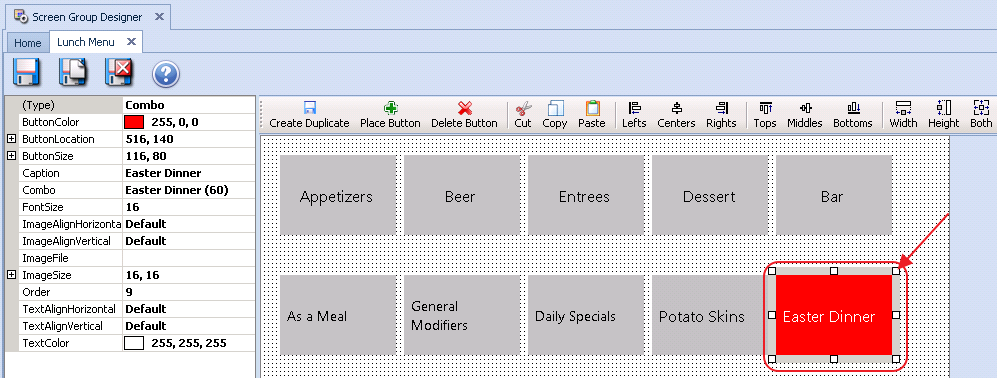
Button Color
A button’s color can also be customized.
To customize the color of a button:
1) Click to select the applicable button.
2) Navigate to the Button Color section and select the desired color.

Button Font
A button’s font size, text color, and text alignment can also be customized in FreeForm.
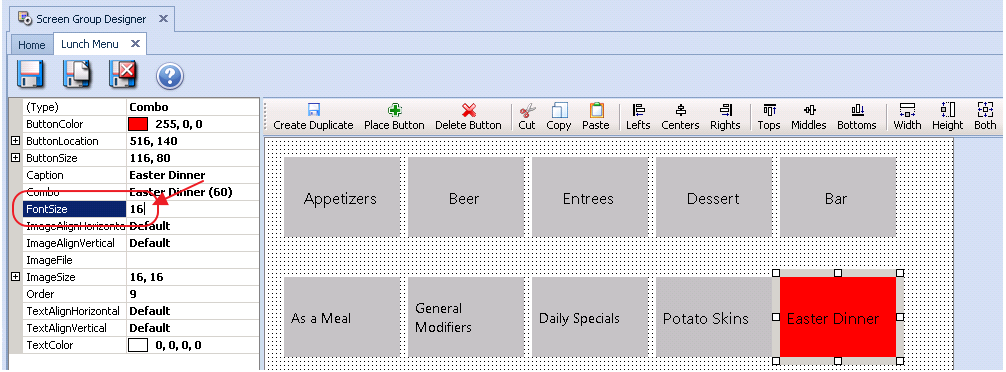
Font Size
To customize the font size of a button:
1) Click to select the applicable button.
2) Navigate to the Font Size section and enter the desired font size.

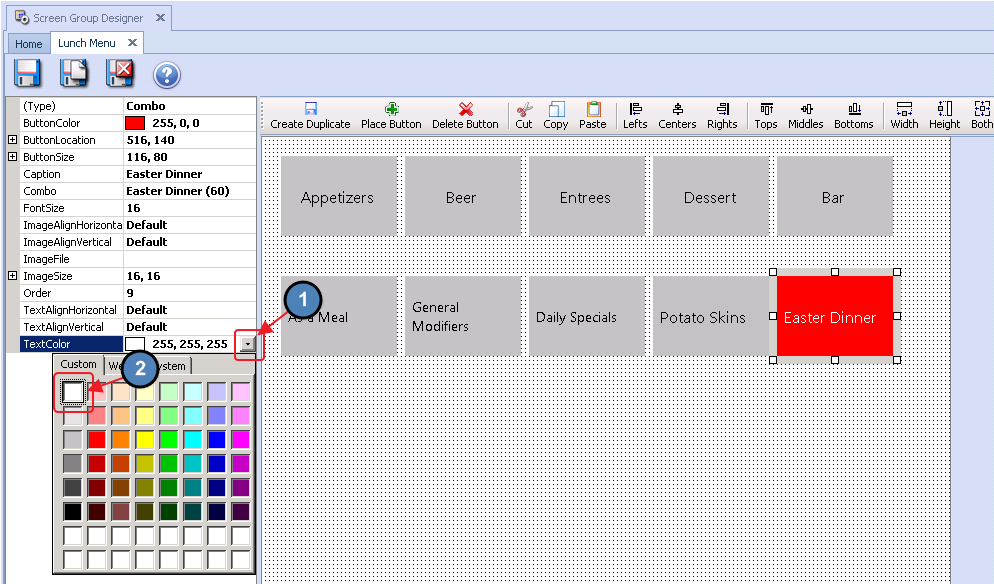
Text Color
To customize a button’s text color:
1) Click to select the applicable button.
2) Navigate to the Text Color section and select the desired text color.
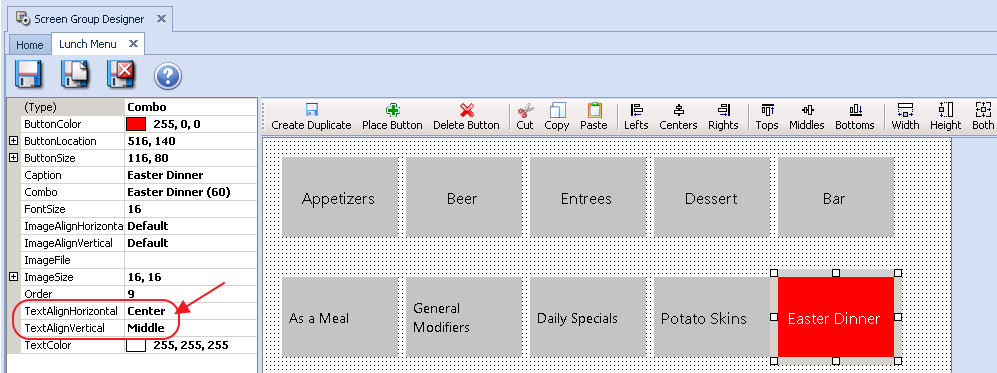
Text Alignment
To customize a button’s text alignment:
1) Click to select the applicable button.
2) Navigate to the TextAlignHorizontal or TextAlignVertical section and select the desired alignment.
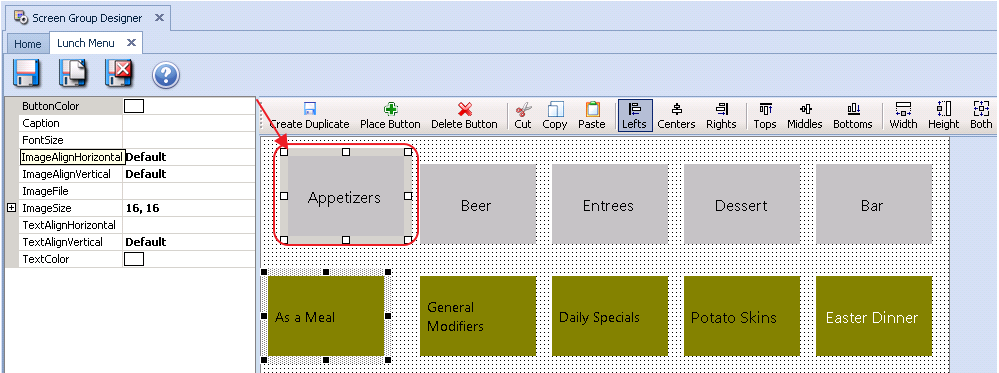
Multi-Edit
It is also possible to edit multiple buttons at the same time. It is possible to select an array of buttons and change their button color, font size, text color, button size, etc. at the same time. Please see examples below:
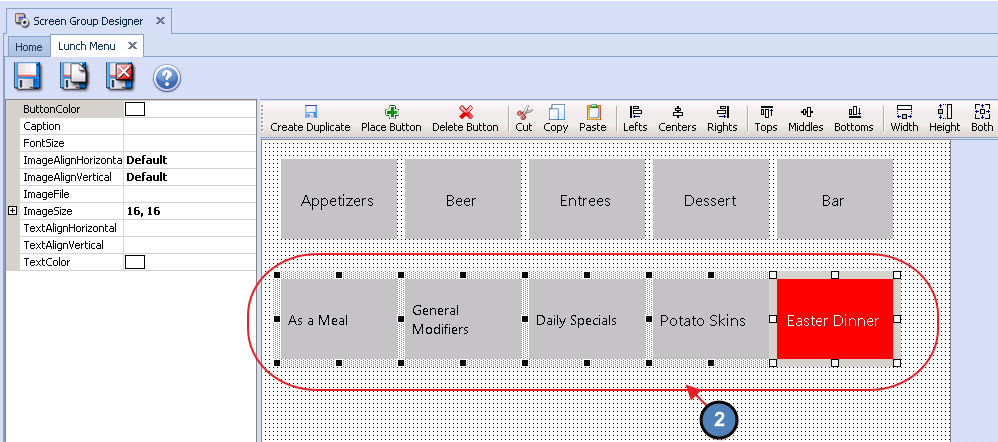
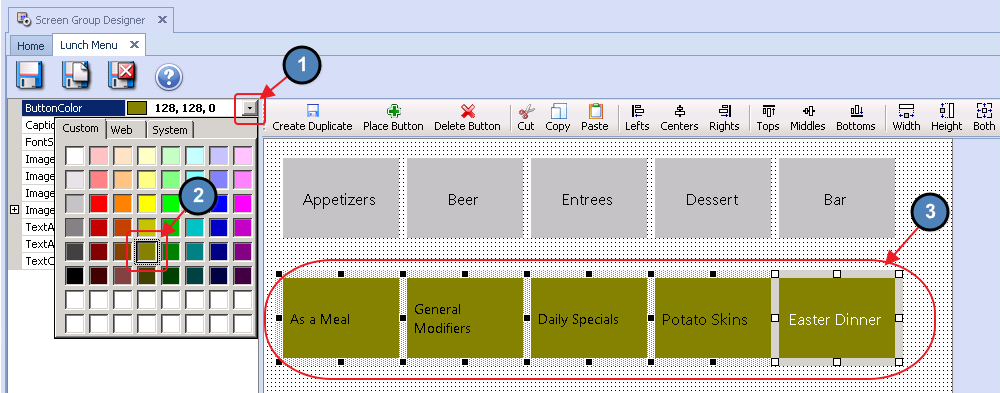
Button Color
1) Click and hold the mouse. While holding the mouse, start dragging your cursor. As you’ll notice, a selection box will begin to take shape. Any button touching this box will instantly be selected.
2) Navigate to the Button Color section and choose the desired color to be applied to all selected buttons.
Button Size
To ensure all buttons on the Screen Group are the same size, the user can select an array of buttons as described above and essentially copy the format of any existing button.
To change the size of an array of buttons at the same time:
1) Select the array of buttons you would like to be the same size.

2) Select the button you would like all other buttons to be the same size as. This is known as the Selected Button, and will have a white border around the button that is currently selected.
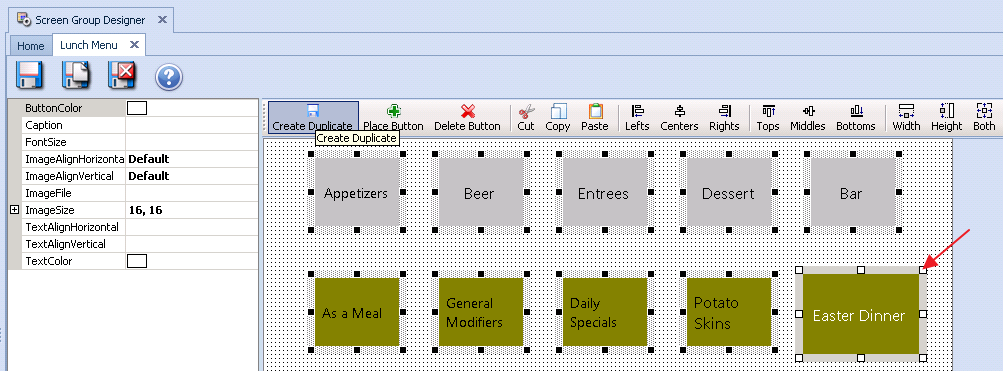
3) Select Both on the top toolbar. This will copy both the Width and Height of the Selected Button to the rest of the selected array.
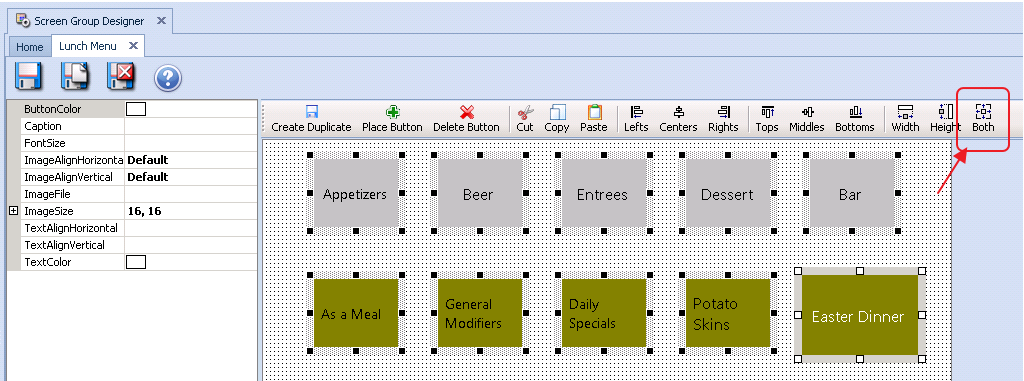
4) Now, all buttons within the selected array are the same size.
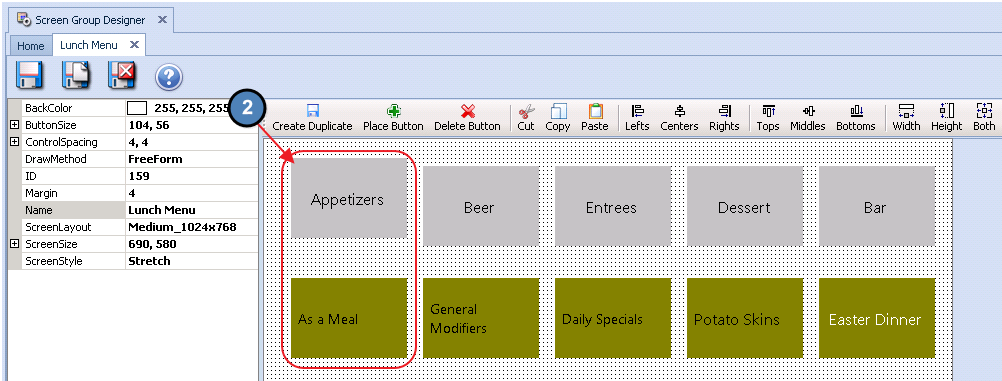
Button Alignment
The Multi-Edit feature can also be used to align buttons within a Screen Group. Users can select an array of buttons and copy the left, right, top, or button alignment of an existing button. Please see examples below:
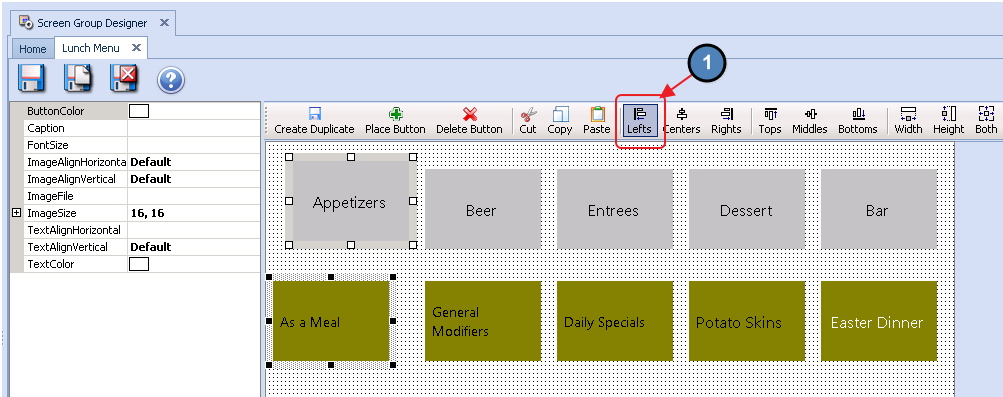
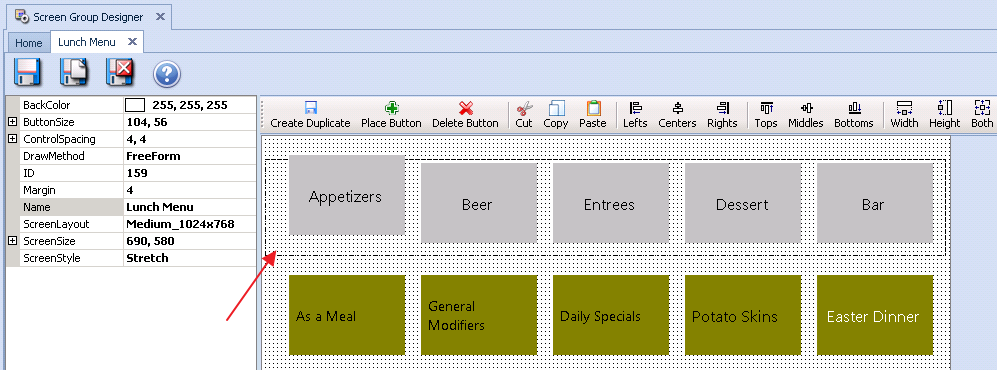
Left Alignment
To align buttons to the left:
1) Select the array of button you would like to align.
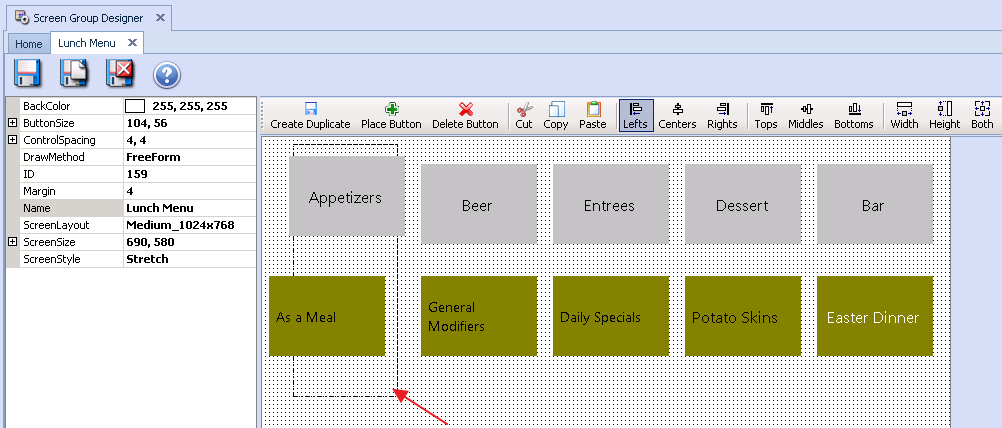
2) Click to select the button you would like all buttons within the selected array to be aligned with. Again, this is known as the Selected Button.
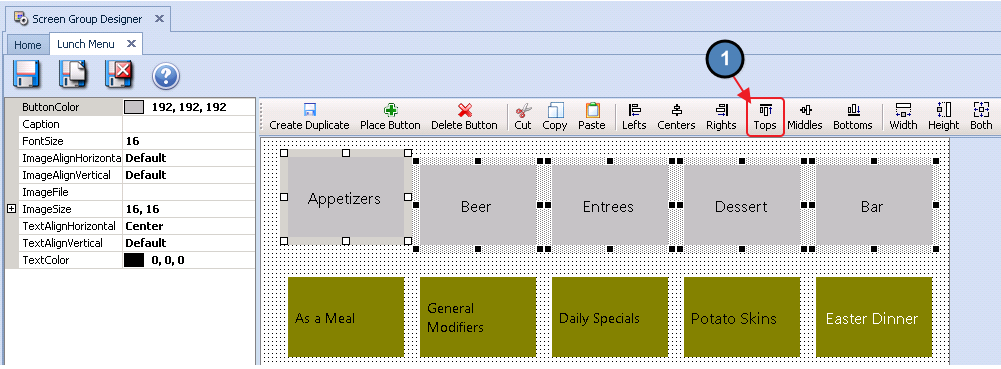
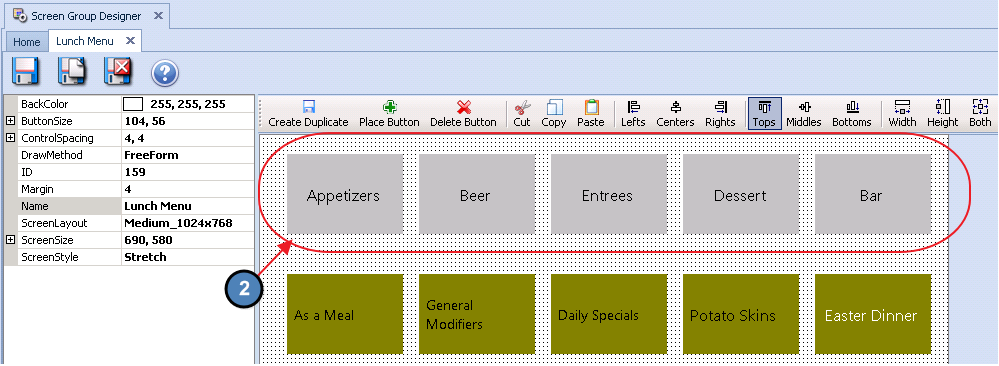
Top Alignment
To align buttons to the top of another button:
1) Select the array of buttons you would like to align.
2) Click to select the button you would like all buttons within the selected array to be aligned with.

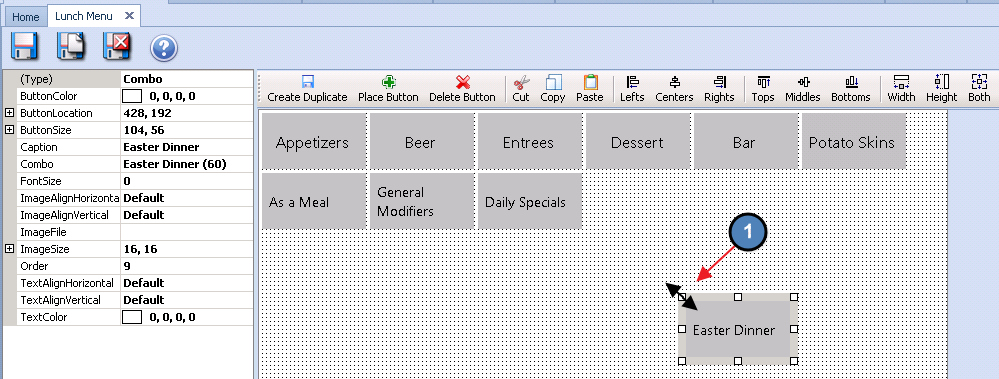
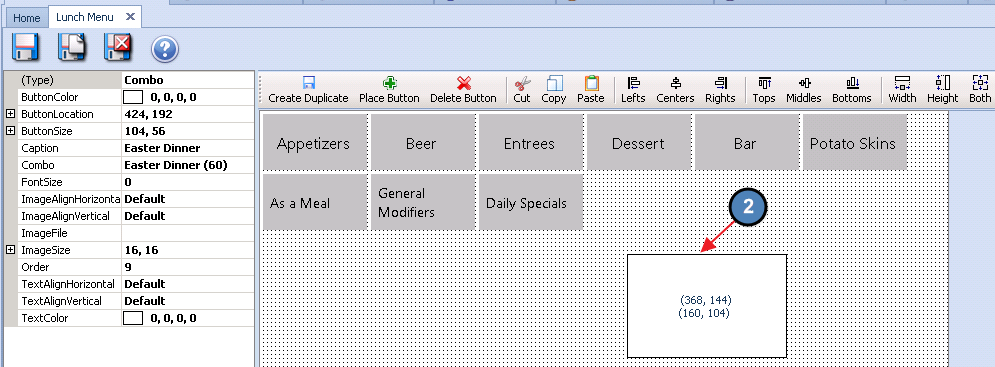
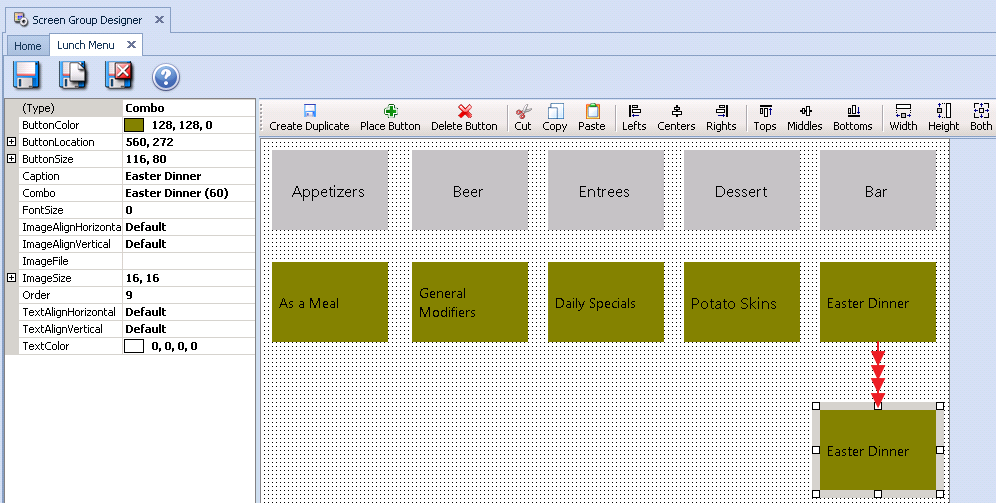
Adding a New Button in FreeForm
When adding a new button in FreeForm the best practice is to Copy and Paste an existing button to ensure the new button is the same size as existing buttons. Otherwise, the user would have to use the Place Button option and draw out their new Button.
To create a new button in FreeForm:
1) Select the button in which you would like the new button to be the same size as.
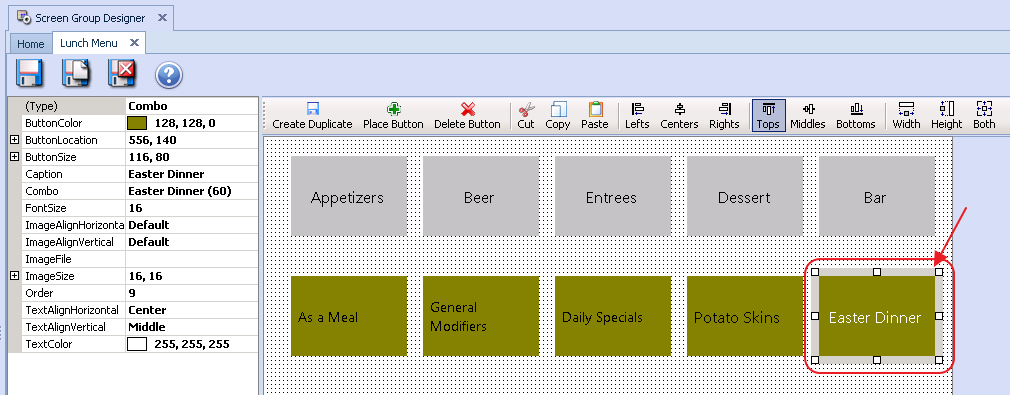
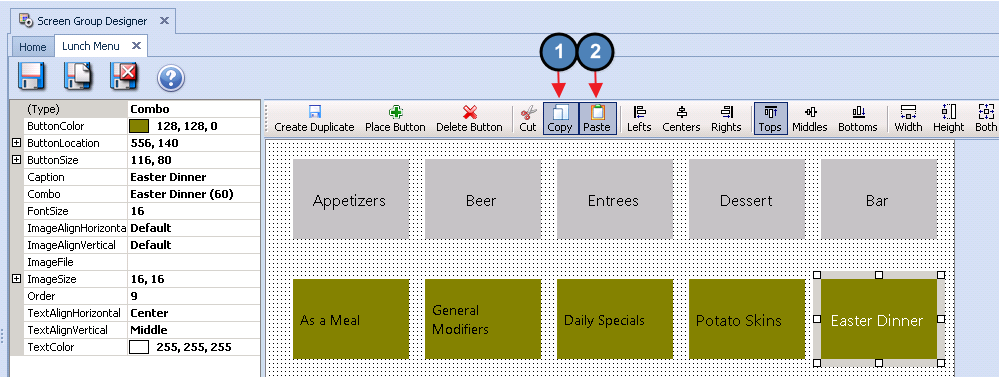
3) The new button will be pasted directly on top of the existing button. Select the new button and simply drag to the desired location.
Applying a Screen Group to An Area
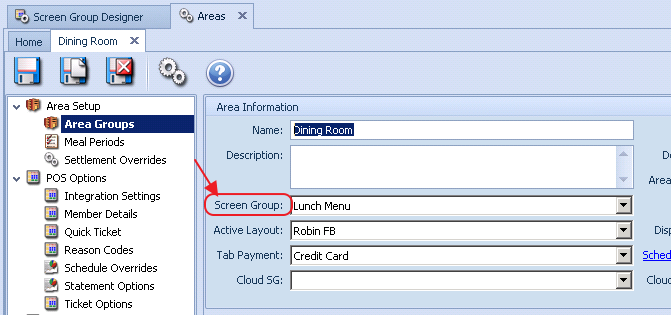
For a Screen Group to show in the POS, it has to be applied to an Area. Once the Screen Group is applied, this Screen Group will show by default when users access the Area in the POS.
To apply a Screen Group to an Area:
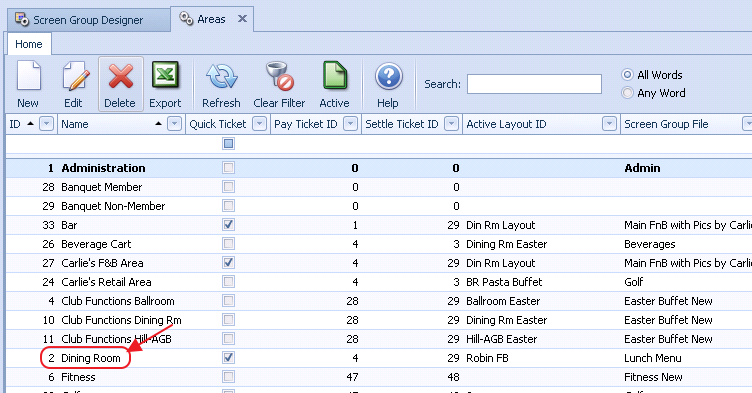
1) Select System across the top toolbar and choose Areas.
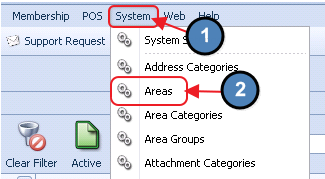
2) Select the applicable Area.
Best Practices
When adding a new button in FreeForm, Copy and Paste the existing button to ensure the new button is the same size as existing buttons.
When creating a new Screen Group, best practice is to add ALL buttons to the Screen Group in the TopLeftHorizontal Draw Method first and then customize button size, color, etc.
Some Clubs find it useful to add buttons for frequently ordered Items, such as Diet Coke on their home screens. For more information on Items, please see our Items Manual.
FAQ
Q: What is the Draw Method?
A: The Draw Method organizes the buttons in the selected Screen Group by the type of alignment preferred.
Options include, Top Left Vertical, Top Right Horizontal, Top Right Vertical, Free Form, Bottom Left Vertical, Bottom Left Horizontal, Bottom Right Horizontal. and Bottom Right Vertical.
Q: How do I create the Item Combo I want to link with a button?
A: While Item Combos allow users to sell multiple items with a single charge at the POS, they must be created prior to being assigned to a button. For more information on Item Combos, please see our Items Manual.