Versions Compared
Key
- This line was added.
- This line was removed.
- Formatting was changed.
Table of Contents
| Table of Contents | ||||||
|---|---|---|---|---|---|---|
|
| Widget Connector | ||||
|---|---|---|---|---|
|
Overview
The Directory houses all active members and staff members on the website. It is necessary for anyone using the website to be in the Directory in order to have website access, however, you may turn off any user’s ability to access the website at any time. The Directory is typically set up with a sync to the club’s accounting system using Clubessential’s application RosterSync, or it may be synced using the Office Products. Both systems allow club admins to update their accounting software software for member changes that will then update on the website Directory (Office systems update automatically so changes must occur within the Office accounting suite, while 3rd party systems must be updated manually by running RosterSync). Use Case(s)
In order for any member, or staff member, to have access to the website, they must first be active in the Directory. The Directory is used to house member information such as: membership status, membership start and expiration date, contact information, affiliated groups or organizations, and account information. The Directory is also used to provide login information, and website privilege level (no access, member access, editor access, admin access).
| Widget Connector | ||||||||||
|---|---|---|---|---|---|---|---|---|---|---|
|
Required Permissions
Admin
Editor
Accessing the Tool
Admins: Hover over Admin bar in the left hand corner of the screen, select Directory.
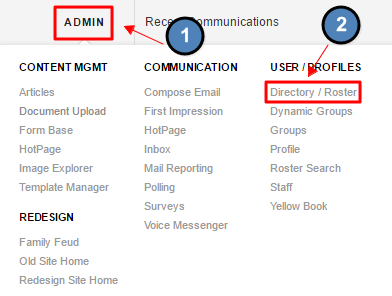
Editors: Hover over Admin in the main navigation, select Main Tools, and then Directory.
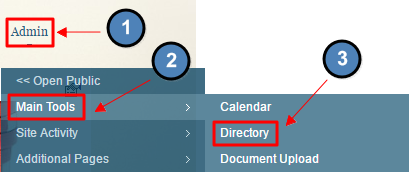
The
followingDirectory interface screen will launch.
Directory Tabs for Admins/Editors
The Directory will offer different options and views depending on if you’re a member compared to being an Admin or Editor. Below will detail the layout for Admins/Editors.
Club Members
ThisClub Members is the first tab
in the Directory, which will list membersin the Directory.
Use the Search Field to search for members by Last Name, First Name, Member Number, or Email.
The Active Members Dropdown allows you to toggle between various lists to show: active members, inactive members, and members.
Note: members can stay in the directory and be inactive unless removed.Click on the letters to show members with a last name starting with that specific letter.
Click Show All to list all members on the screen at once.
Click the Edit Disclaimer link to open the Editor to add text, hyperlinks, or imagery above the Directory Listing. This will be visible on the Club Members, Staff tab, and My Profile page
.
Click on a member’s name in order to view
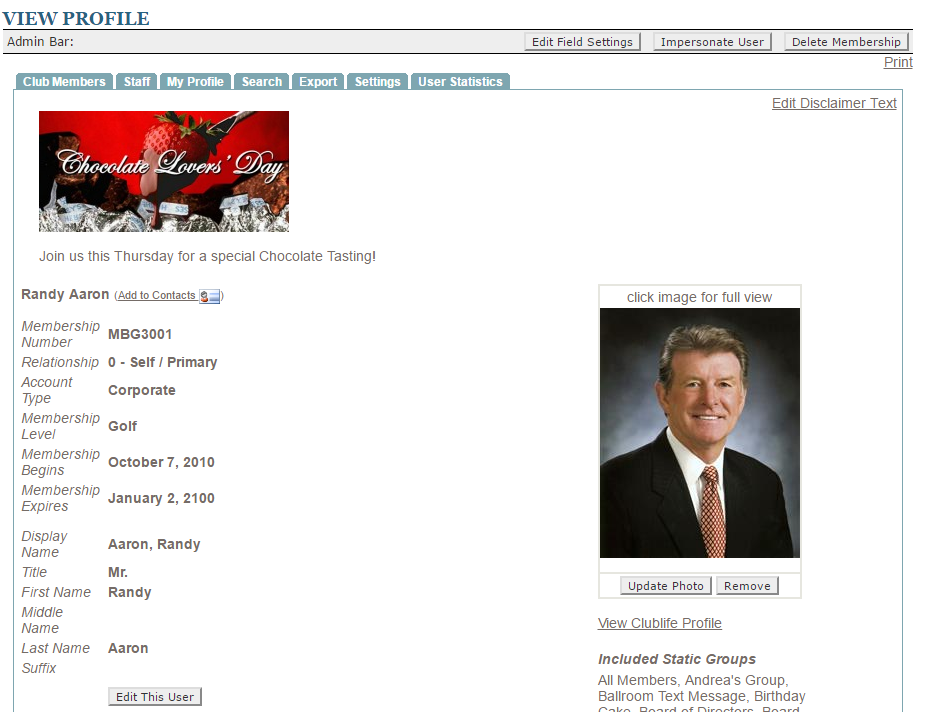
Editing member profiles will be discussed later in this guide.
While in the member profile, you may also use theThe Impersonate User button allows you to
experience the site as
The fields that are displayed in the Club Members tab can be customized to offer other information provided in the Directory. Clubessential Support can assist with customizing this layout as needed.
Note: Fields that are listed in the Club Members tab will show to members.
At the bottom of the member’s list, is a legend that is important to note for future troubleshooting with member’s accounts and recognizing website privilege level.
the user.
Staff Tab
The Staff Tab offers similar options as the Club Members tab, but it is limited to Staff Members.
You can searchSearch staff members using their last name, first name, member number, or email address.
Staff members are listed
alphabetically by last name.
Show All Staff will list all
staff members at once.
Staff members are typically added manually as most clubs do not have staff in the accounting system, so staff members must be added using the Add Membership button. This will be discussed later in this guide.
My Profile
The My Profile
page will pull up the profile listed with the account that one is logged into.The Profiletab will list all account information on file for the member
.Editing Profiles will be discussed later in this guide.
Search Tab
The Search tab allows you tosearch for members, staff, admins, or editors based on
specific criteria.Any information that isany information used in the
Directory can then be searchable to find appropriate members, staff, admins, or editors.directory. Simply follow the prompts for information you’re looking for and then click Search for Members at the bottom of the screen to return results.
Export Tab
The Export tabis used to export directory fields into a .csv file for use offline.
First, using the Users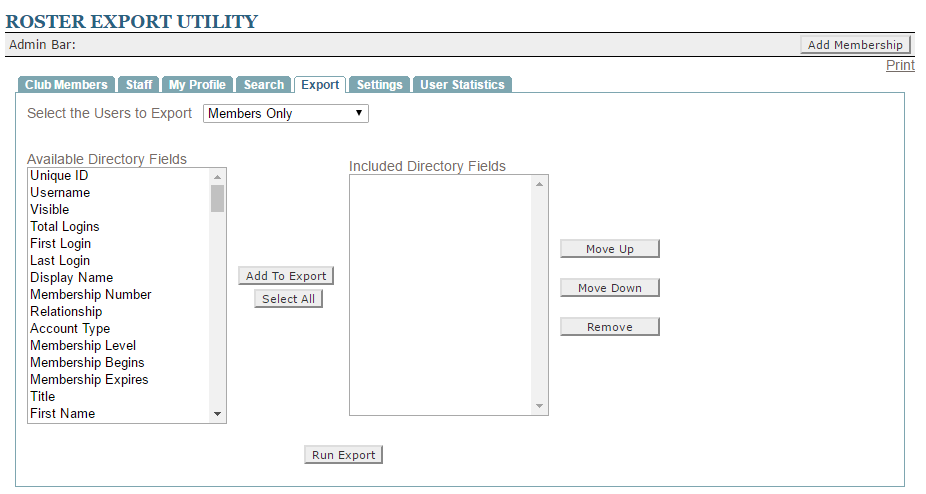
Use the Select Users to Export drop-down
to pull fields for Members, Staff, or
both Members and Staff.
Select fields in the Available Directory Fields box,
then click the Add to Export button.
Once all fields are in the Included Directory Fields box, you can choose to reorder or remove fields by using the Move Up, Move Down, or Remove Buttons.
To create the export, click Run Export.
This will
generate a downloadable .csv file with the information based on the fields chosen.
Settings Tab
The Settings tab
offers various settings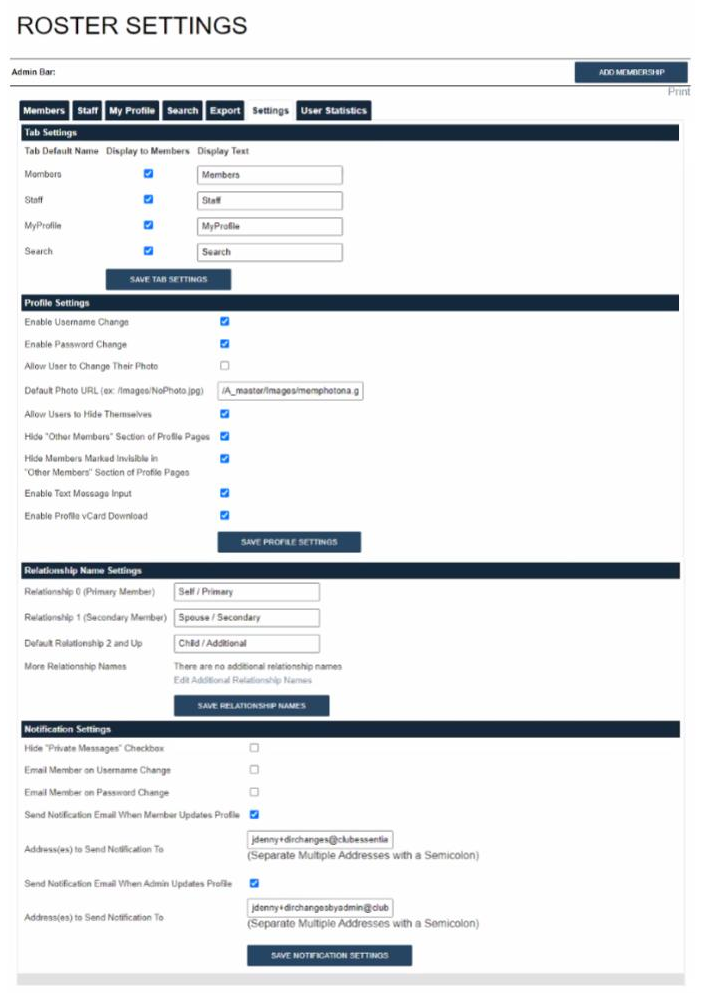
is where all settings are determined for the Directory
such as: tab settings, profile settings, relationship name settings, and notification settings.
The Tab Settings allow admins to customize the names of the Directory Tabs. Unchecking the checkbox next to a tab name will remove this tab from display from members.
Profile Settings
determines the member permissions for various profile
changes.
Relationship Name Settings can be altered by typing in alternate names, and then clicking Save Relationship Names.
Under Notification Settings checkmark or uncheck options like Email Member on Username Change to alter the notifications members receive when making changes in the Directory.
Notification Settings determines which profiles changes will send a notification to the member. Admins or Editors may receive emails when a member, staff, admin/editor changes information by adding an email address in the Address(es) to Send Notification To and Send Notification Email When Admin Updates Profile fields.
User Statistics
The User Statistics tab will list all users in the Directory with information on their First Login, Last Login and Logins During Time Range.
Using the Datepicker, you can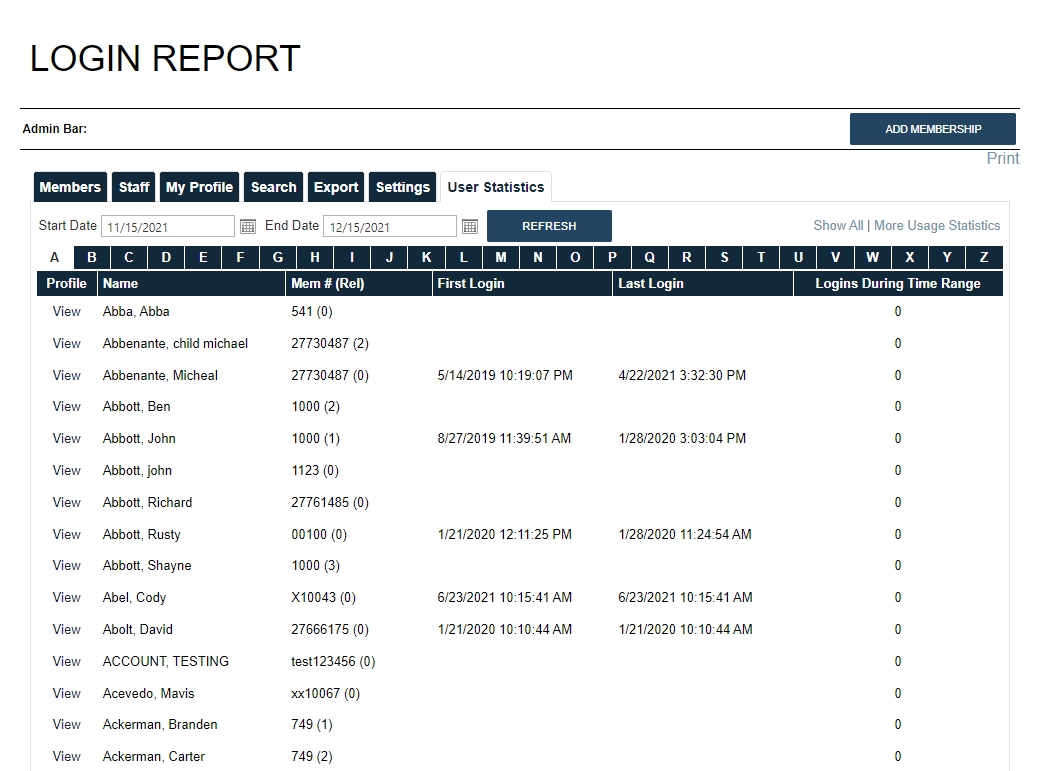
Use the Start and End Date pickers to change the date range
and pull data from within a certain timeframe. Click Refresh to load the new dates.
Click View next to the user’s name
to view the user’s profile to make profile updates as needed. (For instance, if someone still has access to the website that shouldn’t and that user has logged in).
Click More Usage
Statistics to jump to the Site Statistics Module to run a detailed report on user logins that can be exported to a .csv file
Adding a Membership
Memberships may need to be added manually on the website for circumstances such as adding Staff members.
The Add Membership button is located in the Admin Bar of the Directory. This will be available on any tab within in the directory, so you may use it in any location of the directory itself. Click the Add Membership button to begin adding a new membership.
Follow the text field prompts to add in relevant information. Fields with a red asterisk next to them are required and information must be added.
When adding a Membership Number for a Staff member, it is recommended to use their last name and not an actual number as to not conflict with actual member numbers. If you are adding a member manually, be sure that the member number is not in use and is recorded in the accounting system so there are not duplicates. Duplicate membership numbers will lock both accounts out of the website until unique membership numbers are assigned.
Add a username and password for the user and provide this to the user for their first login.
Beneath the username and password field, there are two checkboxes for ‘Ask user to change username/password on next login’ and ‘Lock User From Logging In’. The first option is always checked by default, this will prompt the user to update their information upon first login. The second option is only used if the user must be locked out of the website.
The User Type and Admin Level are extremely important when setting up a new account since this will denote if the user is a member or staff and provide the appropriate privilege level.
Admin Levels:
No Admin Access: access to the website, but no Admin or Editor access
Editor: access to Editor functions (typically used for staff that may edit pages on the website and use limited modules)
Admin: access to Admin functions (fully managers of the website)
Once the appropriate information has been added to the profile, click Create Membership at the bottom of the page to add the membership.
If you receive a pop-up denoting the password is not secure, click OK to override as this is a temporary password only used for the first time login.
Editing Profiles
You may edit a member or staff member’s profile byclicking on their name in the directory.Once in their profile, click the Edit This User button.
From here, you can update any field as needed. Click Save Member at the bottom of the screen to update the information.Additional Directory Management Resources
Best Practices
It is best to never add members manually as members should be synced from the accounting system only.
Add text, hyperlinks, or imagery above the Directory Listing and make visible on the Club Members, Staff tab, and My Profile page. This is a great area to add cross-marketing or disclaimers on the Directory.
FAQs
Q: A member that was recently added to the directory is unable to be found by other members, why?
A: Find the member in the directory as an Admin or Editor - if the member’s name is Red then the member is hidden in the roster. You can change this by clicking their name > edit this user > and then make sure that the Display this user in the Directory checkbox is marked > save.
Q: I have a staff member that needs to receive emails from the website, but they cannot edit or login to the website - how do I add them?
A: Add the staff member as usual with the appropriate information, but click the Lock User From Logging In checkbox. Further, do not provide the login credentials to the user. Make sure the staff member is an Admin Level or No Admin Access.
Q: What fields does a member see when looking at the directory?
A: Fields that are listed in the Club Members tab will show to members.
