Versions Compared

Key

  • This line was added.
  • This line was removed.
  • Formatting was changed.


Table of Contents
maxLevel1
outlinetrue
stylenone
classtoc

Introduction

Content 

Table of Contents
maxLevel3
minLevel2
excludeBlock Out Starts


Table of Contents

Table of Contents
minLevel1
maxLevel7
excludeTable of Contents

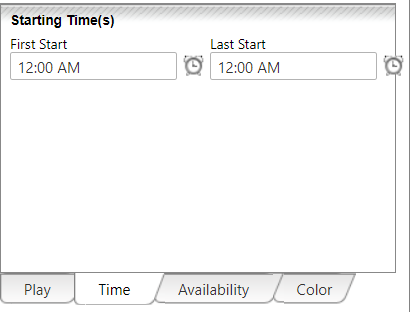
It is worth noting that this setup is also useful for altering the intervals you currently have set up on a single day. This article will provide instruction on that after discussing the opening time.

Use Case(s):

    • As an Admin, I would like one specific day to open a specific amount of time out.
    • As an Admin, I would like to switch the intervals on a single day.

Accessing the Tool


  1. To get started, access the Tee Times Admin Dashboard. Hover over Administration and click on Special Events.

...

Image Removed

...

  1. The Special Events tool will list all events that fall within the Start Date and End Date fields. It will default to the current day in the Start Date and the End Date will default to 6 months out.

  2. To view events in the past, simply set back the Start Date so that your event falls within the time range.

Image Removed


  1. If you have multiple courses, you may use the Select Course filter.

...

Image Removed

...

  1. There is a listing of buttons on the right hand side. They perform the following actions...

    • Add an event: Create a brand new event.

    • Edit an event: Modify the selected event.

    • Add registrations to the event: Create a reservation for the selected event.

    • View registrants of events: View a list of all the reservations for the event.

    • Assign starts for the event: If the

...

    • “Proshop will assign starting times for participants?setting is checked for your event, you will want to use this tool to confirm the event requests.

...

  1. To select an

...

  1. event you will need

...

  1. to click on its name in the listing, this will darken the line of the event

Image Removed

Configuring your Special Event

  1. Start out by creating a new Special Event.

...

  1.  Click the Add Event button.

Image Removed

  1. If you would like to, enter

...

  1. the Event Title. Keep in mind the title will display in each time so typically it is left blank. Select the proper day in the Event Date field. 

...

  1. You will need to choose a Course (if applicable).

Image Removed

  1. You will need to set the Booking Privileges for this event. Select Member Booking or whatever your standard Booking Privileges may be.

Image Removed

Unchecking

...

settings

  1. Here is

...

  1. where your event will

...

  1. deviate from the standard setup of

...

  1. most Special Events. You will be unchecking a few

...

 Image Removed

...

  1. area of your event.

  2. Uncheck:

    1. Override play setup from booking privileges?: This will remove the Play tab. You are unchecking it to ensure you aren't overriding the Guest/TBD limitations set up on the back end.

    2. Proshop will assign starting times for participants?: This will ensure members can book directly onto times, like any normal day of booking. If you have a Lottery template selected in Booking Privileges please ensure this is still unchecked.

    3. Allow members to view event registrant list?: This will automatically be unchecked after unchecking Proshop will assign starting times.

  3. The settings should look like this afterwards

...

Image Removed

  1. . The only thing you need are these two settings:

    1. Remove all default starting times during this event?: This will ensure times aren't duplicated.

    2. Choose when reservations open/close?: This will give us the Availability tab where you can customize the Opening Time and the Closing Time.

  2. You should already have the Time tab selected. You can typically set the First Start to the first time of the day and the Last Start to the last bookable time.

Image Removed

  1. You can click on the clock icons 

...

  1. to choose a time. Only 30 minute intervals will display there but you are also free to type out a more specific time in the First and Last Start fields. If you type out a time please note that it will read it as military time if no AM or PM is listed.

...

  1. You can now move to the Availability tab. Here you can define the time frame for when the event

...

  1. will begin accepting reservations and when reservations will close down.

  2. You will use the calendar icon to determine the day that the reservations will begin and using the clock icon

...

  1. to choose the exact time the event will open on the day selected.

...

  1. Follow the same for when reservations will end, or click Rolling End to set the reservations to

...

  1. close a

...

  1. number of hours prior to

...

Image Removed


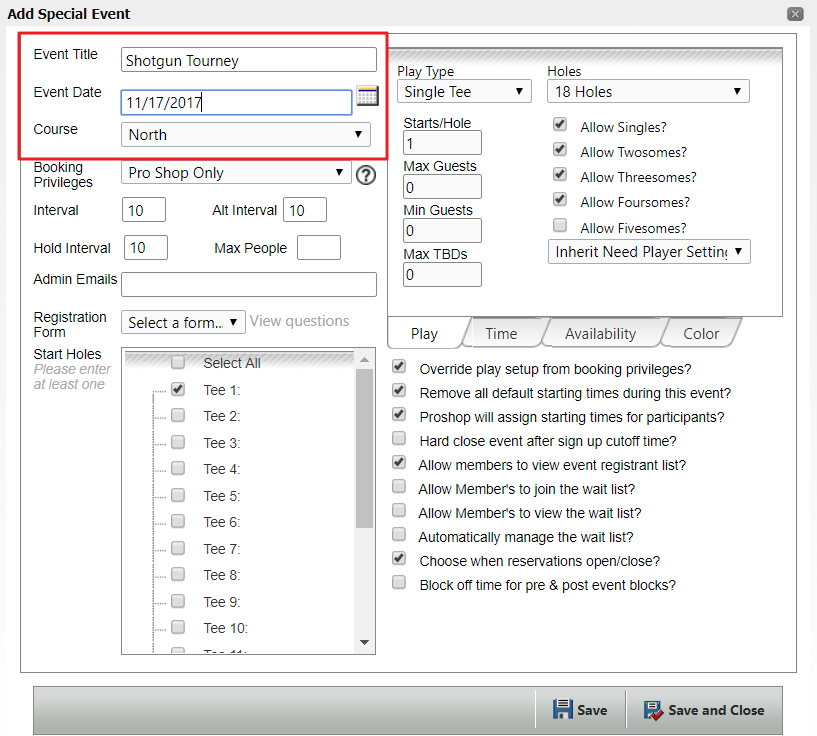
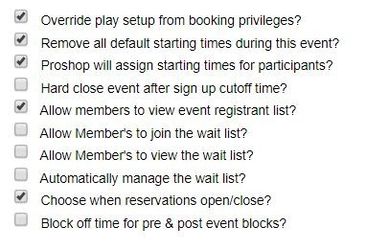
Beneath the various tabs, there is a listing of checkboxes that modify the event in a variety of ways. The most commonly used checkboxes will already be checked off here. Typically, the only other addition club staff make is to enable the Allow Member's to join the wait list? setting. Otherwise, you are free to uncheck or check them as necessary.

 Image Removed


To learn more about each setting, hover over the setting for detailed information.


Image Removed

If you are interested, you can define the color of your event in the color tab. If you choose a color for the event it will display on the member and admin side when the event is open for registration.

Image Removed

Using the background and text dropdowns, choose a color to display.

Image Removed

Click Save to save and post the event to the Tee Times Calendar.

Image Removed

Creating a Calendar Event

To add the event to a regular Club Calendar, click on Create Calendar Event from the Add Special Event window.

Image Removed


Click OK on the warning pop-up that is verifying  you wish to create a calendar event.

Image Removed

All event settings will transfer to the Calendar Event, so you will not need to set up registration criteria again. For the calendar event, you will be setting a design and adding extra information on the event if needed.

Image Removed

Choose an Event Color to display on the Calendar Event. This may be a different color than what was chosen for the Tee Times Event display.

Image Removed

Under Event Summary, add a short summary if desired. This will show on the event details.

Image Removed

Event Status should be set to published which will allow members to see the event.

Image Removed

Clickable Event should be checked as this will allow members to open event details and access the Registration button which will open the Tee Times registration window.

Image Removed

Under categories, checkmark calendars you wish the event to publish on like the Golf Calendar, and/or the Member Home Page Calendar.

Image Removed


Next, click Edit Event Flyer to launch the website Editor.

Image Removed

Within the Editor, you may add text, imagery, and hyperlinks. This is a great place to add a lengthy description on the event or to cross market other upcoming events. For full Editor training, please review our Editor Article.

Image Removed


Once you have finished adding text within the Editor, click Save.

Image Removed


Click Save and Close to save the event to the designated calendars.

Image Removed

Editing & Deleting Special Events/Calendar Events

 Once you have added your Special Event to the Tee Times Calendar, and Club Calendars, you can easily edit and delete these events directly from the Special Events manager. 

Click the event within the Special Events manager so it is highlighted in gray.

Click Edit Event to make edits to the event.

Image Removed

Editing Tee Times Calendar Event

 Make edits within the Special Event tool as needed.

Once edits are made, click Save or Save and Close. You may also use the Save as New button to duplicate your event settings. If you would like to duplicate your event be sure to follow these exact steps or you risk moving reservations in the event: First make the change to a pre-existing event (such as changing the date) and after making your change click Save as New. Do not click Save as New before making your changes.

 Image Removed

Editing Calendar Events 

To edit the calendar event, click Edit Calendar Event.

Make edits as necessary.

Image Removed

Deleting Tee Times Calendar Events/Club Calendars

To delete the event, click Remove. This will also delete the event from any Club Calendars that this event was assigned to.

Image Removed

Downloadable Guide

Tee Times Special Events Guide


...

  1. each individual time. 

Save to Finish

  1. The final step is to click Save.

  2. If you have pre-existing reservations or a block already on this day it may give you a warning message. In this case it should be fine to click through that message as long as the times that the reservations are currently on will still exist after placing your event here.

Image Added